It’s human nature: People horde more stuff than they have space in which to keep it. The tycoon with a vast bedroom suite could use one more jewelry chest; the restless vagabond could use a bigger knapsack.
Bedrooms tend to force the storage issue. We can try to ignore clutter deep in the basement, but bedroom storage—now there’s a problem we have to sleep with. Bedroom closets get stuffed with wardrobes that expand and change: winter and summer clothes; clothes that fit now and others that surely will (again).
In the master bedroom, you may need to find space for reading, sewing, and ironing or even a corner for a home office.
Children’s rooms get buried in toys, games, arid hobby gear. Older children may lose their homework center under piles of clothing. They need space for books, perhaps a computer, and other school supplies.
Guest bedrooms are chameleons; their appearance can change at any time. If guests are infrequent, this space can be disguised as a home office, sewing center, study hall, or catch-all storage for seasonal wardrobes.
If your bedroom space is at a premium, concentrate first on the closet. In this section, we take a look at using walls effectively, taming the closet, and organizing children’s rooms. If your bedroom will include an office or sewing center, you’ll find more ideas in later sections.
Making Effective Use of Bedroom Walls
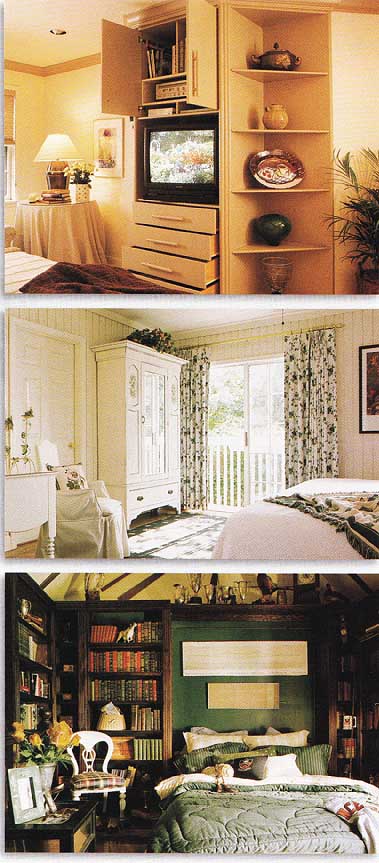
USING A WALL SYSTEM: Demand more from your walls than just a flat surface for displaying artwork and photographs. Wall storage systems can hold books, personal files and records, electronic equipment, sewing supplies, and just about anything else you’re willing to keep in sight. And units with drawers can stash things you don’t care to look at, including clothes— which takes a load off shelves in the closet or drawer space in dressers.
Wall systems don’t have to be exotic built- in units. Freestanding, ready-made or kit systems can help you back your storage problems up against the wall.
USING ARMOIRES OR DRESSERS: Conventional dressers and armoires can store items other than socks, underwear, and lingerie. Make room for sweaters, casual slacks, and seasonal clothes to free up space that these items might take up in your closet. Most armoires provide room for hanging clothes and can help you ease the squeeze in your closet.
Boxes, bins, and interior shelves will help you take advantage of your armoire’s full capacity. Shelves and cubbyholes allow you to store more without reducing your convenient access to individual items.
SLEEPING LIKE HOUDINI: Wouldn’t it be great if that big old guest bed would just disappear when you don’t need it? You can perform this magic—and it’s no illusion. For extremely small or cramped bedrooms or for your guest room, consider a hide-a-bed, or Murphy bed, as they often are called, Hide-a-beds can be purchased as freestanding units, as built-ins, or as sofas. Combined with a freestanding bookcase or wall storage system, they can transform a bedroom wall into a highly efficient storage system. And when the hide-a-bed is folded up, the space is available for that sewing center or home office you wished you had room for.
Taming the Closet
The common closet could scarcely be more spartan: a single rod for hangers, a single shelf above it, maybe a bare light bulb. The builders must have been kidding, right? Let’s get serious: It’s time to divide and conquer with a system that divides that closet into spaces just right for clothes, shoes, linens, and storage boxes.
Begin organizing each closet by listing all the things you would like to keep in it. Use the basic storage concepts outlined in the first section: Separate the items by logical categories and by how often they are used— often, occasionally, or seldom. If an item is used only once or twice a year, banish it into exile elsewhere.
Decide how much space you need for hanging items, for shelves, storage boxes, shoes, and what needs to be on hooks or in drawers. If possible, add an extra 20 percent for future purchases.
Divide hanging clothes into sizes, grouped according to the family member, then by vertical measurements. Allow enough horizontal room in your measurements so the items are not crowded.
Estimate shelf space needs by stacking linens, sweaters, and storage boxes, then taking measurements. Try to use multiple shelves with 7—12 inches of vertical space so you won’t have to stack items in tall piles. Consider buying attractive plastic storage boxes, then make the shelf space at least 2 inches taller than the boxes.
Keep everything off the floor for ease of cleaning. Shoes are a common source of clutter. Shoe racks, shelves, or hanging bags keep them off the floor and within easy reach.
Use hooks sparingly. They often are awkward and make clothes appear untidy. If you use them for robes, belts, or ties, locate them on the back of the closet door or off to the side of the closet. A section of drawers in the closet is handy, especially if you don’t have a dresser in the bedroom.
Closets generally are 22—24 inches deep; shelf units are 16—20 inches deep. Building wooden shelves, the least expensive alternative, takes time and labor, especially in the finishing and painting steps.
Alternatively, many kit closet systems are available at home centers or specialty storage stores. These are easy to assemble but will cost more than lumber. You may not get the perfect fit for your closet. Sometimes a combination approach works best: Construct simple shelves yourself and fit store-bought units into that basic skeleton.
ACCESSORIES:
- Men’s ties 27”
- Garment bags 60”
- Travel dress bags 50”
- Travel shirt bags 41”
- Hanging shoe bag 38-60”
- Umbrellas 36”
- Bare hangers 17-20”
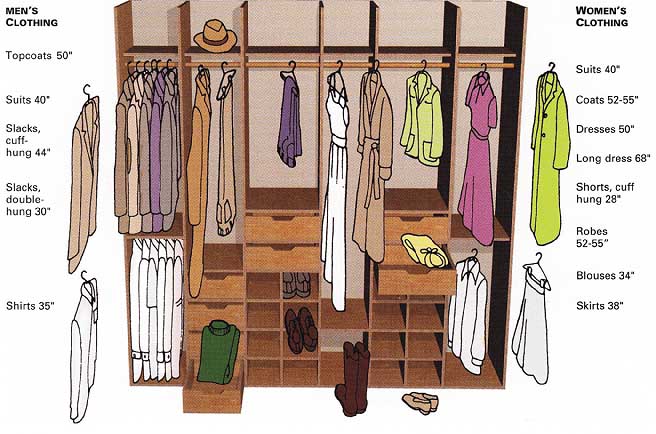
MEN’S CLOTHING:
- Topcoats 50”
- Suits 40”
- Slacks, cuff-hung 44”
- Slacks, double-hung 30”
- Shirts 35”
WOMEN’S CLOTHING:
- Suits 40”
- Coats 52-55
- Dresses 50”
- Long dress 68”
- Shorts, cuff hung 28”
- Robes 52-55”
- Blouses 34”
- Skirts 38”
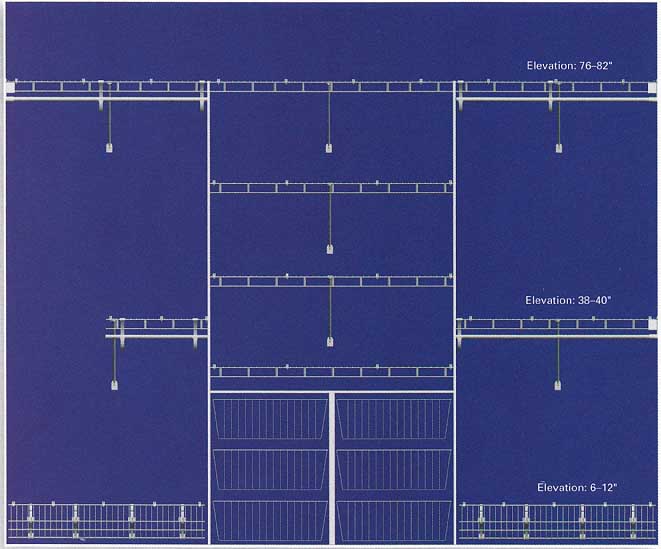
Amazing, isn’t it, how big a closet looks on paper? Wire storage
systems take advantage of every inch. A plan like this will help to
boost your closet’s performance. Install a system that fits, then take
control by refilling that space wisely.
OFF-THE-SHELF SOLUTIONS:
Walk into any home center, specialty-storage store, or even a discount department store and you can find a wide variety of ready-to- assemble closet storage systems. They’re designed for installation by the average homeowner. Some units, especially shelves, can be cut to fit your space; others, especially drawer sections, cannot be sized to fit.
Shelf and rod units are a good place to start. They can be adjusted up or down to use space effectively, and a variety of drawer and shelf units are available to mix with the rod and shelf units.
You’ll find two basic styles of ready-made or kit closet storage systems: ones made of wood components and those of plastic-coated wire grids. The wire-grid systems allow for greater ventilation and almost never need to be dusted. On the other hand, they cannot hold small items, such as jewelry, and they do not hide items, such as underwear, that you may prefer not to have visible. Using plastic slide out baskets instead of wire ones can solve the first problem, but most of those components are made of clear plastic, which does not solve the second problem.
No matter which system you select, take careful measurements of your closet, plan the space requirements you need (use the clothing measurements given above), then sketch your ideal solution on graph paper. With your plan in hand, your retailer can assist you in selecting the proper components and installation hardware, Many stores also supply do-it-yourself installation guides; others, especially the specialty storage stores, offer detailed planning and installation services.
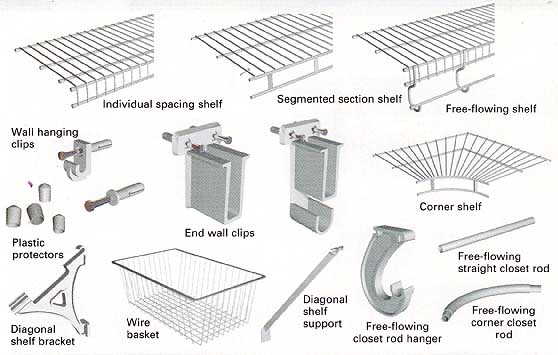
Most wire-grid closet systems are similar, but manufacturers
have distinct brackets and mounting clips, as well as three basic styles
of front edges on shelves: individual spacing, segmented, and free-flowing.
Basket units can be freestanding or attached to vertical support rods. Wall
hanging clips; Plastic protectors; Diagonal shelf bracket; End wall
clips; Segmented section shelf; Free-flowing shelf; Free-flowing closet
rod hanger; Free-flowing corner closet rod; Free-flowing straight closet
rod; Corner shelf.
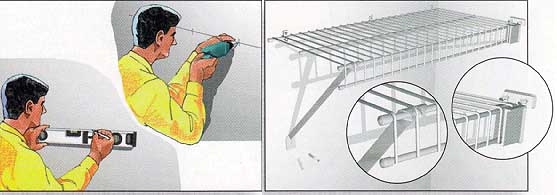
(left) Using a level, draw a level line at the desired height
Locate studs and attach the wall mounting clips to the studs with screws.
Between studs, use the appropriate wall anchors. Depending on the system,
the shelves snap or hook onto the clips. (right) Install wall brackets
to hold the end of the shelf where it meets the wall. You probably
won’t hit a stud here, so use appropriate wall anchors. In the middle
of spans, you’ll need to attach diagonal shelf supports according to
the manufacturer’s directions.
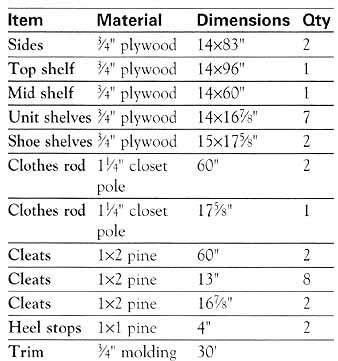
(left) If you’re installing a wire-grid system in a walk-in
closet, corner shelf units connect shelves on adjacent walls. These
are attached in the same manner as straight shelves, with clips on
the back side and diagonal braces where the sections meet; (right)
This shoe rack is a regular straight shelf, inverted so the front lip
is facing up to hold the shoes on the slanted surface. Special triangular
support brackets mount on the wall to hold the shoe rack in place.
BUILDING YOUR OWN CLOSET SOLUTIONS
For a little money and not that much work, you can build this basic shelf-and-rod closet system out of two sheets of plywood. The design shown here is for a basic 8-foot-wide by 2-foot-deep closet with bi-fold doors.
You can adapt it as you want and as your carpentry expertise allows, After cataloging your clothes, for example, you may find you need more than the 18-inch width for dresses and other long apparel on one side. Or you may to want two sections of stacked shelves, one for her and one for him.
Begin by ripping the two sheets of plywood into six 14-inch-wide pieces. Plan and mark out all the pieces to length on these strips. Cut out all the pieces and paint or stain them before beginning assembly.
On the side pieces of the upright shelf unit, mark the location of the shelves based on your calculations of what type of clothes or linens will be stored on them. Because clothing does not weigh much, you can do without dado cuts or cleats and use simple butt joints for these shelves. Again, if you have the skills and inclination, you could use dado joints or substitute adjustable shelf supports to make these shelves movable.
Assemble the upright shelf unit with nails or screws. You can assemble it outside the closet if you’re sure it will go through the closet door after assembly. Before setting the unit into the closet, glue and screw 1x2 cleats to the bottom of the highest shelf and the second-to-lowest shelf, making sure the flat side of the 1x2 is flush with the back edge of the shelf. Set the unit tight against the back of the closet, removing any molding at the floor or notching the unit so it fits around the molding. Make sure the unit is in position and plumb, then attach it to the wall by driving screws through the two 1x2 cleats into the wall studs.
Once the upright shelf unit is in place, draw level lines on the unit and the closet walls to indicate where the remaining shelves go. Cut additional 1x2 cleats to attach the back edge of each shelf to the wall as well as to the side wall of the closet and the upright shelf unit. Attach these cleats, then set the shelves on the cleats, securing them with nails or screws driven down through the top of the shelves into the cleats.
For heel stops on the shoe-rack shelves, cut pieces of 1x1 the same length as the shelf. Attach them about 5 inches from the back of the shelf, or use your own shoes to calculate the best distance. Install the shoe shelves so they slope upward to the back.
Install the clothes rods with closet-pole holders, called rosettes. You probably won’t hit studs on the side wall, so use the appropriate wall anchors. Because the rods are longer than 4 feet, you will need to reinforce them in the center with a shelf support fitted with a closet-rod holder.
Attach ¾” trim molding to all visible edges. Set all nails and fill the holes with wood putty. Paint the edges to match the shelves and touch up any paint you may have marred during installation.

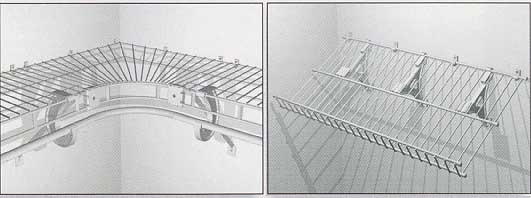
Components of Closet Shelves: Top shelf; Mid shelf; Unit shelves;
Heel stop; Shoe shelves
MATERIALS LIST, DIMENSIONS, and QTY: Sides, Top shelf,
Mid shelf, Unit shelves, Shoe shelves, Clothes rod, Clothes rod, Cleats,
Heel stops, Trim. 3d, 6d, and 8d finish nails; 2¼” #8 drywall screws;
six 1¼” closet-rod rosettes; two shelf supports with closet-rod holders;
white carpenter’s glue; wood putty; paint or stain.
ALTER SHELVES FOR YOUR NEEDS
There are several ways you can alter the upright shelf unit to adapt it to your needs. Here are three ideas:
• Cut dadoes in the side pieces and install shelf standards so the shelves are adjustable.
• If you’re handy and want to build a couple of drawers, install drawer slides in some of the shelf cavities.
• Use wire baskets as drawers. In this case, cut a 1/4-inch dado groove at the correct height for the basket slide and simply slide the basket into the shelf unit.
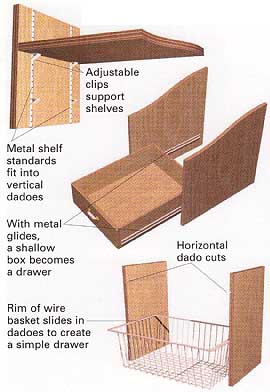
Adjustable clips support shelves; Metal shelf standards fit
into vertical dadoes; With metal glides, a shallow box becomes a drawer;
Rim of wire basket slides in dadoes to create a simple drawer; Horizontal
dado cuts
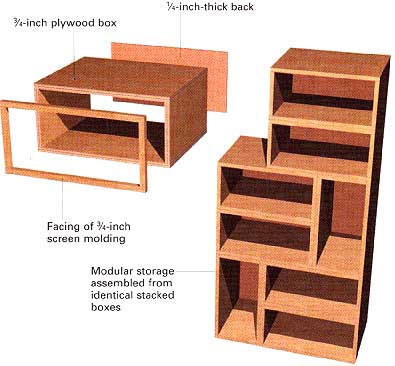
¾” plywood box; ¼” back; Modular storage assembled from identical
stacked boxes
REACHING HEIGHTS OF STACKABLE STORAGE
If you think you may change your storage plan in the future, stay flexible by using stackable boxes that can be moved easily from one room or closet to another. There are plenty of ready-made boxes in stores, but building a set is as simple as building a basic box.
As with the preceding closet project, if you rip plywood sheets into three equal widths, you’ll wind up with 16-inch-deep boxes, a convenient size for most clothes and closets. Plywood works well, and it’s hard to find dimension lumber wider than 11¼”.
The suggested dimensions allow you to build eight 19¾” x 16 x 9 7/8” boxes out of two sheets of plywood. Cut eight short pieces out of one of the ripped lengths and eight long pieces out of the other lengths. After cutting, you’ll find it easier to paint or stain the interior surfaces before assembling the boxes.
Prior to nailing the butt joints together, apply glue to each joint. Put them together with 6d finish nails. To provide rigidity and keep the boxes square, cut backs for the boxes out of 1/4” hardboard, attaching each with 4d finish nails. To give the boxes a finished appearance and minimize the risk of splinters, trim the front edges of the boxes with ¾-inch screen molding, applied with glue and 3d finish nails.
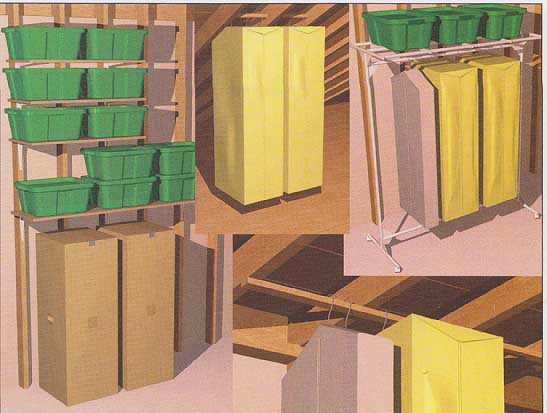
Seasonal Storage Options
If you’ve organized your closets and used your wall space efficiently and still do not have enough space, it’s time to take stock. First, are some of your clothes expendable? If you haven’t worn something for more than a year, it’s fodder for a garage sale or a donation to a clothing charity.
Next, take stock of those seasonal items:
Shorts and short-sleeved shirts just get in your way in winter, and bulky sweaters take up space in the summer. The hassle of moving such items twice a year is more than offset by the space gained in your closets and dressers.
Seasonal clothing can be stored in a dry basement or attic in stackable boxes or on a clothes rod. Because they may be stored for several months, such items should be sealed from dust and insects, Plastic storage boxes are an easy solution for foldable items. Sturdy, stackable containers eliminate the need for shelving. For hanging clothes, heavy-duty garment bags zip closed.
Wool and some other fabrics need to be stored in mothproof places. Although mothballs and cedar chunks repel these pests, they can leave a strong odor in clothes. The best solution is to have clothes dry-cleaned, then zip them in a plastic garment bag. As an alternative, large cardboard boxes with hanging rods are available from moving companies at reasonable prices. Although the boxes do not have especially tight seals, they keep most of the dust out of your clothing, are relatively stable, and last a long time if not moved around too often.
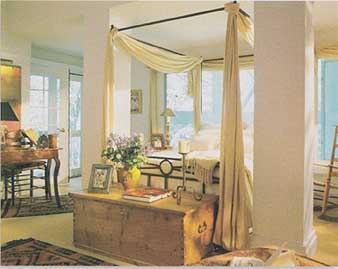
Don’t ignore unique solutions for storing seasonal items. If
you find that perfect antique chest or trunk at an auction, it’ll be
a great place to keep sweaters in the summer and shorts and swim wear
in the winter. Other commercial products— plastic bins, garment bags,
or the moving companies’ big cardboard boxes with hanging rods—serve
as useful storage for seasonal items.
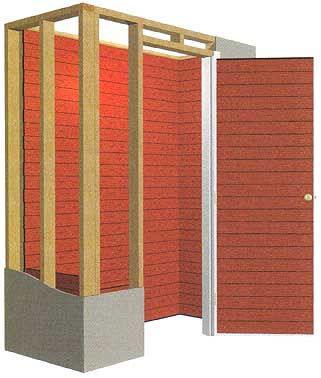
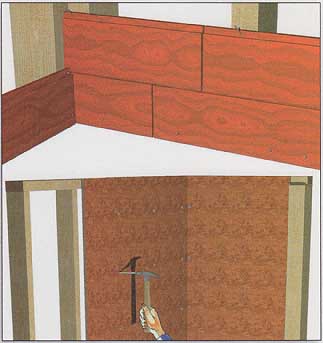
Lining a Closet with Aromatic Cedar
Surrounding your clothes with cedar is a refreshing way to protect them. While not always 100 percent effective, aromatic cedar does repel moths and other insects. It also helps prevent mildew. And cedar looks and smells great.
Cedar boards used for decks and other applications do not have the aromatic and pest-control qualities needed for closets. Aromatic cedar is more expensive, but manufacturers have come up with ways to make a little cedar go a long way. It is available in ¼-inch-thick tongue-and-groove boards or in 4x8-foot panels that have a cover layer of cedar chips. The panels are less expensive, easier to install, and just as aromatic as the boards.
Either product can be installed over open studs, if you’re building a new closet, or over drywall or plaster in an existing closet. If there is mildew in the closet, wash the affected area with a bleach solution (one part bleach to four parts water) before installing the cedar. If the closet is prone to dampness, correct the problem before putting up the cedar. For instance, you can install sheets of rigid foam insulation and a plastic vapor barrier before you add the cedar.
Boards and paneling can bridge holes and gaps in closet walls, but they cannot hide major misalignments. Straighten out any large problems on the walls before you begin.
If you’re installing cedar boards in a closet, mark the location of the studs on the wall. If you’re using paneling, mark the stud locations on the floor and ceiling at each end of the studs.
To install horizontal boards, begin at the bottom of the wall and work upward. Using hard trim nails, which are thinner than regular finish nails, face-nail the bottom row. Nail the rest of the rows on the tongues only, driving one nail at each stud. Butt joints need not fall on the studs; the tongue-and-groove at the ends of each piece will hold them in place. Avoid butt joints within 1 inch of the butt joint directly above or below it.
To install paneling, cut the paneling to fit. Don’t bother trying to make precise cuts for out-of-square corners; gaps will be covered by trim later. Apply paneling adhesive to the back of the paneling in a regular pattern of squiggles. Press the panel in place and nail it into the studs with light brown paneling nails. Add trim to cover the corner gaps.
Aromatic cedar should be left unfinished. After two or three years, if the cedar has developed a hard surface and is no longer aromatic, sand it lightly and that fresh, spicy aroma will come right back.
Whether you build it from scratch or line an existing closet,
whether you use cedar panels or tongue-and- groove cedar boards, there’s
nothing like the aromatic freshness and beauty of a cedar-lined clothes
closet.
Storage Solutions in Children’s Rooms
Children’s rooms house an inherent conflict: You want to keep a lid on chaos, but you also want to allow your kids to be kids. Storage solutions will work in children’s rooms only if they are easy to use.
Making units easy to use depends partly on the ages of the children, Especially in closets of young children, you may have to think horizontally, rather than vertically, so items are easy to grab and, more importantly, easy to put away.
Young children don’t need the same kind of ordered storage that adults or teenagers do. A box into which they can toss toys can suffice. A lid on it to hide the jumble should satisfy your yearning for a neat-looking room.
As children grow older, they’ll require more and more shelf space to handle board games, puzzles, trophies, hobby and sports equipment, and books.
Well-managed hooks can be helpful in children’s rooms. But every hook should be designated for a specific purpose—sports gear, school bags, jackets, or other clothing. Children tend to generalize hooks as catch alls, testing the hook’s load tolerance and their parents’ general tolerance.
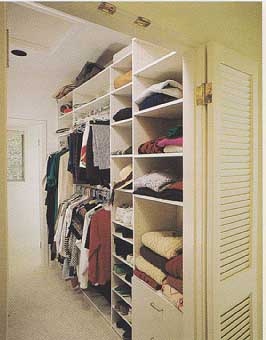
If this child’s walk-in closet, in-season clothes are kept at
a reachable height; out-of-season stuff gets stashed up high.
Use the same approach to planning a child’s room as in other
spaces in your home. Inventory the type and number of items that need
to be stored, then plan accordingly, taking into account the size of
the child and easy access to belongings.
Built-ins work well in cramped rooms like children’s rooms.
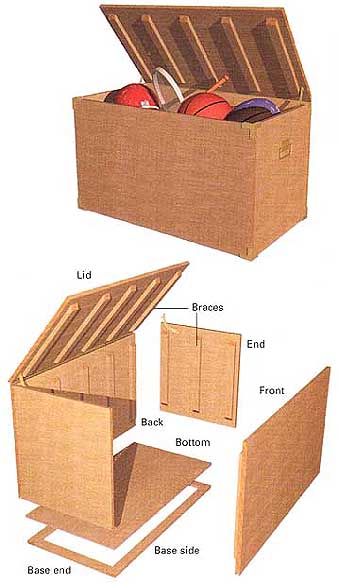
BUILDING A TOY CHEST: Anyone with basic carpentry skills who can make straight, clean cuts will enjoy building this attractive chest. A power miter saw or radial arm saw makes the process easier, but a simple backsaw and hand miter box and a circular saw with a rip guide will work just as well. The rounded brass hardware is not only decorative, it also prevents damage to corners and reduces injuries to toppling toddlers.
To build this chest you’ll need grade A, select, tongue-and-groove fir flooring for the front, back, ends, and lid, The brace and end pieces use grade A or B select 1x4s.
Begin by cutting all the wood pieces to length. Miter cut the ends of the braces at 45 degrees so there will be no sharp edges inside the chest. Rip-cut the four boards for the top on the sides, front, and back to remove the tongue portion of the boards. Temporarily assemble the strips for the lid, then measure and rip-cut the front and back pieces so the lid is 22 inches wide.
Assemble the strips for the front, back, ends, and lid. Use a framing square to make sure the units are square. Position the inside braces to allow clearance for the adjacent pieces. Space the braces evenly across each of the surfaces. The end braces on the front and back should be spaced in from the edge of the front or back the width of the end panels so that when the end panels are attached, the braces serve as cleats to reinforce the corner butt joint. Attach the braces with glue and 3d finish nails. Assemble the lid in the same way, attaching the braces 7/8-inch from the edges.
Attach the ends to the front and back with glue and 6d finish nails. Use glue and 3d finish nails to attach the base 1x2 to the plywood bottom, keeping the good side of the plywood up. Slip the chest over the base unit, then glue and screw it on. As an option, you could attach casters to the 1x2s on the base so the unit would be mobile.
Set all the nails, fill the nail holes with wood putty, and paint or varnish the chest. After the finish has dried, secure the lid to the chest with a piano hinge. Attach and adjust the lid supports and install the handles and corner protectors with the fasteners provided with the hardware.
Toy chest components.
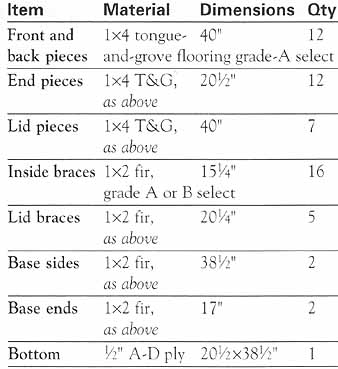
Toy Chest MATERIALS LIST, DIMENSIONS, QTY: 3d and 6d finish
nails; 1½” #6 drywall screws; two brass adjustable-tension lid supports;
one 40” brass piano hinge; two brass handles; 12 brass corners; white
carpenter’s glue; wood putty; paint or varnish.
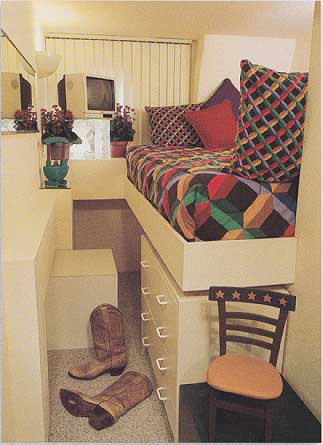
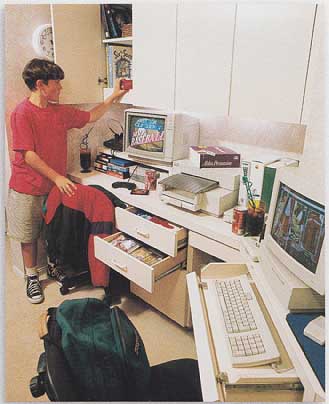
TAKE ADVANTAGE OF NEW SPACE You probably had some ideas for that new space when you planned on installing a loft bed. Are these ideas on your list? • Place a regular bed under the loft. Place the bed parallel with the loft and you duplicate a bunk-bed situation but use all the space you created. But if you place the lower bed perpendicular to the top one, you’ll still have an empty space alongside that bed. • Make a homework center under the loft. You can buy a premade student desk, or add two more ledgers to the wall at an appropriate desk height for your child. Then install a plywood panel (24 - 30 inches wide) on the ledgers and add a corner post as you did for the loft. Cover the plywood with 1/8” hardboard and you’ll have a hard, smooth work surface for homework or hobbies. • Build shelves at the post-end of the bed between the wall and the corner post. Shelves could face either outward, inward, or both. • The space under the loft makes good dresser space. You can place the dresser, rather than shelves, at the post end. |
BUILDING A LOFT BED
TIP: You may be designing a loft bed to solve a space problem or to give your child a fun place to sleep. Involve the kids in the planning phase so they can share in the sense of achievement when it is finished.
Two kids sharing a bedroom—even one child squeezed in a small room—can test your skill at managing floor space. Bunk beds are the traditional answer. But if you’re a veteran of college dorm life, you probably already know of another solution—the loft bed. Raising the bed off the floor frees that space for many other uses.
Loft beds can be of many designs, supported by any combination of posts and wall-hung wooden braces, called ledgers. Lofts should be designed carefully with good supports because, as the nursery rhyme says, “there will be monkeys jumping on the bed.”
BED SIZE: The loft shown here is designed for a twin-size mattress. Check your mattress dimensions before you build, and modify the specifications as needed. This simple structure can be built in a day. But with modifications, the bed can be as complex as you want. Its height should be determined by the age of your child as well as the ceiling height. Strive for 50—60 inches off the floor so you have plenty of space underneath, but make sure you provide comfortable head room above.
Start by cutting the side and end supports to length. Cut a rabbet 1 inch wide and ¾-inch deep along the inside top edge of all the supports. Make a level line at the height of the two ledgers, then find wall studs and mark their location. Temporarily nail the ledgers to the wall and pre-drill holes through the ledgers into the studs. Drill countersunk holes for the lag-screw heads, then screw the ledgers to the wall, making sure the rabbeted edge faces to the inside of the bed. Drive a screw into every wall stud for security.
Lay the 4x4 corner post and 2x4 ladder rail next to each other and mark the spacing for the ladder rungs. Space the rungs about 8 inches apart. Using a 1¼” spade bit, drill ½-inch-deep holes for the rungs.
SECURITY: Cut 1½-inch-wide by 3½-inch-deep rabbets on the adjacent outside edge of the top of the post. Pre-drill countersunk holes in the outside and end supports, then lag- screw the supports to the post. Lag-screw the front side support to the end of the short ledger; hang the end side support from a joist hanger on the long wall ledger. For extra security, add a 2x4 post under the short ledger and front side support. Screw this to the wall with appropriate wall anchors because you probably will not be screwing into a wall stud. Equally space the three 2x4 supports between the ledgers and install them with joist hangers, making sure their tops are even with the bottom of the rabbet in the side supports. The plywood bed board sits in the rabbet.
Cut a 1½-inch-wide, 3½-inch-deep rabbet on the outside top edge of the ladder rail. Set the rail under the side support, apply glue to the rung holes in both the post and rail, insert the rungs, and push the ladder unit together. Screw the ladder rail to the side bed support from the back side, Paint or stain the bed to match the decor of the room.
If the loft is for a young child, you can add a railing around the top bed frame. Pre-build a rail and baluster system and screw it to the 2x6 supports. You’ll have to leave a gap for access to the ladder. Remember that balusters should never be farther apart than 4 inches so a child’s head cannot be caught between them.
College students swear by the concept of loft beds. They should
know; dorm life teaches them about economizing space. Here’s the same
lesson without any tuition. It’s great for an older child’s room, and
you’ll never have to wonder what’s hidden under the bed.
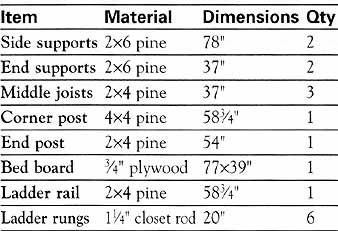
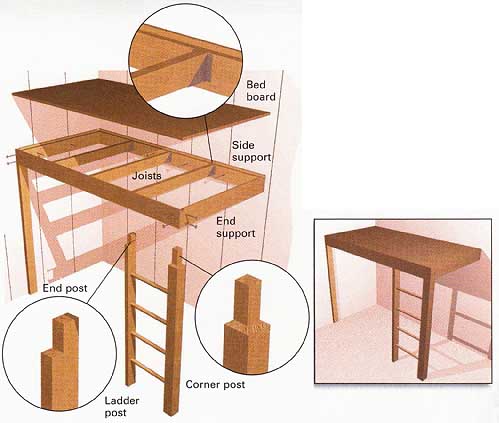
MATERIALS LIST: Corner post, End post, Bed board,
Ladder rail, Ladder rungs, Side supports, End supports, Middle joists.
2x4 joist hangers; 3” lag screws; 6d anti 8d nails; 2½” drywall screws;
white carpenter’s glue; paint or varnish, as needed.
BUILDING AN UNDER-THE-BED ROLL-OUT DRAWER
The area under the average bed, where you usually find dust and missing socks, can be maximized for storage. You can buy many ready-made trays designed to fit in this space. Or you can build this simple roll-out one to the size you need.
Make these units no more than 3 feet wide, especially if they will contain heavy objects. Wider ones will sag and be cumbersome to pull out and push in.
Construct a simple frame using 1x4s or 1x6s. Cut a rabbet into the bottom edge of the boards to accommodate a ½-inch plywood bottom. Use a jigsaw to cut handle openings on one or more sides. Sand all the pieces, then join the corners with glue and 6d finish nails.
For a simple box without casters, give the bottom several coats of high-gloss paint or polyurethane so it will slide easily. If you want casters, attach 2x2 rails to the sides of each unit, then attach the casters to the rails. They should extend at least 1 inch below the rails to ensure adequate clearance, especially if floors are carpeted.
You also can add a hinged plywood or hardboard lid to keep dust out of the box. But this will make access to the items awkward because you will have to pull the unit all the way out from under the bed to open it. If the roll-out is for seasonal or rarely used items, however, a lid is a good choice.
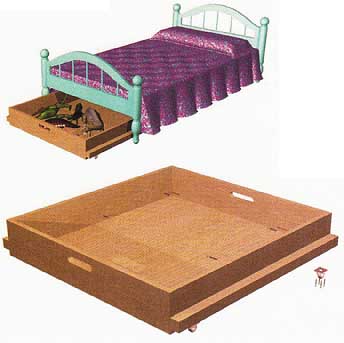
There are 20 - 30 square feet of good storage space under conventional
beds. Put that space to good use by building mobile trays to store
toys, games, linens, or items you don’t use regularly.