If you are processing only 1 or 2 chickens for meat, just plucking by hand is fine. But we usually process 10 to 15 chickens at a time, and under those conditions plucking becomes too time-consuming for efficiency. I had tried the cheap drill attachments with no luck, and building my own tub-style chicken plucker seemed awfully expensive-hundreds of dollars-to make economic sense. We needed something that could be built much less expensively and still do a good job; thus arose our own chicken plucker design that I'll be sharing with you.
Construction
1. Use the two 7-1/2-inch pieces and two 12-inch pieces of 2 × 4 lumber to construct the drum holder as illustrated, using two deck screws for each union. The center of the second cross piece is 3-1/4 inch from the connected end. Drill 3/16-inch holes at 1-1/8 inches and 4-3/8 inches from the free ends of the 12-inch pieces. When done, paint the piece and let it dry.

---------- Parts List
Additional hardware as needed to mount the motor to the piece of 2 × 6 board.
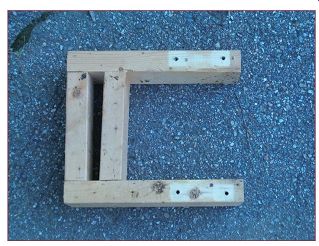
----------- Unpainted drum holder.
2. Cut off a piece of 4-inch PVC pipe that is 6-1/2 inches long, and then use a flexible ruler (like the kind you get in the sewing section) to put four longitudinal lines evenly spaced every 3-1/2 inches around the circumference.
3. Mark two of the lines opposite each other at 1-1/4 inch, 2 9/16 inch, 3-7/8 inch, and 5-1/4 inch from one end. Mark the other pair of opposite lines at 1-15/16 inches, 3-1/4 inches and 4-9/16 inches from the same end. Then use a 3/4-inch spade bit to bore holes centered on each mark. After , pull plucker fingers until they sit in each hole. This will require some muscle!
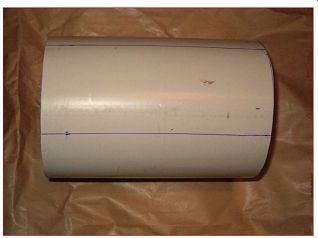
----------- Plucker drum marked longitudinally.
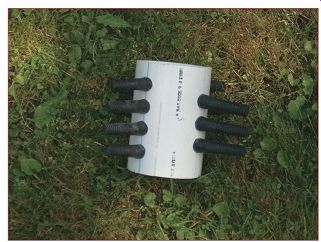
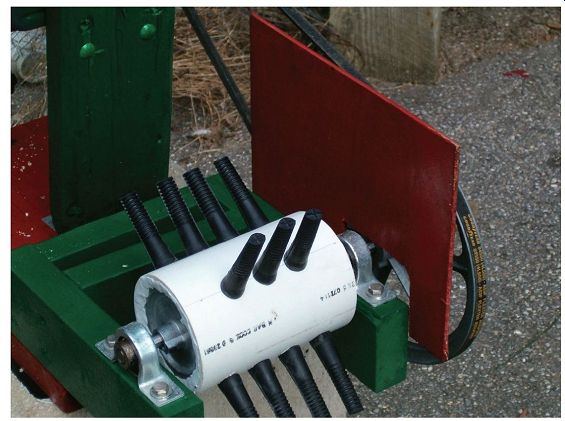
----------- Plucker drum with fingers installed.
4. Complete the drum by inserting the sheaves (with tightening screw facing outboard) into either end of the drum, running the shaft through both sheaves, aligning the outside edge of each sheave with the outside edge of the drum, and then tightening the sheaves to the shaft. Then, secure the sheaves to the drum with epoxy. For this sort of work, I prefer the putty type. Set aside while the epoxy cures.
5. Paint the large board and allow it to dry. Then, insert the steel loop. On the large board, the loop should be 1-1/2 inches from the rear edge and 4-3/4 inches from the right edge. Use pilot holes to keep the steel loops from splitting the boards.
Use screws to secure the rectangular end of the T-hinge on the big board with the hinge facing up, the back 8-1/4 inches from the back edge of the board, and the right 1-7/8 inches from the right edge of the board.
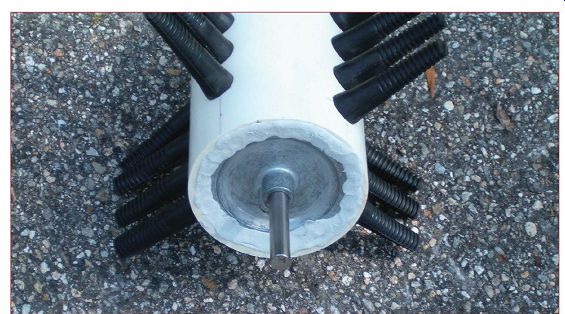
---------- Completed plucker drum.
6. Paint the 2 × 6 board and allow it to dry. Insert the steel loop centered and 1-1/2-inch from the top edge and install mounting hardware for the motor as necessary to position the shaft 13-3/4 inches from the bottom and facing left.
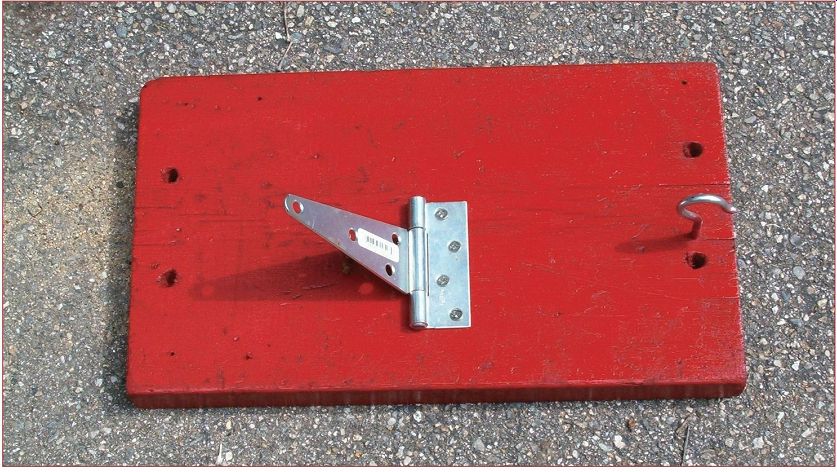
------- The large board with hinge and hook installed.
7. Connect the 2 × 6 board to the large board using the T-hinge such that the right edge of the 2 × 6 board is 1-1/4 inches from the right edge of the large board, and then mount the motor to the 2 × 6 board.
8. Attach the drum holder you made in Step 1, holes facing up, to the front of the large board with the left side of the drum holder aligned with the left side of the large board and the rear edge of the drum holder 4-1/2-inch back from the front edge of the large board. Use deck screws drilled in from the bottom of the large board into the long boards of the drum holder.
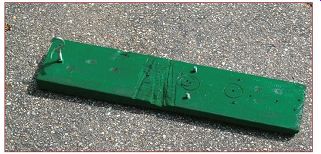
------------- Recycled 2 × 6 board with hook and hardware.
9. Slide the shafts on either end of the drum into the pillow block bearings, mount the bearings to the drum holder using the 1/4-inch lag bolts and washers, and then loosen the Allen screws in the sheaves so that the shaft is even with the end of the left-hand bearing and projecting a few inches out of the right-hand bearing. Make sure the Allen screws on both bearings are facing left and that the drum is centered and moves freely; then tighten down the Allen screws on the bearings and sheaves. Finally, attach the large spoked sheave to the right side of the shaft with the Allen screw facing to the right.
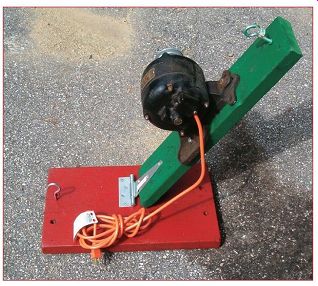
---------- The 2 × 6 board and the large board connected with the T-hinge.
10. Place the entire machine on a stable flat surface with the drum portion hanging off the edge. Run a V-belt between the sheave on the motor and the sheave that rotates the drum. Adjust the sheaves on their respective shafts until both are in the same plane. Then attach a bungee cord between the two steel loops to keep tension on the belt. Depending on your arrangement, you may need to use an alternative such as steel wire and a turnbuckle for tensioning.
11. Cut a slot suitable for allowing the shaft to pass through the 1/4-inch plywood, and then paint it and allow it to dry. Finally, attach it to the long right arm of the drum holder with short wood screws so that it prevents chicken parts from being caught in the spoked sheave.
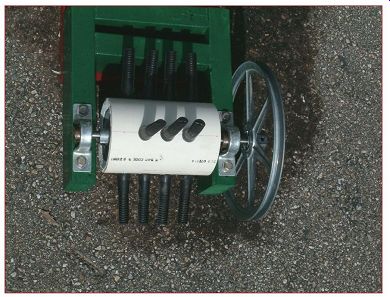
------- The plucker drum and bearings mounted on the drum holder.
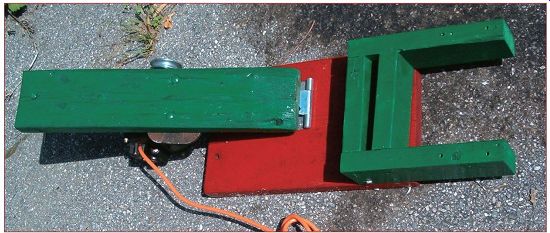
------- The drum holder attached to the large board.
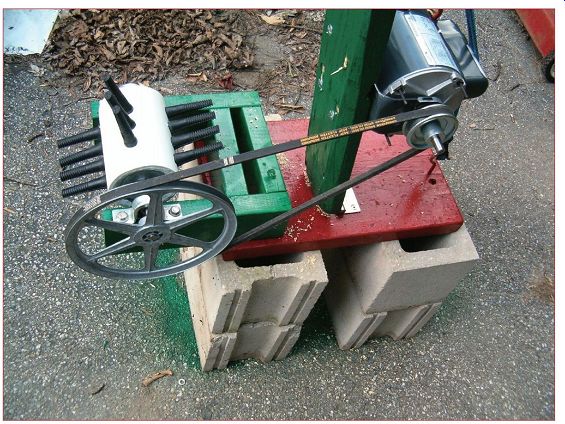
----- Plucker with belt and tensioner installed.
------ Safety shield installed. Keep hands away from the belt and pulleys!
About the Motor and Electrical Safety
My first plucker with this design was made using a motor I had picked up at a yard sale for $2, but the design illustrated here features a 1/4 horsepower farm-duty motor I purchased for $110.
The motor should be wired according to the directions that came with it, paying close attention to make sure that it is turning clockwise (when viewed from the rear) and properly grounded. The clockwise turning means the chicken feathers will go down toward the ground rather than up into your face during operation.
Because chickens are wet from the scald while being plucked, there is a hazard with water being around electricity. Therefore, it is extremely important that you plug this device into a terminal strip that contains an integral ground-fault circuit interrupter (GFCI).
These are not cheap, but they could save your life from an unexpected electrical shock. Don't skip this.
----