It is a good idea to learn to start seedlings for three reasons. The first reason is economic: Starting seedlings at home saves money.
The second reason is variety: Starting seedlings at home vastly increases the range of crop choices because certain varieties may not be available at your local garden center . Finally, since seedlings grown at home were never in a commercial greenhouse, you'll have a known-good product that is unlikely to be harboring pests.
Starting seeds is simple: Place seeds in a fertile starting medium in a suitable container; provide water , heat, and light; and that's it.
Many seeds-such as grains and beets-are sowed directly in a garden bed, but others such as tomatoes, broccoli, and peppers, must be either started in advance or purchased as small plants ("seedlings") and then transplanted.
Timing
Table 15: Spring and Fall Planting Guide
------------
Seedlings need to be started indoors anywhere from 2 to 12 weeks before transplant time, depending on the particular crop.
Transplant time is reckoned in weeks before or after the last predicted frost of the year for spring and summer crops and in weeks before the first predicted frost for fall and winter crops. The timing of transplanting is dictated by the hardiness of the particular crop. Broccoli is pretty hardy, so it is often planted 6 weeks before the last predicted frost, whereas cucumber is very tender, so it is planted 1 or 2 weeks after.
So the most important information that you will need for starting seeds is the date of the last frost for your geographic region. This can be found from the Cooperative Extension Service or from an
Internet search in most cases. The National Climatic Data Center maintains comprehensive tables on the Internet that give the statistical likelihoods of frost on a given date along with the probabilities of the number of frost-free days, broken down by state and city. Weather.com also provides data relevant to gardening.
Once you've determined the average date of your last spring frost, determine the date for starting seeds and transplanting seedlings into the garden by adding or subtracting a certain number of weeks from the date of the last frost, depending on the crop (see Table 15).
If my average last spring frost is June 1st, then I would start my tomato plants seven weeks before June 1st and set them out on that date. Cabbage would be started 13 weeks before June 1st and set out in the garden 5 weeks before June 1st. Eggplant would be started 8 weeks before June 1st and set out 2 weeks after June 1st.
Anything that can be planted in the garden before the last spring frost can also be grown as a fall crop. For fall cabbage, if my average date of the first fall frost is on September 6th, and my cabbage requires 65 days to mature according to the seed package, then I would transplant my cabbage seedlings on July 28th. This is computed by adding 25 days (from the table) to September 6th then subtracting 65 days for the days to maturity (from the seed package). I can tell when to start my cabbage from seed by subtracting 56 days (from the table) from the transplant date. So I should start my cabbage seedlings for fall on June 2nd.
Starting Medium
Gardening experts have many varied opinions on the best starting medium. To confuse matters, seed catalogs try to sell all kinds of starting mediums for that purpose, and the number of choices can be confusing.
Whatever is used as a seed-starting medium should be light and easy for delicate roots to penetrate, and it should hold water well and not be infected with diseases. It should have some nutrients but not too heavy a concentration of them. Commercial seed-starting mixes are sold for this purpose and work fine, as do peat pellets of various shapes and sizes. At the time of writing, commercial seed starting mixes cost about $3 for enough to start 150 plants, and peat pellets cost about $5 per 100.
Compared to the cost of buying transplants from a garden center , the price of seed-starting mixes or peat pellets is negligible. But for a farmer growing hundreds or even thousands of transplants, it may be economical to make seed-starting mixes at home. Most seed starting mixes consist mainly of finely milled peat moss and vermiculite. The Territorial Seed Company recommends a simple 50/50 mix of vermiculite and peat moss, 37 but some authorities recommend adding compost to the mix because it can suppress diseases.
Some farmers also add a little clean sand. If these latter two ingredients are added, they shouldn't constitute more than 1/3 of the soil volume in aggregate. Don't use garden soil, and don't use potting soil. It is extremely important that any compost used to make seed-starting mix be well finished so that it contains no disease organisms or weed seeds. (Garden soil can be used as an ingredient if it is first sifted through a 1/4-inch mesh screen and then sterilized. Instructions for sterilizing are given later in this section . Potting soil can be used under the same conditions-if it is sifted then sterilized.) A little compost or worm castings mixed into seed-starting mixes is fine and can be helpful in warding off diseases. But even organic fertilizer in too great a concentration will create an environment ideal for the growth of various fungi that will invade and harm the seedlings. An indoor seed-starting environment is not like the great outdoors. Wind movement, sunshine, and other elements that keep fungi at bay are greatly reduced in an indoor environment. As a result, the teaspoon of solid fertilizer that does so much good outdoors can be harmful to seedlings.
Another reason for keeping the nutrient content of seed-starting medium low is the lower nutrient concentrations cause more aggressive root growth. Improved root growth leads to a transplant that will suffer less shock when it is planted outdoors.
Here is my own recipe:
Finely milled sphagnum peat moss, 4 quarts Medium vermiculite, 1 pint Well-finished compost passed through a 1/4-inch screen made from hardware cloth, 1 pint Worm castings (available at any agricultural store), 1 pint Again, the simple 50/50 mix of peat moss and vermiculite recommended by the Territorial Seed Company and most commercial seed-starting mixes work perfectly fine. Feel free to experiment! Because the starting medium used for seeds is deliberately nutritionally poor and provided in insufficient quantity to meet a seedling's nutritional needs, it will become necessary to fertilize seedlings periodically once their first "true" leaves appear . The first two leaves that appear , called the cotyledons, contain a storehouse of nutrients that will keep the plant well supplied until the first true leaves emerge. (Plants can be divided into two categories-those with two cotyledons, called "dicots, " and those with one cotyledon, called "monocots. " The first true leaves look like the leaves that are distinctive for that plant.) Adding solid fertilizer to the cells of a seedling tray would be both harmful and impractical, so liquid fertilizer will need to be used.
Seedlings are delicate, and full-strength fertilizer is both unneeded and potentially harmful. A good organic kelp, fish, or start-up fertilizer diluted to half strength and applied every two weeks after the first true leaves appear should work fine.
Containers
Mini-farming is not a small hobby operation. The average mini farmer will grow hundreds or perhaps thousands of seedlings. The best methods for starting seeds on this scale include cellular containers like those used by nurseries, peat pellets, and compressed soil blocks.
The use of undivided flats is advocated in the Grow Biointensive method. In this method, a rectangular wooden box of convenient size and about 2 inches deep is filled with starting medium, and seeds are planted at close intervals. The seeds are kept moist and warm, and once the cotyledons have appeared, the seedlings are carefully picked out and transplanted into a new flat with a greater distance between seedlings. This process is repeated again when the growth of the plant makes it necessary, and the final time the plant is transplanted, complete with a block of soil, it goes straight into the garden. The most obvious benefit of this method is that it is inexpensive. The largest detriment is that it is extremely time consuming. Grow Biointensive publications also state that this method produces a beneficial microclimate and stronger transplants, but my own experiments have shown no appreciable difference between seedlings grown this way and seedlings grown exclusively in soil blocks or peat pellets. Certainly, this technique works well, and in a situation where the farmer is rich in time but poor in cash, it is a very good option.
The commercial growers who make the small six-packs of transplants for the garden center use plastic multicelled containers.
These containers cost money, of course, but also save on labor costs and are easily transplanted. These units have a hole in the bottom of every cell, fit into rectangular plastic boxes that provide for bottom watering, and can be picked up at most agricultural stores for around $2 or $3 for a tray and eight 6-pack containers.
The price of these works out to about $6 per 100 plants, which isn't expensive considering that the containers can be reused year to year as long as they are well washed between uses so they don't spread diseases. If you sell seedlings, as I do, you will want to take the cost of these containers (and labels) into account in setting your price. In practice, once acquired, the economics of using these is sound since the per-plant cost drops dramatically after the first year , and they save a lot of time compared to using undivided flats.
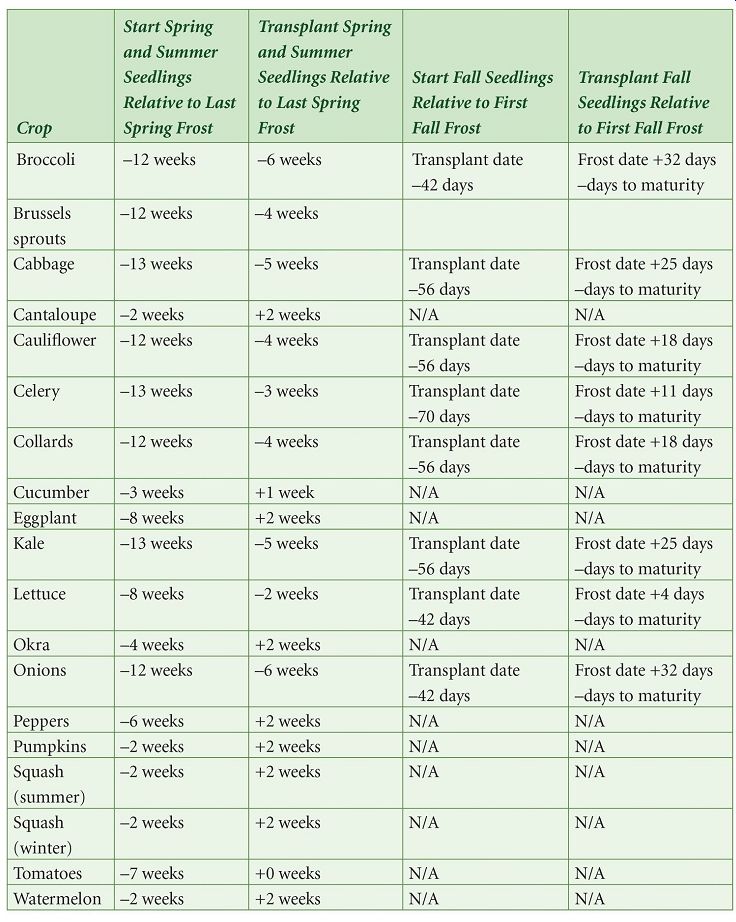
----------- Broccoli seedlings destined for market.
The disadvantage of multicelled containers is that each cell contains only two or three cubic inches of soil. This means that the soil can't hold enough nutrients to see the seedling through to transplanting time, so bottom watering with liquid fertilizer is required. Also, because of the small amount of space, roots grow to the sides of the cell and then wind around and around, contributing to transplant shock. Finally, because of the small soil volume, multicelled containers can't be left unattended for more than a couple of days because their water supply is depleted rapidly. Even with these disadvantages, they are the method of choice for producing seedlings for sale because of their convenience.
Peat pellets have a significant advantage over multicelled containers when it comes to transplant shock. Taking a transplant from a multicelled pack and putting it directly into garden soil can set the plant back for a few days as it acclimates to the new soil conditions. Peat pellets get around this problem because transplants are put into the garden without being disturbed, and roots can grow right through them into the soil. This allows for gradual acclimatization and virtually eliminates transplant shock.
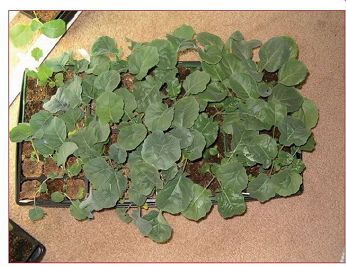
Peat pellets cost about $5 per 100 and can be purchased at agricultural supply stores and occasionally at places like Walmart.
They come as compressed dry wafers and are expanded by placing them in warm water. Once the pellets expand, the seeds are placed in the center and lightly covered, then the pellet is bottom watered as needed until time to plant in the garden. In the case of peat pellets, the seed-starting mix of a peat pellet is essentially devoid of nutrients altogether , making liquid fertilizer a must. If you use peat pellets, be sure to carefully slit and remove the webbing at transplanting time so it doesn't bind the roots.
Peat pots suffer from the same disadvantages that affect multicelled containers because of their small soil volume, plus they don't break down well, and they constrain root growth in many cases, so I don't recommend them. When I worked some compost into my beds last spring, I dug up perfectly intact peat pots that had been planted a year earlier.
----------- Peat pots often fail to break down quickly.
Compressed soil blocks, while not aesthetically acceptable for commercial sale, are the best available choice for the farmer's own seedlings. That's because a compressed soil block contains 400% more soil volume than a peat pellet or multicelled container , meaning it will contain more nutrients and moisture. Seedlings raised in compressed soil blocks using a properly constituted soil mix may require no liquid fertilizer at all. Because roots grow right up to the edge of the block instead of twisting around, and the block is made of soil so decomposition isn't an issue, transplant shock all but disappears. They are also the least expensive option when used in volume.
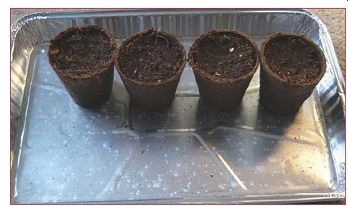
Compressed soil blocks are made with a device called a "soil blocker" into which a soil mix is poured, and the mix is then compressed.
A standard mix for the soil used in the blocker contains 30% fine peat moss, 30% good finished compost, 30% sterilized garden soil and 10% fine sand.
A balanced organic fertilizer such as Cockadoodle DOO is added to the mix at the rate of 1/2 cup per four gallons of soil mix, and the pH is adjusted with lime if necessary to fall between 6.2 and 7.0. My own mix is 50% peat moss, 40% worm castings, and 10% coarse vermiculite with a bit of balanced fertilizer . (Garden soil can be sterilized by spreading it no more than 1-inch thick on a baking pan and baking in the oven at 200 degrees for 20 minutes. Don't use a good pan!) It is important that the ingredients used in a soil mix be sifted so large twigs don't interfere with the operation of the soil blocker.
----------- A standard 2-inch soil blocker with rectangular inserts.
Even though the devices for making soil blocks cost about $30 each, they are made of steel and will last many years, so they will save many times their cost compared to multicelled containers. We bought from Valley Farm Supply over the Internet.
One particular technique for using soil blockers merits attention.
An insert can be purchased for the 2-inch soil blocker that makes a 3/4-inch cubic indentation in the block to accept 3/4-inch soil blocks. This is a great idea because it allows germination to be accomplished in smaller soil blocks that are then transplanted into the larger ones. That way you aren't taking up a large soil block with seed that won't germinate.
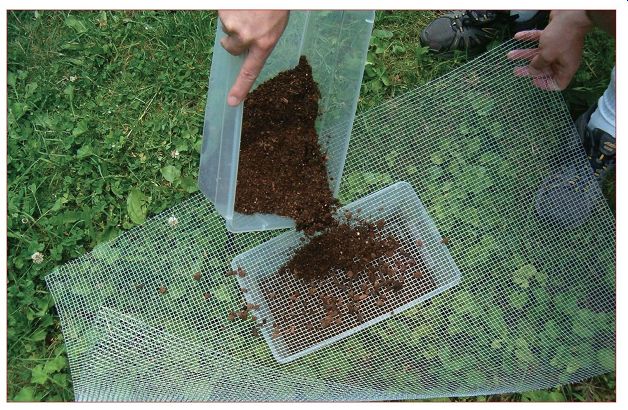
--------- Use 1/4-inch hardware cloth to screen out debris.
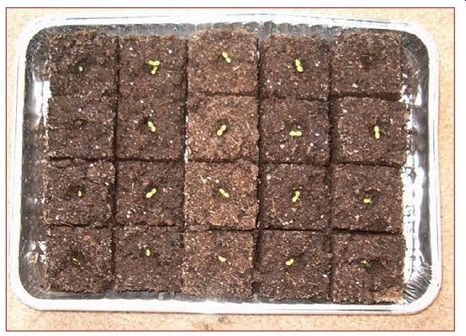
--------- Soil blocks with sprouted lettuce seedlings.
Light
Plants evolved with needs for light intensity that match the output of the sun, which provides light that is so intense that merely looking at it can permanently damage the eye. Naturally, seedlings grown inside also need an intense light source that can provide enough light without also making so much heat that plants get burned.
With the exception of certain flowers, most plants do not need light to germinate. In fact some plants, like those in the brassica family, may have their germination inhibited by light. But once the first plant parts emerge above the ground, all plants need light to grow. In most of North America and Europe, there is not enough sunshine coming through even a south-facing window to adequately start seedlings during the winter months when most seed starting takes place, so a source of artificial light is required. Selecting an artificial light source should be based on an understanding of the plants' requirements.
Plants require light of various wavelengths or colors for various purposes. Red wavelengths, for example, regulate dormancy, seed production, and tuber formation, whereas blue wavelengths stimulate chlorophyll production and vegetative growth. Violet wavelengths affect plants' tendency to turn toward a light source.
The best light sources for starting seedlings, then, should generate a wide spectrum of light wavelengths that encompass both the blue and the red ends of the spectrum.
There is a growing number of options for artificial lighting; unfortunately, most of these are quite expensive. Following is my particular approach that inexpensively meets the light needs for seedlings.
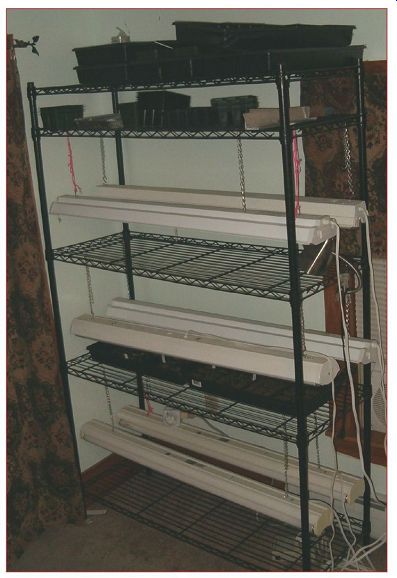
-------- A homemade rack for seedlings works great and costs little.
All sorts of special carts costing anywhere from $200 to $1,000 are sold for this purpose, but with a little ingenuity you can create a suitable contrivance, made like the one illustrated, at very low cost.
This device is made from a simple wire rack sold in the hardware department of Walmart for $50. Three racks hold up to four large seed trays each, and two 48-inch shop light fluorescent light fixtures are hung over each rack using simple adjustable chains from the hardware store. This way, the lights can be independently raised and lowered to keep them the right distance above the plants as they grow. The six lights (or fewer if you don't need them all) are plugged into an electric outlet strip that is plugged into a timer .
Each light holds two 40-watt 48-inch fluorescent tubes.
The fluorescent tubes need to be selected with the needs of plants in mind. Cool white fluorescents put out more blue light, and warm white fluorescents put out more red light. Combining the two in the same fixture gives a perfectly acceptable mix of wavelengths. It's what I use, and a good many farmers use it successfully.
There are also special tubes for fluorescent light fixtures that are specifically designed for growing plants or duplicating the sun's wavelengths-and these work well too but at a cost roughly six times higher than regular tubes and at a reduced light output. The thing to watch for with fluorescent lighting generally is light output, because plants need a lot of it. Go with the highest light output tubes that will fit in a 48-inch shop light fixture. Because the lights are used approximately five months out of the year , the tubes need to be replaced only every other year . Replace them even if they look and work fine, because after being used for two years, their measurable light output will have declined.
The intensity of light decreases in inverse proportion to the square of the distance from the source. In other words, the further away the lights are, the less light the plants will get. Fluorescent tubes need to be set up so that they are only an inch or two above the seedlings for them to get enough light. Because plants grow, either the height of the lights or the bottom of the plants needs to be adjustable.
Plants need a combination of both light and darkness to complete their metabolic processes, so too much of either can be a bad thing.
Because even closely spaced florescent lights are an imperfect substitute for true sunshine, the lights should be put on an inexpensive timer so seedlings get 16 hours of light and 8 hours of darkness every day.
Don't forget: Once seeds sprout, shine the light on them!
Temperature
Many publications provide various tables with all sorts of data about the optimum temperatures for germination of different garden seeds. For starting seeds in the house, almost all seeds normally used to start garden seedlings will germinate just fine at ordinary room temperatures. The only time temperature could become an issue is if the area used for seed starting regularly falls below 60 degrees or goes above 80.
If seed-starting operations get banished to the basement or garage where temperatures are routinely below 60 degrees, germination could definitely become a problem. The easiest solution for this situation is to use a heat mat (available at any agricultural supply store) underneath your flats that will raise the soil temperature about 20 degrees higher than the surrounding air.
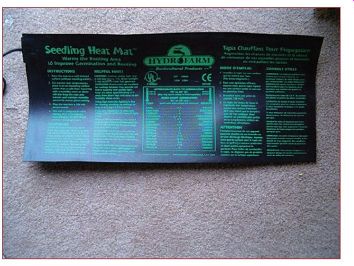
---------- A heating mat is especially useful for peppers and tomatoes.
Water
Seedlings should be bottom watered by placing their containers (which contain holes in the bottom or absorb water directly) in water and allowing the starting medium to evenly water itself by pulling up whatever water is needed. Seedlings are delicate and their roots are shallow, so top watering can disrupt and uncover the vulnerable roots.
It is important that the starting medium be kept moist, but not soaking, for the entire germination period. Once the germination process has begun and before the seedling emerges, allowing the seed to dry out will kill it. Most containers used for seedlings are too small to retain an appreciable amount of water; for this reason seedlings should stay uniformly damp (though not soggy) until transplanted.
Unfortunately, dampness can cause problems with mold growth.
Often, such mold is harmless, but sometimes it isn't, and telling the difference before damage is done is difficult. If gray fuzz or similar molds appear on top of the seedling container, cut back the water a bit, and place the container in direct sunlight in a south-facing window for a few hours a day for two or three days. This should take care of such a problem.
Another cause of mold is the use of domes over top of seedling flats. These domes are advertised to create an environment "just like a greenhouse. " In reality, they create an environment extremely conducive to mold, even in moderately cool temperatures. No matter how clean and sterile the starting medium, anytime I have ever used a dome on top of a seed flat, mold has developed within two or three days. I recommend that you do not use domes.
Fertilizer
As mentioned earlier, once seedlings have their first set of true leaves, they should be bottom watered with a half-strength solution of organic liquid fertilizer once every two weeks in addition to regular watering. Since starting medium is nutritionally poor , some fertilizer will be a benefit to the seedlings, but anything too concentrated can hurt the delicate developing root system and cause problems with mold. The only exception to this is soil blocks, which can contain enough nutrients that liquid fertilizer isn't needed because of their greater soil volume.
Hardening Off
A week or two before the intended transplant date, you may wish to start the process of "hardening off" the transplants; that is, the process of gradually acclimating the plants to the outdoor environment.
This generally means bringing the seedlings outside and exposing them to sun and wind for an hour the first day, progressing to all day on the last day of the hardening-off period, which lasts about a week before transplanting. The process of hardening off serves to make the transplants more hardy.
In my experience, hardening off makes little difference with plants that are transplanted after the last frost, but it does have an effect on the hardiness of plants that are transplanted before the last frost.
It should be done with all transplants anyway, because there is no way to know with absolute certainty if an unusual weather event will occur . I've seen no case in which hardening off transplants has been harmful and numerous cases in which it has helped so it is a good general policy for a mini-farm in which maximum yields are important.
----