As more and more people discover the pleasures of outdoor living, one of their top priorities often becomes the construction of some kind of deck, patio or terrace where they can observe how the garden grows, read the Sunday paper, eat a pleasant meal, enjoy a sun bath or entertain friends. For some, such an outdoor living room may include a children’s play area, a sheltered work space for potting plants or a comfortable garden path that invites an intimate look at the flowers. For most of these garden activities you will want an artificial surface that is attractive, durable, easy to maintain and safe to use in all kinds of weather.
Purists may avow that a garden is not a garden without a lot of grass, but getting grass to grow can be a losing battle. When a lawn is subjected to heavy traffic near the house, especially in a damp and shady spot, it can quickly become a muddy disaster area. Sooner or later even the most ardent grass-grower concedes this fact, and though he may keep the rest of his yard planted with grass, he generally chooses a less perishable kind of carpeting to cover the outdoor living areas.
Such outdoor flooring ranges from loose, soft materials that can be simply spread on the ground to permanent installations of wood planking, bricks or concrete. Among the least expensive are such organic products as wood chips, sawdust, bark chunks and shredded bark. One enterprising gardener who lives near a flour mill in upstate New York has an intricate network of paths surfaced with buckwheat hulls. “When the hulls pack down or blow away,” he says, “I just go back to the mill for more.”
Such materials are more than adequate for simple, rustic paths where the main objective is to avoid trudging through mud. They also make good mulches to spread around plants to conserve moisture and add protection from weather. Shredded bark, tanbark in particular, provides a springy, clean surface for play yards, where it can be piled under slides and swings to cushion inevitable falls. To keep loose material from being scattered, many gardeners dig out several inches of sod or topsoil, add gravel for drainage and line the edges with bricks or rot-resistant boards set on edge to confine the top layer of bark or wood chips.
---

Stone steps bordered with boulders help complete a garden designed by Thomas Church, father of modern American garden construction. The pebble aggregate at bottom gives way to redwood chips at the top.
---
LOOSE-STONE WALKWAYS
For a somewhat dressier, more durable surface, some landscapers prefer such inorganic materials as pulverized rock, gravel or crushed stone. Those that are finely pulverized—red rock, decomposed granite, dolomite or crushed brick—are applied in two 3-inch layers, each moistened and then compacted with a heavy garden roller. Despite this treatment, these finely pulverized materials may become dusty. Larger chunks of crushed rock or gravel are cleaner and more likely to stay in place. They can be spread over a layer of pulverized material or directly on the ground. Like other loose materials, these need to be contained by wood edgings or by bricks laid to form a mowing strip. (A mowing strip is a hard, flat surface flush with the ground adjoining the edge of a lawn; one wheel of the lawn mower runs along this strip, eliminating the need for most tedious hand trimming.)
Gravel consists of rounded pebbles ranging from ¼ inch in diameter to an inch or more, and comes in shades of white, tan and black. Some decorative gravels are available in hues of gray-blue, maroon and even gold. The smallest size, pea gravel, has a formal look but must be raked to keep it looking neat. The ½-inch size is more practical; heels and furniture legs are less likely to sink into it and it’s heavy enough to stay in place. Larger stones are not as comfortable to walk on, but they provide an additional bold touch in the design and they make convenient and care-free drainage beds for displays of potted plants.
COMPACTED FOR STABILITY
Crushed rock, man-made from larger rocks and often called quarry stone, is the most stable of loose-stone surfacing materials because its sharp, angular facets interlock tightly. When compacted with a heavy roller it can be used for driveways and service yards as well as for terraces and paths. For a durable 4- to 6-inch bed of crushed rock, a 2- to 3-inch layer of stones up to 2 inches in diameter is placed and compacted, then is topped with a layer of smaller, ½- inch stones. For a smoother surface, a topping of rock dust is brushed into the crevices to bind the stones before they are moistened and rolled for the final time.
Weeds are bound to pop up through any loose paving material. Covering the soil beneath with roofing felt or heavy black sheet plastic will cut down on the number of weeds that will surface. Punch holes in the sheeting every foot or so in all directions to let water and air penetrate to any underlying tree roots and to allow the surface to dry quickly after a rain.
Most loose stone is sold by the cubic yard. To avoid the possibility of your garden looking like a prison rock pile because you ordered too much material, use the following formula when you order: multiply the length of the area to be surfaced by its width in feet, and by the desired depth of stone in fractions of a foot, then divide that number by 27, the number of cubic feet in a cubic yard. Thus, a 20-by-2 0-foot terrace to be covered with 4 inches of gravel will require 20 times 20 times 1/3, divided by 27, or 4.9 cubic yards, rounded off to 5 cubic yards to allow for some spillage and waste.
BUDGET-WISE GRAVEL
Gravel is an attractive choice for any homeowner on a tight budget. But many people who could afford any material prefer gravel’s natural appearance and the soft, rustling crunch it makes underfoot. If you like, you can combine gravel with more solid paving materials.
A certain small terrace behind a New York brownstone house is one of the most popular stops on neighborhood garden tours because the owner has combined paving materials with plants in a very imaginative way. The terrace is divided into sections with redwood 2-by-4s set on edge and nailed together. The sections of the terrace that are used for entertaining are paved with reclaimed brick, while other sections outside the normal traffic flow are filled with gravel and sculptural rocks. The hardy cacti scattered among the rocks draw a lot of comment, but the mixed-media terrace is a conversation piece in itself.
---
CUTTING BRICKS AND FLAGSTONES

Cut paving bricks cleanly with a mason’s brickset. Wearing goggles and gloves, score the brick by tapping the brickset with a hammer. Then, with the brickset bevel facing away from the part to be used, strike a sharp blow.
The first step in trimming a flagstone or other rock is to cushion it in sand. Then, wearing gloves and goggles, score a line on the rock by rapping a brickset or a stonemason’s chisel with a steel-headed mallet.
The second step in trimming flagstone: prop the scored stone on a scrap of wood, letting the unwanted segment overhang the edge. Tap this piece with the mallet until it breaks off. If necessary, score the bottom as well.
---
The palette of materials available for hard-paving a portion of your garden ranges from bricks and concrete blocks of many kinds to stone slabs and poured concrete. Wood, glareproof and comfortable to walk on, is generally the material of choice for elevated decks on sloping sites, but it too can be used to make terrace paving blocks or low platforms on level ground.
Of all the materials used for garden paving, brick probably is the most popular with weekend handymen. It’s available in some 10,000 combinations of sizes, shapes, colors and textures and is equally at home in a casual or a formal setting. Bricks are of a size and weight easily handled by anyone and thus are especially suit able for family projects. A homeowner who lays bricks on a bed of sand does not have to hurry frantically in a race with hardening mortar; he can put down as many as he feels up to in one session, take a break and return to the project later. If more than a few hours will elapse, however, cover the edge bricks with a board to make sure they don’t shift. Despite this casual approach, a properly chosen and installed loose-brick floor will last for many years. It has the additional advantage of being skid resistant and it won’t glare or become excessively hot to the touch.
There are three basic kinds of bricks: common, face and paving. Common bricks, also called building bricks, are the most widely available and least costly. Most come in a reddish shade and measure 7½ to 8 inches long, 3¼ to 3½ inches wide and 2¼ inches thick. Some common bricks are made with holes for lightness and stronger mortar bonding. They are suitable for paving only if they are set on edge; this requires half again as many bricks as needed for flat paving. Other common bricks are so soft and porous they crumble under repeated freezing. These should be used outdoors only in dry, mild climates.
Face bricks, often used in the walls of commercial buildings, come in many sizes and colors and in textures ranging from shaggy rough to glassy smooth. Face bricks are not always available through retail outlets but if you can locate them, you will have an excellent paving material.
---
HOMEMADE TAMPERS

A homemade tamper, fashioned from scrap lumber, is useful for packing down the fill that will underlay concrete or pavers. To compact coarse stone or rubble, fasten screen-door handles to opposite sides of a chest-high length of 4-by-4 (left). For leveling and firming soil or sand, attach handles and a braced square of plywood to a 4-by-4 (center). A 2-by-4 that is 4 or 5 feet long and has a rounded top for gripping makes a good tool for tamping the fill around fence posts (right).
---
BRICKS MADE TO WALK ON
The best choice of all for outdoor flooring is paving bricks— which is not surprising since they are made specifically for that purpose. Paving bricks are available in some 40 different shapes and sizes and in a wide variety of textures and colors, from red to off-white, yellow, chocolate brown and even pink. Paving bricks are made in the usual brick dimensions and also come as thin as half an inch. The thinner types are laid like tiles in a bed of concrete. You can buy rectangular paving bricks as wide as 4 inches and as long as 11¾ inches, in square shapes from 4 to 16 inches on a side and in hexagons 6, 12 and 18 inches across. Unlike common and face bricks, which are proportioned to allow space for mortar joints, the length of some rectangular paving bricks is exactly twice their width, so they can be laid tightly without using any mortar and still come out evenly in any pattern.
Some brick patterns, such as jack-on-jack (aligned joints) and basket weave (widths and lengths alternating) can be laid without cutting bricks. Others, such as running bond and herringbone, require cutting where the pattern meets a straight edge. You cut a brick by striking it sharply with a brick mason’s hammer or with a hammer and broad-bladed chisel, called a brickset, with the beveled edge facing the piece to be cut off. If you cut bricks (or any other hard material) be certain you wear gloves and don safety goggles to protect your eyes from flying chips.
---
PAVING WITH LOOSE BRICKS

1. To level a bed of coarse sand for a walk of loose bricks, make a screed from a 2-by-4 plank ( -- 40), cutting the lower part to the width of the walk. Pour 2 inches of sand inside a permanent frame of rot-resistant wood, set into a trench 4½ inches deep, and supported temporarily with 12-inch stakes. Before leveling, soak the sand with a fine spray from a garden hose.
2. Roll out lengths of 30-pound asphalt building paper on top of the bed of sand to serve as a weed barrier. When the paper is in place, puncture it with rows of drainage holes at 4- to 6-inch intervals.
3. Lay the paving bricks closely together on top of a thin layer of sand spread over the building paper. Tamp each brick into place with a rubber mallet or the wooden handle of a trowel, adding or removing sand as necessary to keep the walk level.
4. Use a push broom to sweep fine, dry sand across the walk to fill any gaps that could permit the bricks to shift. Sweep diagonally across the joints to avoid brushing out the top layer of sand. When all the joints are filled, hose down the walk. Fill the trench outside the frame and remove the stakes.
---
RATED FOR THE WEATHER
In areas where freezing and thawing cause soft brick to flake or crack, choose bricks for their resistance to local weather as well as resistance to abrasion. The most reliable way of buying bricks is to select them according to grade. A brick rated NW (no weathering) is too soft to be used for paving; a brick with an MW (moderate weathering) can be used in mild, dry regions. A brick with an SW rating (severe weathering) is best if the paving must stand up to extreme weather conditions.
Some retailers have old, used bricks for sale; they may cost more than new bricks but occasionally you can get them free at demolition sites. Such bricks are often very handsome in a garden, and if they come from exterior walls they have already passed the test of time. But after you have spent days sorting out broken pieces and chipping off bits of old mortar, you may decide used bricks are more costly than they seem.
---
QUICK EDGINGS FOR PLANT BEDS

Vertical rows of paving bricks set on end make a simple but attractive curb around a bed of plants. Stake out and dig shallow trenches along the perimeter of the bed, sink the bricks halfway into the ground and pack earth firmly around them.
You can make a saw-tooth edging pattern with paving bricks by tilting each one at a 450 angle. When you pack earth carefully along this brick border you create the illusion of a row of neat brick triangles resting on the surface of the ground.
For wood edgings that will contain raised plant beds, use heavy railroad ties (top) pegged to the ground with 12-inch steel pipes, or preservative treated 2-by-6s (bottom). Join the 2-by-6s with galvanized spikes and brace them with 12-inch stakes.
---
When you order bricks, compare types, prices and delivery charges at two or more yards. As a rule of thumb, five standard bricks set tightly without mortar will cover 1 square foot, as will four and one half paver bricks with 4-by-8-inch faces or four and one half standard bricks with ½-inch mortar joints. Add about 5 per cent to the number of bricks you need to allow for breakage and replacement. A 20-by-20-foot terrace may need more than 2,000 standard- sized bricks, but don’t be put off by the numbers; brick is less expensive than most other paving materials. To avoid extra handling and breakage, ask that your order be delivered strapped to a wooden pallet, not dumped in a pile.
THE EASIEST HARD SURFACE
If the soil in your yard drains quickly and is not subject to heaving frosts, you can make a path or small terrace of bricks without any prepared base at all. Strip off sod and topsoil to a depth half an inch less than the thickness of the brick, or 1 inch less in soft soil to allow for settling. Level the excavation with the back of a garden rake. If you contain the edges of the area with bricks set on end, the internal bricks will shift very little under moderate traffic and weather conditions.
For a more permanent installation, set the bricks in a bed of sand or on poured concrete. Laying bricks on sand, the most popular do-it-yourself method, is not difficult. You can easily replace dam aged bricks and reset any that are heaved up by frost. Because water drains through the open joints, the surface dries quickly, and the water will penetrate to any tree roots below. Many gardeners prefer this method because they can build a planting pocket wherever they want simply by pulling out a few bricks.
A 2-inch layer of builder’s sand is adequate for a loose-brick terrace if drainage is good. But if the soil is soggy or heavy with clay, put down a 3- to 4-inch base of coarse gravel or crushed rock before spreading the bed of sand. To guard against water damage, the finished brick surface should slope away from the foundation of the house; in areas of heavy rainfall or poor drainage, the surface should drop 1 inch in every 4 to 6 feet. Perforated draintile or plastic tubing can be used in the gravel layer to channel water away from especially wet spots.
Before you place bricks, wet the sand bed with a fine spray from a garden hose, then level it by pulling the edge of a board across it. Then, starting at one corner, tap each brick firmly into place with the butt of a garden trowel or the handle of a hammer, checking the surface frequently with a carpenter’s level. As you progress, kneel on the completed brick surface so that you won’t disturb the sand layer.
When you have placed all the bricks, spread fine sand on top of them. Sweep the sand back and forth until the joints are filled, then brush off any excess, sweeping on a diagonal with the joints so you don’t scoop the sand out of them.
---
A RECIPE FOR GARDEN CONCRETE

The containers above indicate the proper ratio, in gallons, of portland cement, sand, gravel and water necessary to make 1 cubic foot of concrete suitable for garden paving. If you make larger batches, increase the ingredients proportionately.
With a hoe, mix the dry ingredients in a wheelbarrow. Start with a center pile of cement ringed by a doughnut of sand. When this mixture is uniform in color, shape it into another ring, add coarse gravel in the center and mix together again.
Pour about three fourths of the water into a scooped-out cavity in the dry mixture. Hoe the mix into the water gradually until it’s all soaked up. Repeat this process as you slowly add the remaining water or until the concrete is workable but not wet.
---
---
TERRACE OR PATIO?
Americans call just about any kind of outdoor living area a patio, but the correct name for that slab of concrete outside the recreation-room door is terrace. Though some people associate terraces with the grand style of country manors, the word is a workaday term that architects use for any sort of outdoor paved area, whether it’s raised or at ground level, freestanding or attached to the house. Patio, a word borrowed from the Spaniards who settled in California, properly applies only to courtyards enclosed on all sides by house or garden walls. During the building boom that followed World War II, real- estate salesmen in the Southwest fast-talked the corrupted meaning into popularity.
---
DRY-MORTAR JOINTS
If you prefer the look of open joints, or if variations in brick sizes require you to open the joints to make a pattern come out even, dry mortar will stabilize the bricks and discourage weeds. To make dry mortar, mix 1 part portland cement with 6 parts of sand and brush it over the paved surface. Sweep off any excess mixture, then mist the surface of the terrace or walkway with a fine spray from the garden hose to set the mortar. If the misting causes too much settling, repeat the procedure.
Paving bricks larger than ordinary bricks, precast concrete payers and flagstones can also be laid on soil or in sand. Precast concrete payers come in a variety of shapes, sizes and colors. Most lumber yards and masonry suppliers sell payers 2 inches thick with face sizes of 8-by-16 inches, 12-by-12 inches, 16-by-16 inches and 18-by-18 inches. You may also be able to find smaller sizes such as 4-by-8 inches, hexagons from 6 to 18 inches across and round payers 2 feet or more in diameter. They may be a natural gray, or tinted almost any color. Some decorative concrete payers are textured or have pebbles cast into their surfaces, giving the effect of a brushed or exposed-aggregate concrete.
---
ADD-ON CONCRETE SLABS

1. A design of rectangular grids for a concrete terrace divides the total area into small, easy-to-handle segments. Build the retaining forms of 2-by-4-inch redwood or other rot-resistant boards, or of lumber pressure-treated with a wood preservative. Set these forms on a bed of gravel 3 to 4 inches deep and brace them with stakes as necessary to prevent bulging. Any single section not reinforced with steel should be no larger than 16 square feet —4 by 4 feet. The maximum amount of concrete one person can handle conveniently in one day when working alone is about 15 cubic feet.
2. Working on one section at a time, pour the concrete, strike it off and smooth it, following the procedure shown. Drive 3-inch galvanized nails through the sides of the form boards at 1-foot intervals, so the concrete slab will be bonded to the wooden grid once it has hardened. Use a trowel or a mason’s edger to round off the top corners of each slab. Protect the top edges of the wooden form boards from concrete stains by covering them with masking tape.
3. You can finish the surfaces of the concrete section with a rough- textured exposed aggregate (right center) or with a dust-on powdered tint of color, applied while the concrete is still damp. A wooden grid design permits future expansion. Plantings, such as the boxed-in bush at left, can be incorporated into your design.
---
If you prize a natural look in your garden, quarried stones are hard to beat. Though they are more expensive than other payers, their durability may justify the extra cost. If you live near a quarry, you may be able to buy them at a competitive price.
FLAGSTONES AS FLOORING
Flagstones—large flat pieces of shale, sandstone, granite or other evenly stratified rock—are available in random, irregular pieces (tricky to put together even if you enjoy jigsaw puzzles) or in rectangular pieces sawed to various sizes from 6 inches square to slabs 4 feet or more on a side. Colors range from gray, blue, red and green to almost black, depending on the kind of rock and where it was quarried. If you plan to lay flagstones directly on soil or sand, they should be 1½ to 2 inches thick. Stones that are thinner, particularly the fragile slate that is often mistaken for flagstone, may settle unevenly and crack under pressure unless secured with mortar on top of a concrete bed.
Many gardeners use flagstones to surface a badly worn patch of lawn. Flagstones also can be used to make a comfortable stepping stone path if they are set close enough to each other so you won’t have to negotiate them as though you were leaping onto boulders in a mountain stream. The width of your path is also important: 18 inches will be satisfactory for a little-used trail, but a width of 4 to 6 feet is necessary for a path that will allow two people to walk comfortably side by side.
To make a flagstone terrace or walk, position the stones and dig around each with a shovel to mark its outline. Set the stones aside and dig just deeply enough so the stones will be flush with the ground when they are replaced. To provide better drainage and minimize frost heaving, you can dig deeper and shovel in a 2- to 3- inch layer of coarse sand under each stone.
PAVINGS THAT POUR
Other kinds of hard paving, such as asphalt and concrete, are poured in place. Asphalt is inexpensive, but it’s messy to work with and has a slick, blacktop look even when it’s colored. Most gardeners use it only for driveways and have it professionally installed from a hot-mix truck. Fixed earth, which is a mixture of soil and cement, is another inexpensive paving material, but it looks like barren, hard-packed dirt.
The most durable, versatile and widely used poured paving is concrete. Placing and finishing it’s heavy work that must be done correctly. If you have a large area of ground that needs to be paved, you probably will want to turn the job over to a professional, then sit down and watch. But if you can call on a helper or two to stand by for the critical pouring process, and if you can break the job down into small, manageable segments, you can save a good deal of money by doing it yourself.
Concrete, a mixture of portland cement, sand, gravel and water, is sold in several ways. For small jobs, like making a few steppingstones or lining a small garden pool, you can buy sacks of dry ready-mix. All you need do is add water and stir. For medium- sized jobs, such as surfacing a small sitting area or anchoring fence posts in concrete, you can save money by buying the portland cement, sand and gravel separately and mixing them with water in a wheelbarrow or a rented power mixer designed for home use. If you are working on a large area, you can do the preparatory excavating and leveling yourself, then have the concrete delivered, ready to use, in a transit-mix truck. Most companies that supply concrete to builders will deliver ready-mixed concrete to do-it-yourself gardeners if the order is for at least 1 cubic yard.
---
DRESSING UP CONCRETE

1. To give wet concrete a smooth and level .surface, trowel it with a wood float. Sweep the float back and forth in wide arcs with its face flat on the surface. As the slab hardens the float marks will gradually disappear.
2. Drawing a stiff-bristled push broom across wet concrete produces a textured and grooved nonskid surface. When the concrete is stiff but still workable, pull the broom in parallel sweeps across the slab, adjusting downward pressure on the bristles to make grooves as deep as you like.
3. Using a push broom and a fine spray from a garden hose, you can expose the small round stones of the gravel aggregate in wet concrete.
For a uniform effect, you may need to scatter extra stones on the surface, using a wood float to press them down. Then wash excess concrete from the tops of the stones.
4. A stamping pad imprints a brick design on the surface of wet concrete. You can speed the work by renting two pads, available at masonry-supply stores, and leapfrogging them across the slab in rows. Use a hand tamper to press the pads down evenly.
---
---
SCREEDS FOR SMOOTHING
1. To build a screed board for leveling gravel or sand, cut a 2-by-4 to fit easily inside the wooden frame in which you will spread the fill. Set this board on edge and nail a piece of scrap lumber to each end, so that the screed will ride on the top of the frame. A concave screed board will shape a concrete walk with a crown so it will shed water. Nail metal straps to the centers of a rigid 2-by-4 and a more flexible 2-by-2. Between their ends, wedge 1-inch dowels or other scraps to bow out the lower board. Add two more metal braces near the ends to make a solid striking board.
2. Set the screed board on top of a wooden frame that you have partly filled with drainage gravel or sand. Standing in the excavated bed, pull the screed board toward you, adding extra fill in low places as you go. Tamp the bed, then screed once again before you lay bricks or pour any concrete.
3. With the aid of a helper, work the concave screed board across the surface of the fresh concrete to compact and shape the slab. Use a small stick to push large pieces of gravel beneath the surface. Zigzagging the board as you draw it toward you makes the task easier.
---
One thrifty Minnesota handyman keeps several hinged wooden forms on hand for casting paving blocks with concrete left over from larger projects. “With the kind of weather we have around here, I have to replace several cracked blocks every spring,” he explains. “It’s nice to have extras on hand.”
Poorly mixed concrete will doom the success of any project. If you use ready-mix, add the precise amount of water specified on the sack, thoroughly mixed to yield a product that is neither too wet, which would be structurally weak, nor too stiff and hard to work. If you start from scratch, a good concrete recipe calls for 1½ parts cement, 3 1/3 parts builder’s sand, 4½ parts gravel or crushed stone and 1 part water.
Concrete used in a climate where the ground is subject to freezing and thawing also needs an air-entraining agent; its microscopic bubbles, dispersed through the mix, act as tiny relief valves to prevent freezing moisture from cracking the finished work. This eliminates the need for costly, time-consuming repairs.
THE CURING PROCESS
For strong, durable concrete in any climate, don’t neglect proper curing. The binding together of the cement, sand and gravel depends on a chemical process called hydration, which needs not only water but warmth to take place and continues well after the concrete itself has been poured; temperatures below 50° impede the process and if the material ever dries out hydration stops completely and cannot be started again. As soon as the surface has been finished and is hard enough to resist imprints, usually a few hours at most, wet it down thoroughly with a fine spray from a garden hose, cover it with burlap, canvas or straw—even old blankets—and keep the covering in place and constantly moist for a week. Wide rolls of polyethylene black plastic sheeting or waterproof building paper can be used instead, and if they are held down tightly at the edges with bricks or boards, they will keep the concrete’s own moisture in.
Finally, you don’t need to leave the surface with a white, raw look. You can add colored dusting pigments before the concrete hardens and use a wooden float to make the surface smooth enough to double as a dance floor. If you prefer a rougher texture, brush the concrete while it’s still soft with a stiff broom. If you pour plain concrete and decide later to improve its appearance, there are stains and paints made especially for that purpose. Or you can use a concrete slab as a foundation for the later application of brick, flagstone, slate or tile.
EASY STEPS TO TAKE
Garden steps, too, can be made of concrete, poured into rigid wooden forms, or of materials as diverse as precast concrete blocks, railroad ties or wood planking. The more sloping or irregular your garden site, the greater the role that steps will play. The lay of the land will largely determine the layout of your steps, but wide steps with a gradual rise are best anywhere in a garden. Indoors, many stairs have 6-inch risers (the height between steps) and treads that are 12 inches deep (from front to back). This should be the maximum steepness outdoors. Better are steps with 5-inch risers and 15-inch treads, 4-inch risers and 18-inch treads, even 3-inch risers and 24-inch treads.
Some landscape architects determine step proportions with a standard formula: twice the height of the riser plus the depth of the tread should equal 26 inches. Thus, a 5-inch riser, multiplied by two and subtracted from 26 would prescribe a 16-inch-deep tread. As for width, 3 feet is sufficient for lightly used steps, but a width of 4 or 5 feet is desirable for heavier traffic and for safety on steps used frequently for moving plants, wheelbarrows and lawn mowers from one level to another.
----
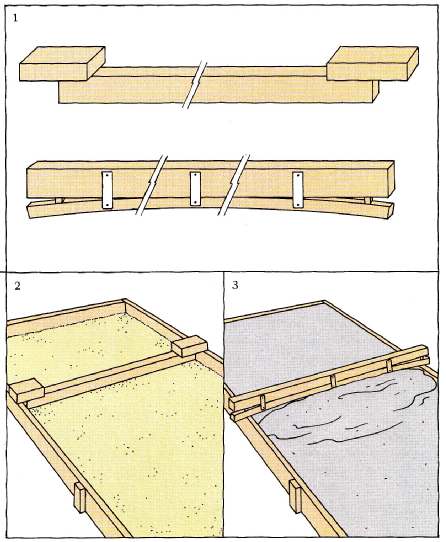
BUILDING A MODULAR DECK

1. To assemble wooden deck modules 24 inches square, nail evenly spaced rows of surface boards t9 rot- resist ant supports. To ensure that the modules are square, build them within a squared-up frame made of scrap lumber, nailed down so that it won’t shift, with inside dimensions equal to the size of the modules. Use scraps of wood 1/4 inch thick as spacers between the surface boards (inset).
2. Drive three nails through the ends of each surface board into its support, staggering the nails and blunting the points to prevent splitting the wood.
3. On the ground, lay out a rectangular site for the deck by stringing lines between stakes, making right-angle corners with the 3-4-5 method. Then excavate the site to a depth of about 6 inches to accommodate a drainage bed for the deck. Tamp the ground, making it as level as possible.
4. A cross section of the drainage bed for the deck shows a 3-inch layer of gravel covered with a 4-inch layer of sand. Rake and tamp the sand until the surface of the drainage bed is firm and level. To prevent weeds from growing through the deck, treat the soil beneath it with weed killer, or lay perforated sheets of asphalt builder’s paper over the drainage bed ( -- 33), and cover the sheets with a thin layer of sand.
5. Assemble the deck, module by module, in a parquet pattern. Tamp each module firmly into the sand, keeping the edges even.
----
WOOD DECKS AND PAVERS
For raised decks the most widely used flooring material probably is wood. Popularized in recent years by California hill dwellers, such decks have become commonplace in suburban communities from Tacoma to Tallahassee, on level sites as well as those that slope. In addition to being adaptable to almost any style of garden, wood is light and easy to work with, blends well with other construction materials and offers an attractive nonskid surface that is comfortable to the touch.
Paving units made of wood and set directly on the ground will last for many years if the wood is rot-resistant or treated with a preservative. Blocks 4 to 6 inches thick, set end grain up and closely butted together, are suitable for edging plant beds or paving garden paths. Wood rounds cut from tree trunks can serve as steppingstones along woodland paths or as decorative patterns in terraces of gravel or crushed stone.
If you incorporate wood payers into your garden design, lay them in a drainage bed of 2 or 3 inches of sand, gravel or crushed stone. By filling the irregular spaces between wood rounds with more of the same materials, or with bark chunks or wood chips, you can enhance the wood’s beauty. But avoid using such wood paving in areas that are heavily shaded and constantly moist. The wood will rot and its surface may become slippery and dangerous to the safety of casual strollers.
The most durable and useful wood paving is spaced planking raised above the ground. Raising wood even a few inches from the earth ensures good drainage and air circulation; such decking is uniform and resilient, and it will dry quickly after rain. These low decks are useful if you want to bring an outdoor living area level with an inside room, eliminating an awkward step down.
SMOOTHING HILL AND DALE
On irregular ground, decks do away with the need for expensive grading, filling and retaining walls. Instead, the heights of supports beneath the deck can be varied to fit the topography. And once you have built a basic deck, you can add railings, built-in seating and storage space, or even leave holes in the decking so trees can grow through it from below. With imaginative design you can make your deck, in the words of noted landscape architect Thomas Church, “a tree-house for adults.”
Articles in this Guide are based on now-classic Time-Life Encyclopedia of Gardening Series from the 1970s ... a timeless series, some titles of which are still available in libraries and bookstores... see our Amazon Store for purchasing options.