If you have an older home, you are more likely to have a radiator heating system. These rely on a boiler to produce steam or hot water that runs through a system of pipes to heat the radiators. The boiler can be powered by oil, gas, or electricity. More common in relatively newer homes, baseboard heaters are usually added as a source of heat in additions, basement renovations, or as supplemental heat. Baseboards can be powered by electricity or a hot water boiler.
MAINTAINING A RADIATOR
Radiators require some regular maintenance to keep running smoothly and safely. The most common maintenance radiators require is bleeding, which eliminates air from the system. Some radiators have bleed valves or bleed keys to help make this adjustment. Older radiators can develop leaks over time, making it difficult to heat the space. To conquer this problem the entire radiator may need to be replaced or need a new thermostatic valve. If you are replacing a radiator, make sure to replace the same size unit, as it will save time in installation. If you are redecorating your room, you may want to remove the face of the radiator to allow better access behind the unit. Always take caution when working around a radiator. Turn off the boiler before attempting any adjustments to a radiator.
CLICK HERE for a list of tools needed for Radiator and Baseboard Heaters

PARTS OF A RADIATOR: A standard panel radiator is made from
pressed steel. It may have a single or double panel, and convector types have
fins on the back to increase heat output. The size of a radiator is selected
to provide the right heat output for each room. Every radiator has a threaded
inlet at each corner, into which various fixtures are screwed. You may need a
special radiator wrench to install them. Radiators may have a handwheel
temperature control rather than the thermostatic valve shown here.
A radiator consists of a RADIATOR BODY with the following components (see above diagram for location of these components):
- Air bleed valve is installed in a top corner. It is used to release trapped air.
- Blanking plug is installed in the other top corner.
- Thermostatic valve automatically adjusts the flow through each radiator to control room temperature.
- Brackets can be used in pairs to hang the radiator.
- Lock-shield valve is used to balance the system, and is not altered once set.
TEMPORARILY REMOVING A RADIATOR
![]()
A. Close the lock-shield valve, keeping note of exactly how many turns it takes. Shut the thermostatic or handwheel valve.
B. Place a container under the radiator Undo the lockshield valve connector nut then open the bleed valve to drain the water.
C. Undo the connector nut to the other valve so that you can lift the radiator off the wall brackets. Carefully tip out the remaining water.
REPLACING AN OLD RADIATOR WITH A NEW ONE
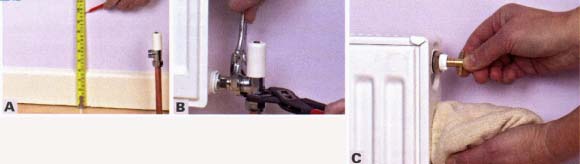
A. Measure from the baseboard to the bottom of the bracket. Measure and mark the same distance on the wall on the vertical line.
B. Hang the radiator on the brackets, and tighten the connectors onto the valves. Brace each valve with a wrench as you tighten the nut fully.
C. Open both valves by the number of turns it took to close them. Bleed the radiator using a radiator bleed key. Always turn off the system before performing any work.
INSTALLING A BASEBOARD HEATER

Baseboard heaters are ideal in additions and in remodeled basements. They are easier to install than a central system. If you want to replace an older baseboard heater with a more energy efficient system, there are few steps you will need to take prior to following the installation below. Always turn off the power before starting any work, and consult the local building official to find out any regulations. You may need to hire a professional to complete this work.
A. Lay out and measure the area where you plan to install the heater. For extra safety, make sure it will not be near any fabric or furnishings.
B. Mark the floor joist locations on the floor using the manufacturer’s directions and template as a guide.
C. Drill holes through each layout mark, making sure the holes are more than 34 in (10 mm) larger than the pipe.
![]()
D. Position the baseboard against the wall. Firmly attach the housing to the wall with screws.
E. If necessary, add an extension collar to the end of the piping to so the pipes can meet to make the connection.
F. Attach the elbow pipe, so the piping can turn the corner from the horizontal unit to the vertical pipe through the floor.
G. Dry-fit all of the pipes to test the connection, making sure they will fit before securing in place.
![]()
H. After the pipes are aligned securely, clean and then solder the elbow connection. Then solder each other pipe connection in the baseboard heater’s system.
I. Check all of the fins to make sure they were not damaged during transport. Straighten any.
J. Cover the heating fins by snapping the baseboard heater face on the front of the baseboard heater.

K. Place the end caps on either end of the baseboard heater, and secure each in place.
L. Adjust the louvers to your desired way of directing heat into the space. Be careful to not touch these while the heat is on.
M. Turn on the furnace and test run the new heater until hot air starts to flow out. Make sure the area around the baseboard is clear of any debris or furnishings when the heating is on.
Previous: Air Cond. | Next: Under-Floor Heating