A thermostat turns heating or cooling on and off to maintain a desired temperature in your home. Old thermostats are manually regulated. Modern “setback” thermostats can be programmed to turn your heating and cooling systems off and on at certain, pre-set times of the day, so the climate control system is only on when it is needed. Replacing an older manual thermostat with a new programmable unit is an easy way to save energy and better regulate the air quality in your home.
FURTHER INFORMATION
Choose a new thermostat that fits your lifestyle so that the program can be set to activate heating or cooling cycles only when needed instead of wasting energy when you are at work or asleep. Most can be programmed for different weekday and weekend usage, while others can be programmed with different timings for each day of the week. Many can sense outdoor temperature as well as humidity. Choose a unit with a manual override. Know your model of heating and cooling system when you go thermostat shopping to check for compatibility. Many old thermostats contain mercury, so check with your municipality for proper disposal of your existing unit.
TOOLS AND MATERIALS needed for Replacing a Thermostat: Tape for labeling wires, new thermostat unit.
REPLACING A THERMOSTAT
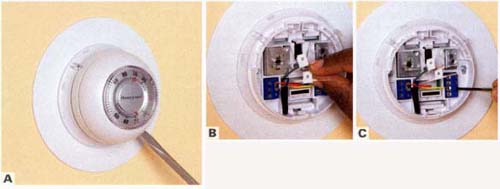
A. Most thermostats run on low voltage, but turn off all power to the heating and cooling system, just to be safe. If your thermostat is powered directly through your breaker box, be sure to turn off the correct breaker. Then, remove the cover from the old thermostat, using a slot-head screwdriver.
B. Label each wire as you loosen it from the old unit. Trim old ends with wire-cutters, allowing enough fresh wire for reconnection.
C. Remove the old thermostat carefully and dispose of it properly. Make sure that the wires do not slip back into the wall.
![]()
D. Feed the existing wires through the new units backplate. Do not crimp any excess wiring.
E. Use a level to help position the new backplate, covering the old screw holes if possible, to avoid later cosmetic repairs.
F. Mark the new screw holes, checking your level for accuracy. Adjust, if necessary, to accommodate the existing wires.
G. Install the new backplate, using drywall anchors and screws to secure it firmly to the wall. Check your level again.

H. Connect the marked wires to the thermostat backplate or body, following the manufacturers directions.
I. Snap the new thermostat into place carefully. Follow the manufacturers directions for setting the programming and function.
Previous: Types of Heat | Next: Furnaces