Custom Solutions for Storage Problems (part 1)
| Home | Wiring | Plumbing | Kitchen/Bath |
|
No matter how large your kitchen, it never seems to have enough space for every thing you need to store. Often, the solution is to organize the available space for greater efficiency. Options range from adding simple screw-on attachments to re structuring cabinet interiors. Or, from a pair of cabinets, you can build a handy movable island that increases both storage capacity and counter space. Reorganizing Cabinets
New Storage Options for Spice Jars
Making Deep Cabinets Accessible

Installing a frame for a stow-away recycling bin. NOTE: We use both fractional and decimal dimensions interchangeably (so, 0.25 inch = ¼-inch; 0.5 inch = ½-inch; etc.) Reorganizing CabinetsWhether your kitchen cabinets are old or new, you can make them more efficient and increase their capacity with attachments and ready-made space organizers. External Attachments: If you know the manufacturer of your cabinets, the local dealer can supply a catalog showing current kits and accessories. The kits come with hardware, instructions, and templates to make installation easy. The underside of a wall cabinet lends itself to space-saving accessories such as a swing-out cookbook holder or a hanging glass rack that keeps fine stemware protected yet easy to reach. Internal Modifications: You can also transform drawers and storage spaces in base cabinets. A tilt-out tray at the sink front keeps items like sponges, brushes, and rubber gloves right where you need them. A conventional drawer box with a removable front can be replaced with a combination cutlery tray and pull-out cutting board. The ample storage space in blind corner cabinets is often wasted because it’s so hard to reach. Half-moon shelves that pivot as a lazy Susan does and then slide out on glides give easy access to the deepest recesses of the cabinet. Most modern cabinets have removable shelves, which simplifies converting the interior space to an other purpose. Permanent shelves need to be cut out. With the cabinet space cleared, you can choose whichever of the units pro filed on the following pages suit your particular needs. Ensuring Correct Fit: Knowing the exact dimensions of drawers and cabinet openings will help you pick accessories that fit perfectly. To make sure racks, shelves, and glide-out trays will be absolutely level, always check screw hole locations with a carpenter’s level be fore you drill pilot holes. TOOLS:
SIMPLE ATTACHMENTS TO A CABINET FRAME A hanging stemware rack. 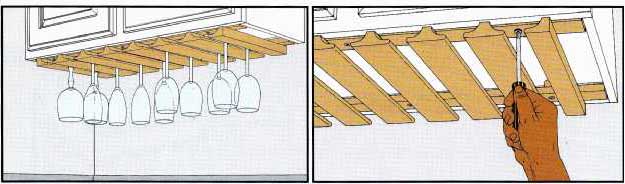
• Hold the preassembled wooden rack in place under the cabinet and mark with a pencil through the pre drilled screw holes in the mounting rail. Drill a pilot hole at each mark with a 3/32-inch twist bit, making sure not to drill through the cabinet bottom. • Insert a 1.5” No. 8 wood screw through each hole in the rail, and slip plastic spacers over each screw. Then drive the screws into the pilot holes. A retractable cook book rack. 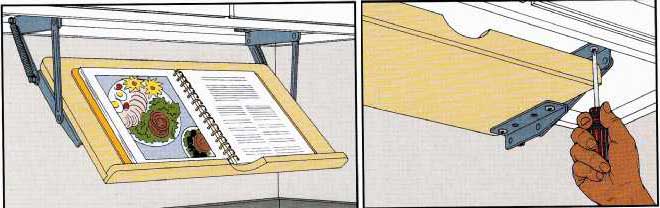
• Place the rack against the cabinet bottom with the spring-loaded hinges in a closed position and the front edge of the hinge plates 0.5” behind the overhanging lip of the cabinet face. Outline the location of the hinge plates on the cabinet bottom with a pencil. A TILT TRAY IN THE SINK APRON 1. Attaching hinges to the cabinet frame. 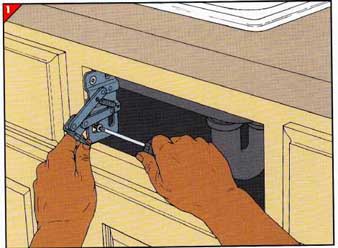
• Reach up through the cabinet door below the sink to find the opening in the cabinet face directly in front of the sink. With a pencil, trace the opening on the back of the decorative face panel, then unscrew the panel from the cabinet. • Position the left-hand hinge flush with the cabinet face and inch above the bottom of the opening. Mark the location for the hinge screws at the center of the oblong holes in the hinge plate and drill 3/32-inch pilot holes at the marks. • Fasten the hinge to the frame with out tightening the screws all the way. Repeat for the right-hand hinge. • Open the rack and reposition the hinge at the penciled outline. Mark the location of the hinge screws and drill 3/32-inch pilot holes. Fasten the holder to the cabinet with the screws provided. 2. Attaching the tray. 
• With the hinges extended from the cabinet, align the hinge plates with the bottom of the penciled outline on the face panel. Mark the screw holes and drill pilot holes. If a handle is provided, center it on the front of the panel, then mark and drill those holes, too. • Lay the front panel facedown on a worktable and center the tray 1/8-inch below the penciled line that indicates the top of the cabinet opening. On the panel, make a mark at the narrow end of each of the tray’s two keyhole-shaped slots. • Drill pilot holes at the marks, then screw two 0.5-inch pan-head screws into the holes just deep enough to allow the tray to slide over them. Set the tray aside for now. 3. Remounting the face panel. 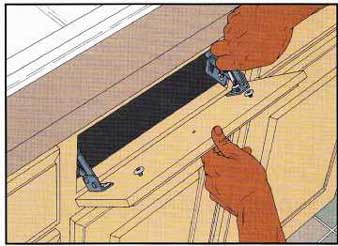
• Attach the handle, if there is one, to the front of the panel. • Screw the panel to the hinges with out tightening the screws completely. If the countertop is in the way, use a stubby screwdriver as shown at right. • Adjust the position of the hinges so the panel fits flush against the cabinet face and is parallel to the countertop, then tighten all the hinge screws. Finally, slip the tray onto the mounting screws on the inside of the panel. A COMBINATION CUTLERY DRAWER AND CUTTING BOARD 1. Marking the drawer face. 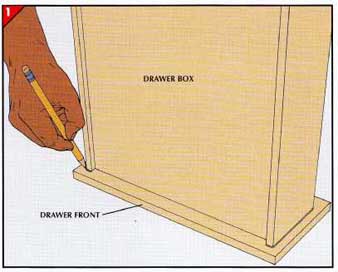
• Remove the drawer by pulling it open and lifting it slightly to disengage the metal glides from their channels inside the cabinet. • Trace the outline of the sides and bottom of the drawer box on the back of the drawer front. Remove the screws that hold the box to the front, but don’t remove the drawer handle if there is one. 2. Installing the cutting board. 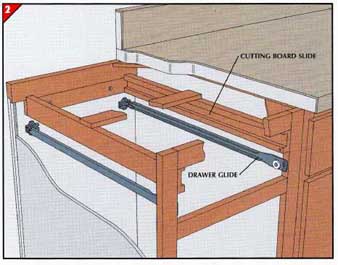
• Insert the cutting board slide into the drawer opening. Hold its upper surface against the opening’s top and its front flush with the cabinet face. • Mark the inside of the cabinet for pilot holes by pushing an awl through the predrilled screw holes on the sides and the back rail of the assembly. Re move the assembly and drill 3/32-inch pilot holes. • Screw the cutting board slide to the cabinet, then insert the cutting board. 3. Attaching the cutlery tray. 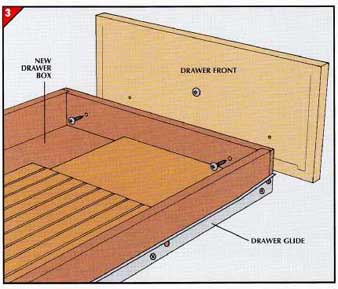
• Set the front of the new drawer box with the cutlery tray against the back of the drawer front, aligning the bottom and sides of the box on the corresponding outline of the old drawer. Mark the drawer front through the pre drilled screw holes at the front of the tray. Drill pilot holes and attach the box to the drawer front. • The drawer box comes with metal glides that match those of the original drawer box. Tilt the box into the cabinet opening and slip the rollers at the rear of the glides into the channels in the cabinet. REMOVING CABINET SHELVES 1. Cutting a fixed shelf. 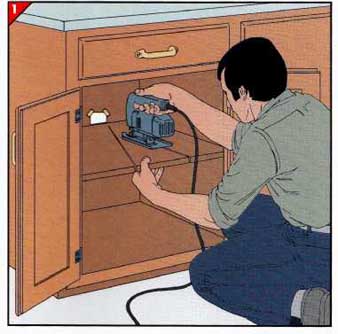
• Using a saber saw fitted with a flush-cutting blade, cut a wedge from the shelf as shown at left. Tape a scrap of metal to the back of the cabinet to protect it from the saw blade. • Tap the top and bottom of the shelf around the edges with a hammer several times to break the glue bond that holds the shelf in the dado joint. 2. Taking out the pieces. 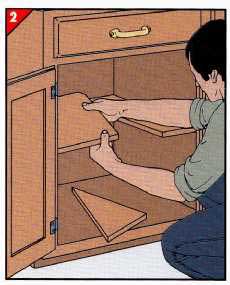
• Gently work each half of the shelf up and down until it comes loose, then remove it. If necessary, cut each piece in half, parallel to the cabinet front, to facilitate removal. • Fill the dado joint with wood putty and let dry. Then sand it with fine-grit sandpaper until it’s flush with the cabinet wall. VERTICAL DIVIDERS FOR HARD.TO-STORE ITEMS Installing vertical dividers. 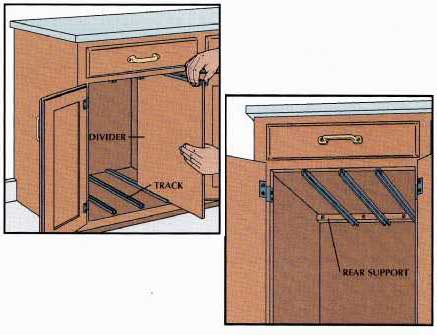
• Cut lengths of metal, plastic, or woo d tracks as long as the cabinet is deep. Screw tracks to the cabinet bottom, perpendicular to the cabinet face, at about 4-inch intervals. Also cut 3/8-inch plywood panels equal in width to the cabinet depth and 0.25 inch shorter than the door opening. • If the cabinet door opening has no frame, slide a panel fitted with a top track into each bottom track. Holding the panel vertical, draw position lines for the upper track, then screw it to the cabinet top. • For a framed door opening, hang the top tracks between the bottom edge of the frame and a crosswise board screwed to the rear wall. GLIDE-OUT SHELVING 1. Mounting the glides. 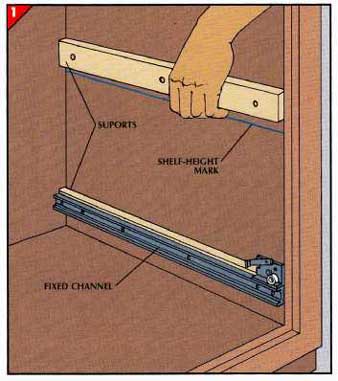
• Mark both cabinet side walls at the height you have chosen for shelves. • Cut glide supports to match the depth of the cabinet. Use stock no thinner than the distance from the door opening to the adjacent cabinet wall. Plane the pieces to this thickness as needed. • Bore screw holes 6 inches apart in each support. Align the bottom edge of a support with a shelf-height mark and drill pilot holes into the cabinet. Glue and screw the supports in place. • Mount the fixed channels of the drawer glides flush with the bottom of the supports. 2. Installing the shelf. 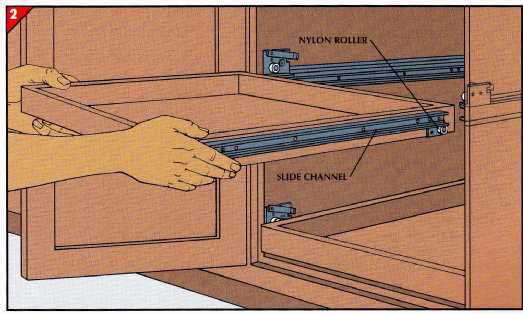
• Align the slide channel of the drawer glide so that the nylon roller is flush with the bottom edge of the drawer . Drill pilot holes, then screw the slide channel to the drawer. • Repeat for the other side of the drawer, then position the nylon rollers in the fixed channel and push the drawer into the cabinet. A HIDDEN RECYCLING BIN 1. Marking the door position. 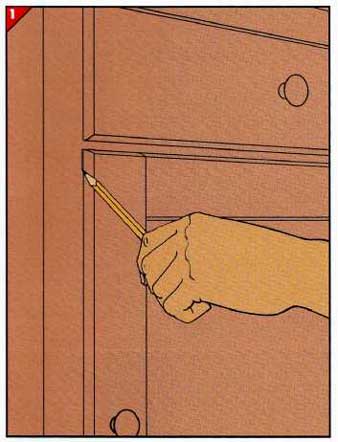
• First, lightly outline the door on the cabinet face with a pencil, then unscrew the door from the hinges and set it aside. • Remove the hinges from the cabinet frame and fill the holes with wood filler of a color similar to the cabinet finish. To avoid damaging the finish, don’t sand the filler. 2. Centering the wire frame in the cabinet. 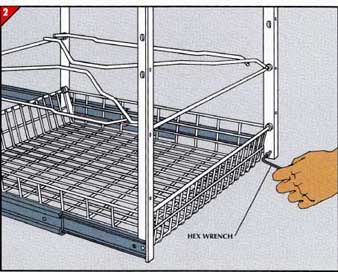
• Attach the wire frame of the recycling bin to the slide channels of the glides with a hex wrench. • Place the assembly in the cabinet, centering it in the opening and making certain that the front edge of the wire frame is parallel to the face of the cabinet. • With a pencil, mark the screw holes for the glides on the cabinet floor. 3. Attaching the glides. 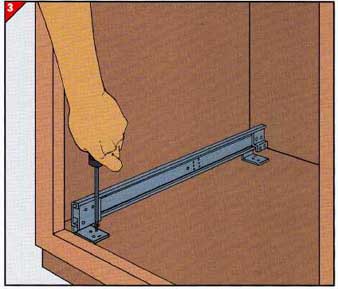
• Remove the assembly and unscrew the wire frame from the glides. • Drill pilot holes at the pencil marks and screw the glides to the cabinet floor. • Extend the inner channels of the glides from the cabinet, then set the wire frame between them. • Starting at the back, reattach the frame to the glides. 4. Measuring the door position. 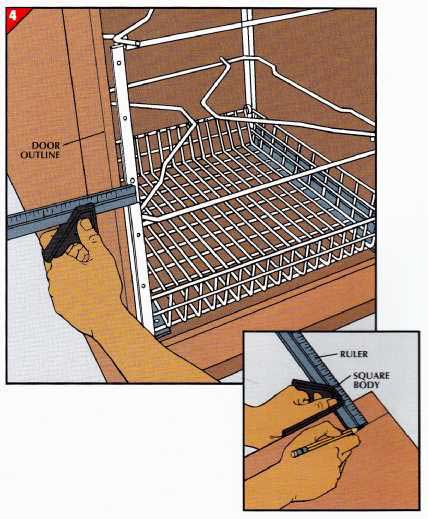
• Push the wire frame in until it’s flush with the cabinet face. Hold a combination square against the cabinet and measure the distance between the penciled door outline and the center of a mounting hole in the recycling bin frame. Then slide the square body to that point on the ruler. • Using the square to guide a pencil down the inside of the door, draw a line along both vertical edges. • On the cabinet, measure down from the top pencil outline to the first hole on the wire frame, and mark this distance on both of the lines drawn with the square on the door. Drill a pilot hole at each mark. 5. Attaching the door. 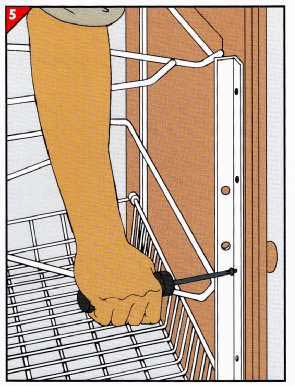
• Pull out the wire frame and have a helper hold the door against it. Drive a screw in each of the two pilot holes, then close the door and make sure it’s square on the cabinet face. • Open the door and mark it for the remaining screws, using holes in the wire frame as a guide. Drill pilot holes and drive the screws. • Finally, place the plastic recycling bins in the wire frame. HALF SHELVES FOR A CORNER Getting the right size. 
The glide assembly that supports a half-moon shelf pivots on a bracket attached to the cabinet frame. A glide stop prevents the shelf from being pushed into the cabinet too far and bumping the wall. A wheel on the glide stop blocks the hardware from marring the cabinet door when the shelf is pulled out. Three cabinet dimensions govern shelf size: depth, length, and the width of the door opening. The standard cabinet depth is 24 inches, but door openings and lengths vary. A good rule of thumb is to buy a shelf 3 inches shorter than the length of the cabinet and about 1 inch narrower than the width of the door opening. 1. Marking the pivot point. 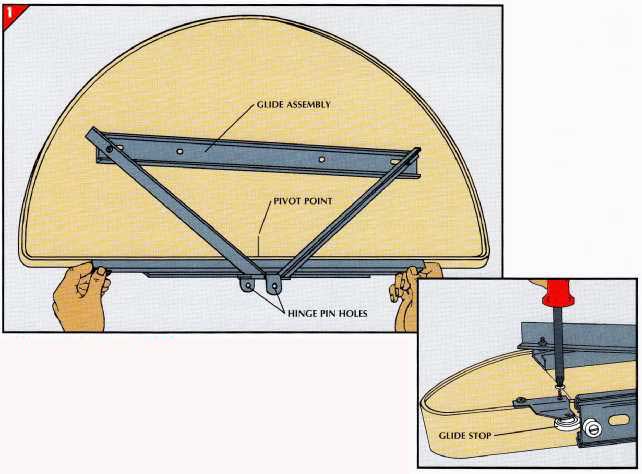
• Subtract 1 inch from the width of the cabinet door opening. Mark this distance on the bottom of the shelf, measuring from the end that will be farthest from the door opening after the unit is installed. • Hold the glide assembly against the shelf and align the hinge-pin hole in the pivot bracket with the mark. Drill pilot holes into the bottom and the edge of the shelf and attach the glide. • Next, mount the glide stop on the bottom of the shelf at the end of the glide nearest the cabinet opening. 2. Installing the shelf. 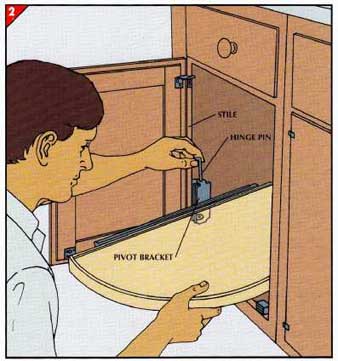
• Hold the pivot bracket against the inside of the stile at the shelf height you have chosen, but no closer than 0.75” from the cabinet bottom. Mark the screw positions, drill pilot holes, and mount the bracket on the cabinet. • Hold the shelf in position to align the hinge-pin holes on both halves of the bracket, and drop the pin into place. +++++++++++++++++++++++++++ New Storage Options for Spice JarsNo kitchen is complete without a selection of herbs and spices. Yet the small jars that hold these seasonings are a nuisance, wasting space on regular cabinet shelves or getting lost behind larger containers. The two simple projects shown here allow you to organize spice jars in their own separate space. The door-mounted spice rack can be hung on any solid raised- panel or European-style cabinet door at least 0.75 inch thick. Only 3 inches deep, the rack uses very little of the interior when the door is closed. Consider hanging two or three racks on the door, fitting them between the cabinet shelves. A kitchen drawer that is at least 3.5 inches deep can accommodate an easy-to-build rack that provides convenient storage for standard 2-inch-diameter, 4.25-inch-tall spice jars. Any leftover space in the back of the drawer can house seldom- used utensils. Either of these spice racks can be painted or stained be fore it’s installed. TOOLS:
MATERIALS:
A DOOR-MOUNTED SPICE RACK 1. Measuring the pieces. 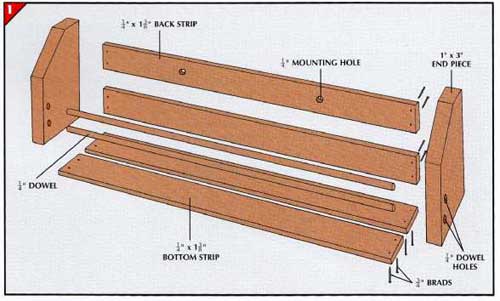
The diagram above shows the individual pieces that are required to assemble the spice rack. The two end pieces are made from one 10-inch length of pine, sawed in half. The back and bottom strips are thin pieces of wood called lath, and the front rails are made of hardwood dowel. The length of these pieces depends on the size of your cabinet. • Measure the inside width of the cabinet door and subtract at least 2 inches to allow for clearance at each end of the rack. Note any hinges or hardware on the door or cabinet frame that might interfere, and adjust the width of the rack accordingly. • Use this measurement to mark four lengths of the wood lath and two lengths of dowel. 2. Cutting the wood lath and dowels. 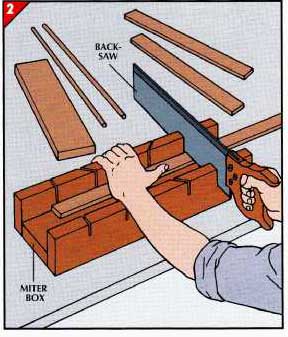
• Place a backsaw in the miter box’s right-angle slots. Hold the wood tightly against the side of the miter box with one hand, and saw through it with light, smooth strokes. • Saw all four pieces of lath and the two dowels, then lay them side by side. Sand if necessary until all are the same length. 3. Making the end pieces. 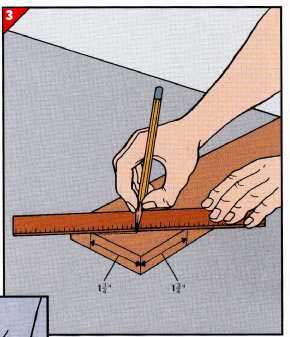
• On a 10-inch length of 1 -by-3 pine, measure and mark 1.75 inches from a corner in both directions. Using a straightedge, draw a line between the two marks. • Set the backsaw in the miter box’s 45° slots, and saw along the line. • Repeat this step at the other end, then cut the board squarely in half midway between the beveled ends. 4. Drilling the dowel holes. 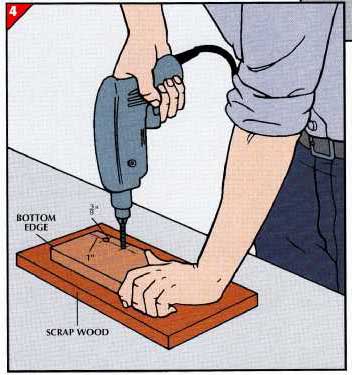
• On the face of each end piece, draw a straight line 3/8-inch from, and parallel to, the shorter edge. Mark the line 1 and 2 inches from the bottom edge of the end piece. • Hold the end piece down firmly on a piece of scrap wood, and drill a 0.25-inch hole straight through the board’s face at each mark. 5. Assembling the back. 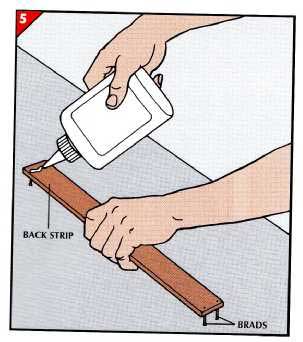
• To attach the back strips, place a piece of lath on the scrap wood, and, 3/8-inch from one end, tap down two 3/4-inch brads until their tips emerge on the other side. • Repeat at the other end, then squeeze a thin bead of glue across all the tips. • Nail the lath to the back edge of each end piece, flush with the bottom. • Prepare a second piece of lath the same way. Then measure 1 3/8 inches above the first strip, and nail the second strip to the back of the end piece. 6. Adding the bottom strips. 
• Tap brads through the remaining two pieces of lath, and add glue as in Step 5. • Then turn the rack upside down and nail one piece of lath to the bottom of the end piece, flush with the back strip. • Nail the last piece to the bottom, flush with the front of the end piece. 7. Gluing the dowels. (figure: above, right) • Test-fit the dowels by sliding them through the holes in the end pieces; if a dowel binds, lightly sand it down. • Pull the dowels out slightly and smear glue on their ends, then push them in so that the ends are flush with the outer faces of the end pieces. Wipe off any excess glue and let dry. • To mount the rack, drill two 0.25-inch holes in the center of the upper back strip, 3 inches from each end. • Hold the rack against the cabinet door, making sure it fits between the cabinet shelves, and mark the mounting holes on the door. Drill pilot holes at the marks, then at tach the rack with 5/8-inch oval-head wood screws. CONVERTING A KITCHEN DRAWER TO A SPICE RACK 1. Laying out the rack. 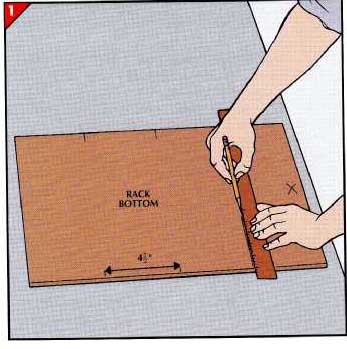
• Measure the interior of the drawer bottom and subtract inch from the length and width. Then cut a piece of plywood—birch veneer plywood has a nice, smooth finish—to those dimensions for the rack bottom. • Mark an X at what will be the bottom of the rack—that is, the edge nearest the drawer front. Starting at that edge, place marks along the sides of the plywood at 4.25-inch intervals. • With a ruler or carpenter’s square, draw parallel lines connecting the marks. You will need to make one divider for each line. 2. Cutting the dividers. 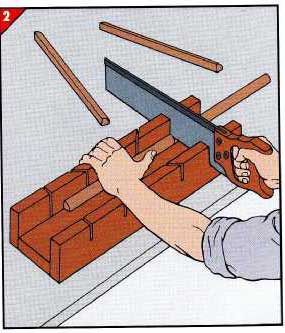
• Measure and mark pieces of 3/4-inch quarter-round molding to match the width of the piece of plywood. • Use a backsaw and the right-angle slots on a miter box to cut the pieces squarely. • On each piece, tap 0.75-inch brads into the center of the molding’s round face at 5-inch intervals until the tips just protrude through the flat side. 3. Final assembly. 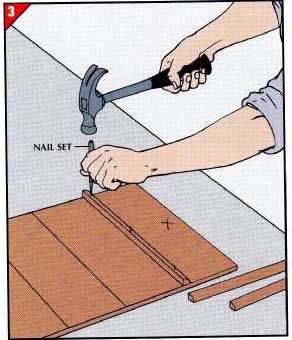
• Take one of the dividers and squeeze a thin line of glue between the protruding tips. • Place the divider on the first line above the X marking the rack bottom. The divider’s 90-dgr. angle should be flush on the line, with the rounded face toward the bottom. • Hammer the brads until their heads barely show, then use a nail set to drive them just below the surface. Repeat this procedure with the remaining dividers. • Fill the nail holes with wood putty, sand smooth, then finish as desired. |
| HOME | Prev: (coming soon) | Next: | Article Index |