Making Interior Changes: Cutting Into an Existing Wall
| Home | Wiring | Plumbing | Kitchen/Bath |
|
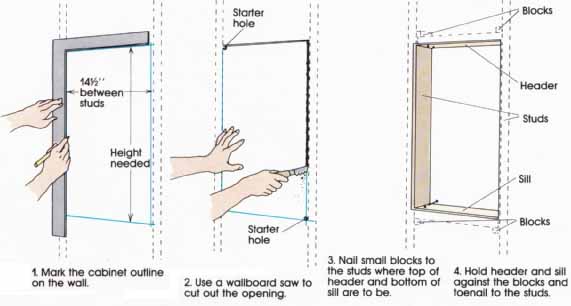
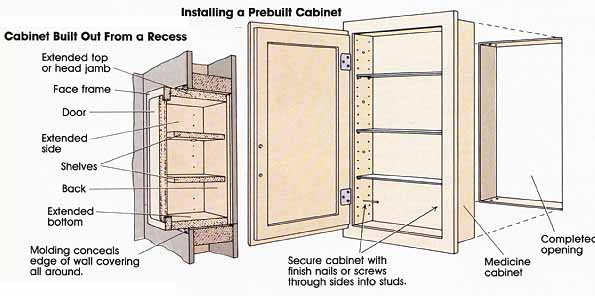
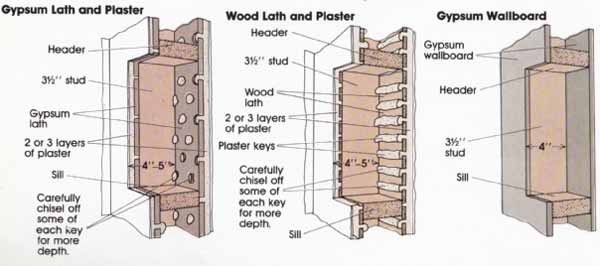
Remodeling projects may require rerouting wires or cables or installing protective metal plates. Now you can get down to the transformations you’ve planned and prepared for. Whether you’re cutting into walls or building new ones, this section will take you through your remodeling projects from start to finish. In this section you will learn step-by-step procedures for five operations common to most interior remodeling projects: making an opening in an existing wall, framing up new partition walls, changing wiring, installing wall board, and installing insulation. In addition you will learn how to do three specific projects that have unique problems or approaches: converting an attic to living space, installing a new stairway, and preparing a basement for finishing. Kitchen and bathroom remodeling are major projects that require their own books, but the basic techniques in this section will help you get started. Cutting Into an Existing Wall At times you may want to create a recess in an existing wall. To install a prebuilt cabinet, such as a medicine chest or ironing board, or to build in-wall storage for books, towels, or collectibles, follow these procedures. The first step is to determine the optimum size for the opening. Begin by checking the location of the studs. If the studs are conventionally spaced 16 inches on center, the space between them is roughly 14 1/2 inches. If you cut one stud, the opening is increased to 30 1/2 inches. The depth available depends on the finish wall surface and stud width. With wallboard this is usually about 4 inches; with lath and plaster the depth ranges from 4 to 5 inches. If you need more depth, use a wider jamb and build out into the room several inches. Next examine the wall for utility systems that may be hidden inside. If you can, move the location to either side to avoid unnecessary rerouting. Reconsider the exact width and location once you’ve located the studs and utilities. If these two factors aren’t limiting, choose the size and location that require the least amount of work to produce the desired result. Perhaps the opening should be smaller or larger than planned originally. Cutting an opening between studs. Use a framing square and mark the outline on the wall with a pencil, check the lines with a level or plumb bob, since the ceiling and floor may not be absolutely level. Drill two starter holes at the opposite corners; then cut out the opening with a drywall saw. Keep the blade shallow so the surface on the opposite side isn’t damaged. The opening will expose the hidden side of the opposite wall. Blobs of dried plaster that has oozed between the lath, called plaster keys, may intrude into the space. If they are especially thick, chip them off carefully with a chisel. With some installations, such as an ironing board or a niche to be surfaced with new wallboard, you should add a 2-by-4 header and sill to the opening. To support the header and sill during nailing, first nail small blocks of 1 by 2s or 2 by 4s to the studs or drive in several guide nails. Then rest the header and sill on these supports and toenail to the studs. If the unit is a prebuilt cabinet such as a medicine chest, you can generally dispense with the header and sill. Simply insert the cabinet into the opening and attach to the studs with nails or wood screws through the sides. If you are building your own cabinet, it’s best to assemble it first, complete with back and sides. Build it at a workbench and then install it like a prebuilt. Because the studs may not be square, make the unit slightly smaller than the rough opening and shim as necessary If you use ½-inch plywood or 1-inch wood for the top and bottom, the header and sill aren’t necessary To protect the opposite wall surface, and yet minimize the unit’s depth, use 3 plywood for the back. Also leave a gap of 1/8 inch between the unit and the opposite wall. Cutting an opening through studs. First determine if the wall is bearing or non-bearing. If the wall is non-bearing, mark the opening 1 1/2 inches higher and lower than the size of the finish opening. This allows room to cut the studs and install a 2-by-4 header and sill. Ideally the width of the opening corresponds exactly to the width between existing studs. This minimizes patching the wall. But even if the width doesn’t correspond, cut back to the outer studs to gain access for nailing. Once the wall surface is removed, mark the ex posed studs with a square and cut with a saw. Since the opposite wall surface is still nailed to the studs, sawing and removing the pieces can be a problem. To minimize damage, rock the cut studs with your hands or use a hammer to knock them sideways. Take care not to puncture the opposite surface. Once the studs are out, install the header and sill by nailing through them into the cut ends of the studs above and below. Also toenail them to the full-length studs on either side. If you need to narrow the opening, toenail a pair of 2-by-4 cripple studs between the header and sill to frame a smaller rough opening. Or you can end nail the cripples before installing the header and sill. If the wall is bearing, before you can cut the studs you must build temporary supports on either side of the wall. Then after the studs are cut, you must install a header large enough to carry the load. If the opening is less than 4 feet wide, a header of 4-by-4 lumber or two 2 by 4s set on edge can generally be used. The latter may be easier to install, since they can be toe-nailed in separately. Use 3 plywood spacers between the 2 by 4s to build the width to just less than 3 1/2 inches. If the opening is 4 to 5 feet wide, the header should be a 4 by 6. Check your local code to determine the exact specifications. Mark the wall surface as described previously. In this case the opening must be large enough to accommodate the increased header size. Cut and strip the wall surface; then erect temporary supports on both sides of the wall. The supports should be the width of the opening, plus one joist on either side. Next cut and remove the portions of the studs inside the opening. Insert two trimmer studs inside the wall cavity and nail them to the full studs on either side. Position the header over the trimmer studs and toenail it in place. Then face nail a 2-by-4 sill to the cut studs below and toenail to the trimmer studs on either side. If you need to narrow the opening, toenail 2-by-4 cripple studs between the header and sill. Once the rough framing is complete, the temporary supports can be removed.
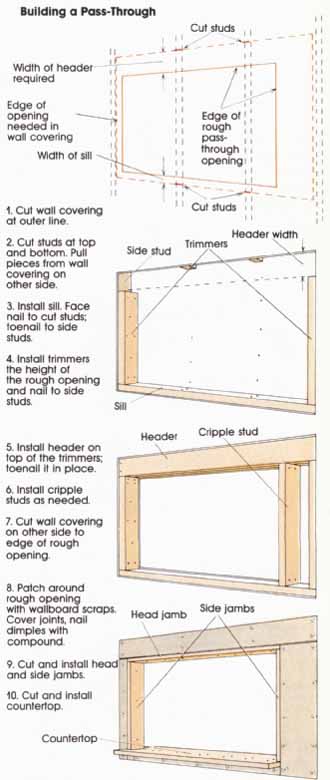
Building a Pass-Through To create a pass-through between two rooms, follow the general guidelines for building a recess within a wall. There are some differences, however. Obviously you will remove both sides of the wall instead of just one. But you need extra access on only one side to install the header. As a result the second side can be cut after the header is installed. And because it can be cut to the exact size, you won’t have to patch the wall. A second consideration is building some type of countertop. The 2-by-4 rough sill is strong enough to sup port a narrow countertop, which can be a 1-inch finish board up to 10 inches wide. Moldings underneath either side of this finish piece will provide additional support. Finally, while a pass-through can be convenient, sometimes it’s desirable to close of f rooms, so plan to install folding door or shutters to cover the opening.
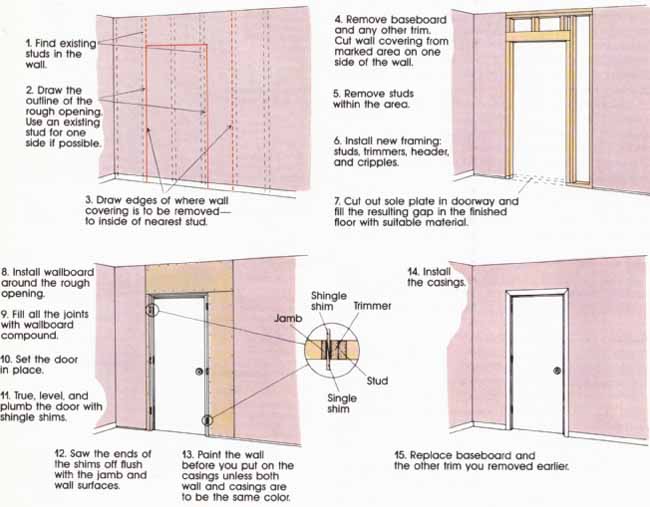
Adding a New Doorway Cuffing into an existing wall to create a new doorway is essentially the same as building a pass-through or in- wall storage. One difference is that the rough opening extends to the floor. Another is the problem of hanging the door once the framing is complete. Using a pre-hung door solves this nicely.
Most rooms have 32-inch doors, but a range of widths from 24 to 36 inches is possible. The standard door height is 6 feet 8 inches, but this can vary as well. For walls finished with wallboard, 4 inches is the standard jamb size. For lath and plaster walls, the jamb size ranges from 5 1/8 to 5 inches. The size of the opening depends on the width of the frame and the location of the studs, As a rule the smallest width possible is the width of the finish frame plus 4 inches. This allows one trimmer stud on either side of the opening plus an extra 1/2 inch on both sides. This 1/2-inch clearance is necessary because the existing studs may not be perfectly vertical. The height of the opening should be the height of the pre-hung frame, plus the depth of the header, plus 1/2-inch clearance. If the wall is nonbearing, the header can be two 2 by 4s laid flat. One is sufficient, but two minimize the flex in the wall and lessen the chance of cracked plaster or wallboard when the door is slammed shut. Laying the headers flat simplifies the nailing, since they can be face nailed to the cripple studs overhead. If the wall is bearing, the header generally should be the equivalent of 4-by-4 lumber. But again, check your local code for the proper size. Once the dimensions of the opening are established, follow the procedures for cutting in-wall storage. If the wall is bearing, be sure to provide temporary supports before you cut the studs. Frame the opening as shown in the sketch below. Before nailing, check the position of the trimmer studs and header with a level or plumb bob to be sure the opening is square. Alter the rough frame is complete, cut out the sole plate with a hand saw or reciprocating saw. Since the bottom of the sole plate is on the subfloor, you’ll need a chisel to cut all the way through. Protect the finish floor by taping down scraps of cardboard. Patch the opening between the floors with a hardwood threshold or a filler board that can be covered later with finish flooring. You should also install wallboard around the rough opening before you install the door and frame. (For wallboard instructions , see this page.) Alter the wallboard is finished, you’re ready to hang the door and frame. Handling and positioning the frame are usually easier if the door is removed first, but this is a matter of preference. If you feel you can manipulate the door and frame as a unit, fine. Otherwise tap out the hinge pins and set the door aside. If you prefer to hide all the finish nails behind the doorstop, remove it. If not leave the stop in place and face nail through the jambs. Cut of f any protective ends on the frame and slip the frame into the rough opening. Begin shimming between the jamb and trimmer stud at the lower hinge. Once you have the approximate position, drive a finishing nail through the jamb and shims into the trimmer. Continue the process all around the frame, checking repeatedly with your level to be sure the frame is plumb. Also check the width of the frame to be sure it remains constant. Otherwise the door won’t swing freely. Make sure the jamb is centered in the opening and extends flush with the finish wall surface on either side. Once the frame is securely shimmed and nailed, cut the shims flush with the edge of the jambs. Use a hand saw or score the edges of the shims with a utility knife and break them with a hammer. Reinstall the door and stop if they’ve been removed, and trim out the frame with casings. |
| HOME | Prev: | Next: Building a Wall |