Low-Maintenance Decks, Porches, and Patios
| Home | Wiring | Plumbing | Kitchen/Bath |
|
The porch is a good example of that ancient adage: the more things change, the more they stay the same. The migration to the suburbs in the ‘50s left the porch behind, it being symbolic of a lifestyle the new suburbanites thought they wanted to escape from. Even the old neighborhood habit of evening porch sitting was ridiculed in the suburbs as “hickish,” in the same tone used by city porch sitters years earlier to refer to neighbors who still kept chickens in the backyard. Television and air-conditioning almost made the porch obsolete any way. Compared to the view from the front porch, the tube was a whole universe more exciting, or so it seemed. And with the air conditioner at open throttle, you didn’t have to wait on the porch for the house to cool down before going to bed. But humans still wanted some extension of the house’s living space into the out-of-doors. The patio replaced the porch. Where a patio was not practical, as for a second-story extension or over un-level terrain, the deck became popular. By and by, however, the absence of rain protection for patio and deck parties became a pain. Why not roof over the patio, or part of it? That done, patio lovers decided to take care of the mosquito menace once and for all. Up went a border partition along the edge of the roofed part of the patio that looked suspiciously like the kneewall of yesterday’s porch, with posts extending up to the roof between which screens could be inserted in the summer. If it wasn’t a porch, it was only because the floor was masonry embedded in the ground rather than a raised wood floor with latticework around the sides. In such a roundabout way, the porch’s practicality has been vindicated. Modem homeowners have rediscovered what Victorians and ante bellum Southerners all took for granted: No matter how hot the day, there’s always a breeze on the porch, especially if it wraps around more than one side of the house, like the ageless veranda. Why porches draw breezes an engineer could probably demonstrate easily. Porch sitters only know that it's so. You get the same phenomenon from what we have named the “breezeway,” which is itself an adaptation of the traditional “dogtrot” or “possum trot”—the open hall between the two halves of a traditional Southern log cabin. We are relearning almost accidentally that the breeze that finds its way softly to the porch brings a much more soothing, staying coolness than the heavy, all-too-insulating cold of air-conditioning. Not to mention that the former is free. Moreover, we now realize that television is simply unable to provide enough really satisfying programs to draw the attention of all our leisure time. Porch sitting, jawing with passing neighbors, or simply counting fireflies isn’t so boring after all. Decks The open, slat-floored deck so popular today is the cheapest way to extend living space into the out-of-doors. It is also, in one sense, a high- maintenance alternative. That decks are practical at all depends entirely on the use of pressure-treated woods or woods like redwood, which are naturally resistant to rot. Nevertheless, wood exposed to the elements, no matter how it's treated, requires fairly continual maintenance or replacement. In selecting treated wood, stick with established, proven products with 30- to 40-year warranties—and read the warranties closely. Wolmanized Lumber (Koppers Company, Inc., 436 Seventh Avenue, Pitts burgh, PA 15219) and Osmose Sunwood (Osmose Wood Preserving, Inc., 980 Ellicott Street, Buffalo, NY 14209) are two brands offering 30- and 40- year guarantees respectively. Generally speaking, even the best material will need waterproofing protection periodically.
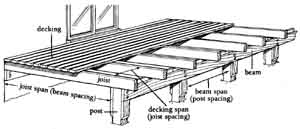
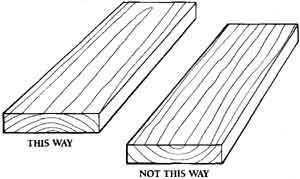
Here are some other tips to keep deck maintenance at a minimum: 1. Use rustproof nails and screws; hot-dipped galvanized ones are the most economical. Use ring-shank or spiral-shank nails; they hold better and help reduce warping. If nails cause splitting, blunt the points slightly. If that doesn’t work, drill holes for the nails slightly smaller than the nail shank. 2. Nail 2 X 4 deck boards flat on the joists with two nails at each joist. Nail 2 X 6s with three nails at each joist. 3. Space between deck boards should be no less than ¼ inch, no more than about ½ inch. 4. When connecting framing with bolts or lag screws, use flat washers under bolt heads and nuts to prevent heads and nuts from pulling into the wood and opening a passageway for water into the wood. 5. Bevel the tops of posts exposed to the weather about 45 degrees so that water runs off rapidly. Even treated wood can and will check and split on the end grain, and a beveled top will encourage water to drain away rather than into the cracks. 6. When nailing down deck boards, lay the boards on the joists with the curve of the grain down, as seen on the end of the boards. Any warpage will then cause the board to rise in the middle rather than cup up on the edges and hold water. 7. Joists should be spaced 16 inches apart for deck boards of 2 X 4s laid fiat. Space the joists 24 inches apart for 2 X 6 deck boards laid fiat. 8. If 2 X 6 joists are used, they should span no more than 9¾ feet at 24-inch spacings, or 8 feet at 16-inch spacings. If using 2 X 8 joists, the span at 24-inch spacings should be no more than 12 feet 10 inches, or 10 feet 8 inches at 16-inch spacings. The span limit is 16½ feet for 16-inch spacings and 13 feet 4 inches at 24-inch spacings. You can usually cheat an inch or two on these dimensions, but where heavy snow loads or big parties are expected on your deck, they ought to be adhered to rather closely. A group of teenagers trying out a new dance step in unison could unleash awesome vibrations not entirely connected with the music. Hot tubs could require extra strong bracing; consult directions or an experienced carpenter. 9. Upright posts should usually be 6 X 6s. You can use 4 X 4s where the deck is small and posts less than 6 feet tall. 10. Beams that attach to the posts for the joists to sit on vary in size depending on how far apart the posts are set and how much space there is between beams. A very rough rule of thumb says that an 8-foot spacing requires at least 2 X 8 beams; a 10-foot spacing, 2 X 10 beams; and 12-foot spacing, 2 X 12 beams. Often, the outer beam is doubled, either laminated together to make a 4 X 8 (or 4 X 10 or 4 X 12) or more often, one 2 X 8 beam is nailed on the outside of the posts and one on the inside. Our deck, however, isn't nearly that strongly built, and it has stood the test of time. Consult a carpenter if you are in doubt. It is always better to overbrace than underbrace.
11. Treated wood posts can be set directly in the ground—at least 2 feet deep or to below frost line—and tamped with earth and gravel, or with a concrete collar. A flat rock in the bottom of the hole to act as a footer plate might add stability in sandy soil. In heavy clay, that wouldn’t be necessary—and certainly not if you are pouring concrete around the post. Actually, it's seldom necessary to anchor deck posts so irretrievably solid in concrete. The post isn’t going anywhere. It is held firmly by the deck bracing to the house and to the other posts. All you need to worry about is that it sits deep enough in the ground so frost won’t heave it up. Our deck posts sit on a concrete slab, which is the lower patio floor, not in the ground at all. In fact, they sit on little squares of insulation board rather than on the concrete itself—the builder’s way of shielding the posts from moisture that much more. Sure, treated wood resists moisture, but it will resist better, the less it has to resist. 12. If you want your deck to last, give it a coat or two of a recommended water repellent. Also, you may wish to stain it a more woodlike color. I still think plain old linseed oil is an effective, cheap preservative and stain for outdoor wood, but manufacturers of treated wood are recommending stains that are alkyd-based over linseed-oil formulations. They say the former dry faster (true) and retain color better (maybe). At any rate, the wood must be dry before applying any of these protectants or stains. Precautions for Preservatives Whenever man “triumphs over nature” there are always trade-offs that make one wonder about the victory. So too with treated wood, which turns about any cheap wood into a product that resists decay and termites for years. But such wood will twist, warp, crack, and splinter occasionally. Also, any opening in the wood that goes deeper than the penetration of the preservative treatment will provide an entrance for decay. The copper or zinc formulations that give treated wood its decay resistance are considered to be safe for normal use around humans and animals. Treated wood with guaranteed resistance to termites usually contains inorganic arsenic. Thus certain sensible precautions should be observed when using these woods. Such wood should never be used as food containers, cutting boards, etc. Nor should it be used for animal food containers, either. It is arguable whether any treated wood should be used in animal pens, where animals get bored and hungry and start chewing or licking on wood, horses particularly. Don’t make parts of beehives that come in contact with the honey out of treated wood. Avoid prolonged inhalation of sawdust from treated wood. If you are sawing or sanding a lot of it, wear a dust mask. Don’t burn treated wood in stoves or fireplaces, or even in an open fire outdoors. The wood (or ashes) may give off toxic fumes. Acquaint yourself with any other safety recommendations that come with the brand of treated wood you decide to use. After reading the label, you may, instead, decide to spend the extra money on a natural wood that resists decay, like redwood. Porches A porch at first glance translates into high maintenance. But in some respects, it can mean better low maintenance than a deck, even though you have the roof to tend to. The roof will at least mean less maintenance for the porch floor and walls and the wall of the house it extends over, and especially the door into the house. All of these components are protected from the weather by the porch roof. The old-fashioned front porch actually served the purpose of the modern portico and foyer combined. Whether you intend to save an old porch or add a new one, the main concerns are the foundation, crawl space, and any exposed wood. Foundations on old porches settle, mainly because they were not dug in deeply enough in the first place. When they sink, the roof starts coming loose from the wall. If that has occurred, jack up the roof and pour a new foundation or strengthen the old one considerably. Then reattach the roof to the wall, using new lumber if necessary. Rotting usually occurs at the junction of wall and sagging porch, where water leaks in. Replace flashing. Outer pillars may be rotten, too, on an old porch, even, or especially, if the posts are embedded in concrete. Some think that setting a wood post in concrete protects it from moisture when quite the opposite is true. The crawl space under raised porch floors should be well ventilated. Skirts should have ventings or latticework, not be solid. The soil surface under the porch can be covered with plastic film to stop some of the rising moisture. The porch floor should slope slightly away from the house so water drains away. Make sure roof spouting directs water away from the crawl space, not into it. If adding a porch to the front of the house, check your zoning to make sure the porch will not bring your house out too close to the front of your property. You may need a zoning variance if this is the case, but be prepared to be persistant. Ceiling fans, or large floor or window fans have been found to create enough breeze to discourage mosquitoes. Letting little pieces of punky wood smolder and smoke like incense will also drive mosquitoes away. Screening Screening a porch requires some wall framing. The usual method is to build a low kneewall around the perimeter of the porch if one does not already exist. Then build up framing to the ceiling with openings for the screens to fit into. With the age of air-conditioning upon us, not much attention is paid to screens anymore, although there are more days in the year when a bit of a breeze from outdoors would refresh a house economically than there are days hot enough for air-conditioning. But at least porches, where we retreat from the closed confinement of the house, can be much improved if screened against bugs. Copper screening is still available, but aluminum cloth is cheaper and quite rust resistant, too. Fiberglass, nylon, and other nonmetallic materials used for screening over the years aren't as effective as metal. They aren't stiff enough and in some cases melt easily—lit cigarettes quickly melt holes in them. As far as frames for the screens are concerned, aluminum ones are light and low maintenance, while wood ones are stouter. The lack of screening stiffness is especially critical in frill-length screens for screen doors and storm doors. Even aluminum and steel will, in time, sag in this situation, especially where children frequently use the door. They tend to push or kick against screening rather than against the metal or wood panels that support the screen. Pet cats, begging to be let back indoors, climb such screens, making them sag all the more. If you have cats, I advise you to buy the kind of door that's solid wood or metal in the bottom third or half. Refrain from buying screen doors with metal decorative borders that reach out over the screening. My family and I learned the hard way that especially with nonmetallic screening, pushing even slightly against it (as when washing it, which should be done once a year), the screening rubs on the sharp metal edge of the decorative border, and in a few years breaks at critical stress points. If you glass in a porch, it's hardly a porch anymore. You will then have to build walls strong enough to support windows—hence, like the rest of the house. Patios Patio floors are usually masonry or stone, and if there are kneewalls around the perimeter, they are also of such durable material, making patios the lowest maintenance of all outdoorsy house additions. Patios, especially smaller ones, provide a good place to use imaginative low- maintenance materials. Embed flagstones, quarry tiles, or slate slabs in your concrete, or lay the slabs on top of the concrete and mortar between them. There are neat new ways to make a concrete slab look like an expensive stone floor. Plastic pattern forms are available to imprint hexagonal, cobblestone, or brick-shaped patterns in a wet concrete slab. They cost about $70. One source for them is the Masonry Specialty Catalog ( 4430 Gibsonia Road, Gibsonia, PA 15044). At least one company, the Bowrnanite Corporation ( 81 Encina Avenue, Palo Alto, CA 94301), has developed this idea to the ultimate—attractive floors that appear to be brick, slate, or beautifully colored flagstones, but which are in reality less expensive special concretes, cast in place, using an almost limitless number of designs, textures, and integral colors to achieve their effects. For low maintenance, patio floors should be mortared. That way there’s no chance that weed and grass seeds can be blown into the spaces between slate or masonry, necessitating lots of bending over and pulling them out. You also won’t have to worry about shifting slate or masonry, due to settling of sand, stones, or soil underneath, or heaving during periods of freezing and thawing. Patio Furniture Patio and deck lovers need to consider furniture. Picnic benches, chairs, and tables can be built permanently into the deck arrangement, when the deck is being built, or later. For table tops that come into contact with food, you might rather use untreated wood. Whether you are doing the work yourself, or hiring a carpenter, furniture of this kind will prove to be cheaper and more durable than most of the cheaper aluminum and plastic patio furniture you can buy.  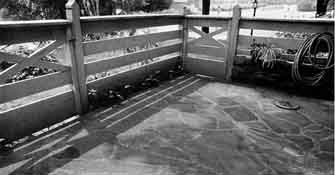 Flagstone makes a good low-maintenance floor covering inside and a durable patio outside. It’s a good idea to paint it with a sealer to prevent staining. Cheap outdoor furniture requires no more care than more expensive kinds—it just needs to be brought in out of the weather if you wish it to last any length of time. Sunlight deteriorates plastic and it cracks or breaks; moisture rusts steel, aluminum eventually pits and corrodes from moisture, too; conventional wood rots unless periodically painted or varnished or treated to resist moisture. Rattan and wicker are too expensive to leave out in the weather, and they ought to have their lacquer finishes renewed periodically. Wrought-iron furniture is still probably the best for low maintenance, for the money. It is heavy and sturdy and resists rust for years if painted, or better, if covered with baked-on enamel. Touch-ups are a fact of life with wrought iron, though, because it’s bound to chip here and there, providing openings for rust to intrude. New enameled cast-aluminum furniture is long lasting and can be left outdoors with little adverse effect. Woodward wrought-iron furniture, sold by many stores and catalogs like the Speigel catalog (1113 West 22 Street, Oak Brook, IL 60609) has a good selection of quality outdoor furniture of all kinds. Woodward gives you a choice of light fine designs, too, if the heavy traditional wrought-iron furniture isn't to your liking.
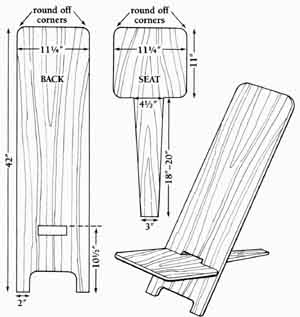
Perhaps the best, and certainly the most expensive, outdoor furniture is made of teakwood with mortise-and-tenon joinery. Teak doesn’t rot and needs no protective paint or varnish. It can sit out in humid weather for a century and the only change is the weathering of the wood to a silvery gray. A good source is Smith and Hawken Ltd. (25 Cone Madera, Mill Valley, CA 94941). For a chair that you can carry around with you easily—from one patio conversation to another—there is an old simple design now being popularized by the Wolmanized treated-lumber folks, which you can make entirely from one 2-by-12-inch piece of lumber, 8 feet long. Saw the board into two 42-inch pieces, then shape them as shown in the illustration shown above. |
| HOME | Prev: Doors and Windows | Next: |