Low-Maintenance Walls and Ceilings
| Home | Wiring | Plumbing | Kitchen/Bath |
|
The number of choices you have in ornamenting walls and ceilings is staggering. The first low-maintenance concern in walls and ceilings isn't weathering or wear, but cleaning, and so some
materials, paint for in stance, can be more appropriate on walls
than when used on floors or outside. But as with floors, taste and fashion in wallcovering can be at odds with low maintenance. To Plaster or Drywall, That Is the Question A basic decision when remodeling a room, adding one or building
new, is whether to plaster or to drywall (the latter is referred
to by many other names, like Sheetrock and wallboard). I would be slower to urge do-it-yourself plastering if I didn’t have the support of at least one architect, Alex Wade, who in his 30 Energy-Efficient Houses You Can Build encourages the idea, too, so long as the goal is “a rough-surfaced, natural gray plaster.” You can always paint it. Or if it’s reasonably smooth, paper it. And by the time you do a wall or two, you could be ready for the traditional brown coat followed by the super-smooth white coat of the professional plasterer. The Art of Plastering No book can tell you how to do it; you just must learn. Start at the edge of a wall, Inside corners are the difficult part. Hold the trowel about 45 degrees to the wall. After you mix the plaster until it’s almost soupy, let it stand for half an hour before applying it so that it can set up some. If it gets too dry, add a little water. To learn the proper way to draw the trowel over the wall in order to spread the plaster out evenly requires practice and more practice. A secret is to learn how to release your pressure on the trowel before you withdraw it from the wall. Start in a closet where no one will see your early goofs. After the plaster has set up on the wall for half an hour or thereabouts, smooth it better. A supersmooth final surface is applied an hour or more later when the plaster is approaching dryness. It’s similar to putting a supersmooth surface on concrete. Only experience can teach you. Plaster is applied to metal mesh or to a kind of gypsum board usually referred to as rock lath, which has a paper surface to which the plaster bonds. Some rock lath has perforations in it that the plaster squeezes into for a better grip. But both smooth and perforated seem to work equally well. One of the arguments in favor of drywall is that by the time you put the rock lath up in preparation for the plaster, you might as well have put up drywall and be done with it. The point is well taken although rock lath goes up easier and faster since you don’t have to worry about the seams, which will be covered with plaster. Rock lath also comes in smaller pieces than the cumbersome 4-by-8-foot drywall panels. Nearly everyone agrees that plaster is harder, tougher, and stronger than drywall. It will hold pictures, towel racks, shelves, and the like much better than drywall no matter what kind of hanger you use. And drywall has been known to sag away from the wall, pop nails, and open seams. But plaster cracks, point out champions of drywall, when the house settles. Cracked plaster does not usually come from the house’s settling, or should not, if the builder is worth his salt. Cracks from settling are what I call one-way cracks in that they tend to widen farther every year. This kind of damage could show up with drywall, too. More often, cracks in plaster come from expansion and contraction of the house due to temperature and moisture fluctuations. Our house, plastered throughout, has in 12 years incurred maybe half a dozen of these kinds of cracks. During periods of contraction, they open scarcely more than hairline spaces, hardly enough to fill with the proper Spackle or caulking. In periods of expansion, the cracks come together, forcing out any repair material we may be tempted to use. The cracks have not widened over the years, are barely noticeable, and are best left alone or covered with a double-layer, embossed paper wallcovering (see “Flexible Wallcoverings,” below) that has enough elasticity in it to endure such minute expansion and contraction without tearing. Some builders say they won’t use plaster because the moisture in it affects the structural wood as it vaporizes. The wood swells then shrinks as the house dries out, and the expansion and contraction cracks the plaster. This is arguable. So much of the structural wood used in building today isn't properly dried to begin with, or if kiln-dried, languishes at the building site in rainy, humid weather and absorbs much more moisture than it could get from drying plaster. If water from the plaster were the culprit, why didn’t the plaster in our house crack in the first year? An advantage of plaster not often mentioned is that when finished by a professional, the smooth white coat is nice enough to stand as the wall finish without anything put on it. It is in fact a smart idea to wait at least a year before painting and papering anyway. Hot spots in plaster—accidental concentrations of lime that cause a condition where wallpaper or paint won’t adhere well—should be all gone in that length of time. At any rate, new plaster should be allowed to cure at least five weeks before papering. Hot spots can be neutralized with a zinc sulfate solution (available at wallcovering stores). Dry-walling Nevertheless, drywall is easier than plaster to install if you don’t consider the heavy weight of the panels. It is only decidedly inferior to plaster when the 3/8-inch thickness is used instead of the proper ½-inch. Architect Alex Wade says that if two layers of 3/8-inch drywall are installed, with the joints staggered and both adhesive and screws used to hold them instead of nails, they make “a very superior wall finish that rivals plaster in quality.” Directions on how to install double-layer drywall are available from drywall manufacturers like U.S. Gypsum and Gold Bond. See your local dealer. Directions for putting up drywall conventionally can be found in many books and supplier brochures. Nail the heavy panels well. Two nails an inch or so apart every foot are better than one every 6 inches. The only real skill involved is in applying joint tape and joint compound so smoothly that the seams don’t show. In my experience, it takes a normally handy person about one room to learn the skill. But most amateurs who have put up drywall say they would be better off hiring the work. Most of them do, the second time around. A favorite ceiling finish these days consists of putting up drywall with screws, then covering the whole ceiling, not just the seams, with about a ¼ inch of joint compound (some people call it glop) or a material almost exactly like regular joint compound that has a bit more elasticity. Then, before it dries, the plasterlike compound is textured with swirls or any other design the homeowner finds appropriate. One plasterer I know who does this work has a texture he calls The Stomp. Using a piece of board nailed to a stick, he pushes the board against the wet plasterlike com pound much as you would use a stomper to level a soil surface, only more gently. As the board pulls away from the ceiling at each “stomp,” it leaves a dimpled texture. Such designs would not be practical in kitchens or over wood stoves where regular cleaning is necessary. There you want as smooth a surface as possible. But anyone can do The Stomp, and swirls are easy, too. A little imagination could supply an almost unlimited number of designs to imprint in the wet glop, just by carving or gluing patterns on the stomp board. Another tip about drywall: Champions of wood paneling like to point out that the use of this low-maintenance wallcovering negates all the worry and work of either plaster or drywall. This contention isn’t, or shouldn’t, be true. Most wood paneling, especially the 4-by-8-foot panels, are so thin and flimsy that alone they do not make a solid or strong wall. Good builders advocate backing them with at least 3/8-inch drywall, which is about the most economical way to make a panel wall solid. Because of so many variations in individual cases, it's difficult to say whether drywall or plaster will last longer. I’ve known drywalls to last without needing repair for 15 years, and plasterers are quick to use words like “forever” when referring to plaster walls. But one man who does a lot of work with both materials bared his soul to me. “Well, both are likely to last a long time without much repair, but I’d say that you can expect to find popped nails in drywall in about five years, and a few cracks in your plaster in eight years.” Flexible Wallcoverings Many years ago, the Typical Homeowner of my age got some un wanted experience steaming and scraping off layers of old wallpaper. And then if he was really lucky, he got to mix up wheat paste glue, smear it on new wallpaper, carry the gloppy stuff to the wall, and hopefully get it stuck up before his arm muscles failed completely. Such an individual reached a point where he wiped the glop of wallpaper glue from his shoes and the sweat caused by the steamer from his brow and swore never to look at another piece of wallpaper in his life. Such a Typical Homeowner is in for a surprise should he or she venture into a wallpaper store today. First of all, there’s no such thing as wallpaper anymore—the proper word is wallcovering. With good reason. Unless some exotic textile is used, almost all the wallpaper today is vinyl, or in the cheaper kinds, paper coated with vinyl or paper bonded to some kind of plastic closely related to vinyl. The choices in vinyl are mind- boggling. There is evidently no flexible material that vinyl can't be made to imitate with amazing fidelity. There are vinyls that look and feel like silks, satins, richly embroidered brocades, metallic foils, grass cloths, burlaps, leathers, anything at all. And even in our little village, I counted nearly 400 sample catalogs. No wonder it takes people so long to choose a wallcovering. Most “ordinary” vinyls start at about $11 per metric roll (28 square feet approximately) and the highest priced I found (leafing madly through 400 volumes) was a richly embroidered flower pattern of 100 percent acrylic that cost $90 per roll! Wallcoverings of real textile materials, like burlap or linen, aren't easy to clean and so are more of a maintenance headache than a help. Such materials, exotic and beautiful as they may be (not to mention expensive), do not double as a vapor barrier as vinyl will. If they should get soiled, they are very difficult to clean. On good scrubbable vinyl, you can bear down with a detergent and get rid of almost any kind of dirt. Do not, however, use any more water than absolutely necessary, especially around seams. Excess water could soak the vinyl enough to weaken the glue. What the low-maintenance-minded wallcoverer looks for on the back of a wallcovering sample are these words: scrubbable, strippable, and pre-pasted. “Scrubbable” means just that. You can scrub it. It will hold up in damp conditions. You can use it in the kitchen or even the bathroom. Cheaper plastic-coated papers might be wipeable or gingerly washable, but not scrubbable, and they should not be used in kitchens or other areas where periodic cleaning is necessary, or where moisture is going to be plentiful. Most good vinyls are now fabric-backed, and these are “strippable” When and if you want a new wallcovering, you can peel the old off— no more steaming, scraping, and cussing. Some good wallcoverings are still paper-backed, and these vinyls will sort of peel off, too. The paper backing stays on the wall, but the job is easier than the old-fashioned way. Finally, especially if you intend to hang the wallcovering yourself, you’ll want to see the word “prepasted” on the sample back. Sometimes the word isn't there, but a little picture of a tray with a roll of wallcovering issuing from it instead, and the words, “use with a water box” or some such underneath. What both this symbol and words mean is that the wallcovering already has glue on the back, which is activated by soaking it in water. Prepasted coverings should not be confused with papers that have some kind of gumming or peel-back adhesive on them to be stuck directly onto the wall. These latter coverings have not generally proved very satisfactory. Some of the good fabric-backed vinyls aren't prepasted. Rather than hung with the traditional wheat paste glue, new vinyl adhesives are recommended for them. Wheat paste, I’m told, is sometimes affected by mildew.
Hanging Wallcoverings Wallcovering stores provide all kinds of information on hanging the various materials they sell and even schedule periodic seminars where representatives of the wallcovering manufacturers give lessons on installation. The mistake most often made by do-it-yourselfers, a clerk in the local store told me, is forgetting to put a coat of sizing on the wall first. Special sizing makes the job of hanging vinyls somewhat easier. The vinyl stretches a little when wet and shrinks upon drying, and the sizing allows you to slide the vinyl a bit to position it perfectly against the adjacent sheet and smooth out air bubbles. Also, sizing makes stripping off the wall- covering easier when you want to put on new. Two coats of primer sealer on drywall can take the place of sizing in some cases, but it's advisable to apply sizing, too. Holes in old plaster should be filled and sanded smooth—otherwise you might soon have a hole or a noticeable indentation in the covering. Surfaces covered with glossy paints won’t hold wallcovering adhesive. Wash the surface with paint thinner and when dry, coat with sizing. Don’t try to violate the tried-and-true directions for hanging wallcoverings. For example, don’t try to wrap a strip around an inside corner. It might look okay for awhile, but soon it will wrinkle. Check the run numbers on all your rolls to make sure they are the same. Color can vary slightly from run to run. To keep the color uniform on plain textured or solid color coverings, reverse every other strip, top to bottom. Don’t use a seam roller on flocked wallcoverings. Instead, tap gently all along the seam with a rounded tool handle or similar object. Where vinyl strips overlap at corners, you will need a vinyl-to-vinyl adhesive to make them stick together. Old and New Wallcoverings One type of old-fashioned wallpaper is enjoying something of a re naissance these days. Among wallpaper aficionados, it's called anaglypta, and it's composed of two pieces of paper laminated together and then stamped with an embossed design to give it texture. Historically, anaglypta was a cheap copy of lincrusta, a deeply embossed linoleumlike wall- covering that was itself a cheap copy of stamped metal. And to carry the history one step further, stamped metal was a cheap imitation of stamped leather, or expensive decorative plaster or carved wood. The historical theorem at work here can be briefly stated: The higher the price of common labor the more unaffordable becomes craftsmanship and quality materials. By raising the “standard of living,” we have ironically lowered the “quality of life.” The sad lesson, not yet learned, is that money alone can't level out the differences between wealth and poverty. As we can see from contemporary America, throwing money around freely only widens the chasm between the two. Anaglypta, made in England, is being sold in America as an ideal covering for cracked plaster walls. Its embossed texture hides cracks and other minor imperfections. You see it advertised in many householder magazines right now. It is sold by Decor International Wallcovering, Inc., and Rejuvenation Houseparts. Though it hides cracks, it will not keep cracks from widening farther, wallcovering stores assure me. So don’t expect miracles. This type of wallpaper needs to be painted if you wish to clean it. Where cleaning is more or less regular, as in a kitchen, or where moisture is more or less constant, as in a bathroom, oil-base paint is recommended. Otherwise, latex. Directions with the wallpaper spell out priming and finish coat details. In terms of low maintenance, this type of wallcovering is debatable. Among the questions asked and “answered” on the manufacturer’s brochure is this one: “How long will it last?” Answer: “It can be painted up to eight times.” If you paint it every 3 years, that’s 24 years. I will let you make your own deduction. As president of the I-Hate-to-Paint Club, I know what mine would be. If you don’t mind painting, there is another beautifully embossed wallcovering on the market that's brand-new. It is made from cotton fibers and is advertised as more durable than paper. Manufactured by Mile Hi Crown, it’s available in many stores that sell wallcoverings. From Flexi-Wall Systems comes a new wallcovering impregnated with gypsum and designed to take the place of real plaster. It will go directly on almost any surface—cement, tile, glass, wood, or plaster. It is also available in many stores that sell wallcoverings. Like all new products, only time will prove or disprove its low-maintenance advantages.
Moldings Wall trim, moldings, baseboard, and chair rails are now easily avail able in extruded polystyrene in enough different colors to match almost any wallcovering. You can also get polyurethane cornice molding that looks like fancy plaster or carved wood. All these plastics can be sawed, sanded, nailed, and painted, if necessary. What they lack in vibrancy of the more natural materials they make up for in low maintenance. Interior Wall Paints If paint makes low-maintenance sense anywhere (which is debatable), it makes the most sense on interior walls, protected from the weather and from the scuffing that floors get. Paint is a good wallcovering for those people who have a low tolerance for permanence. Cheaper than other wallcoverings, paint allows you to change colors in a room more often than you might do if facing a wallpaper or paneling change. (What is really needed is a paint that changes colors with one’s moods, like the mood rings popular several years ago!) Types of Paints Oil-base or alkyd-base paints (they are almost synonymous) no longer have any real advantages indoors over latex (water-base) paints although the experts still argue. Being very interested in paint, or rather in trying to escape painting, I have looked deeply into the subject and for awhile believed that oil-base paints could rightly boast that they adhered to wood better than latex. Further reading revealed that at least one expert disagreed, even for outdoor uses, contending that since wood swells and shrinks and since latex is more elastic than oil-base films, it will endure wood movement better and hence adhere longer. Be that as it may, latex paints have so many advantages that they remain the first choice for interior walls. They mix easily with water and they clean up easily with water. Latex paint odors aren't so offensive indoors and go away quicker. Latex dries faster, too, so that you can follow with a second coat almost right after finishing the first. Today, latex paints are almost as washable as oil-base paints, and unless a wallcovering manufacturer specifically recommends oil or alkyd paints (as in the case of embossed wallpapers) latex paints are the right choice. Just remember that no painted surface is going to clean up perfectly after it gets dirty. The only alternative is to clean as best as you can and paint it again. That sounds worse than it really is; it's easier to paint a wall than to try to clean all the dirt off it, especially if you have to do the ceiling, too. There is one exception to using latex, and that's that it should not be used over an oil- or alkyd-base paint because it will not stick well. If you are covering an old, oil-based paint, use oil-base paint to do the job. If you don’t know whether the paint is an oil or latex, chip some off and take it to the paint store to see what the experts say. Latex paints are designated flat, semigloss, and gloss—the flatter it's , the harder (usually) it's to clean. If you do choose to use a high-gloss paint, remember it will have to be de-glossed before putting a vinyl wallcovering on it, should you decide to do that someday.
Sealer and /or primer on a new wall or new wood trim almost always should precede topcoats, and two topcoats almost always are better than one. Follow label instructions for the specific paint you choose. And though it be repeated 10 million times, always remember that if the surface isn’t clean and dry; even a paint guaranteed for ten years will not last that long. On a wettish surface it won’t last six months. On a masonry wall, as in a basement, the best low-maintenance paint (and the most expensive) is an epoxy concrete enamel. But if the wall tends to be moist, you are probably better off with a portland cement paint, especially one with water-sealing capacities, real or advertised. Roller Brushes and Other Tools Advances in painting equipment continue to be marketed. The latest is a motor and canister affair that pumps paint through a connecting hose to the roller. When you push a button on the roller handle, paint flows from the hose into the roller. No more bending over to slop your roller into a tray of paint—or what I’ve done, step into the tray inadvertently while admiring how handy I was with the roller on the wall! One manufacturer is Power-Flo Products Corporation. These power paint rollers appear to be ideal for professional painters. But at a cost of between $50 and $100, homeowners are slow to buy. Once they get over the shock of what good paint costs these days, they settle for a brush or a simple hand roller so that they can keep down costs. Even some of the professionals don’t like to use the power rollers because they take so much longer to clean than a simple pan and roller. (A cleanup tip: Line the pan with aluminum foil or plastic wrap, sealing all the edges, before adding your paint. Then at cleanup time, merely pour off any unused paint and carefully lift out the liner. If you were very careful, there’ll be no paint in the pan to wash off.) On walls and ceilings, rollers make better sense than brushes, being considerably faster and , for most of us, easier for applying an even coat. Always buy the spring-loaded kind that allows you to slide old roller brushes off and new ones on easily. The nap on the brushes varies in thickness for different paints—short naps are usually for flat paints, a short stiff nap of mohair for enamel, etc. Your paint dealer can advise you in any specific instance. Since you can’t roll right up to the ceiling or corners, you “cut” these areas with a brush or foam pad, about 3 inches out from the corner. By far the easiest tool to use is a little plastic gadget that you mount a foam pad on and then run along the corner. In fact, they are a great tool for painting flat surfaces anywhere since they apply the paint evenly and leave no brush marks. The foam pads are easier to clean than brushes but because they are so cheap, most people throw them away after use. There is much ado written about using good brushes and taking care of them after use, but I agree with George Grotz, author of The Furniture Doctor and other good books. Buy cheap brushes and throw them away after use. Let’s face it. What the Typical Homeowner does is buy a brush or two for a certain painting job. Afterward, he cleans them up religiously or thinks he does and wraps them in a cloth for safekeeping. Or he puts them in a can of solvent on a piece of wire just like the books say he should. Then he forgets about them. Two years later when the next paint job comes along, the brush in the cloth is as hard as a rhinoceros hide, and the one forgotten in the can of dissolved solvent is totally petrified. Or more likely he can’t find it at all because the kids used it to paint a bicycle and left it in the bottom of the paint can that got thrown away In actuality, it's seldom that a Typical Homeowner ever uses a paintbrush a second time, and very rarely a third time. Even when I have taken supreme care in cleaning a brush, by the time I haul it out for a third use, the upper half of the brush is stiff and won’t hold much paint, and the corner edges are beginning to frazzle. I’m forced to buy a new brush anyway.
According to market statistics, plain old paintbrushes still outsell all other kinds of paint applicators. This is true because the typical home owner appreciates that a brush is handy and can be taken up immediately to proceed with the job. With rollers, you still have to have some kind of brush for cutting the corners, and with brushes you don’t need to spend half the day masking everything in sight as you do with a paint sprayer. Nor do sprayers do as good a job, especially on rough wood. Professional exterior painters I know have developed a technique where they spray and brush simultaneously, the brush working the sprayer paint better into the boards. Only where you have to paint finely turned and carved cornice trim, or newel posts on stairs, or fancy filigreed molding, does a sprayer prove its worth. And low-maintenance homeowners will avoid such ornate decoration anyway because these dust catchers are a real pain to clean and hell to refinish. Paneling When we think of paneling, we automatically think wood. But paneling today comes in such a vast array of facings that the only way to differentiate it from vinyl wallcoverings is to say paneling does not come in rolls. Much paneling—more precisely called decorator panels—is actually nothing more than hardboard with vinyl wallcoverings overlaid on it. Panel size is usually the standard 4-by-8-foot dimension, in thicknesses from ‘/s inch up to about 1/2 inch. Thicker wood strips or boards are often referred to as paneling, but I deal with them under the heading “Planking” (see later). Plywood panels consist of thin layers of real wood laminated and glued together. Plywood is graded for quality and for exterior or interior use, the wood usually being softwood—fir or pine—with a thickness of ¼ inch up to 1 inch. These are used structurally in framing a house, but not for wallcoverings, except perhaps in a garage or workshop. Some plywood panels have an exterior layer of hardwood, usually birch or oak, and are often used in making cabinets. A good buy in this kind of plywood right now is one with an exterior layer of Philippine mahogany, called luan. Luan panels are comparatively cheap, but the wood is much more attractive than the usual plywood facing. Philippine mahogany isn't considered exotic wood like other mahoganies and is, for the time being, plentiful. You can even find pallets made of it. What distinguishes these plywood panels from the kind of panels used as decorative wallcoverings is that the wood surface is raw—unfinished—and there is little or no provision in the panels’ designs for hiding seam lines. The edges just butt against each other, requiring some covering trim to hide the crack. But it's mostly because they are unfinished that they score low as low-maintenance wallcovering. In recent years, manufacturers have begun facing plywood with fine veneers of choice and exotic hardwoods in beautiful designs. The veneer is then covered with prefinished coatings—usually tough acrylic vinyls. The pre-finish means you have nothing to do but put the panels up. No home finishing could equal the factory finish in durability or ease of cleaning. If pizza at little Joey’s birthday party mysteriously ends up on the wall, you can wipe it off and use a little mild detergent to clean all residues away. Since most of the veneers are of rather dark-grained wood, dirt doesn’t show, and regular dustings can be few and far between. These are usually the most expensive of the 4-by-8-foot panels, but worth it if you like wood walls. A general rule to follow is that if you are putting up these panels in thicknesses less than ¼ inch, from 1/8 up to 1/16 inch (thicknesses vary), you should back them with drywall to make a solid wall. Even at ¼ inch, that’s not a bad idea. The newest innovations in paneling that allow an almost unlimited choice in facing design are rarely plywood-based at all but are made of some kind of fibrous hardboard (Masonite is one brand everyone knows) overlaid with plastic, vinyl, or a paper-thin covering upon which the design is printed. The latter is among the cheapest of the panels. Because the designs are printed—actually photographs—they can mimic faithfully the most exotic woods or anything else, but they are rather easily scratched or torn. Often, to keep costs down, these panels come with the cheapest and thinnest hardboard backings. I once lifted one such panel at the corner and it promptly snapped off. You probably know of them—they’re the panels usually listed in the red hot sales notices for only $8.99 a sheet. Avoid them. Somewhat higher-quality panels overlaid with what amounts to vinyl wallcovering in a myriad of designs are worth considering in lieu of drywall and wallcovering, especially if you have confidence in your ability to put up panels but not to put up wallpaper. Remember, however, that panels are more permanent. If you become dissatisfied with the design or color, it's more expensive and difficult to remove panels than wallpaper. With the panels, which are usually called generically “decorator panels,” you can buy matching trim and molding, which will give your work a more professional appearance even if you are a beginner. Decorator panels are all washable—good low-maintenance materials. So as not to be kept out of kitchens, baths, laundry rooms, or other areas of high-moisture or high-dirt possibilities, panel manufacturers have developed ways to bond tough plastic coatings to waterproofed hardboard. Now you can buy panels that look like ceramic tile, onyx, marble—you name it. Some are recommended even for shower stalls if you use the prescribed moldings and trim—a bit risky, I think. These panels aren't cheap, but they can be attractive as well as very low maintenance. When buying panels, check them for damage in shipment or by careless carpenters. Edges tear, chip, and fracture rather easily. If the somewhat flexible plastic-face panels are flexed too much, that tough, hard plastic coat can crack. It is wise to have a helper when installing the cumbersome 4-by-8-foot sizes. Detailed instructions come with all panels as do proper nails and /or adhesive. Be sure to follow the directions, especially those that advise that a particular panel be held at room temperature and humidity for a certain length of time before installation. Observe all provisions for creating a slight crack between panels to allow for expansion. Failure to obey such instructions may result in buckling panels. Planking The Cadillacs of wood paneling are the solid-wood boards, or planks as interior decorators prefer to call them. I call them interior wood siding. Good-quality planks tongue and groove into each other with enough room left to allow for expansion. Check the boards and see how they fit. On good plank paneling of the tongue-and-groove kind, the groove will have a notch in it so positioned that the tongue can’t be seated tightly in the groove. The notch keeps a tiny open place between the abutting edges of the planks. This allows for expansion and contraction, and because this space is consistent, spacing always looks neat and equal across the wall. Prefinished planks are worth the extra money since you would work hard and long to duplicate or even come close to that low-maintenance finish. Knotty pine is the granddaddy of interior wood siding. Western Wood Products Association is pushing western pine, cedar, and redwood interior planking, which are reminiscent of knotty pine, but much more beautiful to a new generation’s eyes. This organization has an excellent guide (Our Real Wood Interiors Design Workbook) to tempt you with wood planking. For hardwoods like oak, walnut, etc., you should consult local lumber- yards by all means. They won’t carry these plankings in stock necessarily because they’re expensive, but they probably have samples and catalogs of sources. There are even very thin “planks” of real wood (½ inch thick) that go on over plaster or drywall with adhesives, almost like wallpaper. Because they are cheaper than thicker planks, they’re good for those who love wood but are on a strict budget. Marlite, famous for its man-made panels, makes a hardboard “planking” 16 inches wide, 8 feet long, and 1/4 inch thick with very realistic, embossed wood graining. Though thin, the planks actually tongue and groove together. Man-made planking of this kind has an advantage, if it's an advantage, over solid wood in that it won’t expand and contract as much. See your local lumberyard; almost all carry or can order Masonite products. FINISHES If your wood paneling isn't prefinished, the question arises as to what is the best finish. I discuss this subject in detail in section 13. Suffice it to say here that nearly everyone who has ever taken the lid off a can of varnish has a firm opinion on the matter. My own feeling is that a good plain wax finish is something to consider. Wax tends to get dirty quicker than a varnish or shellac and wears away where fingers frequently touch it. And if you ever want to put on another finish, removing all the wax might be difficult. But on the other hand, wax is easy to apply, easy to polish or give a new shine to, fairly easy to wash dirt off of, and most important, doesn’t show scratches the way other clear finishes do. (Scratches in wax can be often obliterated with a little more wax.) A homemade wax recommended for wood consists of 2 pounds of beeswax dissolved in a gallon of hot turpentine. Be very, very careful heating turpentine because it's highly flammable. Use a double boiler in a well-ventilated place. Just rub the warm wax solution on with a cloth, let dry, and then buff. Some solid-wood planking isn't smooth but retains the texture of rough wood, or in the case of certain popular “barnboard” planks, is stressed artificially to resemble old weathered wood. On these planks, a wax finish would not be practical. Barnboard planks are often varnished-stained at the factory and require no other finish. Obviously, textured wood is going to be harder to keep clean and should be installed, in the low-maintenance house, where dirt is a minimal problem. Clean by vacuuming it.
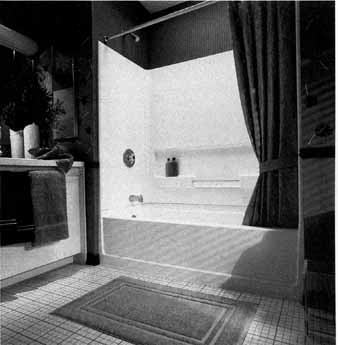
Tile Walls The ultimate in easy-care walls is ceramic tile, most would agree. Nothing resists dirt and staining as well, or cleans easier. Wear and breakage on walls are almost impossible. Because of its impervious and enduring nature, however, ceramic tile is called upon to cover walls in the most difficult of situations, which is, above all, around the bathtub and shower stall. If bathroom walls were built like in-ground swimming pool walls, there would be no problem. But when we attach a thin water- impervious skin to a stud wall, we are demanding of nature almost the impossible. Someone came up with the solution a decade or so ago—the one-piece molded fiberglass shower and tub assembly. But to keep the price low enough these units are small, very standard, and ugly to many people. One person I know says it’s like taking a bath in a plastic bottle. Nevertheless, these one-piece units (that also now come in polyvinyl chloride or PVC, which is cheaper than fiberglass) are good for low maintenance. A large bathroom, totally encased in cast iron covered with good porcelain would be the ultimate, but no one could afford it. Light weight fiberglass and PVC systems you can install yourself are the practical alternative. One source is Traco Bath Systems. To clean fiberglass and plastic bathtub and shower assemblies (or even porcelain, for that matter), you should not use abrasive cleansers, which mar the surface. There are now cleansers designed for cleaning just such surfaces, like Dow’s Bathroom Cleaner with Scrubbing Bubbles, which TV has made famous. They will not scratch fiberglass. However, in time, fiberglass and plastic will stain in some water, usually picking up a very light brown tinge which cleansers won’t remove entirely. This is one reason why investing in porcelain in the first place is lower maintenance in the long run. Over and over again “you get what you pays for.”
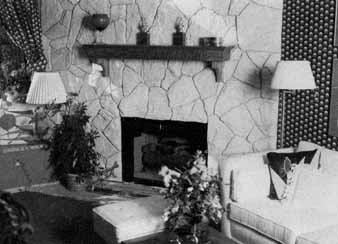
Installing Ceramic Tiles There are different ways to put up ceramic tiles: one right way and several wrong ways. Unfortunately, the way that’s most wrong of all is still commonly followed: The ceramic tiles are glued to a plaster or drywall wall and grouted with an organic adhesive or mastic, the kind you should not use in high-moisture areas because water will inevitably get through it. (Organic adhesives originally were made from rubber extracts and now refer to a whole class of mastics that dry and cure by evaporation.) But in this kind of slapdash installation, even using an epoxy grout isn't insurance that within a few years the grout will not crack, allowing moisture to seep to the inside. When this happens, the tiles loosen and soon must be removed and re-glued. I’ve seen it happen in too many bathrooms including one of our own. Often the adhesive holding the tiles to the wall remains very intact but the whole outer layer of plaster comes loose! If you merely scrape off the loose plaster, clean the backs of the tiles and re-glue, expect the same problem to recur in five years, although you can slow the inevitable leakage through the grout by covering it with a sealer or elastometric caulk, the kind you use to seal the crack between the tub and wall. As I mentioned, we did one of our bathrooms the wrong way because we were trying to save money over the more expensive right way that we used in our main bathroom. In the latter, we called in a professional ceramic-tile installer. (The other bathroom was tiled by a general carpenter who tried to talk us into cheaper plastic panels, which indeed would have lasted longer without maintenance than the ceramic tile he was installing the wrong way, as he knew fully well.) The professional, following the Hand book for Ceramic Tile Installation (available from the Tile Council of America) nailed galvanized metal lath (mesh) on the stud wall very securely, that's , about every 8 inches. If you don’t use galvanized lath, the lath will eventually rust away. Make sure the right side faces outward. The little cups of mesh should slope upward, away from the wall. This is hard to tell by sight, but if you run your fingers upward, the mesh will feel smoother than running them downward. Then he overlaid the metal lath with a scratch coat about ‘/4 inch thick made of one part portland cement, five parts sand, and V5 part lime. When this was dry, he laid on a mortar bed about 1/2 to 3/4 inch thick, leveling the wall. He then bonded the tile to the mortar bed with a latex-portland cement mortar. (There are two other portland cement and dry-set mortars that you can use instead of this mixture. Both work well, but one requires that the tile be soaked before installing—see The Handbook for Ceramic Tile Installation, mentioned above.) He then grouted with a portland cement-sand mixture to which latex had been added. This procedure is very similar to laying a ceramic- tile floor, as I describe in section 11. The grout can be further sealed with some silicone sealer (if the grout label calls for it) and by all means, the crack between tub and tile should be so sealed. Incidentally, that crack should not widen with the years. Mediocre building that allows houses to settle and the bathtub to fall away from the wall is something we have all come to expect, but one sign of a really well-built house is that the tub doesn’t fall away. Ours hasn’t. If it does, resealing with a silicone caulk is important or moisture will get behind the lower tiles. Our ceramic tiles were installed 12 years ago and we have had no problems like we’ve had in the other bathroom. Nor does it seem any are forthcoming. I realize today that epoxy adhesives combined with portland cement are giving results as good as the old mortar-bed style and are easier and quicker to work with. These new methods are usually referred to generically as “thinset” since the bed of mortar and adhesive isn't as thick as it's in the old method. Using these epoxy-cement mixtures with galvanized metal lath for a wall anchor may give good low-maintenance permanence. (Be sure to use one of the new rock lath boards made especially for ceramic tile, like Durock.) But the information I can gamer from installers is that the old way is still better, if costlier. Pre-grouted tiles relieve most of the agony of installation: no more struggling to keep the spaces between tiles straight and even. Designer Tiles to Choose From What makes ceramic wall tile so exciting today is the wonderful array of designer tiles available. Some of the new crystal-glazed and opalescent tiles look like jewels or little works of art. Together with the durability of ceramic and the epoxy adhesives, we may witness a resurgence of ceramic tile to the high level of popularity it enjoyed in the late 1800s when entire rooms were enclosed in it from floor to ceiling—even ceramic baseboards and chair rails! In fact, some of the demand for ceramic tile is coming from the resurgence of interest in Victorian house styles and fashions. (There is an entire magazine published now for people interested in restoring Victorian homes, and it's an excellent source for ideas and products for sale in low-maintenance materials. It’s called Victorian Homes). There is, in addition to the fine and numerous kinds of ceramic tile from mass producers, select designer tiles from the same manufacturers and some very unique kinds and designs from sources that are just one leg up from cottage industry. The Moravian Pottery and Tile Works is making reproductions of the famed Henry C. Mercer tiles of the early part of this century. Also available are unique styles from Sax Tatterson. The finest stock selections come from Mexico, Portugal, and Italy and are available through American companies like American Olean Tile. The Tile Gallery is another source of unusual tiles. Actually, if you have any knowledge of pottery, or are ever tempted to learn, making your own tiles is much easier than throwing a pot on a potter’s wheel. Other than a kiln, you really need no special equipment. You can make wood molds and cut designs in the clay with an old knife. Or carve designs on wood blocks and imprint them in wet clay. Many, many books tell you how. Incidentally, the American Olean Tile Company, mentioned above, has over a dozen publications on all aspects of ceramic tile, including the latest simplified methods of installation. Pre-grouted tile panels now obviate some of the skills formerly important in tile installation. It may be a good idea to have a professional install tile in a shower, but there’s no reason you can’t do a kitchen wall or countertop yourself. And what a countertop it will be. Good porcelain ceramic is almost completely impervious to moisture—less than 1/2 of 1 percent absorption. It is stain-proof and dent-proof (although under hard impact it may crack). Stone and Masonry Walls Any stone or masonry used in floors or exterior siding will work as an interior wall, often with dramatic effect. The use of such walls has become more popular in new energy-conserving houses because they provide some heat storage capacity and are ideal in houses with passive solar systems. A good example is the headquarters of Amory Lovins (the high priest of low-energy alternatives) in Colorado—a long sinuous stone wall, which winds around most of the house, provides great beauty and practicality simultaneously. Rough cobblestone walls aren't easy to clean, but if they get dirty they don’t show it. Construction and labor costs are high whenever a non-conventional material like this is used, and most people, no matter how much they love low- or no-maintenance stone interior walls, are content to limit themselves to fireplace and chimney-facing stone, or at most to one wall in which the fireplace is located. Real stone walls are heavy and require deep and sturdy foundations. Where the look of stone is desired in a room that can’t be bolstered with such a foundation, various kinds of fake stone made of special concretes are available. The word, fake, does not do them justice, however, since they can look remarkably real and are available in all kinds of stone colors and formations, some classier than the real thing. Coronado Products, Inc. is one manufacturer with national distribution. Installation requires no special support or wall ties. The stones are usually laid against metal lath with mastic and then grouted in place.
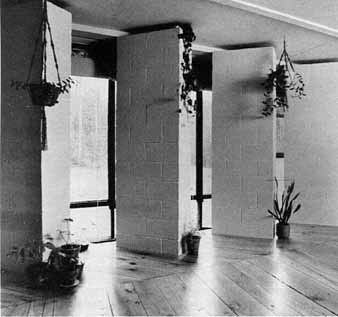
Concrete Block Concrete masonry blocks, specially scored on the facing and integrally colored, make a low-maintenance wall of great permanence. Most often, the structural load-bearing walls are made of these special blocks and their facings serve as the decorative wall finish, too, both inside and out. (They may be given a coat or two of sealer to keep out moisture and make cleaning easier.) Building this way is fairly low cost since once the blocks are laid the walls are finished. No paint, no drywall, no plaster, no paneling, no wallpapering. The concrete mass acts as a thermal mass, too, in passive solar systems, and generally helps to keep a building cooler on a hot day and warmer on a cold night. It also provides great fire safety, which is why condo and apartment builders like it—great savings in fire insurance. In an apartment complex, the blocks cut down on noise better than frame walls. The overall visual effect of the scored blocks is surprisingly attractive, too. Write for the pictorial brochures from the National Concrete Masonry Association or better yet, pay a visit to your nearest concrete block manufacturer. As I’ve mentioned earlier, you’ll be surprised at what has happened to the lowly concrete block these days.
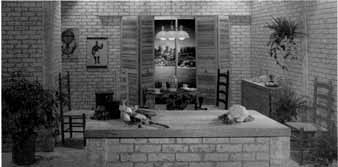
Bricks Conventional bricks can be used in interiors and often are, but available now are thin bricks, more like tile, which you glue to the wall individually or in panels. Your lumberyard carries them. It probably also carries plastic tile “brick” that looks and even feels like real brick but goes up much more easily. Easier still to put up are interior wall panels that have brick facings. The better ones are so well designed that you can hardly tell them from real bricks. Masonite Corporation is a leading manufacturer of these panels.
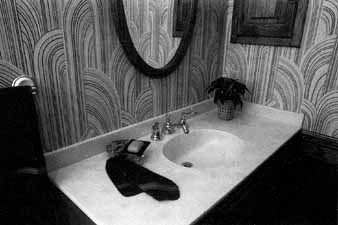
Marble Tiles Marble tiles for interior walls are now available with a new adhesive that makes installation easy. The makers of Hearthstone Decorator Tiles believe their “Ultrabond” adhesive isn't only easy to use but permanent. Each individual marble tile has an adhesive tab at each corner and one in the middle. All you do is stick them up. No goo of any kind to slop on the wall and then sag and slump while you frantically try to get the tiles on straight and square. Nor do you have to smear grout all over the wall to get it packed into the gaps thoroughly. You apply vinyl caulk neatly between the tiles instead. The company recommends a clear lacquer to protect the marble. Detailed instructions on installation are available with your purchase. These tiles go on over any surface, even plastic laminate. Plastic Laminates and the Like Plastic laminates are most often used for kitchen and bathroom countertops, and so this section doesn’t really belong in a section on walls and ceilings. But there is no better place to put it in this book, and I’d hate to leave it out; plastic laminates are to many people the ultimate in low maintenance surfaces. What’s more, they are sometimes used on walls, in the bathroom and kitchen and other places where there’s water splashing around. A few years ago, Formica and the other laminate manufacturers came out with a new product—what they refer to as their “solid color” laminates. Because the color goes all the way through the laminate, edges do not have the layered veneer look. I doubt this development means a great deal to most people because edges are usually covered up anyway. And I doubt that solid colors necessarily mean these new laminates have more quality. Some, in fact, do not wear as well as the older kinds, but because the color or pattern goes deeper, wear isn't as noticeable. Don’t expect the durability of ceramic tile, however, and when or if you replace the old countertop with a new one, do expect some hard work getting the old adhesive off. Usually it’s nearly impossible, and the new adhesive won’t stick well to any old adhesive that’s remaining. Most carpenters simply replace the whole countertop. But you can also glue a new layer of laminate over the old. This is sticky work, pun not intended, and before you are through you may wish you had replaced the whole countertop—or covered it originally with longer-lasting ceramic tile instead. (To make laminate last longer, it isn't a good idea to use it for a cutting board, as my wife scolds me for doing; a knife can leave permanent marks in it.) Choices in laminates range from simulated leather to granite, agate, and marble mimics. Choose one of the thicker laminates for a countertop (.05 inch deep) or you are really asking for high maintenance. Laminates are being used more and more on walls, where they wear better than on countertops. (A thickness of .028 is plenty for a wall.) Here again the choice of designs and colors is almost endless, including leather, stone, and wood-grain mimics and decorative wallpaper-like panels. Manufacturers with good (free) information include: Formica Corporation, Nevamar Corporation, and Wilsonart. A much better low-maintenance countertop material than plastic laminate is Corian, which looks like marble and ranks right up there with it in price. Corian has advantages over laminate in that it's a much more permanent installation. Its cultured marble appearance runs completely through the thickness and so wear doesn’t show. Nor does it need to be glued to a plywood or other substrate like laminate does. You can sand away scratches and blemishes like cigarette bums, and the repair isn't noticeable. Stains are easier to clean up on Corian than on most marbles, and it can be cut and worked like hardwood (using special blades), so you can custom-fit it to any situation. One of Corian’s biggest sellers is its one-piece counter/sink combination. It’s great for low maintenance on wet bars, tabletops, desktops, island tops, telephone counters, and windowsills. In bathrooms, it gives the look of cultured marble to one- piece vanity tops and tubs and matching shower walls, windowsills, and baseboards.
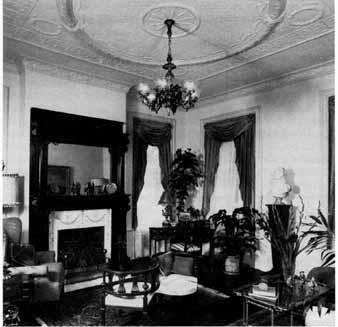
Ceilings Structurally, ceilings face a problem not shared by the rest of the house. Unlike a wall or floor, most of the ceiling’s weight has no underpinning but hangs from the joists overhead on the relatively frail strength of nails, screws, or adhesives. To make matters worse, style dictates heavy plaster ceilings, or heavier drywall panels overlaid with textured plaster. It is no wonder that the first sign of aging in a house is usually cracked or sagging ceilings. Plaster is the lesser of two evils in this case because it isn't as heavy as drywall. Because of its weight, drywall must be installed with screws, not nails. Textured plaster ceilings are relatively cheap. In a room where dirt isn't a particular problem, they are fairly easy to maintain if the rock or metal lath is solidly fastened to the joists and if the joists are dry and solidly braced before installation. The key to any kind of plastering is a very well- built house frame that keeps expansion and contraction to a minimum. Finely textured plaster is okay, but heavily textured plaster should be avoided; it's difficult to paint and impossible to clean. In a kitchen or bathroom, a smooth plaster ceiling has the advantage of not having any grooves or indentations to make cleaning more difficult. But greasy kitchen stains can rarely be scrubbed completely from the ceiling; streaks remain. Here is where paint is wonderful (in my opinion the only place paint is wonderful). Once reasonably clean, the smooth plaster ceiling can be painted to like-new condition. And repainted as necessary. In the long run, this is easier maintenance than trying to clean unremovable ceiling tile. Lightweight wood panels or planks would make very good low- maintenance sense for ceilings, but only recently have they been merchandised, and homeowners appear hesitant to use them this way, not just because of cost. A tongue-and-groove “siding” could make a very practical ceiling nailed directly to the joists, but few like the idea of wood grain over their heads, especially the darker shades of wood. Ceilings must be light-colored, and the fact that wood can be blonded or painted white never seems to occur to many people. Ceiling Tiles Instead of wood panels or planks, ceilings are now very often wood fiber, mineral fiber, plastics, and fiberglass, shaped into tiles usually a foot square, but sometimes 2 feet square. When these tiles are factory finished for easy cleaning, they are the best low-cost solution for low maintenance. The acoustical kinds absorb noise very well. But the biggest advantage of these tiles is that if the ceiling is damaged by roof leaks or anything else, you can remove individual tiles rather than having to do over a whole ceiling. The choices in tile design are many, both in the new look of real wood panels and the old traditional look of embossed paper or fancy plaster. The suspended ceiling tiles that rest in metal or vinyl frames (and that now can be purchased in colors that match or complement the tiles) are particularly nice for cleaning. You merely lift them out of their frames and wash them at the sink instead of having to break your back, neck, and arms reaching above your head to scrub them. Suspended ceiling tiles are, of course, only practical if you have enough headroom. Suspended ceilings came into vogue to lower high Victorian ceilings so that the rooms wouldn’t be so expensive to heat. They have proven so handy for hiding plumbing and light-fixture wires that buildings, especially office buildings, are built with enough headroom to allow for them. However, today you can use suspended ceilings in almost any standard height room—if you don’t plan to invite many 7-foot 10-inch basketball players in for a party. As I said a bit earlier, these tiles are designed to hang in metal or vinyl frames, but they can alternatively be nailed directly to furring strips that are nailed to the overhead joists. Installation information is easily available when and where you buy the tiles. It pays to use quality wood for furring strips—straight, clear kiln-dried pine or fir in 1-by-3-inch or 1-by-4-inch dimensions. This is no place for knotty, warped boards. Ceiling Moldings If you are doing over an old Victorian house authentically, you may be staring up at some once-beautiful plaster molding that's cracked or chipped. Small cracks can be filled with plaster of Paris or Spackle, and chips can be built up with new plaster. You can even replace whole sections of damaged molding with new by making a new mold from the existing molding—many books and magazines show you how. But it's all high maintenance. I think it’s much better to replace it, when possible, with new lightweight polyurethane moldings that look exactly like old plaster, or, in other forms, like fancy wood molding. That advice is probably anathema to authentic restorers, but at least if you desire fancy molding in a new room or an old one not previously so ornate, these synthetic cornice moldings, chandelier bases, etc., etc., look as good as plaster and can be cut, sawed, sanded, and painted. Vinyl moldings that look like wood are good for low maintenance, too, if you can be satisfied not using real wood. I can’t. Though in this case wood may mean slightly more maintenance because it may chip or scratch more easily, but you can repair gouges, scratches, and chips in it better than in vinyl. Metal Ceiling Panels Some 60 years ago, metal ceiling panels were very popular, and you can still find them by the thousands in shops and businesses along the Midwest’s Main Streets. Today, stamped metal ceiling panels usually referred to as tin ceilings are enjoying a minor comeback, even in residences. They can be used as they are finished from the factory, usually in some metallic luster, or they can be painted. Be sure to wash the panels with paint thinner to remove the protective coat of oil before painting. Prime with an oil-base metal primer and topcoat with alkyd (enamel) paint unless manufacturer’s directions advise otherwise. Stamped metal for ceilings or walls is available from W. F. Norman Corporation; and from A. A. Abbingdon Affiliates.
Exciting new metal panels for ceilings and /or walls are available in brass and aluminum. Contact especially Wilsonart. And they come in a variety of colors—polished black aluminum, polished brass aluminum, polished gold aluminum, polished smoke aluminum, solid-polished brass, stain-brushed bronze aluminum, and others. Although their use in residences has been limited so far, they make extremely stunning ceilings. The polished or brushed surfaces will scratch or mar rather easily, which makes the panels better for ceilings than walls. The panels come from the factory with a protective film to prevent scuffing and this film should not be removed until the panels are safely installed. (they are bonded to ceiling or walls with prescribed adhesives.) Care must be taken not to bend them too much or the panels might crease. Clean with warm water and mild soap; abrasive cleaners could scratch the decorative sheen of the metal. |

| HOME | Prev: Floors and Floorcoverings | Next: |