Repairing Roof Coverings
| HOME | Prev: Roofing Materials | Next: Types of Gutters |
|
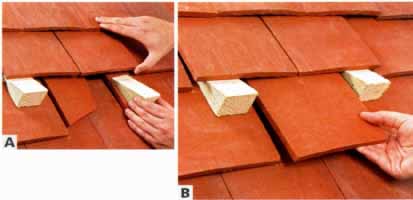
Re-roofing is a major project, and should usually be carried out by a professional contractor. DIY work on a roof usually involves carrying out a small-scale repair, rather than total replacement—and that's what these pages deal with. The most common problems with a tiled roof are broken tiles (slates, or shingles), missing tiles, and damage to a valley. These may be due to natural wear and tear, or as a result of storm damage, for example. The following sections show steps to replacing a few types of tile, and three common valley structures. TOOLS / MATERIALS: Replacing a tile: Access equipment (e.g., ladder or scaffolding)*, lumber wedges*, bound hacksaw blade* Replacing a slate: Access equipment (e.g., ladder or scaffolding)*, bound hacksaw blade*, slate ripper*, lead strip or proprietary clips Replacing a wood shingle: Access equipment (e.g., ladder or scaffolding)*, bound hacksaw blade*, sealant, sealant dispenser Replacing an asphalt shingle: Access equipment (e.g., ladder or scaffolding)*, pry bar * = optional + BASIC TOOLKIT REPLACING A DAMAGED TILE OR SHINGLEThe method needed for replacing a roof covering will depend on the type of tile or shingle in use. For instance, the steps below show a simple way of replacing a tile, but you may need to alter them slightly, as described alongside the steps. To remove a slate, you may prefer to use a slate ripper rather than a hacksaw blade (as shown). Slate rippers are specially designed to remove fasteners that are under a row of slates, but they are specialty tools and probably not worth buying unless you are likely to replace a lot of slates. With wooden shingles, the problem may have to do with waterproofing rather than breakages: damp shingles may buckle or rot. Replace split or damaged shingles so that they do not allow moisture to penetrate into or through the roof. Replacing asphalt shingles is easier because they are flexible, so they can simply be lifted up to give access to the fasteners beneath them. Cutting a tile or shingleWooden shingles and shakes can be cut with a saw, and asphalt shingles can be cut with a utility knife. Clay and concrete tiles are best cut using an angle grinder (pay attention to the safety issues involved, and wearing all suitable protective clothing). Slates can be scored by running a sharp nail along a guide line, and then snapped along that line, or they can be split apart by tapping the scored line with the edge of a trowel. REPLACING A TILETiles with nibs may be nailed in place, so those nails may need to be cut free as shown in Replacing a Slate (below). Otherwise, lift the old tile free of the furring strip, and lip the end of a new one over the furring strip. With inter locking or single-lap tiles, wedge up the tiles next to the damaged one, as well as those above it, as shown here, to undo the interlocking joints.
A. Wedge up the tiles above the broken one, so that you can access it. Unhook the tile from the furring strip and lift out the broken tile. B. Position the new tile, hooking its nibs over the furring strip and ensuring that it's securely attached. Remove the wedges from the adjoining tiles, and check that the new tile is sitting flush with the neighboring tiles. REPLACING A SLATE
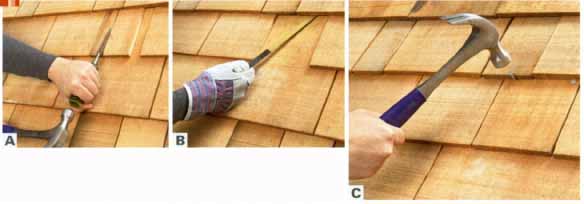
A. Remove any loose pieces of slate, then cut away the nails with a hacksaw blade wound in tape at the “handle” end. B. Nail a strip of lead over the exposed vertical joint between slates, securing into the furring strip below. You can use clips instead. C. Position a new slate to replace the old one, ensuring that it fits well. D. Bend the lead or clip up over the new slate to secure it in position. REPLACING A WOOD SHINGLE
A. Use a hammer and chisel to split and remove the broken shingle. B. Wind tape around one end of a hacksaw blade to form a “handle” by which to hold it. Use the blade to cut through the shingle’s nails. C. Slide the new shingle into position and secure it in place with nails as close as possible to the row above. Seal along the edges of the shingle, and across the nail heads, with a sealant. REPLACING AN ASPHALT SHINGLE
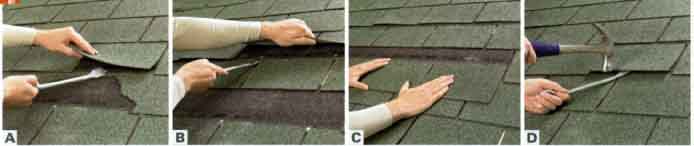
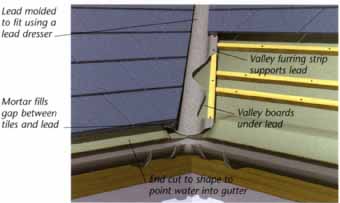
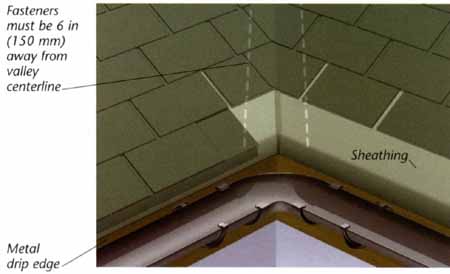
A. Use a pry bar to lever up the nails in the damaged strip of shingles. Then remove it. B. Loosen the nails at the top and bottom of the strip of shingles above, so that you can slide the new strip of shingles in underneath it. C. Slide the new strip of shingles up and into position. D. Hide nails by placing the end of the pry bar over them, and hitting it farther down the shank of the bar with a hammer to knock them in. REPAIRING A VALLEYA valley can be constructed from lead or other metals such as tin, from plastic, or from special valley tiles or shingles. Repairing a leaking valley will normally involve stripping back the tiles, slates, or shingles from along the valley edge to expose the structure, and then replacing the damaged part. Tiles or similar coverings may well have been cut to the right size to follow the valley course. Chalk numbers on them as you remove them, so that you can put them back in the right order. Not all valleys have flashing on them; some are made with shaped tiles or even with shingles cut to fit across the valley. Assess your repair requirements according to the type of valley you have. Three types of valleys are shown here:
LEAD VALLEY: Lead molded to a fit using a lead dresser; Mortar fills gap between tiles and lead
ASPHALT OPEN VALLEY: Pre-shaped valley will weaken if bent; Valleys are available in different profiles to suit tile types
SHINGLE WOVEN VALLEY: Fasteners must be 6 in (150mm) away from valley centerline; Metal drip edge. |

| HOME | Prev: Roofing Materials | Next: Types of Gutters |