ABANDONING SHIP
The decision of whether or not to abandon ship is a serious one that is, in the majority of cases, dictated by circum stance and necessity. There are really only two situations in which it is absolutely necessary to abandon ship: an uncontrollable fire aboard that threatens both lives and the vessel; or a capsizing of or other damage to the vessel that causes it to sink.
In all other situations it is probably best to stay with the parent craft as long as possible. Too often, a panicked crew has taken to the life raft and perished while the unattended parent vessel has weathered the storm still afloat and intact. Tragic incidents of this type have been documented in all areas of boating—from the weekender, to the blue water cruiser, and even to the professional racer. “Never leave your ship until it leaves you” is an old rule that could have saved lives in numerous situations if it had only been adhered to.
Preparing to Abandon
Proper planning will give you the confidence and the tools with which to survive an open water survival situation. Knowing that you can survive in a raft is important, but don’t be too hasty in making the decision to abandon ship. You must first decide whether to use the precious minutes available to attempt repairs to a damaged hull (by using a “collision mat” or a plug) or whether to begin gathering survival equipment. With available tools you may be able to stop the water inlet or at least keep the hull afloat a little longer, allowing you time to gather more equipment, send another SOS, and provide a better visual target for rescue.
Flotation Bags. The ideal method of protecting your vessel in the event of a sinking is to have flotation bags to keep the vessel afloat. These bags are strategically stored inside the vessel, ready for rapid deployment in the event of an emergency. Vessel flotation bags can also be improvised by using the inner tubes of large, heavy equipment tires connected to a rapid inflation mechanism. When inflated, the bags should fill the inside of the vessel and keep it afloat.
Locating a Leak. It may be easier to find the leak in a hull by feeling for it rather than by trying to detect it visually. Check under piles of supplies, for example, and feel around with your hands in inaccessible corners and crevices. Remember, however, that once a leak is below the waterline it will be very difficult to locate.
If you find a hole, try to contain it by cutting up light sails and filling the hole, or by wrapping the exterior of the hull with a sail or collision mat. A sail placed on the outside of the hull covering a hole will be held in place by the pressure of the water (Fig. 7-1).
Fig. 7-1 Method of improvising a collision mat to plug a hole, using
a sail.
External wrapping of the hull with a sail or collision mat over a hole that is aft of admiships may prove ineffective, since the prop and rudder will most likely prevent an effective seal.
While it is important to try to locate the leak, with the hope of perhaps repairing it, don’t let the search for a leak delay or keep you from pumping water or preparing for abandoning ship.
Bailing and Pumping. Don’t stop bailing or pumping, because every amount of water expelled from the boat converts into extra time afloat for other efforts. Buckets may be necessary, regardless of the size of the bilge pump.
Abandoning Ship. Once the decision is made to abandon ship, your chance of survival will be influenced by how you accomplish this and what you take with you. Boats have been known to sink in a matter of minutes, barely allowing time to get the life raft overboard. Consequently, it is not difficult to understand the wisdom of having a grab bag of supplies prepared and stored in an easily accessible place in the event of an emergency.
ABANDON SHIP PROCEDURES
Discuss with the crew procedures for abandoning ship, including delegation of responsibilities, location of vital survival stores, and life raft launching procedures. The onset of an emergency situation is no time to acquire these skills; they should be drilled and practiced before an emergency. The following are the procedures to follow when abandoning ship:
• Don a PFD.
• Assess damage to the boat, and attempt to repair it if practical.
• Send an SOS stating position and situation.
• Launch the life raft. Use the leeward side so that the parent vessel will block any rough seas and weather and so that any flotsam will drift toward you for salvage after the vessel sinks. Don’t wait until the last minute to inflate your life raft system. If a malfunction occurs in the automatic inflation mechanism additional time will be required for manual inflations.
• Station one person at the painter that connects the raft to the boat, with knife in hand prepared to cut the line.
• Transfer all supplies to the raft in order of their importance, which should already have been predetermined.
• Position the life raft at a safe distance from the parent vessel, but keep it in sight to make sure that the vessel actually sinks.
• Salvage anything and everything remotely usable that may be floating around you. Make sure you don’t bring aboard anything that may threaten the life raft with sharp edges or points.
• Tie together all rafts at a safe distance. Once the currents and winds take over, you may never again be close enough to do this.
• Check the life raft, bailing out water or making any re pairs if necessary.
• Assess the physical condition of the crew and treat all injuries immediately.
• Activate the EPIRB, if applicable.
• Inventory your survival stores, and log pertinent information.
• Ration the food, and give the crew a ration of water.
• Raise the canopy.
LAUNCHING THE LIFE RAFT
Launching
Launching is any means of getting the life raft or boat over the side and floating while it is still secured to the parent craft by a line. The mistake of forgetting to secure the bitter end of the line that is attached to the life raft or dinghy is a common, but very serious one. In the confusion surrounding an emergency situation, the possibility of a panicked crew member throwing the life raft overboard without an attached line is very real. This type of a mis take happens frequently with anchors, even in normal anchoring procedures. It is advisable to secure a lengthy line from the raft to the boat while the raft is stowed on deck. Tie the line in such a manner that the life raft can be launched and the line payed out without having to be untied or attended to.
CO2 Inflation
Once the life raft container is over the side, a sharp “tug” on the line or painter will activate the carbon dioxide inflation system and at the same time provide a secured line to the boat. This not only prevents the inflated raft from drifting away (especially in high winds) but allows you to concentrate on other activities, such as collecting and loading valuable gear.
Painter
The object is to launch, inflate, and board the raft, and then cut the painter loose before the parent craft sinks. Should the parent craft be sinking too fast, you may have time only to launch the life raft and abandon ship into the water. If this happens, the connecting line between the raft and the parent craft must be severed, to ensure that the life raft does not go down with the ship.
BOARDING THE RAFT
If at all possible, board the raft from the parent craft to avoid getting wet. If a “water boarding” must be used, let the strongest person climb into the raft first so that he can aid the others in boarding.
To help an injured or exhausted crew member aboard, grab onto the person from behind, gripping him under the shoulders or armpits, and then hoist him upward rather than to try and push or pull him aboard (Fig. 7-2).
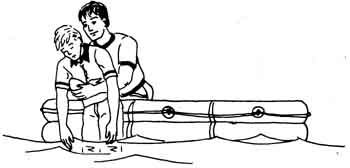
Fig. 7-2 The correct way to assist another person boarding a life
raft.
Discuss procedure and duties for righting an over turned raft before you find yourself in that situation! Floating in the water with a capsized raft in heavy seas and strong winds is not time to learn how to do it!
AFLOAT IN THE LIFE RAFT
Feelings of panic, despair, and hopelessness can easily surface while afloat in a life raft. The disappointment following the sighting of a ship or plane that doesn’t see you, for example, can be devastating. Because of the shock, both mentally and physically, of being stranded in a survival situation is acute, it is advisable to begin delegating duties, establishing goals, and setting up routines and schedules immediately.
It is your attitude, faith, and perseverance that are key ingredients in your ability to survive. The will to survive is your strongest tool. It has been proven over and over again that positive thinking and positive actions are the absolute keys to coping with even the most seemingly hopeless of situations.
Delegating Duties
The presence of an officer or captain on board the survival craft will determine who is in charge. If, however, for any reason that person chooses not to retain command, it is important that some person assume the role of leader. Whoever the leader may be, his rank must be respected and supported.
The person in charge should delegate duties to en sure that important tasks are carried out and that there is no duplication of work. Chores should begin immediately.
Delegating Responsibilities
• Assess the situation. Determine the condition of the raft and the condition of the survivors (physical and mental). Delegate responsibilities accordingly.
• Keep every crew member abreast of the situation and developments. Arrange a daily meeting to discuss and update the situation to determine what must be accomplished during the day and by whom. This promotes good morale as well as a feeling of unity.
• Convey a feeling of acceptance to each of the crew members, especially the disabled or ill. Be certain that every crew member feels that he or she is contributing to the survival group and is vital in some way, no matter how trivial it may actually be.
• Avoid dissention at all costs.
Establish Goals
Establishing goals, whether they are long-term or short-term goals, will contribute to positive actions and positive thinking. Focusing on goals will also help you maintain a stable mental and physical condition, which is essential to your survival. Establishing goals will also en sure that the vital tasks of obtaining and rationing food and water are based on extended goals.
You have a much better chance of surviving if you mentally prepare yourself for surviving the longest possible time afloat. It is a good idea to think of rescue as a welcome interruption to a directed voyage toward landfall, rather than placing all your hope on a chance rescue.
Establish Routines
Just as setting a goal is vital and important to the overall well-being of the castaway, so is the task of setting up daily routines or schedules. Once established, strictly adhere to the schedule.
An established routine will give relief and purpose to the situation, will help pass time, will occupy the minds of the crew, and will provide something to look forward to. More importantly, it will assure that certain necessary duties are carried out.
Establishing a routine of daily events on the life raft lends a feeling of “normalcy” to an otherwise alien and perilous situation. Establishing routines and schedules will also aid morale. Meals, for instance, should be eaten at set times only. This helps give reference to passing time, as well as something to look forward to. Allocate a certain time each day for conversation or games. Even the de tailed daydreaming descriptions of food or other fantasies can support the will to live, and is a good example of a positive activity that may be included in a daily routine.
THE LIFE RAFT ROUTINE
The following is a list of basic duties and routines which, if scheduled and performed, can enhance the morale of the group and will help maximize the chances of a successful survival.
Inventory. Itemize and list all stores, such as water, flares, fish hooks, and so on. It is best to itemize supplies by examining them carefully one at a time, rather than all at once. This will minimize the loss of unsecured items overboard in the event of a sudden movement by a crew member or even an unexpected capsizing.
Rations. Divide and list the rationing amounts. Plan for the longest period of deprivation. Refrain from drinking or eating anything for the first 24 hours. This will activate the “water-saving” capabilities of your body. Note: When drinking your water ration, sip it slowly and let it spread throughout your mouth before swallowing. This has a positive psychological effect in cases of water deprivation.
Compile a Log. Record the last “fix” (longitude/latitude), last transmission, course, present wind direction, swell direction, time of sinking, etc. If possible, continue the log for the duration of the survival situation.
Inspections. Make routine inspections to avoid unnecessary trouble or repairs that result from neglect. Establish a schedule of inspections:
• All areas of strain or chafe and places where towing lines are attached should be checked regularly.
• Lines, sea anchors, knots, leaks, repairs, and bailing chores must be attended to regularly.
• Periodically assess the condition of injured crew members, and attend to their needs accordingly.
• Inspect the pressure of the buoyancy chambers. On hot days, as in the tropics, it may be necessary to release some air to compensate for expanding hot air. The re verse will hold true in cold weather areas.
Lookouts. Watches or lookouts should begin immediately to maximize the chance of being detected or of sighting land. This also helps to establish a good routine for the duration of the time afloat.
Length of Watch. Depending on the situation and the number of crew available, a two-hour watch is a good maximum. If the crew is debilitated from exposure or dehydration, or, if heavy work such as bailing or rowing is necessary, then a much shorter watch period would be in order.
Schedules. Schedule each person for his same watch time each day or night. This is so that any changes in conditions such as wind or swell direction, rising stars, etc. will be more easily detected.
Eyestrain. While on watch, the lookout must protect himself against eyestrain. Extreme cases of eyestrain can result in temporary blindness, which can be brought on by prolonged exposure to such elements as snow, ice, or bright sunlight. Eyeshades or sunglasses should be worn and can be easily improvised if necessary.
Attend to Crew. The lookout person must also be attentive to his companions and to the valuable stores on board. He should make certain that all stores remain in secured, safe positions and that the injured are checked upon regularly. He should be able to recognize the warning symptoms of hypothermia in a crew member, and must see that no one is exposed either to sunburn or frostbite, and that no one is trailing a hand or foot in the water.
False Alarms. Since the object of a lookout is to sight land or a rescue vessel, it is wise to discuss the ramifications of a false alarm on the morale of a distressed crew. The accidental raising of hopes by a premature “yell” of sighting land or a ship can have serious effects of despair on the exhausted crew. First summon the leader to verify any indications of landfall or rescue before alerting the entire crew.
Miscellaneous Life Raft Skills
Hygiene. Keep the raft’s interior as dry as possible. This promotes good hygiene and helps to prevent expo sure related problems (immersion foot, salt water boils, hypothermia, etc.)
Avoiding Mistakes. When passing important rations or tools, use a verbal communication system. For example, when handing a sextant to someone, before you let go, ask: “Sextant secure?” and wait to hear “sextant is secure” before you release it.
Righting the Raft. You should expect and be pre pared for a capsizing. Being prepared includes lashing and securing your stores as well as mentally going over the procedures and educating the rest of the crew in their duties. Do this now, before you experience a capsizing and the chaos that goes with it (Fig. 7-3).
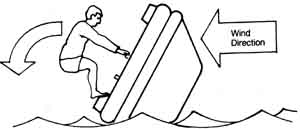
Fig. 7-3 The proper way to right a life raft with the aid of the
wind.
Fishing Tips
Fishing line:
• Never tie a fishing line directly to the raft unless you are capable of quickly cutting it.
• If necessary, fishing line can be fashioned out of wire or unraveled rope.
Bait. Try to make the bait appear natural. Conceal it if possible and jiggle it slowly to make it appear alive.
Night Fishing. The use of any type of light at night will often attract fish. A torch, flashlight, or even the moon’s reflection through a mirror will accomplish this.
Gaff Hook. The most effective fishing technique may be using the gaff hook. Its use has been documented in several stores of survival, apparently due to the frequent appearance of surface fish.
EMPLOYING THE SEA ANCHOR
One of the principal functions of a sea anchor (or drogue) is to provide stability in a rough or heavy sea. Because a raft floats on the water rather than in the water, it is susceptible to high winds. By trailing a sea anchor you can minimize the possibility of capsizing in high winds or heavy seas. The sea anchor will slow down the drift of the raft, which may be advantageous if you have sent an SOS transmission and want to remain close to the area of the transmission or the capsizing.
The principle involved in using a sea anchor is to create a “drag” effect that will:
• Slow down the drift of the raft
• Give you direction and control
• Stabilize the raft
• Minimize capsizing
Often a sea anchor will continually spin or twist, causing the line to unravel or part. A swivel shackle, if available, can be added to prevent this (Fig. 7-4).
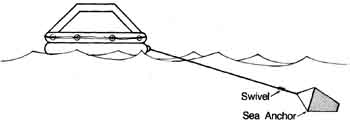
Fig. 7-4 The proper deployment of a sea anchor will give directional
stability to a life raft.
Improvising a sea anchor is easy if a sturdy line is available, as well as anything that will create a drag when towed. For example, oil skins, cloths, or cans could be used (Fig. 7-5).
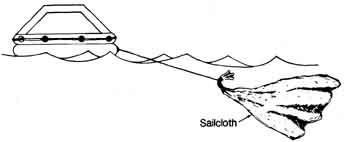
Fig. 7-5 One method of improvising a sea anchor is by using a large
piece of canvas or any other sturdy material available.
Position the sea anchor over the stern so that it is in the trough of the wave when your raft is on the wave’s crest. Use a liberal amount of line and adjust it constantly in order to keep a strain on the line.
TO STAY PUT OR TRAVEL
The choice of whether to stay put or to travel in the life raft is a controversial one. Each survival situation is unique, and this decision can be made by evaluating the conditions in force. Even then you have no guarantee which decision is best since you have no way of foreseeing factors of chance. There are, however, several points you should consider in making your choice.
Deciding to Travel
SOS. If an SOS transmission was never sent, it may be that no one is aware of your situation or whereabouts. In this case, it may not be to your advantage to remain in the same area.
Knowledge. If you know where you are, and know where land is located or where there might be a shipping lane, then it may be advisable to try and reach them.
Near Land. If you definitely know that you are near land, and that you won’t exhaust yourself by fighting an “up-hill” battle against the elements, then it would be advisable to travel.
Goal. If it is deemed most advisable to travel, whether it be to reach a landfall, shipping lane, or an area with greater rainfall, you would be taking a positive action to try to improve your situation. This promotes a feeling of accomplishment.
Mode of Travel. If you have a suitable craft for sailing (such as a sailing dinghy), or are in strong currents, or perhaps have good navigation gear, then the best decision may be to direct your efforts toward a destination.
Landfall. Remember: trying to navigate and locate a 2-mile-long, flat island in a raft may be too much to ask for. If you are aware of your position and have a choice of more than one landfall, choose the larger landfall.
Deciding Not to Travel
SOS. If you sent an SOS stating position you might want to wait and remain as near as possible to the last point of transmission.
SOS Acknowledged. If your SOS was acknowledged, it is advisable to remain as close as possible to your stated position for a reasonable period of time.
Conserving Energy. If you are totally unsure of your whereabouts, then it is usually better to stay put and use your energies for other activities. Moving consumes energy that is perhaps better saved for the basic task of living and trying to survive in the life raft.
LANDFALL
Once you have determined that setting out for landfall is your best course of action, the following section will pro vide you with specific information to help you locate, evaluate, and effect a successful landing. Because of the wide range of geographic variables that differ from one situation to another, evaluate the following information in terms of your own circumstances.
Locating a Landfall
Any of the following conditions may be an indication of a landfall:
Greenish Tint in the Sky. A tropical island can sometimes be detected by a greenish tint in the sky. This is caused by light reflections emanating from shallow la goons and bays surrounding the island.
Lighter Colored Water. Deep water is prominently dark green or dark blue. A significant lightening of the ocean water around you may indicate shallow water, which could signal the closeness of land.
Smells. Be aware of any smells that may come from a nearby landmass. An inhabited or heavily vegetated is land might produce strong odors or scents. Anything from campfires, to flowers, to swamps, to spoiled fish can give off a smell. If you are located downwind, you may be able to detect such smells from a nearby landmass.
Sound of Surf. The sound of breaking surf may indicate a shallow reef surrounding an island, or will signal the actual shore itself. In the case of reduced visibility from dense fog, mist, or rain, the roar of the surf can be heard long before breaking surf can be spotted.
Cloud Reflections. In the arctic regions, snow-covered land areas, or large ice fields are often indicated by light-colored reflections on clouds. This is markedly different from the normal darkish gray reflections caused by open ocean.
Birds. The continual cries of marine birds coming from one direction may indicate their roosting place on a nearby island or coastal area. Also, the sighting of birds flying overhead may indicate the direction of land.
Mirages. Mirages are a real phenomenon in a survival situation, and are quite common in tropical environments, especially during the middle of the day. A mirage may change appearance and height while being viewed, and can also shimmer and disappear. Beware of mistaking a mirage for a landfall.
Choosing a Landfall
Remember: Having reached or sighted land does not necessarily guarantee the end of the survival ordeal.
Bear in mind that a large island, once sighted, might still be another 5 to 6 days away. Be prudent with your rations.
One of the most difficult decisions a survivor might face will be the decision to pass by a landfall. Adverse conditions might necessitate having to pass by a landfall because:
• Landing on a barren island that won’t sustain life may only worsen your situation and might even damage your life raft in the process.
• Treacherous surf or steep cliffs that would endanger life and limb in the landing process should also be avoided. (Remember, the dehydrated castaway may not be capable of walking, let alone swimming.)
• If the decision is made to pass by the landfall, you may have to convince a desperate or less experienced crew to agree with you.
Evaluating a Landfall
Deciding to attempt a landfall, as well as choosing the method and location, calls for serious evaluation. To be successful, you must complete the landing and survive it.
Landing at Night. If possible, never attempt a landfall at night. Wait for daylight to see the surf or reef lines or any other potential dangers.
Coral Reefs. Try to avoid landing near coral reefs. The razor sharp coral can shred your skin, as well as the life raft. Often the distance from the sandy shore of a tropical island to the end of the shallow reef is considerable.
Rivers. On islands fringed by coral reefs it is best to seek the outlet of a river. Coral cannot thrive in fresh water, and consequently, wherever there is a fresh water river emptying into the ocean there will be an opening through the coral reef.
Exploding Waves. Try to avoid places where the waves explode with high spray and white water. This usually indicates that the waves are breaking on shallow reefs, rocky shores, or vertical cliffs.
Your Physical Condition. Consider the physical stamina and condition of yourself and your crew. Dehydration, prolonged periods of sitting without exercise, and exposure to the elements are all extremely debilitating.
Wave Conditions. The size of the surf on the lee side of an island is usually smaller than on the windward side, so this may be your best place to land.
Remember that from the ocean and from your raft, you can only see the smooth “backs” of the waves, which can be very misleading as to their actual size. Wave size is sometimes smaller during ebb tide.
Directional Control. When drifting toward land, utilize any directional control you have as quickly as possible, before your control of direction is lost to prevailing winds, currents, or wave patterns.
Land Travel. Remember that it is easier for an exhausted or injured survivor to travel by way of raft on the ocean along the coast than to hike over mountains or other rugged terrain.
PREPARING TO LAND
Once you decide to land you must do everything you can to make the landing operation as safe as possible.
• Wear your PFD (personal flotation jacket) if you have one.
• Wear clothing and shoes, if possible, to protect you from the rocks and coral. (Make sure they won’t weigh you down too much in the event that you are capsized and have to swim.)
• Portion out an extra ration of water to provide additional nourishment and also lessen the amount of water that may be lost overboard.
• Use a sea anchor. A sea anchor is extremely important when surf is present to minimize the chance of capsizing. The purpose of a sea anchor, when adjusted properly, is to keep the raft in the trough and off the crest of the waves, If a proper sea anchor is not available, now would be a good time to improvise one, even at the expense of some valuable clothing.
• Create ballast and greater buoyancy by filling the raft with sea water (weather permitting) and by deflating the lower tube or chamber of the raft to produce a sluggish effect. This will also help minimize capsizing. (Re member, rafts that have deep ballast pockets may en counter problems when negotiating shallow reefs.)
• Sit low in the raft to place the center of gravity as low as possible. If you are going to lay down, lay on your side to avoid back injuries from bumping against rocks or coral, with your feet forward (toward shore).
• Have the stronger survivors float outside the raft, if the raft is dangerously overcrowded, by holding onto the grommeted safety line that is attached to the outside of the raft. This will add more ballast to the raft, and may produce some additional control.
• Remove the canopy to make escape easier in the event of a capsizing.
Effecting the Landing
Before you attempt the landing, study the waves breaking on shore. Groups of waves approach shore in regular cycles. These cycles will consist of sets of large waves followed by small waves. The wave sets typically run from five to nine waves, followed by a lull. Time the sets, and effect your landing during the time of minimum wave action.
Keep in mind that it will be very difficult to prevent capsizing if the waves are sizable. Should the raft capsize:
• Try to stay with it. Although you run the risk of being hindered or struck by the raft, you have a greater chance of surviving by holding on to it. The raft should eventually carry YOU toward shore.
• Position yourself when you are in the water so that you are on the “seaward side” of the raft. This will afford you the protection of the raft itself.
• Should you find yourself adrift alone in pounding surf, roll up into a ball and try to roll with the waves. Keep your life jacket on. It is never a good idea to shed your life jacket to try to swim or dive under the waves.
• Don’t try to swim through seaweed, but simply crawl over it using an overhand motion.
Controlling the Life Raft
Directional control of an inflatable life raft is minimal at best, but it can be improved by using a sea anchor. A sea anchor will help to prevent the raft from spinning, which in turn will help reduce the possibility of sea sickness. Sea anchors can also be used with a rigid type craft to function in the same capacity, for the same reasons, and in addition will help give the bow of the boat direction.
Some degree of control can be effected by opening the canopy “door” of the raft. This can to some extent create a “sail” (or more precisely a wind pocket) that can increase the raft’s downwind travel. This may also provide a more comfortable ride if used in conjunction with prevailing winds and waves. It may, however, be impossible to do this in rough or heavy seas.
Use the ocean currents or wind direction to gain some control. A sea anchor can help you take advantage of the currents. Use favorable wind direction by providing as large a mass as possible on the ocean surface. This can be accomplished by creating a sail or perhaps just sitting up as high as possible to provide more surface to the wind.
WATER: THE LIFE SOURCE
In most ocean survival ordeals, the predominant factor governing survival is the ability to obtain fresh water. Water is essential to survival, and is far more necessary than food. In fact, it is possible to live for weeks on water alone, while existence without it leads to delirium in a few days’ time.
Medical authorities have established that a minimum of one pint of water per day is sufficient for one person to exist. The actual amount, however, may vary from one individual to another and also might be affected by factors such as: the climate (air temperature and humidity), the conservation of body fluids, exposure to the elements, physical exertion, and your individual resistance.
SURVIVAL WATER SOURCES
Solar Still. The solar still was developed primarily for use in survival kits for naval aviators in time of war and provides an excellent source of potable water for the cast away. When deflated, the solar still measures about 6”X6”X2” and is easily stored. When inflated, the 24” diameter ball is capable of collecting more than a quart of fresh water per day in temperate climates with sunshine. Water is produced through the principle of condensation (Fig. 7-6).
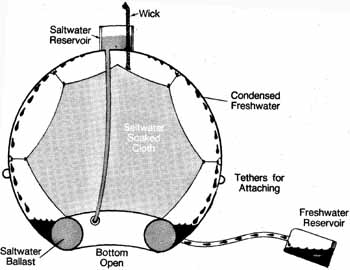
Fig. 7-6 Solar Still.
Solar stills are reusable, require no chemicals, and are capable of producing some amount of water even on slightly overcast days. Since a solar still requires sunshine to produce water, it is of course restricted to daytime use. Its ability to produce water on heavy, overcast days and in rough seas is impaired.
Desalinization Kits. You can use desalinization kits both day or night for converting sea water into potable water. When applied to one pint of salt water, the desalting briquette will precipitate the salt, which is then removed by a filter bag. The water is usually acrid and discolored, but when prepared according to instructions, it is safe for consumption.
For storage economy, it is estimated that each de salting kit can produce about seven times the amount of fresh water that could be stored in the same space. An advantage of the desalinization kit is that it can be used to produce potable water when conditions restrict the use of the solar still.
Rain Water. Without the aid of water producing devices, such as solar stills or a desalinization kit, your only source of fresh water will be from the sky. Water is also available through moisture in the air (dew, condensation, frost), but rain comprises the only viable immediate source.
A rain catchment device can be improvised from your life raft canopy, sails, clothing, or any such surface. Or, a tarp included specifically for funneling water may be included in your survival provisions.
It is critical to collect rainwater as efficiently as possible. Because of the inconsistency of rainfall in many areas, you will not be able to count on rain to fulfill your water needs at regular intervals. You must instead maximize the amount of water that you can collect and store from any one rainfall to hold you through dry periods of no ram.
Dew and Condensation. Collection of condensation from surfaces that are free of salt can yield fair amounts of potable water. Condensation forms occasionally and, if collected with clean materials, can provide precious water for the castaway.
Ice. Once melted, ice is an alternative source of potable water. It should never be consumed directly be cause it requires vital body heat and fluids to melt it internally. (Note: For information on how to distinguish salt-laden ice from freshwater ice, see Section 9).
Fish. In times of acute water shortage, fluids can be obtained from the blood and body fluids of fish. Separate the vertebrae or break the backbone and drink the spinal fluid. The entire fish can also be tightly squeezed in a thin cloth, and the resulting fluids consumed. Some types of fish have large eyes that yield sizable amounts of fluid.
Blood. The blood of birds and sea turtles is drink able, providing both nourishment and fluids.
Storage
To store fresh water in a life raft, you need containers that won’t break or cut the raft fabric. They should be re-sealable and easily retrievable in the event of a capsize. Plastic containers serve the purpose very well. If filled ¾ full, plastic containers will float and are re-sealable. It is best to store plastic jugs out of the sun.
Water provisions stored in tin cans for prolonged periods may turn bad and become undrinkable. A viable alternative is to purchase club soda or mineral water in aluminum or plastic containers. This makes periodic up dating of your water provisions very convenient since these items are widely available.
WATER SKILLS
Thirst. Be aware that thirst is not always an accurate indicator of the body’s need for water. Physical exertion in colder climates, for example, can produce fluid loss through sweat, even though the body may not signal its need for water by making your feel thirsty. Nevertheless, the need for water is still present.
Food Intake. Food intake also greatly increases the need for water. Water, in the form of gastric juices, is required to digest and assimilate food. Therefore, when water is not available, avoid all intake of food, since precious body fluids will be used up in the digestive process.
Water Requirement. A minimum of one pint of water per day is sufficient for one person to exist; the rationing of any less than one pint of water a day can severely debilitate the castaway, defeating the purpose of stretching the water supply.
Remember that survival requires a coherent state of mind and rational actions. There are records of survivors lasting as long as seven days on less than a pint of water a day. But individual resistance varies greatly and is influenced by environmental conditions.
COLLECTING WATER
If you have a solar still, deploy it as soon as weather permits. Take advantage of all fair weather periods, and continually top off your water supplies as well as your body’s supply. Remember these critical points involved in catching rainwater:
• Ensure that it is not contaminated from any surface you are using to funnel and catch it.
• Catch as much as possible when the opportunity arises.
The person on watch should always keep an eye out for the appearance of potential rain clouds. A sudden cloud burst may leave you with next to nothing if you are not prepared to catch the rain. Since most survival craft can not be steered or propelled, you must take advantage of the sudden arrival of a rain cloud.
Procedures
• Plan ahead. Pre-rig a catchment, canopy, or runoff of some design so that it can be set up quickly and easily. Be prepared.
• When the possibility of rain is present, be sure to scrub the catchment surface area with salt water and rinse it well. By doing this before it starts to rain, you will re move any heavy salt build up and residue that could foul the collected fresh rain water. (if water stores permit, it is better to rinse the catchment surface with fresh water or with a store of reusable “salt tainted” fresh water that has been set aside for just this purpose. This will help lessen the degree of salt contamination in the newly caught rain water supply.)
• If the catchment surface is a dry cloth, saturate the cloth in sea water and then wring it out. The amount of salt contamination will be negligible in comparison with the amount of rain water that would be lost in the cloth absorption.
• If you must improvise a catchment use any available material, preferably with low absorption qualities. Allow for a catchment pocket and then funnel the collected water into a container. Never mix newly collected water with your fresh water stores until you have had time to taste it and verify that it is not contaminated. Mixing newly collected water that is contaminated with salt into your fresh water stores will ruin your entire supply of water.
RATIONING
Rationing is determined by both the availability of supplies and the period that you wish to have the supplies last. Plan for a long period of isolation. This will motivate the crew to tighten rations and begin looking for a means to supplement the supplies.
DANGEROUS LIQUIDS
Acute stages of thirst can alter the victim’s ability to reason. Survivors in desperate conditions have been known to swallow any form of liquid in their attempt to alleviate thirst. To the person in a healthy and hydrated state, the very notion of drinking dangerous liquids may seem incomprehensible. The possibility is nevertheless very real to the delirious castaway. The following “dangerous liquids” should be avoided at all costs:
• Battery water, because it contains sulfuric acid
• Kerosenes or lantern alcohol
• Alcohol, because it will not satisfy your body’s need for water. It may also intoxicate you, which could induce vomiting and the loss of fluids. Alcohol absorbs water and accelerates the dehydration process.
SHORE WATER
Once on shore, it may be possible to obtain water by digging holes at about 100 yards above the high tide mark (at low tide). Filter the water through a “sand filter” to improve the taste. It may be brackish, but it is usually safe to drink. Test for salt content by tasting a small amount.
If there are sand dunes present, look in the hollows between them for visible water or moist sand, and dig for water there.
PREV: Navigation
NEXT: Edible and Hazardous Marine Life
All Sea Survival articles
© CRSociety.net