|
Grandma’s flatbed sewing machine was probably set into a sewing table with
a flip top that became an extended sewing surface. This concept was an excellent
one, since the table was an extension of the machine itself and served to support
the fabric as Grandma guided it under the needle. Some manufacturers, such as Bernina, do provide a small sewing table
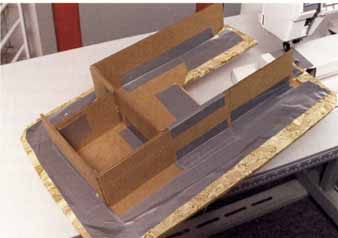
that you can attach to the free arm, which is helpful with some projects. You can support your project in a number of ways, some expensive and some that will cost you virtually nothing. Put your machine on the largest surface available. Any extension should be as level with the feed dogs as you can get: • Make a template of the free arm of your machine and cut that shape out of the right-hand end of a flat board. You can have a local woodworker make a Formica tabletop with a cutout for your machine, or you can make one yourself out of any number of substances. For example, you can cut the free-arm shape out of a piece of plywood and fit the wood with adjustable legs that you can buy in any hardware store. Be sure to cover the wood with something smooth like oil cloth or contact paper so your fabric won’t drag on the rough surface. • Use a tabletop ironing board. I always see tabletop ironing boards made of particleboard in junk shops; you know, the 1-ft. by 2-ft. kind with the little plastic tube feet. Take off the fabric cover, and there is your extension table ready to be cut to fit your machine. • Make a cardboard extension table. If you aren’t handy with a saw and you don’t want to spend the money for a deluxe surface, you can make an extension table out of cardboard. With a sharp X-acto knife, cut the top out of two layers of corrugated cardboard (foam-core board would also work), using a large kitchen cutting board as a template. Carefully trace an outline of the top of the free arm on a piece of typing paper, using your fingernails to score the edges. Transfer the pattern to the cardboard and carefully cut out the shape. Next, carefully measure the distance from the base of the sewing machine to the top of the free-arm sewing surface and subtract the thickness of the cardboard you are using. Cut cardboard strips this height, then score, bend, and tape the strips to the bottom of the extension table so that they provide good support all around and slide around the base of the machine, Cover the surface with contact paper so the fabric can move without dragging. I’ve made these for several of my machines and they work great. Dealers sell clear Plexiglas versions of my cardboard table for more than $60.
|
| PREV: Setting Up Your Sewing Space | NEXT: The Cutting Table | Home |
Thursday, 2009-07-02 3:37