|
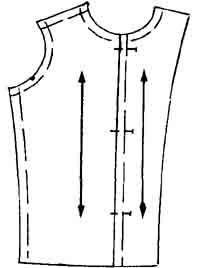
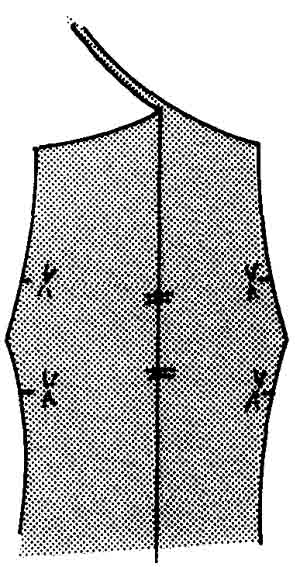
FABRIC AND PATTERN SELECTION Shortcut sewing isn't just quick-sew patterns and easy-sew fabrics, but you will save time and temper and ensure success if you combine easy-to-make styles with difficult fabrics and easy-to-sew fabrics with intricate or complicated designs. Every time you combine a fabric and a pattern you are a designer. Many of your designs will be first-class, some will be mediocre, and a few may even be failures. Analyze ready-made garments to help you recognize successful fabric-design combinations and analyze your wardrobe to ascertain which fabric-design combinations are your favorites. Use the fabrics recommended by the pattern companies as a guide to select an appropriate fabric for each design. It’s impossible for the pattern companies to list every suitable fabric, but you can easily compare the characteristics of the suggested fabrics with the characteristics of the fabric you like. If you do have an occasional failure, don’t despair—the professionals have them, too. For every design you see in the stores, many others were eliminated. Sometimes you see these discards at sample sales. Consider these factors when selecting patterns and fabrics for speed sewing or if your sewing skills are limited. Garments with a minimum of design details and seams are quick and easy to sew. Collarless garments take less time than those with collars. Round necklines are easier to finish than square ones. Shawl collars can be assembled more quickly than notched ones. Kimono, raglan, and shirt sleeves are easier to sew and fit than traditional set-in sleeves. Loose-fitting styles are easier to fit and sew than fitted garments. Dresses without waistline seams can be sewn faster than those with seams. Skirts and slacks with elastic casings are easier to stitch and fit than those with waistbands. Barrel cuffs take less time than cuffs with plackets. Patch pockets are more time-consuming than in-the-seam pockets. Dresses that slip over the head are easier to make than those with zippers or buttonholes. Patterns with few pieces are easy to sew but may be difficult to fit. Unlined jackets and coats are usually quicker to make than lined ones, but they can be more time consuming if the seams require finishing. In addition, if you decide to line a garment which doesn’t include a lining pattern, it will take time to make a pattern. Blouses usually take longer to make than skirts. Evening gowns are quicker to make than suits. Skirts and slacks usually take less time to make than jackets. Mistakes are less noticeable on small all-over print fabrics. Firmly woven or knitted fabrics are easier to sew than fabrics which are slippery, soft, or loosely woven. One-way designs, napped fabrics, and fabrics which require matching take longer to lay out and sew. Fabrics which ravel are harder to sew and require special finishes. THE PATFERN Pattern Preparation Press the pattern. Remove all of the pattern pieces from the pattern envelope. Select the ones you’ll need and cut them apart as needed. Open out the largest pattern sections and lay them flat, one on top of the other. Stack the smaller pieces on top of the larger ones. Smooth the stack of pattern pieces with your hand or press them with a dry iron from the center to the edges. Trim the pattern. To trim or not to trim the margins on the pattern before cutting out a garment is a decision you must make each time you use a new pat tern. It is time-consuming to trim away the excess paper, but it often saves time later. You’ll find you get fewer zigs and zags when you cut out the fabric if you have trimmed away the excess tissue. When cutting thick or heavy fabrics, trimming the pattern before you cut allows you to cut without distorting the cutting line. If you plan to cut the garment out using the tailor’s cutting method, you must trim away the excess tissue. When you trim away the excess paper, cut off the notches printed in the margin. If you reuse the same pattern for several garments, you can avoid this boring chore. Fitting the Pattern Adjust and alter every pattern before you cut out the garment. This not only saves time, it prevents disaster. Fitting a basic pattern. If you have difficulty fitting garments and adjusting patterns, make and fit a basic garment with a dart-fitted bodice, straight skirt, and long set-in sleeves. Each of the major companies offers a pattern in this basic style with instructions on how to fit the garment. Make the garment in a good-quality gingham. Fit it carefully, but avoid over- fitting—some figure irregularities should be camouflaged, not fitted, to create an illusion of perfect fit. After the basic garment has been altered to fit you perfectly, carefully rip it apart. Transfer the alterations to the original paper pattern—this perfected pattern can be used to adjust every pattern you make. I cut a copy of my basic pattern in lightweight cardboard and use it to alter every new design I make. I punched some large holes in it so that it could be conveniently stored on a coat hanger. You might prefer to cut yours in nonwoven pattern fabric or interfacing material, or you could fuse interfacing to the altered paper pattern to preserve it. The scope of this guide doesn’t include pattern adjustments or how to alter a garment. There are several complete books and web-guides to help you solve each and every fitting problem. In addition to these books or guides, many stores offer classes in fitting patterns. Fitting a basic pattern to perfection can be very time-consuming, but its importance can't be over emphasized. It will eliminate multiple fittings every time you make a garment; it will also eliminate excessive handling of the garment during the garment construction; it will ensure a better fitting garment, and it will save you time every time you sew. Fitting the commercial pattern. If you don’t have a basic pattern, you can fit many paper patterns satisfactorily. This allows you to check the pattern size and make minor adjustments before you cut out the fabric, but it won’t eliminate fitting as you sew. Fit the pattern with the printed side out. 1. Trim away the excess paper around the pattern front, back, and sleeve sections. Clip curved seam allowances as needed. 2. Press the pattern with a warm, dry iron. 3. Pin the darts or tucks outward on the stitching lines. 4. Pin yokes and other details within a section in place before pinning the section to another major section. 5. Pin shoulder seams outward on the stitching lines. Repeat at the side seams. Pin other vertical seams together so that the pattern sections overlap and the stitching lines match. Pin the waistline seam outward. 6. Pin the center of a 36” (91.4 cm) strip of twill tape to the center back of the paper pattern at the waistline. 7. Carefully, try on the pattern. 8. Tie the tape at the front. 9. Pin the pattern to the tape at the center front. 10. Check the pattern fit, silhouette, and design lines. Check the ease, spacing of darts, garment length, and hang. Decide on adjustments and mark where the changes are to be made. 11. Remove the pattern and adjust it by slashing and spreading or slashing and overlapping. 12. Pin the darts and underarm seam of the sleeve outward. Then pin the sleeve into the armscye at the shoulder seam, circles, and notches, matching the seamlines and overlapping the pattern sections. 13. Carefully try the pattern on again. 14. Check the sleeve length, fit, ease, and location of the darts and indicate adjustments to be made. 15. Remove the pattern and adjust the sleeve. 16. Try on the pattern for a final fit check. Measure the paper pattern. Some patterns can be adjusted successfully by comparing your body measurements to the pattern measurements. This method has limitations if you want a perfect fit but it will eliminate cutting garments too small, too short waisted, or too short. Take your body measurements, then measure the pattern, allowing some ease for movement. Adjust as needed. Don’t over-adjust--most patterns have design ease in addition to ease for movement. Fit a complete or expanded pattern. Most commercial patterns include a pattern for the right half of the garment. (Fig. 41a) This pattern is then laid onto two layers of fabric. A complete or expanded pattern is for the entire garment, and it's cut from a single layer of fabric. (Fig. 41b) 
Fitting a complete pattern is an easy way to check the pattern fit for a jacket, coat, or any garment to be made from an expensive fabric. Cut the complete pattern in a material similar in weight and drapability to the fashion fabric. Nonwoven interfacing or pattern materials are easy to work with, but you can use a woven fabric if you treat the edges with a fray retardant. Cut out a complete pattern for the major garment sections. Mark the pattern carefully to designate the right and left sides. Sew or pin the pattern sections together for fitting. True the pattern. After the paper pattern or complete pattern has been adjusted and new stitching lines have been established, check the pattern care fully, and draw the new cutting lines, using a see- through ruler, so that they are parallel to the stitching lines. 1. Place the ruler on the stitching line so that the long edge of the ruler is /8” (16 mm) from the line. Mark the cutting line along the edge of the ruler. (Fig. 42a) 2. To mark a cutting line parallel to the neckline, armhole, or any curved seamline, place the ruler on the stitching line so that the end of the ruler is 3/8” (16 mm) from that line. The line on the ruler will overlap the stitching line for a very short section (1/8” or 3.2 mm). Mark a point at the edge of the ruler directly across from the overlapped lines. Re position the ruler and repeat around the curved line. Connect the marked points.(Fig. 42b) 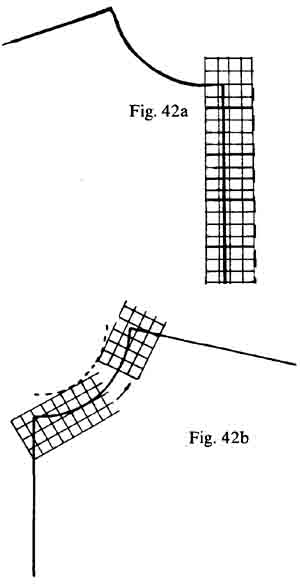
3. Measure stitching lines which will be joined together to be sure they are the same length. 4. True the darts. Fold each dart into the position it will have in the finished garment. Trim the dart even with the cutting line of the seam to shape the dart at the edge of the pattern. Design Using Commercial Patterns Use the same pattern several times to eliminate altering patterns and fitting garments. Learn to design with commercial patterns to maximize pattern use, save time, and create your own originals. To copy a pattern, place the pattern paper on a resilient surface such as a cutting board, piece of cardboard, magazine, or table pad. Lay the pattern on top of it. Using a tracing wheel, trace the desired stitching and /or cutting lines, the notches, the grain- lines, the center lines, and all other construction marks. Use a ruler to keep the straight lines straight. Lengthen or shorten patterns. Increase the use of patterns by lengthening or shortening them. Because all horizontal lines below the waist, such as the hem line, that are parallel to the floor are parallel to each other, you can use a blouse pattern to make a dress, long or street length (Fig. 43a), or use a dress pat tern to make a blouse, tunic, or tennis dress. (Fig. 43b) 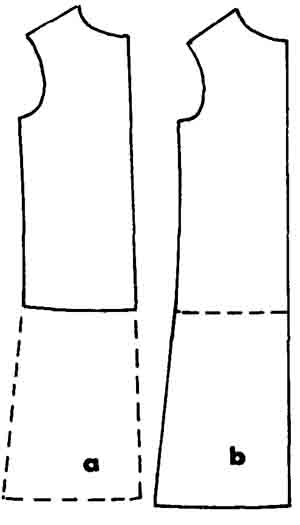
1. Draw a new cutting line parallel to the pattern hem edge by measuring the desired distance with a tape measure or ruler from several points along the pattern edge. Connect the points and draw a new cutting line. 2. Extend the vertical seamlines and foldlines to the new cutting line. Be sure stitching lines which will be sewn together are equal in length. 3. If you are lengthening a pattern, check the width of the pattern at the hipline and adjust it if needed. Bias designs. Cut some garment sections on the bias for a new design. Place the see-through ruler so that the diagonal of a one-inch (2.5-cm) square on the ruler is on the pattern grainline. Draw a new grain- line along the edge of the ruler. (Fig. 44) 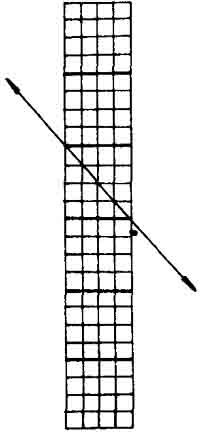
Pattern Preservation Preserve often-used patterns by bonding them to in expensive interfacing or a pattern preserver. Roll them up and store them in cardboard tubes. Patterns are folded and inserted into the pattern envelope by hand at the factory—a fact that's hard to believe when you are trying to stuff one of those super-bargain patterns with a hundred pieces back into the envelope. Cut your pattern envelope open and tape it onto a large manila envelope, new or used. The pattern will fit into the larger envelope easily. Pattern Guide Sheets Pattern guides are just that: guides. Use the guide sheet to help you but don't be its slave. Remember, a guide is written for millions to use—novice or expert. Home sewers use many different kinds of fabric to make the same pattern. There is no way the pattern companies can write specific instructions for every type of fabric; you must use your experience and knowledge to supplement the guide sheet. Read the entire guide sheet before you begin the garment; sometimes, even the experts make mistakes. The guide sheet for one current designer pattern instructs you to set the patch pockets after you complete the blouse body! THE FABRIC Get ready. Have everything—interfacing, lining, notions, and so forth on hand, prepared and ready to sew. Make a shopping list of anything you are missing, pin a fabric swatch to the list, and put it in your billfold. Prepare the fabric. Prepare the fabric as soon as you purchase it. If you plan to wash and dry the garment, wash and dry the fabric before you cut out the garment to shrink it and to remove any resin-like finish which might gum the needle. If you plan to dry clean the garment, the fabric is probably needle-ready. If it isn’t needle-ready, ask your dry cleaner to steam and shrink it. Many garments will retain their beauty longer if they are dry cleaned, even though the fabrics are washable. Preshrink the interfacing. Preshrink the interfacing materials before cutting them. Purchase four-yard lengths of interfacing in different weights to have on hand ready to sew. Most interfacings do shrink, even nonwovens and fusibles. Do not dry fusible interfacings in the dryer before bonding them to the fabric—hang them over the shower rod instead. Examine the fabric. Examine the fabric carefully for flaws and irregularities before you lay it out. Hold the fabric up against a bright light or window to examine it. Flaws and holes will show plainly. Mark them carefully. Expensive fabrics, produced in limited quantities, often have more flaws than moderate-priced fabrics which are mass-produced. If the fabric has a number of flaws, return it to the retailer. Block or straighten the fabric. If the ends of the fabric haven’t been torn, straighten them by pulling a crosswise thread and cutting along the line formed by the pulled thread. Check the crosswise grain—it should be at right angles to the lengthwise grain or selvage. Fold the fabric in half lengthwise. lithe ends of the top layer are on top of the ends of the bottom layer, the fabric is grain perfect and doesn’t require blocking. (Fig. 45a) Tithe ends are not on top of each other, the fabric is off-grain and must be blocked. (Fig. 45b)
Unfortunately, off-grain fabrics can't be blocked if they have a permanent-press finish. To block the fabric, pull the short ends of the fabric diagonally. This often requires two people to do it properly. (Fig. 45c) 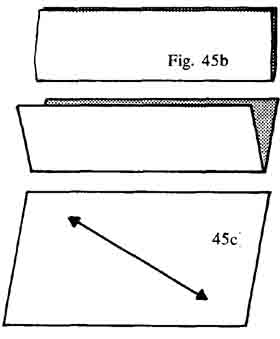
Check fabric content. If the content of the fabric is unknown and you are unsure of its washability, you can identify the fiber by burning a small scrap. For safety, work over a lavatory or sink. Hold a small piece of fabric horizontally with tweezers when you ignite it. The combined reaction to the flame and resulting ash will identify the fiber. Identify the right side of the fabric. The right side of the fabric is often difficult to distinguish from the wrong side, but the position of some fabrics on the bolt makes it easier. Generally, cottons and linens are folded with the wrong side together and woollens are folded with the right sides together or rolled with the wrong side out. If the fabric isn't on a bolt, examine the selvage —the smooth or finished side is usually the right side; however, if pins have been inserted in the selvage during the manufacturing process, they are usually inserted from the wrong side. If these clues don’t identify the face side, select the side you prefer and mark it with a small piece of tape on each garment section. Marking the right side of the fabric eliminates finding a piece of tape on the inside of a finished cuff or collar. If you use tape on napped fabrics, remove the tape by pulling it down with the nap. It is better, however, to mark napped fabrics on the reverse side; the tape may pull the nap off when you remove it. Test to be sure. Use chalked arrows on the wrong side to indicate the direction of the nap. (Fig. 46) 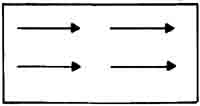
FABRIC BURN TEST:
LAYOUTS Layout and cut several garments in one session. Even the lucky sewers with a sewing room usually cut out their garments in the dining room. It takes the same amount of time to set up and clean up for several garments as it does for one. Cut interfacings, linings, backings, and so forth when you cut the fashion fabric. Lay the fabric on the table so that it doesn’t hang off the table. Many woven and knitted fabrics will stretch out of shape when hanging free, then they will “shrink” after the garment is completed. If the fabric has a center crease that can't be removed, lay the fabric so that you can cut around the crease so the crease will be inconspicuous in the finished garment. Determine the Lengthwise Grain If the selvage has been cut away, you can easily determine the lengthwise grain; remember, the length wise grain always has less stretch than the crosswise grain. Hold the fabric securely along one grainline, spacing your hands only an inch apart. Pull. (Fig. 47) Repeat in the other direction. The grain that stretches least is the lengthwise grain. 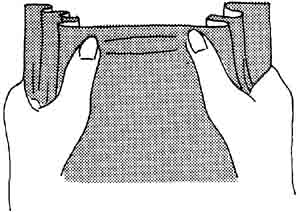
Spread the Fabric The fabric is usually folded with the right sides together when you cut out the garment. Position the wrong sides out for easy marking with tracing wheel and paper, tailor’s tacks, or pins. In addition, center-front and back seams will be properly aligned for machine stitching. Fold the fabric with the wrong sides together when you plan to mark with chalk, soap, or water- erasable pen, or if it's a fabric with a nap. Spread the fabric face-up in a single layer to cut out fabrics that require matching or are very expensive. This layout requires a complete pattern. It eliminates folding the fabric several different ways to save fabric, and it eliminates cutting blindly. Be sure to place each pattern section right-side-up on the fabric to avoid cutting two right fronts or two left sleeves. Lay Out the Pattern The success of the finished garment begins with laying out the pattern. Follow the layout on the pattern guide sheet or devise your own layout. Carefully measure the distance from the selvage or fold to the grainline to ensure accuracy on each piece. When the design, width, or weave of the fabric makes the use of the pattern guide impractical or impossible, these suggestions will help you develop a new layout. If possible, lay the pattern pieces on the fabric so that the top of each piece is in the same direction even though the fabric doesn't have an apparent nap, directional print, or weave. The difference in some fabrics is so subtle that the difference in direction isn't noticeable until the garment is completed. Lay the large pieces in place first so that the cut ting lines meet but don’t overlap; then, place the smaller pieces on the fabric. Dovetail the pieces wherever possible. Position pattern pieces with seams on the length wise grain along the selvage of the fabric. Clip the selvage if it doesn't lie flat. Pin the Pattern to the Fabric Position all the pattern pieces before you pin them in place. If you have to rearrange them, you won’t have to unpin them first. Pin the pattern to the fabric by placing pins first at each end of the grainline or fold-line. Place the remainder of the pins within the seam allowances parallel to the grainline. Use as few pins as possible so that the pattern and fabric won’t pucker. Five or six pins are usually enough for each garment section. Pins may leave holes in very delicate fabrics like satin. Instead of pins, use very fine needles (sizes 9 or 10). Place the needles only in the seam allowances. Weights. If you trimmed the excess paper from around the pattern, you may prefer to use drapery weights or dinner knives instead of pins to hold the pattern in place. Too Little Fabric Position all the pattern pieces before you begin cut ting to be sure you have enough fabric. If you are short of fabric, don’t despair—one of these suggestions will often solve the problem. Shorten the pattern length instead of the garment. Shorten the sleeve length. Allow a 2” (5.1 cm) hem instead of the 3” (7.6 cm) hem indicated on most patterns, use a ma chine hem which requires even less than 2” (5.1 cm) or face the garment with scrap fabric or packaged bias. Change patch pockets to flaps, welts, or bound pockets. Change the grainline from the lengthwise grain to the crossgrain or from the bias to the straight grain. Cut facings, pockets, and casings from another fabric. Contrasting fabrics can be used to provide de sign interest as well as to solve the too-little-fabric problem on collars, cuffs, plackets, and yokes. Eliminate waistbands and face the garment with another fabric or grosgrain. Eliminate nonfitting seamlines by pinning the pat tern pieces together on the stitching lines. In addition to saving fabric, you’ll save time with this technique. (Fig. 48a)
Reshape the facing. (Fig. 48b) Pretrim the seam allowances of enclosed seams to 3/8” (9.5 mm). Piece the garment inconspicuously. (Fig. 48c, d, e) Replace buttons and buttonholes with a zipper. 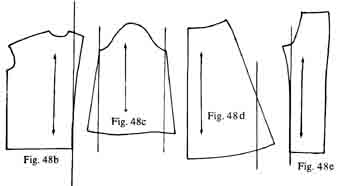
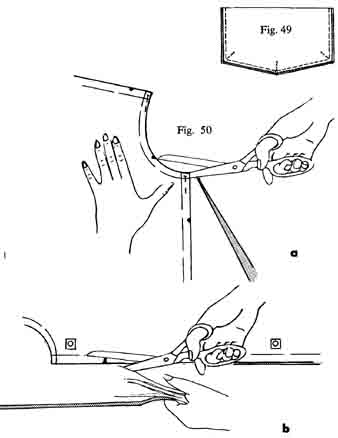
CUTTING Mistakes in cutting are very difficult to correct, and if you don’t cut the garment out accurately, you can not sew it together accurately. Never use pinking shears to cut out a garment. Cut precisely along the outer edge of the cutting line, trimming away the notches printed in the margin. When you cut, don't close the points of the shears. Cut almost to the ends of the points, then slide the shears forward to take another bite. For a smooth cut, keep the point of the shears on the table all the time. Cut Directionally Cut directionally with the grain whenever possible but avoid twisting and turning the fabric in order to do so. Walk around the table, use a combination of dressmaker’s and tailor’s methods for cutting, or block-cut around the garment sections first. Cut Everything To save time, cut out everything—the interfacing, lining, backing, and stays—when you cut out the fashion fabric. If you are unsure of the fit, don't cut the lining fabric until you have fitted the garment. Alter the lining pattern as needed, then cut the lining fabric. Pretrim the Seam Allowances Necklines and armscyes. Pretrim enclosed seams, those seams which form a finished edge at the neck line and armscye. In the past, you’ve stitched these seams, then trimmed them. Narrow seams are easier to stitch with greater ac curacy. In addition, if you should have to rip out a seam after it’s stitched, the seam can be re-stitched with greater accuracy because the seam allowances are Cut evenly and the notches haven’t been trimmed away. Trim the seam allowances of the garment and facing at the neckline or armscye to 3/8” (9.5 mm). Collars and flaps. Pretrim the seam allowances at the finished edges of the under collar or flap facings ½” (3.2 mm), making the facing seam allowance ½” (12.7 mm). Trimming the facing causes the finished seamline to roll to the underside. To stitch the seams together, match the cut edges and stitch a ½” (12.7 mm) seam—the additional ½” (3.2 mm) on the upper layer will be absorbed in the turn of the cloth. Trim the stitched seam to ¼” (6.4mm). Since most home sewers can stitch the facing edges of collars, flaps, and tabs more accurately and faster if they pretrim the facing seam allowance ½” (3.2 mm) and match the cut edges, this method is used throughout the guide; however, the off-set method is popular with many home sewers. The off-set method is when the facing edges extend 1/8” (3.2 mm) beyond the edges of the garment section. Hold or pin the seam allowances as you stitch a 5/8” (16 mm) seam, measuring from the cut edge of the facing. (Fig. 49) Trim the stitched seam to ¼” (6.4mm). If the off-set method works for you, pretrim all enclosed seams to 3/8” (9.5 mm). Off-set the facing edges 1/8” (3.2 mm) and stitch a 3/8” (9.5 mm) seam. Dressmaker’s cutting method. The dressmaker places her left hand on the pattern and cuts with her right hand, keeping the cutting line on the pattern in sight at all times. (Fig. 50a) Tailor’s cutting method. The tailor holds the fabric to be cut away in his left hand; the blades of the shears obscure the cutting line. To avoid a jagged cutting line and ensure accuracy, trim the excess margins from the paper pattern before laying out the pattern. (Fig. 50b)
MARKING TECHNIQUES Mark, mark, mark! Five minutes spent marking often saves lots of sewing time and it ensures accuracy. Mark everything as soon as you finish cutting so that you won’t waste time later dragging out the pattern to look for the piece which you need in order to mark the garment. Different fabrics and different patterns require different marking techniques. The cut edges of most garment sections can be marked with clips. Pins, chalk, soap, water-erasable pen, tracing wheel and paper, tailor’s tacks, thread tracing, or pressing can be used to indicate intricate stitching lines, construction symbols, darts, foldlines, and placement lines on the body of the garment. Generally, I use a combination of clips and pins to mark garments quickly and easily; however, special fabrics and garments sometimes require more time consuming methods to ensure a professional finish. Clips Many garments can be marked entirely with small clips. Clip into the seam allowance ½” (3.2 mm) to mark the notches. Clips will not weaken the seam allowance. Notches cut away from the stitching line are often inaccurate, and the cutting line may be distorted when you twist and turn the fabric to cut the notches. Clip everything. The notches, garment centers, foldlines (top and bottom or both sides), dart legs, pleats, tucks, any seamline that's not a standard 5/8” (16 mm), the circles indicated on the seamlines of the sleeves and garment, the hemline, waistline location, inseam pockets, belt-carrier locations, the zipper length, shoulder points on the collar, and other special details indicated on the pattern should be clipped. (Fig. 51) 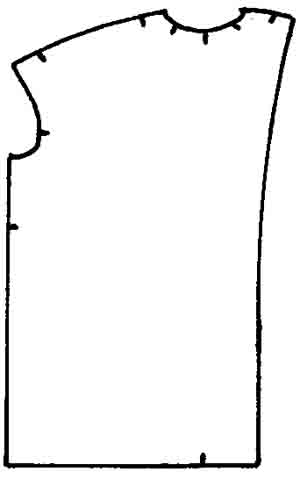
Clip properly. Only scissors that cut to the ends of the blades can be us Hold the blades between your thumb and forefinger. Position the scissors so that the points are exactly where you want the clip to be. Clip. If you position your scissors correctly, you will never clip too far. Pins Use pins to indicate dart points, placement symbols, and points to be matched on the body of the garment when you plan to make the garment immediately. Don’t leave pins in the garment for a long time; they may leave permanent marks. Lay the fabric out with the right sides together. 1. Insert pins vertically into the pattern and both layers of fabric at each symbol to be marked. 2. Turn the garment section over to mark the other layer with a pin at each marked point. (Fig. 52) 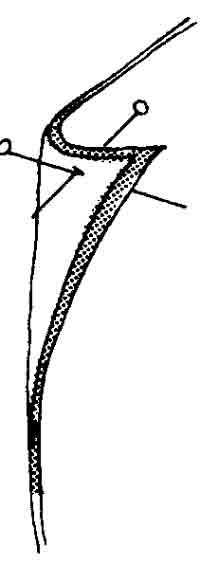
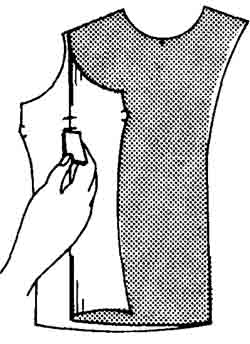
3. Before you remove the pattern push the head of each pin through the paper pattern. 4. Set the pins so that they won’t fall out. Chalk, Soap, or Water-erasable Pen Darts and other details on the body of the garment can be marked with chalk, soap, or water-erasable pen. White clay chalk or a sliver of soap, which has no oil or cold cream, can be used on most fabrics. Colored chalks may leave a permanent stain. Water- erasable pens can't be used on fabrics that water- spot. Always check before using the pen to be sure it won’t stain the fabric permanently. Never press over water-erasable-pen markings. Lay the fabric out with the wrong sides together. 1. Insert pins vertically into the pattern and both layers of fabric at each symbol to be marked. 2. Separate the fabric layers carefully so that the pins won’t fall out. 3. Mark the location of each pin with chalk, soap, or pen. (Fig. 53)
Tracing Wheel and Tracing Paper Use a tracing wheel and white tracing paper to mark intricate stitching lines, placement lines, darts, and underlinings. Colored tracing paper may permanently stain the fabric or show on the finished garment. For best results, always use white tracing paper, especially on white fabrics. Test to be sure the tracing wheel won’t damage the fabric. Staple the tracing paper to a piece of cardboard 20” (51 cm) by 26” (66 cm) with the wax side of the paper up. Use several sheets if the paper isn't that large. Lay the fabric out with the right sides together. 1. Place the cut-out garment sections on the tracing paper with the pattern pinned to the fabric. 2. Trace the pattern on all lines to be marked. Use a ruler for accuracy and mark each construction symbol through the center to form an “x.” (Fig. 54)
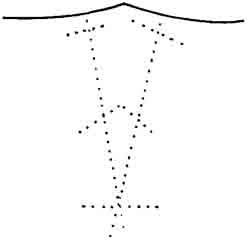
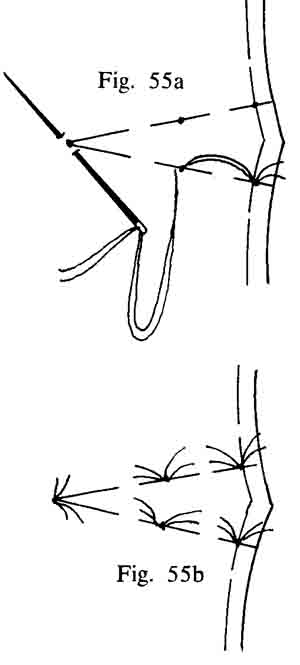
3. Remove the paper pattern, leaving the fabric sections together. 4. Carefully turn the garment sections over on the tracing paper so that the marked layer is face-up. 5. Using the marked lines as a guide, trace all markings to transfer them to the underlayer. This method gives you a clearer, more accurate marking than when you mark both layers at the same time; furthermore, the tracing paper will last much longer. Some fabrics can be marked using the tracing wheel without tracing paper. Tailor’s Tacks Use tailor’s tacks to mark delicate, loosely woven and some napped fabrics. Lay the fabric out with the right sides together. 1. Using white embroidery floss, sew through the pattern and two fabric layers with a long, loopy basting stitch. (Fig. 55a) Do not use colored thread to make tailor tacks; some fabrics absorb color and some colored threads crack. 2. Clip the loops between each stitch. (Fig. 55b)
3. Remove the pattern. Separate the fabric layers carefully and cut the threads between them. (Fig. 55c)
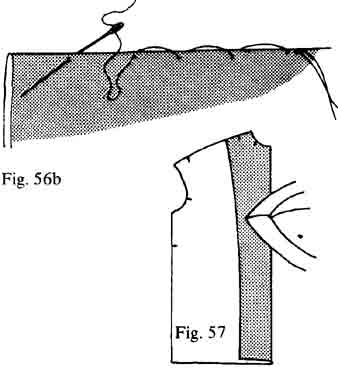
Thread Tracing or Basting Mark grainlines, center lines or placement symbols on the right side of the fabric with thread tracing or basting. Marked grainlines and garment centers will help you fit garments quickly and accurately. Mark placement lines on the wrong side of the garment sections with a tracing wheel and tracing carbon. Using an uneven or dressmaker’s basting stitch, baste along the traced line to mark the right side of the fabric. (Fig. 56a) Use a machine-basting…
…stitch to mark fabrics which won’t be marred by needle holes. Fold the garment section on the foldline and baste along the fold. (Fig. 56b) Press Marking Mark straight lines for placket and casing locations, folds, and hems by pressing lightly with the iron.
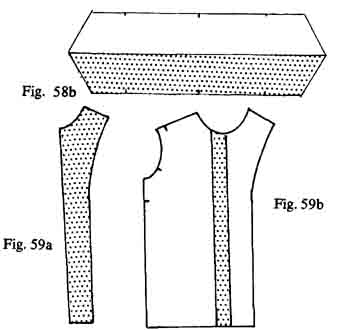
Mark each end of the line to be marked with a small snip. Fold the garment section so that a snip is at each end and press carefully along the folded edge. INTERFACINGS A garment without interfacing is like a cake without leavening—it sags. Interfacing is the invisible ingredient that makes the garment a success. The interfacing is positioned between the garment section and the facing to give shape, body, and support. It is used to preserve the garment shape in areas of stress, to prevent stretching, to add body and stiffness to certain garment sections and limp fabrics, to build an unusual silhouette, to cause the garment facing seamline to roll to the underside, and to prevent a seam shadow. Select interfacings to complement and reinforce, not overwhelm. They should have the same care requirements as the fashion fabric, be lighter in weight, shrink, and wrinkle-resistant. Commercial interfacing fabrics are available in woven, knitted, and nonwoven fabrics, fusibles, and sew-ins. They range from soft and sheer to crisp and heavy. If you keep a variety of interfacings on hand, you can experiment with several before you make the final choice on each garment. Carefully mark each interfacing for washability and keep any instructions for fusing with the appropriate interfacing. Nonwoven Interfacings Nonwoven interfacings were introduced in the early fifties by the Pellon Corporation. Today, many people call all nonwoven interfacings “pellon”; actually, Pellon is the trademark of one manufacturer. The nonwoven interfacings of today bear little resemblance to their predecessors of the fifties. They’ve lost their “paper” quality and no longer crumble after they’re washed. Today, they are soft and flexible, finishing edges almost as well as their woven cousins. They don’t ravel, making them easy to apply and lovely to look at after repeated launderings. Contrary to popular opinion, they do shrink and should be prewashed. There are three kinds of nonwoven interfacings: stable, stretch, and all bias. Stable nonwoven interfacings have little or no give in any direction. The interfacing section can be cut out on any grain with success. Stretch nonwoven interfacings are stable in the lengthwise direction and stretch in the crosswise direction. Cut these fabrics in either direction to utilize the stretch most effectively on your garment. Eliminate buttonholes that stretch out of shape by inter facing the buttonhole area so that the lengthwise direction of the interfacing is parallel to the button holes. All bias interfacings have some give in all directions. They are not suitable for interfacing button holes. Nonwovens are a good choice to use with knits and nonwoven fabrics; however, woven interfacings are preferred for better garments. Woven Interfacings Many washable woven interfacings are available to meet your everyday needs. Preshrink them before cutting. Hair canvas, lamb’s wool, collar linen, and wiggan can be purchased for tailoring and haute- couture details. Other fabrics that can be used to interface the garment include muslin, colored organdy, lining fabrics, self-fabric, flannel, and nylon net. Cotton and linen interfacings with potato starch stiffening have been replaced with synthetic fibers and permanent-press finishes, enabling woven inter- facings to retain their shape and appearance for the life of the garment. Cut the unnotched edges with pinking shears to retard fraying. Knit Interfacings Knit interfacings are soft and silky. They can be used to stabilize the entire garment or a section without adding bulk, weight, or crispness. Fusibles and Sew-in Interfacings Fusible interfacings are easy to apply, easy to sew, and retain their shape after extended use and abuse. However, the adhesive changes the fashion fabric’s characteristics, adding extra body and some rigidity. Fusible interfacings sometimes overwhelm the fashion fabric. If they are not properly applied, the section will blister when the garment is washed or dry cleaned. A slight ridge may show through on the right side of the garment at the edge of the interfacing if the entire section hasn’t been interfaced. This ridge is more visible on light-colored or lightweight fabrics. Fusibles shrink, too, so soak them in very hot water and line-dry. Sew-in interlacings preserve the shape of the garment and the qualities of the fabric. They never stiffen or blister. Which is better—a fusible or sew-in interfacing? It depends on what you’re making, the results you desire, and what works best for you. Always use a sew-in, not a fusible, interfacing on designer garments when you want structure with haute-couture subtlety. Use fusibles for a more structured look. Do not use fusibles on corduroy, velvet, velveteen, crepe, gauze, sheers, or silks. It is easy but tedious and time-consuming to fuse the interfacings in place; however, the interfaced sections can be stitched together quickly and easily. Avoid using fusibles where a demarcation line (ridge) shows unless you interface the entire garment section. Nonfusible interfacings can be applied quickly with a washable glue stick. Assembling the garment takes only a little longer than when fusible inter- facings are used. How to Cut Interfacings Cut nonfusible interfacings by the facing pattern or in 1” (2.5 cm) bias strips for easy application and fabric economy. Cut fusible interfacings by the facing or the garment pattern. Fuse a piece of interfacing to a fabric scrap to check for a demarcation line. This line is less noticeable on some fabrics if you pink the un notched edge. If the line still shows, interface the en tire garment section or the facing section, or substitute a sew-in interfacing. Generally, don't trim away any seam allowances from the interfacing, except in tailoring. How to Apply Interfacings Sew-in interfacings. Set sew-in interfacings on the wrong side of the garment section, using a washable glue stick. 1. With the interfacing section wrong-side-up, apply the washable glue sparingly. If the fabric is light weight, the glue may show until the first washing. Avoid this by applying the glue only in the seam allowances. 2. Position the interfacing on the wrong side of the garment and smooth it in place. If you should inadvertently get glue on the right side of the fabric or apply too much, it will wash out. Fusibles. Fused interfacings must be applied by the manufacturer’s directions to avoid blistering after the garment is washed. Always make a sample to check the amount of stiffness and to look for a demarcation line. Wash the sample if possible before making a decision. All fusing directions clearly indicate: Do not slide the iron. Sliding the iron rearranges the fusing agent, leaving some sections bare. These bare sections will bubble when the garment is washed. Overlap the iron on fused sections carefully to avoid missing an area. Place a piece of aluminum foil on the press board to reflect the steam and heat, ensuring a good bond. If you have two irons, use both to save time. These directions can be used if there are no manufacturer’s directions: 1. Set the iron at “Wool” and allow it to preheat. 2. Place the garment section on the press board wrong-side-up. 3. Place the interfacing on top of the garment section with the resin side next to the fabric. 4. Cover the interfacing with a wet press cloth. 5. Press each area a full 10 seconds, overlapping areas until the interfacing and fabric are bonded together on the entire section. Do not slide the iron. 6. Turn the section over, cover with a damp press cloth, and repeat the fusing process. 7. Allow the fabric to cool and test the bond by trying to lift one corner. If necessary, press 5—10 seconds longer on each side. Fusible agent. Fuse a sew-in interfacing to the fashion fabric with a fusible agent. Always make a sample to check the amount of stiffness and to look for a demarcation line. 1. Cut a piece of interfacing and a piece of the fusible agent from the facing pattern. 2. Sandwich the fusible between the wrong side of the fabric and the interfacing. 3. Fuse them together according to the manufacturer’s directions. The fusible agent will stiffen the section slightly, but it rarely blisters. If there are no directions with the fusible agent, handle it as a fusible interfacing. Bias strips. Stitch 1” (2.5 cm) bias strips of inter facing into the garment-facing seamline as you stitch the seam by sandwiching the garment between the bias strip and facing. Clip the bias so that it will lie flat against the garment. This ready-to-wear technique has been overlooked by most home sewers. It is the perfect answer for subtle shaping at necklines and armholes. Designers often use cotton flannel strips to shape a soft edge on silk and woolen garments. Where to Apply Interfacings Interfacings are usually applied to the garment rather than to the facing, except in tailoring and with some fusibles. Collars. The interfacing for a collar is usually cut from the upper-collar pattern and applied to the upper collar. If the collar and undercollar are cut in one piece, fold the pattern in half lengthwise to use as a pattern to cut the interfacing. (Fig. 58a) Apply the inter facing to the upper collar. (Fig. 58b)
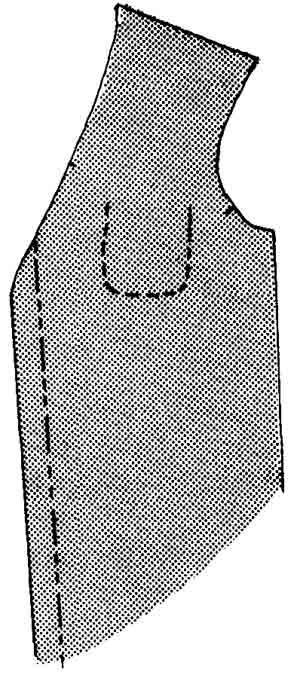
If the collar is cut with a separate band, the interfacing is applied to the upper collar and band section next to the neck. The other band section may also be interfaced. Garment fronts. When the facing is cut as an extension on the garment, the interfacing is cut to fit the extended facing (Fig. 59a) or it may be cut as a straight strip. (Fig. 59b) If the garment is collarless, apply the interfacing to the garment. Glue baste to hold the facing until the buttons and buttonholes are set, thus eliminating the need to secure it by hand along the garment- facing foldline. (Fig. 59c) Tithe garment doesn't have buttons and button holes, stitching the interfacing into the neckline seam and hem is adequate for most garments. Permanent glue can be used sparingly on some fabrics. Test to be sure it won’t show on the finished garment. 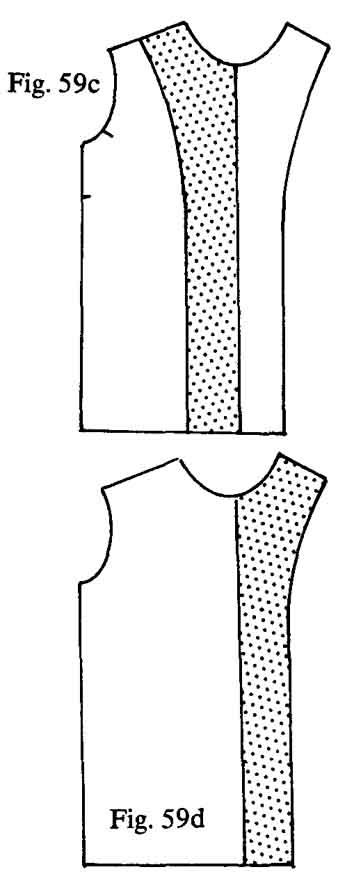
If the garment has a turned-back lapel, apply the interfacing to the facing. (Fig. 59d) The facing and interfacing edges can be finished neatly by facing to] facing (see FACINGS) or by using a flat-edge finishes. Welts, flaps, and pockets. Apply the interfacing 1 the section that will be uppermost on the finished garment. Waistbands and cuffs. Interface these sections as you would collars. |
| PREV: Basic Sewing Skills | NEXT: | Home |
Tuesday, 2009-10-06 7:06