|
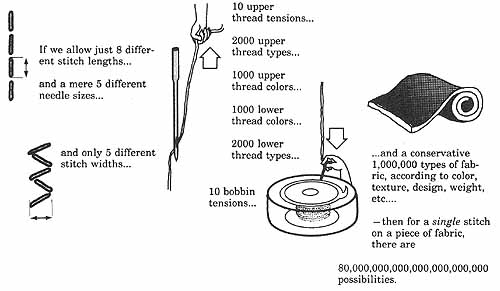
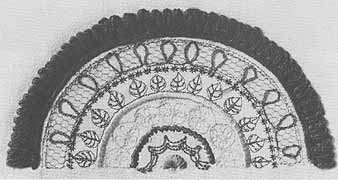
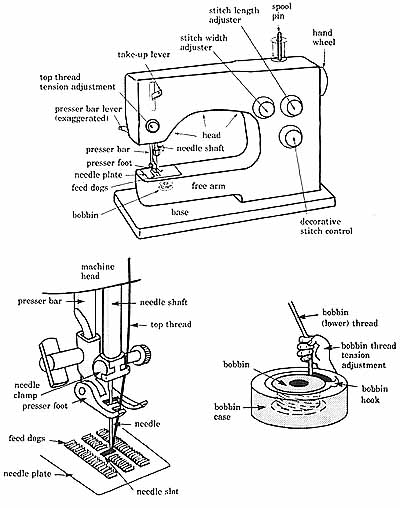
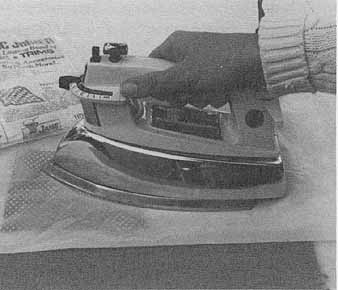
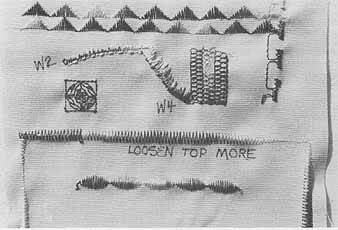
Aside from being beautiful, unique, and sensuous, machine embroidery has one overwhelming factor in its favor: it’s fast. How satisfying it's to dream up a colorful, heavily embroidered garment and then actually to complete it in one day. With machine embroidery, large areas of texture and color can be filled in a short time. Ideas can be executed before inspiration fades. And the scope of possible effects worked on a machine is staggering. Say that you had eight distinct settings for stitch length, going from the tightest stitch to the loosest basting stitch. And say that your zigzag machine had five settings from 0 (or no zigzag) to a wide zigzag. Add to those the various tension settings of upper and bobbin threads and throw in a few thousand variations in color and texture of threads. While you’re at it, consider various needle sizes and the million types of fabrics available to us. Feed it to a mathematician and she will tell you that there are at least 80 septillion possible combinations. And that’s for the first stitch! Fig. 1-3 shows but a few of the 80 septillion. The specific how-to’s of each technique are in the section texts. How difficult is machine embroidery? If I can hold a four-year-old on my lap and merely run the foot pedal for her as she free-machine embroiders, you can do it too. You don’t need a fancy zigzag machine to do work similar to most shown in these sections, except for the specific sections on decorative stitches and zigzag. In fact, graceful machine embroidery is still done on treadle machines (Fig. 1-4). On the other hand, if you’re thinking of buying a machine, I would recommend upgrading to one that does have a zigzag and fancy stitches because it increases the versatility of your work. Besides extending your decorative possibilities, it can handle all kinds of knit fabric, from the lightest tricot to the heavy sweater knits, for both garment construction and embellishment. No matter what your make of machine, though, learn how to take care of it by reading its instruction manual and by consulting a reputable sewing machine dealer. A guide such as this can hardly touch the wealth of knowledge of a helpful dealer with years of experience. For example, my favorite dealer instructed me that because one of my machines has a rotary shuttle mechanism, which travels twice as far for each stitch as the rest of the machine, it's vitally important that I keep my bob bin shuttle hook well-oiled. Except for my computer machine, which doesn’t need oiling, I oil my machine before every major project, and if it doesn’t seem to sew as quietly as usual, I oil that hook more often. (I also sing to my machine as I work.) Dust and lint are the enemies of your machine, especially if you have one of the new computerized machines. Keep a cover over your machine when you aren’t using it. Clean its innards every time you sit down to sew, using either the brush that comes with your machine or canned air (available in photography stores). About every eighteen months, either take the machine apart yourself for a thorough vacuuming and cleaning out of gunk, or take it to a dealer. We don’t think twice about taking a car in for a periodic tune-up; why not treat your sewing machine with the same respect? With proper care, a good machine can last for years. Some of the computer machines may be sensitive to magnets. Ask your dealer and be careful about setting magnetized pin cushions near the machine. Because there is no standard language for machine embroidery, you and I may use different terms for the same part of a machine. Fig. 1-5 shows a generic sewing machine, labeled with the terms I use. Your machine may differ— see your own instruction manual and re-label this picture to fit your machine. We will also start each section with a pictorial glossary of the terms used in it. Judi C. has students new to machine embroidery write “length” and “width” on press-on address labels. These can be stuck on the machine, yet later removed.
If we allow just 8 different stitch lengths...and a mere 5 different needle sizes...and only 5 different stitch widths 10 upper thread tensions...2000 upper thread types...1000 upper thread colors...1000 lower thread colors...2000 lower thread types... 10 bobbin tensions...and a conservative 1,000,000 types of fabric, according to color, texture, design, weight, etc....— then for a single stitch on a piece of fabric, there are 80,000,000,000,000,000,000,000 possibilities.
Supplies What supplies will you need for machine embroidery? Obviously a machine. You will also need a supply of machine needles in the various sizes. Incidentally, buy the needles made for your machine instead of grabbing the nearest packet at the fabric store. One reason the machine may be skipping stitches is that you’re using a needle not suited to your machine. Specific needles for specific threads and fabrics will be discussed in Section 2, but in general, fit the thread to the type of work or material, and choose the needle to make a hole big enough for the thread. But even the best machine will give shoddy results with a bad needle. If you sew over a lot of pins (a big no-no: you can damage your machine and run up a big repair bill or you could injure your eye with flying pin parts) or have been using the same needle for years, put in a new needle for each machine- embroidery project.
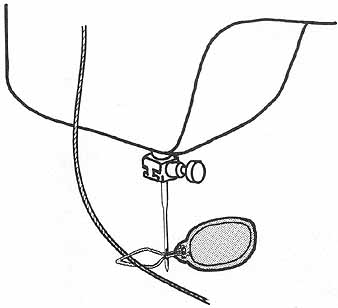
Thread is so reasonably priced that you can afford to treat yourself to one spool in at least all the rainbow colors, as well as white, black, and gray. And while you’re buying, throw in a few extra bobbins. The nicest present I’ve given myself recently is ten extra bobbins — no more unwinding a half-filled bobbin of one color because I need to fill an empty spool in another color. What threads are appropriate for machine stitchery? Believe it or not, al most any, from the finest embroidery thread to four-ply wool. Some of the thick slubby threads can't be threaded through a needle and should be wound onto the bobbin and stitched in a special way (see Section 6), or laid on the surface and couched down, but any thread that inspires you can probably be incorporated into your work. How ever, the greater part of your machine embroidery will be done with 100% cot ton or rayon thread, so buy a decent supply of it. Since 20% of the weight of cotton threads is water, after the thread sits around for awhile, it dries out, becomes brittle, and breaks when you sew. Either mist the thread with a plant sprayer, leave the thread outside overnight so dew will soak into the thread (but bring it in before the sun dries it out again), or store it in the refrigerator. Your major problem with rayon thread is its slipperiness. If it falls off the spool, it can wind around your upright bobbin spindle and break. Some machines have horizontal spindles or special spool holders that eliminate this problem. Here are four ways to tame rayon (see Fig.1-6): (1) tape a tapestry needle, eye-up, between the spool and the first thread guide on your machine; (2) buy a gadget that transforms your vertical spool shaft to a horizontal one (see Supply Source); (3) put the ray on through the center of the tube, from top to bottom, and draw it out through a notch in the base of the tube (make the notch with a file or knife); (4) stand the rayon in a coffee cup behind the machine and surround the thread tube with dried beans, to keep the tube up right. When you sew with rayon, start slowly, so the thread doesn’t jerk off the tube.
As for appropriate machine-embroidery fabrics, anything a needle will pass through is fair game, from gauze to leather. Some possibilities come to mind immediately, like cotton fabrics for appliqué. But splendid machine em broidery is done on see-through plastic, organize, felt, imitation suede, and a host of other unusual fabrics (see Sections 9-12). If you were to look at your backing fabric through a microscope, you would realize that heavy machine embroidery on a fabric backing is going to squish the threads of the backing and cause them to pucker. We try to minimize this by backing our fabrics with a stabilizer—in effect, changing, say, a lightweight cotton to a denim. In the past, we’ve used organza, organdy, muslin, or typing paper. But in the last few years, some marvelous new products for machine embroidery have appeared.
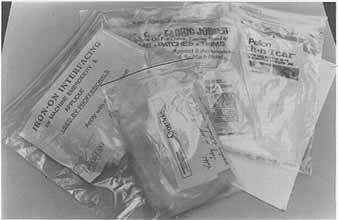
Your choices of fabric stabilizer are: (1) any see-through fabric such as organza or organdy, which remains a part of the stitching; (2) a non-woven inter facing that can be torn away from the stitching (and is generically called “tear-away”); (3) a new product called water-soluble stabilizer, which disappears when doused with cold water; or (4) paper (typing, tissue, or plastic- coated freezer paper), which is torn away when you finish stitching. From now on in this guide, I will say “use a stabilizer” and you’ll know that the stabilizer can be any of these four choices. Other supplies you will need are the regular sewing supplies, such as fabric marking devices, sharp scissors, pins, and tape measure, as well as some from the desk drawer — tracing and typing paper, graph paper, ruler, felt-tipped pen. I also keep a pair of tweezers near the machine for pulling out small pieces of stabilizer from the back of machine-embroidered garments and for extracting lint and broken threads from the bobbin case. A needle threader is helpful, too, for guiding thicker threads like buttonhole twist through the machine needle (Fig. 1-8). Put a spot of glue where the wires enter the holder, to prevent them from pulling out. You will often use a 6” (15 cm) or 8” (20.5 cm) embroidery hoop. The best hoops are designed especially for machine embroidery, but you can also use a screw-type hand-embroidery hoop. If you do, you may want to wrap its inside ring (the one without the screw or hinge on it) with strips of cotton fabric or bias tape. Secure the end with a spot of glue. When you stretch material in the hoop, particularly the lightweight fabrics such as organza, cotton strips keep the fabric from slipping and puckering (more on this in Section 4). If you plan to do any machine appliqué, you will need some or all of the new fusing materials. The fastest to use is a glue stick. Read the label to be sure it’s a washable glue. Also available is a disappearing basting tape that washes out. A wonderful new invention is an appliqué pressing sheet that allows you to bond fusible web to the back of fabric. Then you cut out your appliqué and fuse it to the backing fabric, adding whatever decorative stitching you want to the edge. A variation of this is a paper with fusible web bonded to it. You iron the paper to the back of your appliqué fabric, peel off the paper, and iron the appliqué to the backing fabric (Fig. 1-9). Using a test cloth will greatly in crease your chances of success in machine embroidery. For every project, set up a 6” (15 cm) square of the same fabric you’re sewing on to be used as the test cloth. On this cloth practice the stitches you intend to use in your em broidery. If the stitches pucker the fabric of your test cloth, loosen the upper and lower tensions until you reach a desirable result, always keeping track of your changes by writing directly on the test cloth with a felt-tipped pen. When you find the best tension settings and the best thread variation for your work, you will know how to proceed on the actual item to be embroidered. And if you save this test cloth, pinning it to your pattern or filing it in a sample notebook, you will always be able to duplicate your efforts with a minimum of initial experimenting.
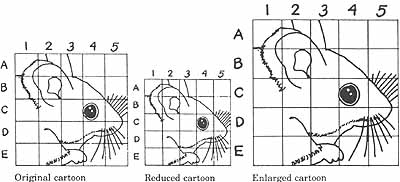
Another item will improve your efforts 100%: an iron. Mother was right; pressing makes the difference between sloppiness and craftsmanship. One last tip: if your foot pedal slips away as you stitch, put a press-on bath tub appliqué, available from hardware and grocery stores, on the bottom. The rubber of the appliqué will keep the pedal from sliding. Now you know what’s possible with machine embroidery: it’s not too difficult for you and your machine, and the supplies won’t deplete your bank ac count. Next you need to find out how to transfer a design from a piece of paper to your fabric. Enlarging Designs Many times you will want to enlarge a small design into something bigger, so it's useful to know how to blow up a design. If you have access to a modern photocopy machine, you can make enlarged copies easily. You can also take a small design to a blueprint or graphic arts store and they will enlarge it as much as you need. Even easier, but more expensive, is to buy an opaque projector, which projects your image to any size, depending on how far away from the wall you place the machine. The kind where you set the projector on top of the image to be copied is more useful for blowing up a wide range of original images than is the kind where you set your image on top of the machine. But if it’s midnight and you want to enlarge a design right now, use this easy technique. Lay ¼” (6 mm) graph paper over a design and trace the design onto it. Decide how much bigger you want the design — twice the size? Three times? Number and letter the squares as shown in Fig. 1-11. Now take a ruler and a fresh sheet of ¼” (6 mm) graph paper and rule off new squares. For example, if you want your new design twice as big, rule off every other line, both horizontally and vertically. If you want your finished design three times the size, rule off every third line. You will now have squares that are twice or three times the size of your original squares. Number and letter these new squares in exactly the same order as you did the original design. Start with square 1A and draw in the larger square whatever you see in the small square. Do this for each square . . . and surprise!, your design is enlarged.
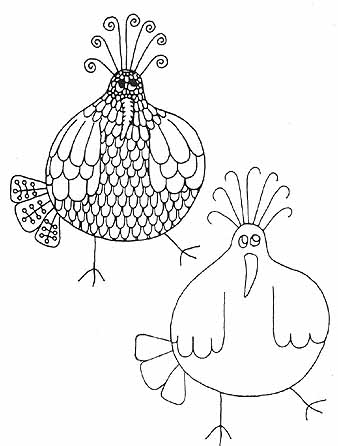
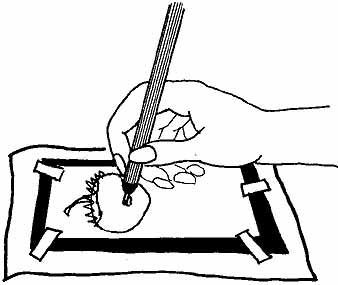
Once you’ve enlarged your design to the exact size you want, you can choose one of the eight methods to transfer it onto fabric for machine embroidery. Which method you choose depends on either the kind of fabric you’ve chosen or on whether you will reuse the pat tern. Before we delve into the ways you can transfer designs to your material, we should decide how much of the de sign to transfer. As is often the case, the rule is “least is best.” In general, only the main lines or curves of your design need to be sketched in. At best, only the outlines of large, filled-in areas need to be put onto the transferred design (Fig. 1-12). The old, venerable name for such a line drawing is “cartoon.” Long before the Saturday morning TV cartoons, the great painters of the Italian Renaissance were using cartoons to put their preliminary sketches for frescoes upon walls. On some of your designs, you will also need to indicate direction of stitching. This becomes especially important when you’re filling in with zigzag or using decorative stitches with directional designs.
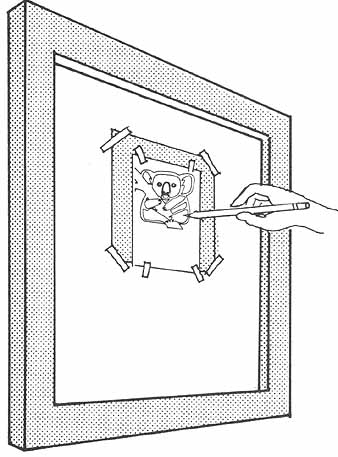
One of the most pleasant advances of recent years is the variety of marking devices. The most convenient is the water-soluble marking pen. It draws a blue or purple line on your fabric that washes out when touched with a Q-tip dipped in cold water. Use a variation, the air-soluble pen, when you will work immediately. Otherwise, the ink vanishes within 48 hours. (Our daughter once wrote my cousin a letter with an air-soluble pen. My cousin wondered why she received a blank piece of paper with faint purple marks.) Store your pens upside-down with the caps on to make them last longer. Visit a well-equipped sewing or quilting store (or send for the catalogs listed at the end of the guide) to ac quaint yourself with all the new marking tools available to you — white and blue charcoal pencils, transfer pencils, double-tracing wheels with built-in chalk, etc. Transferring Designs — Eight Ways My favorite method of transferring designs is to lay a piece of tracing or tissue paper over the cartoon and to copy it with a black felt-tipped pen. I often use the wrong side of outdated or extra tissue paper from clothing patterns, ignoring any print on the tissue. Wait a minute for the ink of the felt-tipped pen to dry so it won’t smudge your fabric, then tape the tissue paper to a window (assuming it’s daytime; see Fig. 1-13). Tape the fabric over the tissue, centering the design, and trace the design onto the fabric with pencil, water-soluble pen, or tailor’s chalk. Caution: If you know the design line will not be completely covered by the sewing machine thread, don’t use an ordinary pencil for tracing the design as it doesn't always wash out. On dark material I use a white pencil and on light material, a blue one. This method of tracing works on a surprising number of fabrics — from the most transparent fabric through medium-weight cottons with even surfaces. It doesn't work well on linen and other textured fabrics.
At night, use a lighted TV screen on a channel you don’t receive. Or go out side, and use the window method by looking into a well-lit room. In lieu of a lighted window, you can use a make-shift light table. Put a sheet of clear plastic or an old window on a cardboard box (or sawhorses or two chairs or an open drawer or whatever you can improvise), into or under which you’ve set a bare-bulb lamp. Cover the plastic with plain white paper so the light is diffused. Now tape down the cartoon, put the fabric over it, weight or tape it down, and trace the design (Fig. 1-14).
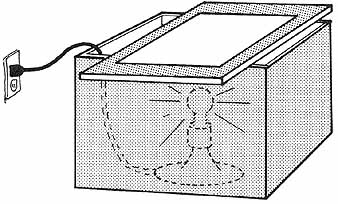
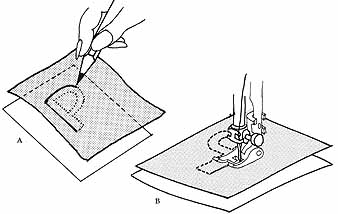
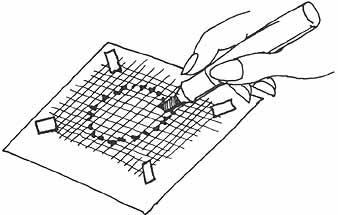
Best of all, invest in a portable light table (try your local photo, art, or engineering supply stores). I bought a used one from an engineer for $30. I keep it right next to my sewing area and use it constantly. See the Supply List for mail-order sources. Another way to transfer designs is particularly suited to the machine. This method works well on all fabric except the heavily textured and is especially useful for transferring repeat patterns (Fig. 1-15). Copy the cartoon onto a piece of plastic. A meat tray works, as does acetate from an art store. You can also use typing paper. Sew along the lines of the cartoon with an unthreaded machine, using a Size 9(60) sewing machine needle so that the holes in the plastic or paper are not too big. You can sew with or without the presser foot on. Pin or tape the plastic to your fabric, centering the design wherever you want it, and gently rub tailor’s chalk over the line of holes. I use a rolled-up pad of felt to apply the chalk to the fabric, gently rolling it into the holes of the plastic and taking care not to put too much onto the design at once. If you are using plastic, you can see how well your design is being marked. If you use paper, you will need to check. Pull up one corner of the typing paper from time to time to check whether enough chalk has gone through the holes to mark your design sufficiently. Then carefully lift off the plastic or taped paper and lightly blow off the surplus chalk. If you try to brush it off, the chalk will smudge the fabric.
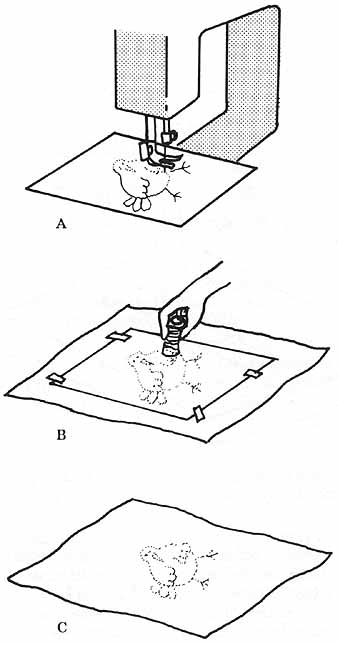
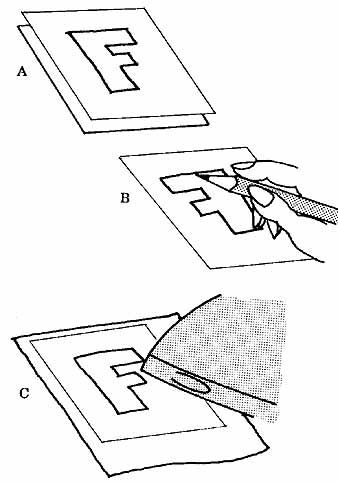
Since we often put a fabric stabilizer above or underneath fabric to prevent puckering, a third method of transfer ring designs becomes simple. Put the stabilizer directly over the cartoon and trace with a dark line (Fig. 1-16A). If the item being machine-stitched will ever be washed, use only felt-tipped pens that are guaranteed waterproof (such as canvas-work or needlepoint markers). Now pin-baste the stabilizer to the back of your fabric, with the de sign against the wrong side of the fabric; otherwise you’ll have a mirror image on the topside, which is undesirable for, say, letters and other non-symmetrical designs. Load your bobbin with a thread that's slightly lighter or darker than the color of your fabric. Set your machine for a long stitch (approximately 6 stitches/inch) and machine-baste the design, the stabilizer facing up and the topside of the fabric against the needle plate (Fig. 1-16B). You now have transferred the design to the right side, where it's marked by your bobbin thread. A variation of this method is to trace the design or draw directly onto iron-on interfacing, which is then bonded to the back of your fabric. However, the design will be a mirror image on the right side, of course, when you machine-baste through the interfacing.
To transfer a design with dressmaker’s carbon paper, available in any fabric store, tape your fabric to a hard surface, like a glass-topped desk or a Formica kitchen counter. Trace the cartoon onto tissue or tracing paper and center it on the fabric, weighing down the top edge with anything handy and heavy. Carefully slip a piece of dress maker’s carbon paper — don’t use typing carbon paper because it smudges — between the tracing and the fabric, and then anchor the bottom edges of the tracing paper over it. Trace the design with an empty ballpoint pen or the handle end of a letter opener. You must push hard enough to produce a decent line on the fabric, but not so hard as to tear the tissue paper (Fig. 1-17).
Transfer pencils are now available in needlework and sewing stores (see Sup ply List), taking some of the fuss out of transferring the design. They seem to work better on warm (not hot) materials, so iron both your paper and your fabric with a low dry heat before drawing with the pencil. Lay the warm tissue or tracing paper over the cartoon and copy with a felt-tip pen. Let the ink dry and then turn the tissue paper over and retrace the design on the wrong side with the transfer pencil. Now lay the tissue paper on top of the warm fabric, the transfer pencil side against the fabric, and pin it carefully in place. Use a dry iron as hot as your fabric permits (Fig. 1-18). Since the transfer lines sometimes rub off later as you work, as soon as the transfer cools, I like to machine-baste the main lines of the design as a safety precaution. The transfer lines that remain visible on the fabric wash out easily with baby shampoo or when sprayed with hair spray before washing. Since a washing machine is in constant agitation, you don’t have to worry about the transfer pencil bleeding. But if you are hand-washing, be sure to agitate the water. If you let the fabric sit, the transfer marks will bleed into the water and then settle else where on the fabric.
Another kind of transfer pen is pres sure-sensitive, rather than heat-sensitive. You draw the cartoon on paper, place it against the fabric, and retrace the line with a dry ballpoint pen. The line transfers to the fabric. Until water-soluble stabilizer appeared, transferring a design to heavily textured fabric was a problem. Transfer pencil, chalk, and carbon lines became lost in the bumps of the fabric, and even machine basting lines were difficult to follow. With water-soluble stabilizer, though, the transfer is easy. However, if you run out of water-soluble stabilizer and need to transfer a de sign, lay white net over the cartoon and copy the design with a felt-tipped pen. (If you’re copying from a library book, lay a protective piece of tissue paper over the design and don’t use a felt-tipped pen as it will bleed through the tissue paper; use a crayon instead.) Then lay the net over the fabric and re trace the design lines with a fat-tipped felt-tipped pen (waterproof), which runs through the holes of the net onto the fabric (Fig. 1-19). This isn’t my favorite method as the results are vague and wavery, but sometimes this is the only method that works.
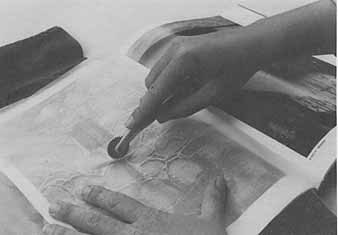
Another way to copy a design from library books is to use waxed paper and a dressmaker’s tracing wheel. Put a towel under the page to be copied and lay ordinary waxed paper from the kitchen over the page. Trace your design with the wheel (Fig. 1-20). You can now use this paper as stabilizer and pattern on the underside of your fabric. Since the paper is milky-colored, though, you won’t be able to see your marks if your fabric is also light-colored. If your waxed paper isn’t wide enough, simply overlap two pieces and press with a warm iron to fuse them together. The wax won’t hurt your iron. Jackie D. prefers to photocopy designs from her library books. She says color pages photocopied in black-and-white offer a clearer idea of the major shapes. The other method I use on heavily textured fabric is to cut the main de sign shapes out of paper (typing or construction), pin the papers to the fabric, and machine-baste around the outsides of the paper, not catching the edges (Fig. 1-21). Then remove the pins and construction paper. You can use tear- away for this method, too. Cautions Now that you know how to transfer designs and are eager to start, it’s prudent to remind you of some cautions. It’s important to consider how your machine embroidery will be used and choose appropriate fabrics and threads. I once sent a friend a zigzag message on wool felt, which she decided would make a great patch for her jeans. Wool felt isn't washable, which she forgot until after her first trip to the laundromat. Threads, too, must be carefully chosen for ironability and washability. I heard a sad story about a white polyester knit dress with red silk floss topstitching, made for a prestigious fashion show. It was handled and soiled so much before the show that someone tossed it into the washing machine. Those pitiful pink streaks never did come out. Likewise, if you are using rayon or nylon threads, which can't withstand a high iron temperature, think twice about stitching on 100% cotton or linen fabric which will need heavy pressing after washing. Preshrink your fabric, straighten the grain, and test it for colorfastness. All those boring preliminaries prevent that gut-wrenching feeling of spending hours on a garment that's ruined by the first wash. Also, when working on a garment, to prevent unalterable puckering and shrinking of the fabric, don’t cut out the exact pattern shape before machine embroidering. Leave at least a 2” (5.5 cm) border all around. Do the work and then cut out the pattern piece. Although machine embroidery has its own visual identity and should not attempt to imitate handwork, it does combine harmoniously with all kinds of hand embroidery — stitchery, patch work, drawn thread, and many more. If this guide touches you at all, by the last section you will be eager to develop your own ideas. I would like to stress that there is never only one way to do any of the techniques and procedures described in here. Experiment on your machine and find the way that works best for you.
|
| PREV: About this Guide | NEXT: Straight Stitch | Home |
Wednesday, 2014-02-19 21:56