|
Elastic finish . Use ball point sewing machine needle when stitching
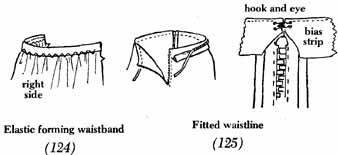
elastic. There are several methods for using elastic to finish waistlines. Elastic in casing is the easiest of “pull on” waistline finishes. Remember: Lower edge of casing will represent the stitching line of the waistline. For casing you will require two times the width of the elastic plus 3/8 to 1/2 inch. Waistline is less bulky if cut edge of casing is overcast by machine and left hanging inside garment, about 1/4 inch. Test width needed for casing; take a scrap of garment fabric, fold over elastic, and pin be sure elastic slides easily through pinned casing. Mark position of pins on both sides of fabric. Unpin and measure distance required. Stitching line of casing must be straight so casing will be wide enough to insert elastic. (Machine stitch your test sample.) On right side of garment carefully mark stitching line of waistline; mark fold line. Finish cut edge; fold casing to inside of garment and baste folded edge. From right side check width of casing (folded edge to stitching line). Use adjustable seam guide or a strip of masking tape stuck on machine, set at required width of casing. From right side of garment machine stitch on marked line, fastening casing to garment; a very narrow zigzag stitch may be used. Leave an opening to insert elastic. Insert elastic, overlap ends, and stitch securely. Close opening. Zipper closing and elastic in casing . This allows garment to be fitted in waist area. It is neater and less bulky if garment is worn with “tuck in” tops. Waistband will fasten with trouser hook and eye or two small hooks and eyes. * Leave an opening on left side for zipper and hook and eye. Turn seam allowance to wrong side and baste. * Insert elastic and pin ends about 1/2 inch from edge opening. Hand stitch ends securely to inside of waistband casing. * Slip stitch open ends of casing. Measure space for hook and eye. * Turn down ends of zipper tape. Tack. Insert zipper in opening by machine or, by hand, using backstitch. Elastic-forming waistband . For easier handling, leave one side seam partially open. Choose elastic webbing in color to match fabric; measure elastic; don't allow for lap because when side seam is closed, stitching will continue through elastic. On right side of garment stitch a row of machine stitching just inside waist seamline, 1/2 inch from cut edge. Divide elastic and waistline into 8 equal parts. Pin elastic to right side of garment, covering stitching on seamline, matching pins. Zigzag, using long stitch, close to edge of elastic. Trim seam allowance slightly. Close opening. Press seam of garment open. Hand stitch ends of elastic to keep flat. Hint : To keep fullness distributed evenly and to prevent elastic from curling, stretch out finished band and pin through all layers at seamlines and darts. Machine stitch in “crack” of stitching lines from top of band to lower end of casing. Fasten thread ends of wrong side. Fitted waistlines, without a waistband, on garments with zipper closing . Use elastic webbing, petersham belting, boned belting or non-slip belting. Either elastic webbing or non-slip belting will hold “tuck in” tops inside garment. Machine stitch around waistline seam, 1/2 inch from cut edge. Fit belting around your body to degree of snugness preferred. Mark length, allowing for finishing ends. Divide waistline of garment and the finished size of belting into 8 parts. Pin elastic to garment, matching pins; setting elastic at machine stitching line, zigzag into position. Trim seam allowance slightly. Turn down ends of zipper tape and tack. Turn back ends of belting; handstitch. Fold belting to inside of garment; baste. Tack belting securely at seams and darts. Use hooks and round eyes or trouser hook and eye to close belting. 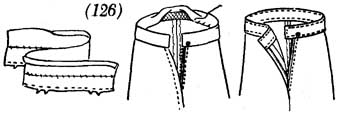
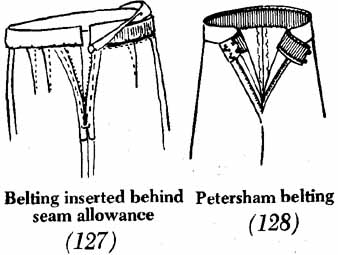
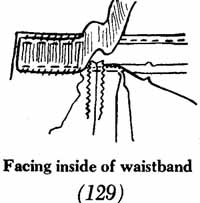
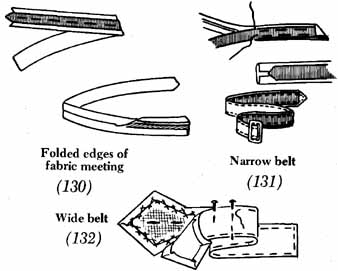
Fitted waistline, without waistband, finished with bias facing . Set zipper in opening, metal top of zipper set 1 inch from cut edge of waistline. Mark stitching line of waistline on right side of garment, using chalk or basting. From firmly woven fabric (cotton or cotton and polyester sheath lining), cut strips of true bias, 2-1/2 inches wide and long enough to fit waistline. Join strips if necessary — see Section 15 for joining bias strips. Fold bias in half lengthwise and press. Baste to right side of top of skirt on the marked stitching line, but using only 1/4-inch seam off the cut edges of bias strip. Baste 1/4-inch twill tape on seamline (to keep waistline from stretching). Machine stitch on seamline, stitching through tape, bias and garment — see diagram. Trim garment seam edge to 1/4 inch. Press bias upward, machine stitch on bias near edge of seamline, turn bias to inside of garment, baste, press. Tack bias securely to darts and seams. Turn in ends and hem to zipper tape — see diagram. Sew hook and eye above zipper. This is a couturier method of finishing a waistline seam and is excellent. Waistbands — making, attaching, and finishing. To keep band from stretching and wrinkling, interface bands with a firm interfacing fabric or use petersham belting, either inserted inside band or handstitched to finished band. Petersham belting is the easiest to use. Cut waistband on lengthwise grain. Band should measure about 3 inches longer than waist measurement to allow for seams and underlap. Check length of paper pattern; check finished width. Is it the width you prefer? Buy petersham belting ac cording to desired width. Shrink all belting and interfacings . Follow sewing guide for constructing band or study following diagrams and directions. Try a number of methods as you make garments and decide which you prefer to use in the future. Interfaced bands . Cut interfacing half as wide as waistband. Baste to wrong side of notched half of band. Catch stitch or hem to fold line. Turn under and baste seam allowance along unnotched edge. Right sides together, pin band to garment, matching front edge of garment to stitching line of front end of band; match notches and the center front, side seams, and the center back markings of band to corresponding markings on garment. Underlap will extend beyond back edge. Ease garment edge slightly if necessary. Baste. Machine stitch. Trim seam allowance of interfacing close to stitching line. Close ends. Trim interfacing. Blend waistline seam edges. Turn waistband right side out. Baste and press waistline seam allowance toward waistband. Pin or baste upper edge of band along the fold line. Lap free edge of band over waistline seam, matching notches. Hem to seamline — see diagram 126. Top stitch entire waist band. * Belting inserted behind seam allowance, placing lower edge of belting to seam line. Baste. Tack cut edges of seam to belting. Pin band closed. Hem or slipstitch to seamline. Top stitch entire band. Petersham belting applied to inside of finished waistband. Make skirt band without interfacing. Attach to skirt. Belting is exact width of finished band. Pin belting to inside of skirt band, cut ends of belting turned under. Hem to position. Facing the inside of the waistband . Narrow waistbands don't require interfacing. Facing the waistband is an excellent finish for bulky fabrics. Petersham belting (black, white), milliner’s corded ribbon (colored), is excellent to use because the edges are finished. See diagram 129 for application. Shaped facings on waistlines. Follow sewing guide. BELTS Most fabric belts should be interfaced unless faced or backed by firm belting. For interfacing use cotton, tailor’s canvas, belting, non-woven or press-on interfacing. Choose type suitable for fabric and width of belt. Make test sample. Fold and pin pieces of fabric over interfacing to determine stiffness and bulk. Cut fabric on lengthwise grain. Cut twice width of finished belt plus seam allowances. Cut 6 inches longer than waist measurement to allow for lap or tab end and finishing it, also to allow for end that goes over buckle. This end can be adjusted at any time. This end will be less bulky if cut edges are overcast. Folded edges of fabric meeting in center of underside of belt and slip-stitched together produce a flat, neat belt. Make sample to judge width of fabric required. Narrow belts faced or backed with petersham belting (black, white) or petersham ribbon (used by milliners; available in all colors). This is a simple procedure and an excellent finish. Make sample, cutting fabric wide enough so cut edges meet in center. Turn and pin seam allowances. Pin and baste the ribbon or belting in place. Slip-stitch. Edge-stitch from right side if desired. Shaped or very wide belts require interfacing . Trim seam allowance off interfacing. Baste and catch-stitch to upper section of belt. Fold edges of fabric over interfacing, clipping fabric edges where necessary and notching (Section 9) if required. Place lining over belt. Pin and diagonally baste down center. Turn under and pin outer edges, clipping or notching as before. Slip-stitch folded edges to belt — see diagram. Edge-stitch from right side if desired. Hint . Velcro is useful for fastening loose end of belt to belt. Tie belts. Use lengthwise grain. Cut desired length. Stitch lengthwise seam, leaving a 1 - 1-1/2 inch opening for turning. Close both ends. Use a pencil or the knob end of a strong knitting needle to push end through opening. Slip-stitch opening closed. Check finished length of the belt pattern before cutting. |
| PREV: How to Set in and Finish a Sleeve | NEXT: How to Fit and Alter Garments | Home |
Thursday, 2009-07-16 15:41