|
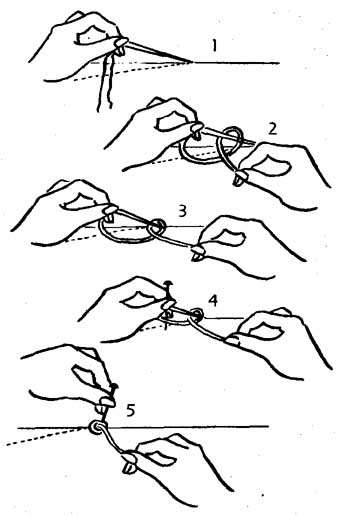
The following techniques are used by most dressmakers. Practice them; assess their value. Use them in garment construction where you think they will be suitable and satisfactory. DRESSMAKER’S KNOT If properly tied will not pull apart. Used to tie threads at ends of darts,
tucks, and shirring. Observe the 5 steps in diagram. Support fabric by placing
on table.
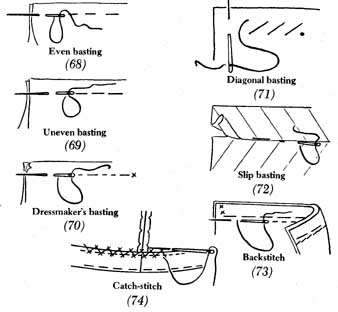
HAND-STITCHING Hand stitching is used on all garments. * Use a thread no longer than 22 inches to avoid tangling. * Place knot in end that came off spool last. To prevent twisting, knot double threads singly; use beeswax (Section 3). Basting hints — Dark colored threads may leave bits of lint on light colored fabrics, which are almost impossible to remove. To prevent bas ting pulling out when fitting, fasten both ends securely. Begin with a back stitch, and end with one or two small cross stitches. Support fabric when pinning, then basting. * Even basting — stitches and spaces about 1/4 inch in length. * Uneven basting — a long and a short stitch.
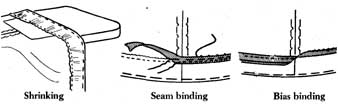
* Dressmaker’s basting — a long stitch and several short stitches. Quick and strong. Useful on long seams. Keep fabric flat on table. * Diagonal basting — holds turned edges securely for pressing; holds underlinings against fabric, etc. Keep fabric flat. * Slip basting — useful in matching plaids, stripes, designs. Done from right side of fabric. Take a long stitch under fabric, insert needle at right angles into folded edge. * Iron or press basting — Use with discretion because bias and crosswise grainlines stretch, also curved cut edges. * Back-stitch — resembles machine stitching on right side, but overlaps on wrong side. Used to insert zipper by hand. Take small stitch through fabric. Take a stitch back to cover space. Understitches are twice the length of top stitches. * Catch-stitch — used over an edge to hold it flat against a garment section or on hems, as described in hem finishes. SEAMS and SEAM FINISHES * Pinked — on fabrics which don't ravel. Press open. Stitched and pinked on fabrics which ravel slightly. Stitch about 3/16 inch from cut edge. Press open. Pink cut edge close to stitching. Overcast — when edges ravel. Overcast neatly by hand or by machine (zigzag). Work with the grain. Press open. Stay-stitch 1/8 inch from cut edge if necessary, then overcast. Edge stitched — turn under cut edge about 1/8 inch and stitch from right side of fabric, close to edge. Press open. (A neat finish for straight edges of unlined jackets, but produces a bulkier edge than zigzagging). Ribbon seam binding — Shrink binding. Fold and press so one edge is slightly narrower than the other; press seam open. Baste over cut seam edge, keeping seam edge close to fold. Machine stitch from narrower side. Bias binding — comes prepared in packages, double-fold; of silk, crisp cotton and soft cotton (nainsook). It is ready to apply, pressed so one edge is narrower. Baste over seam edge. Keep cut edge close to fold. Stitch from narrower side. Press seam open. Net used for binding choose a fine mesh. Net may be cut on the straight because it has no grain. Cut strips 1-1/2 inches wide, fold in half, and you have one finished edge. Stitch cut edges to right side of seam edge. Turn net over seam edge and stitch in place. Use on straight or curved seams. Hint: Pull a piece of net crosswise, lengthwise and diagonally. It stretches lengthwise and crosswise, but doesn't stretch diagonally. Custom dressmakers use net for many purposes, cutting it in the direction necessary for its use.
Plain seam, double-stitched and pinked — Do not press seam open. Place a second row of machine stitching 1/4 inch from first row. Pink close to second row of stitching. Press seam to one side. Neat finish for sheer fabrics. Plain seam, double-stitched and overcast — Do not press open. Place second row of stitching 1/4 inch from first. Trim to 1/16 inch from second row. Overcast by hand or machine. DARTS Darts are used to shape garment fabric to a body curve. Use ruler and chalk pencil or lead pencil to mark stitching line or tape a strip of paper along stitching line. Darts must taper to a very fine point. There should be no bubble at end. Stitch from wide end to point. Stitch slowly. The last 3 or 4 stitches at point will catch only one or two threads of folded edge, or the end will bubble. Turn wheel by hand as you near end. Check: Fold dart in the paper pattern. Observe the point. It is very sharp and fine. Crease folded edge of fabric dart with fingers. Pin paper dart over fabric to compare accuracy of stitching lines. Tie thread ends with dressmaker’s knot. Press in direction indicated on sewing guide. Press over a curved surface — tailor’s ham or press mit. Remember: 1/8-inch increase or decrease on double layer of fabric equals 1/4 inch. In a skirt or dress, if there are 4 to 8 darts around the body, the garment will be 1 to 2 inches larger or smaller than the pattern size. Be honest in your checking. Inaccuracy of stitching lines is the cause of many fitting problems. Many beginners think they used the wrong pattern size. If body measurements were taken accurately by an experienced person, the fault is probably inaccurate stitching or cutting. Cutting darts open — Consider fabric before cutting. Does it ravel easily? Will cut edges require finishing? • Very narrow darts — Do not cut. Press as indicated. • Medium darts — Do not cut unless necessary to reduce bulk. • Wide and very wide darts — Trim to seam width. Press as indicated; always observe illustrations on cutting guide. Finish edges. • Darts which are pressed open — Cut to within 1 to 2 inches from point. Always stop when cut edge is 1/4 inch from stitching line. Press open and form a box pleat in uncut section. • Curved darts — Do not cut open unless necessary. Clip folded or cut edges at regular intervals so the dart will lie flat when pressed over a curved surface. Remember: Clipped darts can rarely be altered; fit garment before clip ping and pressing. Pressing darts. Press folded edge first; press in direction indicated. Use strips of brown paper under darts if fabric marks — shape paper for curved darts. HEMS and HEM FINISHES Let garments hang about 24 hours to allow fabric to “take its own weight”. Mark hem. Fold on marked line, keeping a smooth flowing line. Baste close to folded edge. Trim to desired width. Place a row of machine-ease stitching 1/8 inch from cut edge. Pull up bobbin thread until hem lays flat against garment, seam on seam. Place a strip of brown paper, shaped if necessary, between hem and garment. Steam until all fullness is re moved, moving iron from folded edge toward cut edge. Lay hem either lengthwise or crosswise on ironing hoard. Have board near table to sup port weight of garment.
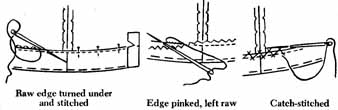
Finishing cut edge • Overcast — by hand or machine. • Seam binding — ribbon, lace, net. • Bias seam binding — more satisfactory for circular skirts — use silk or cotton single fold or cut binding from net or a lining fabric. • Raw edge turned under and stitched — lengthen machine stitch so edge can be pulled up to lie flat. • Edge pinked or left raw — use on many bonded or non-ravel fabrics. Machine stitch 1/8 inch from cut edge. Also used on coats or fully lined garments.
Baste finished edge of hem to garment and stitch in position, using a slip-stitch, catch stitch, or blind-hemming stitch. Do not pull thread too tightly. Take a back stitch occasionally. Pick up only one or two threads of garment fabric so no stitching will be visible on outside of garment. 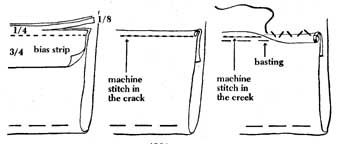
Hong Kong finish or bound hem edge — The hems of garments made from heavy fabrics or fabrics which ravel easily are often finished with bias binding. Prepare the hem for finishing following the procedure for all hems; mark hem, turn hem, baste lower edge, trim to desired width, machine ease stitch cut edge, draw up bobbin thread, press, shrinking out fullness. Then finish the raw edge of the hem as follows. Cut a strip of true bias 1 inch wide from a lining fabric. Or, use ready-made silk bias binding and press the folded edges out to produce a fiat bias strip. Fold under one end of the bias strip. Beginning with the folded end, pin the right side of the bias strip to the right side of hem edge, keeping the cut edges exactly even. Where bias strip begins and ends, overlap about 1 inch. Machine stitch 1/4 inch from cut edges. Trim seam slightly if type of fabric permits trimming, so as to produce a narrow binding and hence a more attractive finish. Fold bias strip over the cut edges, working from the right side of the hem and keeping width of binding uniform. Baste. Machine stitch in the “crack” of the seam and the machine stitching will be almost invisible. Press lightly, if necessary, using a strip of brown paper between the hem and the garment. Baste the hem to the garment near the binding. Fold back the bound edge at the machine stitching line and finish as for the French hem or Tailor’s hem. Read instructions and see diagrams. You will note that the raw edge of the bias strip is hidden inside the hem. That is why the ready-made bias binding is pressed open before applying to the cut edge thus producing a less bulky edge. This method of binding a cut edge is used in custom dressmaking to finish the raw edges of seams, facings and hems of unlined coats, coat dresses and jackets. It is less bulky than using a folded bias binding and the raw edge of the binding is always hidden. Fine nylon net or tulle (see “net used for binding” in this section) is used on delicate fabrics that fray easily such as silk velvets, chiffons, metallics, etc. It is also used to finish raw edges of lace garments. French hem or Tailor’s hem finish — rarely shows on right side of garment. The stitch occurs between hem and garment, producing a neat inside finish, also wears well. Used by all tailors and high-class custom dressmakers. Follow procedures for all hems; baste lower edge, trim, machine ease stitch and draw up thread, press, shrinking out fullness, finish edge. Baste hem to garment, placing basting 1/4 inch from edge. Hold hem in left hand, cut edge uppermost. Fold loose edge back and hold with thumb. Work from right to left. Use sharp, rather fine needle and pick up a thread of garment fabric and then take a stitch in the folded edge — stitches of equal length — 1/4 inch. Pull up thread gently, leaving slightly slack, because it tightens when folded edge falls back into position. Take an extra stitch, for strength, at regular intervals, in the folded edge. Check right side occasionally for tension of threads and visibility of stitches. Observe diagram for finishing corners at hem edge of garment openings. To keep kick pleats closed. Eventually the inner edge of most kick pleats stretch, and the pleat will not stay closed. Stretching can be prevented by taping the inner edge. Use preshrunk 1/2-inch cotton twill tape, preshrunk silk seam binding or nylon seam binding. (See diagram 92.) 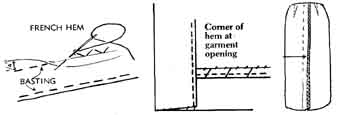
In Section 6, under points to remember, it was suggested that all kick pleats be cut to extend from hem to waistline. If the pleat has not been cut to the waistline add a strip of lining fabric. Measure the length of the inner or cut edge of the pleat (hem to waist) on the paper pattern. Cut the tape 1/2 inch shorter. Pin the ends of the tape to the ends of the cut edge of the pleat. Working back and forth, pin the tape along the edge of the pleat, easing in fullness evenly. Baste if necessary. Machine stitch along both edges of the tape. Press, shrinking out fullness of garment fabric. The shortening of the tape draws the pleat closed and prevents stretching. Hem with a pleat — To reduce bulk and obtain a sharp crease on the pleat, clip the seam allowance at the top of the pleat and trim the seam to 1/4 inch below the clip. See diagram. Press the seam open. Stitch by hand, through all thicknesses of the folded edge. This is a “trick of the trade” and is used on pleats in skirts, coats, etc. It is very good for knit fabrics. (See diagram 93.) 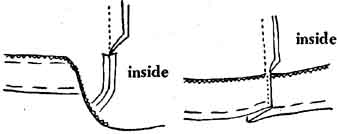
Hints: Hems for sheers and transparent fabrics and scarves. * Rolled hem — staystitch 1/8 to 1/4 inch from cut edge. Trim close to stitching. Roll hem edge between thumb and forefinger, moisten finger slightly, roll back and forth, making width of roll as narrow as possible. Slip stitch. * - Narrow stiffened hem — Use horse-hair for stiff finish, double fold of net for softer finish. Stitch to edge; turn and baste; slip stitch into position. * Wide hems — are turned twice — a 2” hem requires 4” of fabric. This is also used on sheer curtains and on custom-made drapes. Weights — Small round or square metal weights (soft enough to trim smaller, using kitchen shears) are used at seams and corners of coats and jackets to assist in “the hang” of some garments. Chain weights and covered weighting can be purchased by the yard to tack along hem edges if required. Weights are used sometimes on cowl necklines. TRIMMING SEAM ALLOWANCES Consider whether or not fabric will ravel; whether garment will be washed or dry-cleaned. The amount trimmed depends on type of fabric as well as type of seam and type of finishing. 1. Regular seams with raw edges exposed receive more wear. Some seams may be altered in the future. * Pinked edge — never trim to less than 1/2” from stitching. * Double-stitched and pinked — 3/8”. * Double-stitched and overcast or zigzagged — 1/4”. 2. Encased seams — seams with raw edges concealed; rarely become frayed; e.g., collars, cuffs, facings, etc. These seams are usually trimmed to 1/4 inch before turning. Pattern guides merely state “trim seam”. You are expected to use common sense in determining the amount. Top-stitching pleats — to hold pleat close to the body near the waistline. Usually stitched from the level most flattering to the individual, 7-9 inches below waist. Always stitch from the bottom up. |
| PREV: How to Make Pants and Shorts | NEXT: Armhole and Neckline Finishes | Home |
Friday, 2016-03-18 17:52