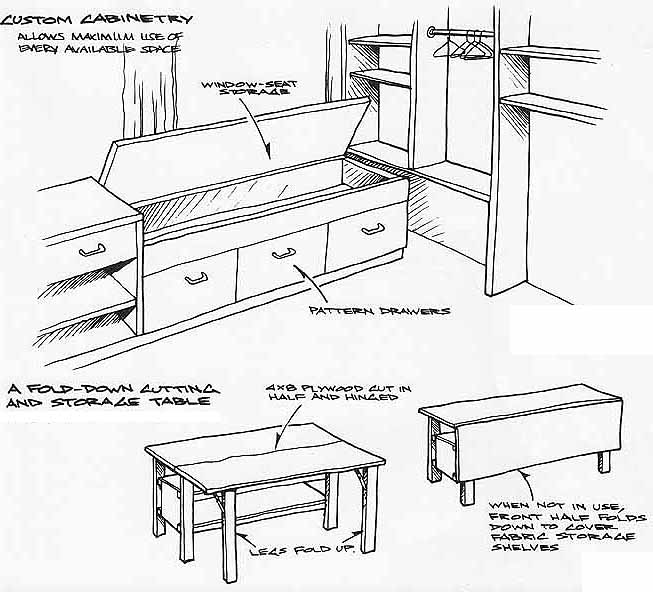
When I started reading letters from readers, I expected to see a lot of clever ideas about fabric storage, cutting surfaces, and room arrangement. But your letters weren’t only about spaces and hardware—you also shared thoughts and feelings about your selves, your arts, and how your spaces affected both. A central theme, voiced over and over again, is legitimacy. Many of us connect the validity of what we do with having a designated, recognized place to do it in. Serious space tends to give importance to one’s work. I could never imagine living where my sewing didn’t have as much space as it needed. A relative of mine didn’t start sewing seriously until she had her room together. For one client, the studio is as necessary to her well-being as practicing the fine arts she’s trained in. For another client, whose sewing room is shown and described in “An affordable dream room” below, noted that, while sewing, knitting, spinning, and weaving have always been valid activities to her, her family and friends tend to interrupt her less now that she has a “studio.” She says there’s less tendency to assume she can put down her work to go do what others want her to be doing. Along with this sense that a dedicated space makes sewing a serious activity is a second and somewhat paradoxical feeling. Many of us feel isolated and shut out if our work spaces are out of the traffic flow of our families. While the back bed room may seem to be the perfect place to sew (since we can close the door on the mess), we may still prefer the dining room so that we can fix a snack, mend a scratch, or just take our inspiration from the life going on around us. A client recently noted: “I have sewed in the bedroom, in the dining room, and for a while, in an office built in our garage. I thought the office would be perfect, as it had air conditioning, carpeting, phone, and a large drafting table with overhead lighting. But I did not like being so far from the family, sol went back to sewing in the dining room. “I now have a house with a large family room off the kitchen. The ‘breakfast eating area’ is now my sewing room. It’s perfect, as I can see television, be with the family, and am near the kitchen and utility room.” The back bedroom of a client’s mobile home in Avila Beach, CA, had been her sewing room for years, but she describes it as cold and dark, and the carpet as a magnet for pins which then found her husband’s feet. Her new sewing room, built off the kitchen, is “the dream of my life.” Her fold-away table is shown in the figure on the facing page. When I asked her what role the sewing room played in her life, she called it “the heart of the house.”
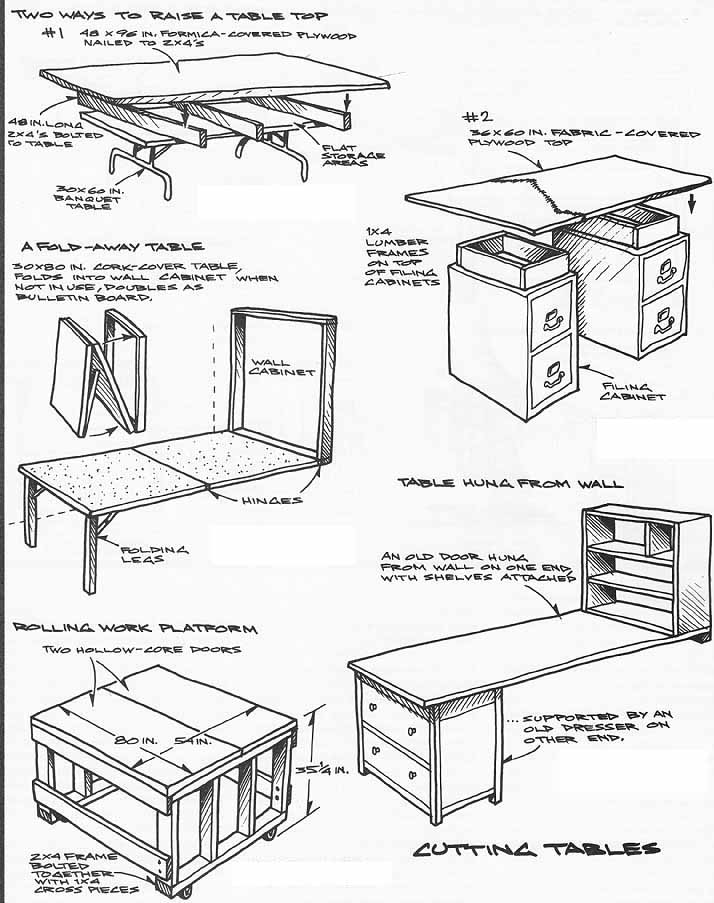
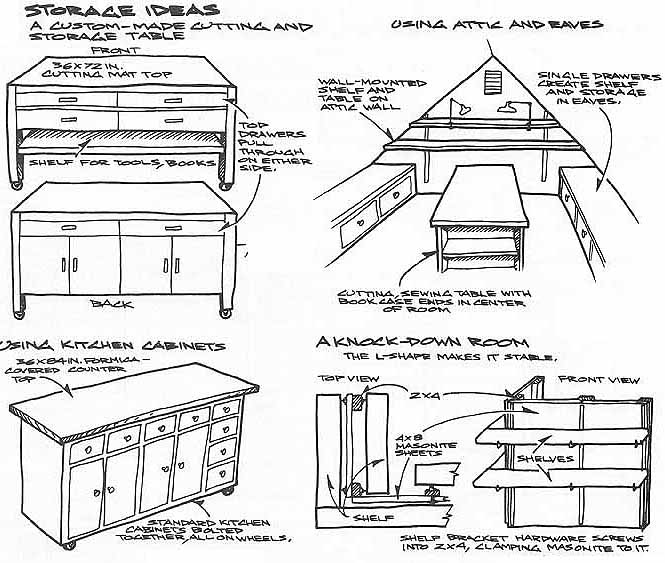
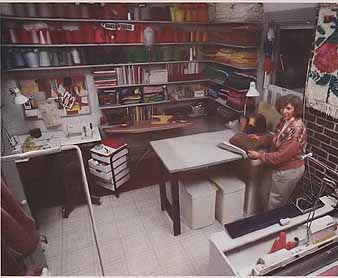
The most important part of the sewing room is the sewing machine, right? Not according to the responses we received. Nearly half of the letters concerned cutting surfaces, some to the exclusion of all else. Drawings of some useful tables, from the do-it-yourself to the custom-made, are shown above. Why do we love our tables above all else? When I email folks to ask them more, I got a series of increasingly en lightening responses. One person loves her table because it’s the only thing she has that’s devoted only to sewing. Someone else said that it’s because we spend relatively little time at the machine compared to the time spent laying out and cutting. A local sewer got one of the biggest tables we heard about; it’s shown above. She told me that her work-table was the most important part of her studio because the creative process begins at the table. For her, the exciting part of sewing is exploring the possibilities inherent in the project, the interaction between her hands and eyes and the fabric. Assembling, to her, is the work that gets done after most of the creating has already happened. Dimensions—Our tables’ lengths and widths vary according to space available, but most of us want a table at counter height or higher, between 35 and 36 in. For most of us, this reduces back strain while still allowing for a reach across the table. At 5 ft. 6 in. tall, I’ve found heights up to 40 in. comfortable, if I could walk around two long sides of the table. Raising a too-low table is no problem. One person extended her banquet table’s legs with pre-cut lengths of metal pipe from the hardware store. The wide range of pipe diameters available made it easy to find just the right width to slip over the legs. Someone else wanted to use a pair of teak end tables in her sewing room, but they were too short to support a top until she hit on the idea of stacking several tops on them. She had three plywood layers made; two are Formica-covered, and the top one’s padded, and all have carefully rounded corners. Then she gathered 4-in.-thick blocks of wood from her husband’s wood shop, covered each with felt, and slipped them between the layers to separate them and support the centers and corners. The spaces in between form ample storage areas for large flat things, shallow boxes, and the single wide, wooden drawer her husband added that’s just the right height for pull-out convenience. Coverings—The only real difference of opinion regarding the cutting table centers on the nature of the surface. We’re al most evenly split between fans of the smooth, hard surface and devotees of the softer, upholstered surface. A hard surface has the advantage of allowing your scissors to glide smoothly on the table under the fabric as you cut. Finishes that were suggested for this were several coats of high-gloss enamel paint, Formica, and bathroom-type wall board with a glossy finish. I prefer to use tempered hardboard, like Masonite, be cause of its warmer feel. If its hard surface gets scratched with use, as will hap pen in time, it's also inexpensive and easy to replace. Many seamsters prefer a fabric-covered table. After cushioning the table with bat ting, wool blankets, or carpet padding, they cover it with canvas or duck, stretched on top and stapled into the back. This allows them to pin into the surface, keeps fabric from sliding around on the table, and gives them an ultra-large pressing surface if they need it. Of course, if you do most of your cut ting with a rotary cutter and a storable cutting mat, as many seamsters do nowadays, a smooth table top may not be that important. One of our editors takes the opposite approach. He says that he’d never sew without his table-sized rotary-cutting mat permanently installed. Whenever he’s pressing new yardage, he whips out a 34- by 56-in, padded board from behind the door, supporting the board’s front edge at a comfortable standing height with his ironing board, while the back edge rests on stacked books on his table behind. Storage The second largest category of responses from readers concerned storage. Some seamsters out there actually say that they buy only what they intend to make up next, and that they store nothing. Most of us, however, have gained the courage to face our dependency squarely and admit that we hoard fabric, patterns, trims, buttons, zippers, and all manner of other important items. The only problem with having everything IS: Where to put it all? Shelves—I read somewhere recently that the best way to store fabric is in card board boxes. Just sort your fabric, the author said, label the boxes, and put them away. Well, I did that for years. It would be stretching the point to say that the day I got my fabric collection out of boxes was the happiest day of my life, but not by much. For about the same amount of money as I would have paid for those industrial, gray, sharp-edged, ten-thousand-bolted, wobbly garage shelves (about $37), I found what I think is a seamster’s dream come true. I got a shelf unit three feet wide, six feet high, and a foot deep and sturdy enough to load completely with folded fabric. Each shelf has a ¾” lip all the way around, so my fabric doesn’t slide off. There are no rough edges to snag fabric, it snaps together without tools, and since it’s a non-brittle plastic, I don’t worry about it rusting. My shelves are made in the U.S.A. by Contico, and come in white, beige, and blue. Contico also makes organizers, crates, and tool boxes from high-tech plastics. They’re available at Wal-Mart and other stores. Another great-looking shelving unit was suggested to us by a client. It’s called Tic Tac shelving, and it’s available from Conran’s Habitat. Eighteen square compartments look like they’d hold fabric and other items (yarn?) nicely. The unit is 79 in. high, 38 in. wide, and 13 in. deep. It cost Dorothy $185 and weighs in at Under the table—One area of “wasted” space that most of us convert to storage is under our cutting tables. Several readers sent ideas for combination cutting table / storage units, shown on above. Others suggested putting bookshelves or file cabinets under the table. Taking my cue from these readers, I made a major change in my sewing room. Instead of adding height to my banquet table with bricks or pipes, I folded its legs and put it on top of the dresser I use to store patterns, interfacings, cutting tools, and miscellaneous craft items. It just fit on top, and a decorative trim strip on the dresser fortuitously keeps the table from sliding. It’s just shy of 35 in. high—about 2 in. lower than my optimum—but for a no-work, no-cash idea, it’s great. Bins— A client who embellishes liturgical garments and makes wall hangings, built a storage wall for his appliqué fabrics from three-gallon ice cream cartons stacked together on their sides. After taping them together, he filled the fronts of the spaces in between the round cartons with papier-mâché. A coat of white paint finished his organizer wall, which he keeps stocked with fabric sorted by color family. You can sometimes get the empty cartons from your local ice cream store. Another client stores what she calls odds and ends (elastic, zippers, shoulder pads, ribbon, lace, boning) in oatmeal containers stacked on their sides in a small-sized variation of the former client wall. Hers are stacked loose in a bookcase, and have labels on their covers. One of our editor’s dream remodel in Tucson, AZ, includes tilt-out storage bins alongside the kneeholes at each sewing machine for dumping scraps of fabric and interfacing. Opposite extremes—There’s storage, and then there’s storage. For a one of or clients, it’s essential to put everything away at the end of each sewing session, not just at the end of a project. She bought a put yourself (knock-down) wardrobe, which she uses to store her entire sewing room. Her folding sewing-machine table, as well as her machine, ironing board, and all other materials, fits inside. When she gets home from work, her apartment is neat as a pin, which she says inspires her to begin sewing again. In order not to have to clean up in the middle of a project, one sewing-room designer created a make-it-yourself room, which has traveled with her through 20 years of apartments. Assembled out of 8-ft. 2x4’s and three wallpaper-covered 4-by 8-in, sheets of Masonite, her two portable “walls” form an “L” to support each other, and conceal a 4- by 10-ft. sewing space, which is just large enough for a machine table and storage shelves. On the outside, more shelves hold books. The figure above shows how it fits together. Lighting and power Track lighting was the favorite of our readers. Aiming overhead light directly on their work made their lives much more pleasant. Those of us without track lighting generally make do with swing arm lamps or overhead incandescents. A few were happy with fluorescent lighting, but some questioned the color distortion they create. A quilter from Fort Collins, CO installed both in candescent and color-corrected fluorescent, so she can compare the color effects in various combinations of lighting. A client (“Dee”) in the Midwest added almost 500 square feet to her house in the form of a sewing room over the garage, the electrical supply was a major concern. Track lights over her cutting table and recessed lights at each end of the room provide ample candle power. She installed Wiremold (available from building supply houses), which allows electric supply wiring to be attached to the surface of a wall, rather than pulled through a wall. Dee put lines around all the walls close to the floor, with receptacles every 12 inches. She also had three duplex receptacles installed in the floor. Proceeding despite the neighbors’ disparaging remarks, Dee was vindicated when her needlework group plugged in machines and irons and didn’t blow a single fuse. As is the case with all the readers who wrote to us, Dee’s sewing room reflects her own unique priorities. An affordable dream room When she had little room around the house for sewing, one of our clients made little time to use it and felt she was stealing space from her family. But an attic remodel opened up plenty of space for other family members, so she finally had a room to call her own. Here is the story of her new, guilt-free room, shown below. With my family adequately situated, I no longer felt guilty about the amount of space that my equipment was taking up. (By now I had accumulated a new sewing machine, a serger, two knitting machines, a serger, two spinning wheels, a floor loom, an industrial iron, a drum carder, and an unwieldy supply of fabrics, fibers, yarns, books, and magazines.) The unofficial sewing! laundry/guest room became officially mine in Which to design a sewing/knitting studio. With the loom, spinning wheels, and other spinning/weaving paraphernalia occupying one wing of the new family room in the attic, my task was to design efficient working space for my sewing, knitting, laundry, and supplies. Since I have two knitting machines, the first and easiest decision was the purchase of a key to dual-tilt knitting-machine table designed to hold two machines back-to-back with a storage bin between the machines. It was soft gray in color, so I chose a neutral light and medium gray as colors for my flooring, wails, and woodwork. I had 10- and 12-inch-wlde gray wood shelving installed on every possible space on the four wails of the room. Shopping for sewing furniture was frustrating. What I could find was expensive, generally poor quality, and designed for sewers who want to put everything out of sight after each sewing session. Since I was devoting an entire room to fiber work, I wanted good-looking, functional furniture that would allow me free access to my machines at all times. My solution was to use computer and office furniture in unique ways. My sewing table is a 24- by 48-in, computer desk with a pull-out keyboard shelf under the right end of the table. I had a hole cut in the top of the desk, over the keyboard fray, and placed my Bernina machine in the hole. It rests on the keyboard fray and the detachable flatbed covers the hole, resting on the table surface. The flatbed cover removes easily for using the free arm or changing bobbins. The Bernina knee control sticks out between the fray and the table top. My cutting table consists of a 30- by 60-In. desk top ordered from our local office supply store. I bought metal workbench legs at the hardware store that were long enough to put the table top 35 in. above the floor, and had a handyman attach them to the top. He also added braces in back to add stability. The cost of the furniture was moderate: three pieces of computer furniture for about $389, Keyto table for $290 (on sale), and desk top for $80. Shelving supplies and labor to install were about $750, but that includes having all the shelf boards cut to length at the lumber yard. The total cost of the room fixtures was less than $1900, installed.
|
| PREV: Getting to the Bottom of Things | NEXT: | Related Articles | Home |
Friday, 2016-12-30 10:28