Skill level:
You only need basic DIY and woodworking skills to build a carport. The most important part of the job is setting the supporting posts truly vertical - a job for which another pair of hands will be helpful.
Safety:
There are no particular safety risks involved. Make sure that any power tools are plugged into an RCD adaptor or RCD socket outlet. Set up stepladders or other access equipment on level ground, and don't overstretch on them.
Intro:
If you have space off-road for your car, a carport is an inexpensive way of giving it some shelter from the elements.
You can adapt the structure to the size you need and the space you have available for it.
A carport is more than just a protective canopy for your car.
It can do double duty as a porch over a side door, and provides useful undercover space for storage. It can be used as a work area for DIY or car maintenance, a children's play area, even somewhere to dry clothes on wet days.
2--Planning the carport
A carport is classed as an outbuilding as far as planning rules are concerned, wherever it is sited. So long as it does not project in front of the local building line (usually the front wall of your house), is not more than 3m (10ft) high, and does not result in more than half of the garden being built over, then you do not need to apply for planning consent.
If you are in any doubt about whether your proposed structure needs consent, check with your local authority planning department.
As far as the need for Building Regulations approval is concerned, a carport is exempt so long as its floor area does not exceed 30m² (325ft²) and the structure is open on at least two sides.
3- Designing the carport
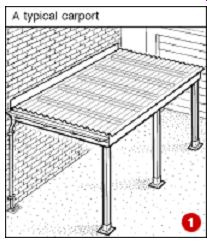
The simplest way of building a carport alongside the house is to erect three or four stout timber posts along one side of the site to support a that will carry the outer edge of the roof, and to fix a horizontal timber wallplate to the house wall to support the other edge. Then joists are fixed into notches cut in the beam and wallplate, and corrugated plastic roofing sheets are secured to this timber framework (1).
Make sure that all the wood you buy for the carport is pre-treated with wood preservative. Treat all the notches you cu in the wood with extra preservative before assembling the structure.
The roof needs a slight slope in order to drain rainwater off it. This can run from front to back or from the house wall to the opposite side of the roof. It is easier to waterproof the junction between the roof and the house wall if the drainage runs from end to end, since the flashing tape will run parallel to the corrugations in the roofing sheet rather than at right angles to them.
Add a run of guttering along the downhill edge of the roof so rainwater does not simply drip off. Fit an outlet and a downpipe to discharge the water into a nearby gully if one is available. If there is no gully nearby, collect the rainwater run-off in one or more water butts, for use in the garden.
4 - Fixing the wallplate
The roof is supported on two main beams of 100 x 50mm he mm sawn timber running the length of the carport. One, the wallplate, is fixed to the house wall with masonry bolts. T other is screwed to the posts at the outer side of the building. Both are notched at intervals to a depth of 50 to receive the sawn timber joists; you need seven for a carport 6m (20ft) long, spaced at 1m (3ft 3in) centers.
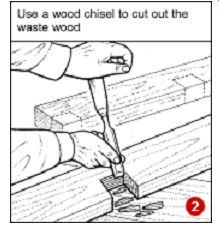
Cut both beams to length, then mark the positions for the notches on both together to ensure that their positions coincide exactly. Saw out the open end notches, and saw down the sides of the others.
Then use a wood chisel to cut out the waste wood and leave notches 50mm deep (2). Treat the newly-exposed surfaces with wood preservative.
Drill clearance holes through the wallplate midway between the notches, using a twist-drill bit sized to match the diameter of the masonry bolts you are using. Use the posts you will be fitting at the other side of the carport to support the wallplate temporarily against the house wall at the required level - at a minimum height of 2m (6ft 6in) to allow adequate headroom.
Create the necessary fall along the length of the carport by lowering one end of the wallplate by about 1mm for every 100mm of wallplate length - for example, a drop of 60mm for a carport 6m long.
Mark the positions of the fixings on the wall through the clearance holes in the wallplate, then set it aside.
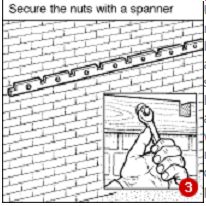
Use a large-diameter masonry drill bit to drill the holes for the masonry stud anchors. Insert them so their sleeves are fully inside the holes and take off the nuts and washers. Lift up the wallplate (with help if you need it) and locate the clearance holes over the projecting bolts. Fit a washer on each one and hand tighten the nuts. Then tighten them fully with a spanner to expand the sleeve within the wall and make a secure fixing (3).
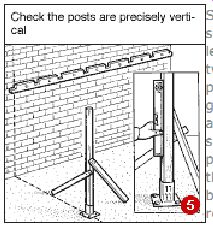
5 - Position the posts
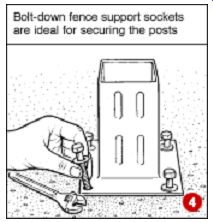
The simplest way of securing the posts on an existing concrete base is to use bolt down fence support sockets (4). These are fixed at the post positions with four small masonry bolts set in holes drilled in the concrete.
Measure the carport width out from the house wall at 90° at each end and at the center of the wallplate, and mark the socket positions. Place a socket at each position and mark the bolt positions through the fixing holes onto the concrete.
Drill the holes, insert the sleeves, set the sockets in place and tighten the bolts down to fix each one in place.
Stand the first post in its socket and temporarily nail lengths of scrap timber to two adjacent faces of the post to brace it upright. Then get it precisely vertical using a spirit level (5). Screw the socket to the base of the post. Repeat the process for the other posts. Leave the braces in position until the roof structure is complete.
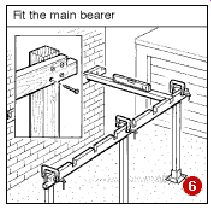
6 - Fit the main bearer
Drill screw clearance holes through the face of the outer side beam at positions to match the post spacing.
With help, hold the beam up and use G-clamps to secure it to the outer faces of the posts at roughly the right level. Place a joist across the high end of the roof (6). Use your spirit level to get this truly horizontal, loosening the clamps slightly so you can move the end of the outer beam up or down as necessary. When the joist is level, tighten the clamp and screw the end of the beam to the first post. Use four 75mm screws to make a strong and secure fixing.
Repeat the process at the low end of the roof, again resting your spirit level on a joist fitted in its notches to get the other end of the outer beam at the correct level. Clamp it in place and screw it to its post. Finally, screw the beam to the center post and remove all the clamps.
7 - Fit the joists
The two end joists are cut from 100 x 50mm timber. Mark and cut out a 50mm square notch in the underside of each joist end. Then lift each one into place so the notches fit in the end notches of the wallplate and outer beam (7). Drive a 75mm screw down through the joist end into the wallplate and beam. Repeat this to fit the other end joist.
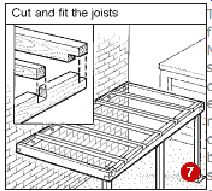
Cut the remaining joists to length from 50mm sq timber.
Simply drop each one into its notches and screw it in place
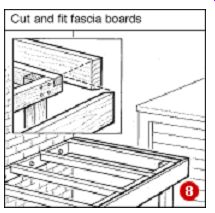
Complete the roof structure by cutting fascia boards to length to fit along the sides and ends of the carport. Miter the outer corners using your jigsaw with its soleplate set at a 45° angle, then screw each board on so its top edge is flush with the top of the roof framework (8).
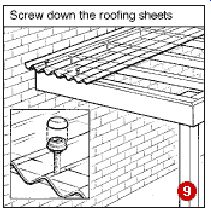
8 - Add the roofing sheets
Start placing the corrugated roofing sheets at the downhill end of the roof. Lay the first one so it overhangs the end fascia board by about 50mm, with one long edge butted against the house wall. Drill 3mm clearance holes in the first ridge (above the wallplate) and in every fourth ridge above each of the joists. Slip a sealing ring over each screw, insert it in its clearance hole and drive it into the wood below. Snap on a plastic cover to conceal the screw head (9).
Lay the next sheet against the house wall, with its downhill end lapping over the sheet you have just fixed by about 300mm, and repeat the fixing process.
Add further sheets as necessary until you reach the uphill end of the roof, where you may need to fit a cut-down length. Let it overlap the fascia board by about 50mm. To cut across a roofing sheet without cracking it, sandwich it between two long timber offcuts and secure them next to the cutting line with clamps. Then cut the sheet with the saw blade running against the edges of the offcuts.
After fixing the first row of sheets, seal the junction between the house wall and the roof surface with a strip of self-adhesive flashing tape (10). Apply flashing primer to the wall and allow it to become tacky. Then peel back the release paper from the tape, bed one end against the house wall and let the other lap onto the roof surface.
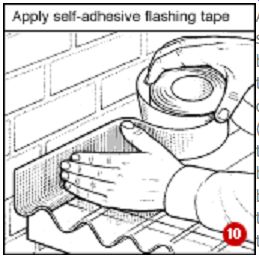
Unroll the tape, peel off more paper and work your way along the edge of the roof to the other end. Cut the tape to length, then go back and bed the tape down firmly onto the roof surface all the way along.
Don't think you can leave fitting the flashing strip until all the roof sheets are in place and then climb up on to the roof and apply it. This type of roofing cannot support a person's weight.