Brickwork--a simple garden wall
The following notes are intended to be sufficient to enable you to tackle simple garden-wall type projects. For your first attempt at laying bricks, it is a good idea either to build your wall dry, or make up a mix of soft sand and water so that you can practice spreading mortar.
The mortar and bricks.
Real mortar should never turn out too hard when set, in fact never harder than the bricks it bonds. One part cement to five of clean soft sand, plus a plasticizer is a good average mix.
The plasticizer makes the mortar 'buttery' and easier to handle and adds extra adhesion.
Never make the mix too sloppy or you'll have problems handling it and it will be squeezed out by the weight of the bricks and mark your brickwork. Mortar has a limited life; one and a half to two hours is about the limit, and once it stiffens should never be 'knocked up' again with water. When it starts to stiffen throw it away. There are all kinds of brick, but for most projects medium density facing bricks will do. Avoid really soft bricks which soon break down if exposed to the elements. Bricks for foundation work which is to be hidden away could be common bricks, but choose sound ones.
Choose your bond.
If you look at any brickwork you will see that the vertical joints are staggered so that no two line up. The simplest bond is the stretcher bond, and using standard bricks 22.5 cm x 11.25 cm x 7.5 cm (allowing 1 cm joints) to produce a wall, you produce a wall 11.25 cm thick. The size given includes a thickness of mortar, so the brick is in fact slightly smaller than quoted. A wall produced in this bond would not be very strong, so if it is more than about 38 cm high, pillars need to be built into the wall to add support. These will be 22.50 cm by 22.50 cm and the addition of pillars will involve the cutting of half-bricks (referred to as 'queen closers'). If you turn a corner in this bond, rather than build a pillar it is probably better to just interlocks as illustrated. Where a stronger wall is required you can build a double thickness wall (22.50 cm), and this needs no strengthening. You can also use more decorative bonds (i.e. English or Flemish bonds) than for a half brick wall. These involve the stretcher bond already mentioned plus headers (bricks laid across the width of the wall). English garden wall bond is really a modification of another bond and it consists of one course of headers to three of stretchers. It produces an interesting and fairly economical wall. With this bond you will note that a piece about 5.6 cm wide (called a queen closer) has to be placed next to the corner header bricks. Bricks are cut using a wide blade chisel called a bolster, and the bolster is tapped firmly with a club hammer. Grooves are nicked in both sides of the brick, then a good sharp tap will split the brick along the cuts. Having said that, practice for a while with old bricks until you get the knack.
Foundations.
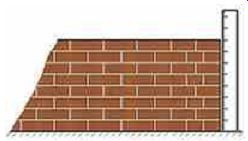
The most important part of any wall is its foundation, and if this is out of true, you will have a hard job producing a wall. Always cut your foundations horizontal, on sloping ground this may involve stepping them to accommodate the slope, make each step equivalent to a whole number of bricks plus mortar. And the foundation must be strong enough to bear the weight of the wall. For a light garden wall, 30 cm deep should be sufficient if the soil is firm and well drained. But on unstable or weak ground, make the depth 46 cm. Make the trench twice the width of the brickwork. Lay a concrete footing of, say, 1 cement, 6 ballast to a depth of about 15cm (6 inch) in the bottom of the trench. (See our page giving details for foundations for more details.)
Laying the bricks.
When you come to actual laying, you will note that your bricks have an indent on one face, called a 'frog'. The brick should be laid with the frog up, this will ensure that the frog is then filled with mortar as work progresses and no voids are left within the wall. With your foundations laid, mix enough mortar for an hour and stack bricks near the job.
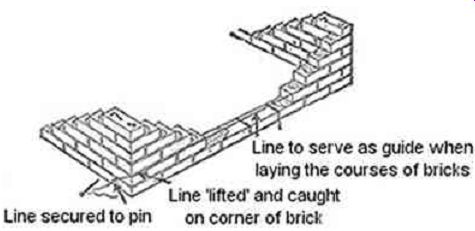
Place some mortar on your mortar board and you are ready to start. Lay a course of bricks dry first to see the work fits in the given space. Open or close joints slightly if necessary rather than have to cut bricks. Start with a corner brick and bed it in mortar, run a line from the laid brick to the opposite corner of the wall. Lay a second brick a meter or so along the line then checked with the spirit level. Then fill in between bricks. Proceed in this way until the far corner or end is reached. The first course must be straight and true!
When you've laid a number of bricks, you need to check and adjust them. The four checks are (in order):
• Gauge - use the gauge rod to make sure that the corner brick is the correct height.
• Level - use the spirit level to check that the row of bricks is horizontal. Don't try to level each individual brick.
• Plumb - Use the spirit level to make sure the wall is vertical.
• Straight - use a straight edge horizontally along the face of the wall and adjust so that they are all in line. (for further details of these checks, see further pages).
When you first start bricklaying, you may want to check and adjust and then check it all again.
After a little experience, you'll be quite confident to just check and adjust once. Bricks are mass produced and are not perfectly square, so you won't get a perfect level along the top of the bricks or a straight line along the face. Now building up the corners, checking each course (Gauge, Level, Plumb and Straight). With the corners built, you can fill in the rest of the wall using a line between the corners. The actual joints may look a little ragged, so as the mortar stiffens, strike the joints as required.
Checking Brickwork
Four steps are required to check brickwork as it is being built:
• Gauge - check the height of the course
• Level - make sure the course is level
• Plumb - make sure that the wall is vertical
• Straight - make sure the wall is straight
These checks should be carried out as each course is laid and in this order to ensure that the previous checks are not 'disturbed'.
Gauge
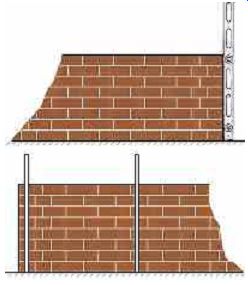
When building any wall, it's necessary to keep the courses at the corners at the same height. A gauge board is used to do this. Mark out a piece of timber with marks corresponding to spacing of one brick height plus the thickness of the bed joint (normally a total of 75cm). Use the rod at the corner when each course is begun and check that it is at the correct height, On uneven ground, start by putting a datum peg next to the wall so that the gauge rod can be easily positioned.
Level

Use a spirit level to keep the courses level. Remember that the corner bricks have been set to the correct height, so any adjustment should be by bedding down the bricks in from the corner. Bricks are not made to very tight tolerances, so don't waste your time trying to get each brick exactly level, the point is to get the parts of the bricks which touch the underside of the spirit level, level. Don't worry about trying to get the bricks level width ways.
Plumb
Check that the wall face is vertical by using a spirit level, tap the brick across the wall as necessary to adjust the brick as necessary. Do not try to do this to both sides of the wall, choose one side as 'the face' and just plumb that side. Do it along the wall, spacing the points approximately just under the length of the spirit level. Check both sides of corners.
Straight

Straighten the course by using a straight edge between the points previous plumbed. Tap the bricks as necessary. Like plumbing the wall, only check the face of the wall, don't try to straighten both sides. Again the problem of the shape of the bricks come into play. It's unlikely that the straight edge will touch each brick across its whole face, try to get the center of each brick to touch the straight edge and the two ends of the brick roughly equally spaced from it.
Striking and Pointing brickwork
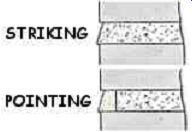
The difference between 'striking' and 'pointing' is that:
• Striking is finishing the mortar joints between newly laid bricks.
• Pointing is applying a small amount of mortar into the face joint between bricks (either newly laid or in old brickwork). In new brickwork, pointing can apply harder mortar to increase weather protection on exposed faces. In old brickwork, pointing is often used to repair mortar joints which have been eroded by exposure to the elements.
Styles of finishing
Whether striking or pointing, the basic finishes are the same:

----FLUSHED
Flush finishing can be difficult to achieve due to the irregularities of most mass produced bricks.
It's achieved by drawing a strip of wood about 12mm wide, 6mm thick and 100mm long along the joints.
---WEATHERED
Weathered finishing throws off rain water and is considered to be fairly durable. The joint is made by drawing the blade of a small trowel, slightly inwards at the top , backwards along the joint, the top edge of the trowel being in contact with the underside of the bricks above the joint being struck.
For vertical joints, the edge of the trowel is in contact with one of the side bricks and is inclined by the same amount as the horizontal joint.
Keep the direction of the vertical strikes the same all over a wall, otherwise it may look peculiar.

HOLLOW KEY
Hollow key - is formed by pulling a suitable shaped piece of metal (i.e. bucket handle) along the joints.
STRUCK
Struck jointing should not be used for exterior facings as it leaves the upper edge of the lower brick exposed to the weather. The actual procedure is similar to the weathered finish above, except that the trowel is angled inwards at the bottom of each horizontal joint.
RECESSED KEY
Recessed key - the mortar needs to be racked out to a consistent depth from the face of the wall and then the face of the mortar is pressed back firmly using a metal jointer tool or a piece of wood. A tool known as a 'chariot', which is designed to recess the joint evenly, can also be used.
Striking.
Bricklaying should be stopped at a convenient point to allow enough time to strike the section of wall laid.
1. Except for the recessed finish, the first job is to fill in any parts of the mortar joints which show surface voids, use a small amount of fairly stiff bricklaying mortar and apply using a small/pointing trowel. Do the vertical joints (called 'cross-joints') first, and then the horizontal joints (the 'bed-joints').
2. Strike the mortar in the style required. Do the cross-joints first, then the bed-joints.
3. Finally, lightly use a soft sweeping brush to remove any crumbs of mortar from the wall. If there are any larger pieces of mortar on the face of the bricks, don't rub them off until the mortar has gone off for 12 hours or so.
Pointing.
On new brickwork, bricklaying should be stopped at a convenient point to allow enough time to clean out the surface mortar of the section of wall laid. The mortar in the joints should be raked out to a depth of about 12mm from the brick surface. Only point a wall when it has been completed. On old brickwork, chip out the old mortar or pointing to the depth of about 12mm from the brick surface. Some people use angle grinders to remove the old mortar, if you choose to do so, be aware that it will cause a lot of dust, close all the windows to your house, warn your neighbors and wear a face musk and goggles. Use an angle grinder with care otherwise damage to the actual bricks could result. When the wall is ready to be pointed, the joints should be wetted before being filled with pointing mortar and finished off as for striking above. The mortar should be a fairly stiff mix. Put a small amount of the mix on a hawk and use a small pointing trowel to cut off a slither of mortar. Pick the mortar up on the edge of the trowel and press the mortar into the joints to be filled, drawing the blade backwards at the same time, repeat this until the mortar is flush with the face of the bricks. Fill the vertical, cross joints first, then the horizontal, bed-joints. When the joints over about 1 square meter have been filled, finish off using the required style. The mortar used for pointing can be ordinary 5:1 sand/cement bricklaying mix or 3:1 for added weather resistance or colored mortar for added effect.