Being around the water offers allure and beauty, which is why waterfront homes are admired by many. Your own backyard can be alive with the visual appeal and sounds of water in motion. These soothing sounds and the beauty of colorful fish swimming among your plants, brings your landscaping alive. It's fun to create this attractive feature and it will become the centerpiece of your backyard.
Before we get started I would like to answer some frequently asked questions about backyard ponds.
• Will the winter cold kill my fish? Most fish will naturally stop eating and hibernate at the bottom of the pond when the temperature of the water goes below 45 degrees. If you live in a climate where the pond will completely freeze over (even at the edges) you will need to create a hole in the ice for the fish to remain alive.
• Will the winter cold kill my plants? Yes, if it goes below freezing in your area. Bring plants inside for the winter months.
• Do I need to filter the water? That will depend on your climate and the design of your system. Ask a local dealer his recommendations for your geographical area concerning filtration. (look up in the Yellow Pages under ponds or water gardening) The action of water moving provides some natural filtration, so sometimes you can get away with only a fountain or waterfall. There are biological filters and cartridge filters available from pond supply outlets. We have provided links below to 3 sites that offer products, services and advice for building backyard water gardens.
Water Gardening and Pond Supply :
• Home Depot
• Lowe's
• Ace Hardware
• Walmart

Step 1. Educate yourself so you can make intelligent decisions. Learn about water gardening in your part of the country. Visit retail stores, shop out of a catalog click on the website links above. Determine the answer to such questions as, will I use a flexible liner or pre-formed shell...The location of my pond should take into account such things as availability of electricity...will I have a waterfall...etc.
We will describe how to install a flexible vinyl liner pond in this article. Flexible liners give you complete variety in the shape of your pond, and are extremely durable.
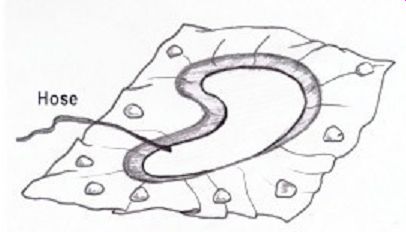
Step 2. Locate the area in your yard for the pond. Determine how deep you want your pond to be. The depth of a back yard pond will usually be between 18-24", but you determine that after study and deciding the particulars about your pond. Mark the outline of the pond shape with string or garden hose on the lawn. Remove sod and start diggin! The outside wall of the pond will have a step in it to hold potted plants just under the water. Figure 2 below shows a profile view of the step in the side wall. You create this step by leaving the original dirt in place as you dig. This will make the step as solid as possible. The depth of this step is approximately half of the depth of your pond. This depth is also determined by the potted plants you plan on placing in the pond. Figure 1 represents digging out the pond using a 2x4 board with level on top to make sure the outside edge is level all around the perimeter. You need to raise low areas so the entire perimeter is the same height. Check the depth as you dig to make sure the bottom is level as well.
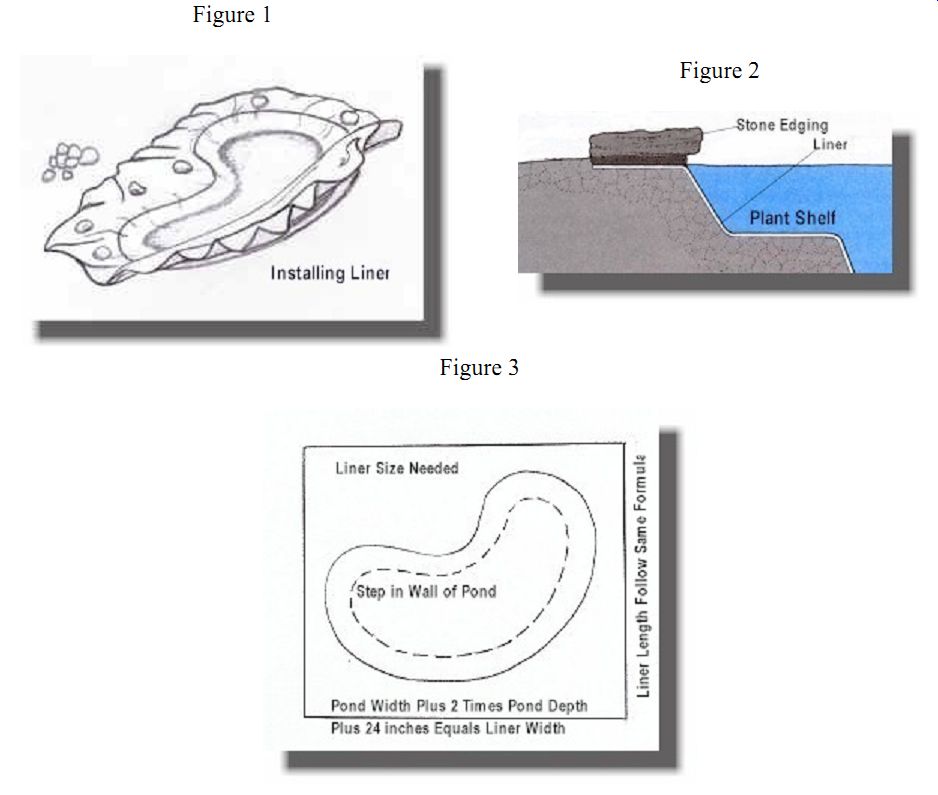
Figure 1
Figure 2
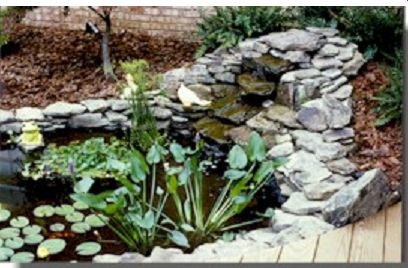
Figure 3
Step 3. Figure 3 shows how to measure your pond to get the right sized liner. The big square on Figure 3 represents the liner size needed for the pond in the drawing. To determine the right liner size, take the width of the pond and add twice the depth of the pond, plus 24 more inches. The length measurement will be done using the same formula.
Step 4. When hole is completed, drape liner over pond, centering it and
placing stones around the edge. Start filling with water. As it fills,
remove wrinkles and fold large creases into neat folds to be less noticeable.
Step 5. After pond is filled, trim excess liner to within 12 inches of edge of pond, and place your coping material around edge to give it a natural finished look. We recommend large flat stones because they can overhang the pond edge slightly, and they look very natural.
See Figure 2 above.
Now your ready to add the finishing touches. This article covers the basics of how to install your own backyard pond. To finish the project you will need to investigate pumps, filters, plants and fish. Check out the 3 website links above for the specifics needed to have a pond that is exactly right for your area. I know from personal experience that the catalog from Lilypons is complete and informative.
Enjoy your new water gardening hobby.
Waterfall built next to pond with dirt from pond excavation
-------