Older homes may have a chink or two in their defenses against the spread of fire. Balloon framing, a method of house construction that was common before 1930, has spaces between studs that extend uninterrupted from cellar to roof. Unless blocked by horizontal boards called firestops inside the walls, flames can shoot up these natural chimneys between the studs.
Any house that was built before 1960 with an attached garage may lack a fire-resistant wall to slow a garage fire. A simple fire wall can hold a fire at bay about twice as long as an ordinary wall can.
Identifying Balloon Framing: Shine a flashlight up into the exterior walls from the basement or crawl space. If you see the bottom of a ply wood subfloor but not the wall studs of the story above, your house has inherently fire-resistant platform- frame construction; each wall has a horizontal board top and bottom, called plates, that serve as firestops.
However, if you can see the wall studs, your house has balloon framing. Use a mirror to reflect a flash light beam up between the studs, and look in the mirror for firestops. If you see none, you can greatly slow the upward spread of a fire by in stalling them at the top or bottom of each story (below and opposite, top).
A Garage Fire Wall: Install Type X wallboard on the wall between the garage and the house.
Also add it to a garage ceiling below a living space above. Designed for fire walls, the gyp sum core of Type X wallboard contains, in its crystalline structure, 50 % water by volume. When heated, the gypsum gradually releases the water as steam, holding back fire for nearly 30 minutes. Adding this material to both sides of the wall can double the protection.
Getting Ready: Check local codes for fire wall requirements such as wallboard thickness. Remove existing wallboard, if any, from the garage wall. Reposition electric switches and receptacles outward as needed to match the thickness of the new wallboard. Also nail strips of lumber to the doorjamb so it will also be flush with the face of the new wallboard.
Finishing the Job: Cover wallboard joints with tape and joint compound. Caulk around any fixtures, ducts, and pipes that pass through the wall. Last, replace the door between the house and the garage with a metal- skin, solid-core, fire-resistant model.
TOOLS
- Circular saw
- Hammer
- Electric drill with screw bit
- Keyhole saw
- Utility knife
- Joint knife
- Caulking gun
MATERIALS
- 2 x 4s
- Common nails (2 1/2” and 3 1/4”)
- Type X wallboard
- Dry-wall screws 1 5/8”
- Metal pipe strap
- Wallboard tape
- Joint compound
- Caulk
SAFETY TIPS
- Protect your eyes from injury with goggles when hammering, sawing, or drilling.
Adding Firestops to a Balloon-Framed House

In a basement or crawlspace.
• Cut lumber as wide and thick as the studs (usually 2-by-4s) into blocks that fit horizontally between each pair of studs. If joists lie next to studs, cut the blocks to fit between the joists and studs.
• Tap the blocks into position— between the studs, the exterior wall, and the edge of the subfloor above—and toenail them to the studs with 3 1/4-inch nails.
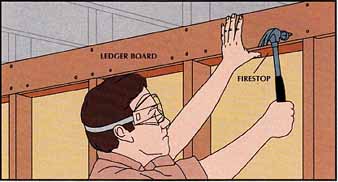
On the first story. If the first-story studs are exposed
during a renovation—or if you are willing to remove and reinstall a strip
of the wall covering—nail firestops behind the ledger, or ribbon, board that
supports the second-floor joists.
• Cut firestops from 2-by-4s to fit between studs and between the exterior wall and the ledger board, which is set into the studs.
• Position the firestops as shown at left and drive 2 1/4-inch nails through the ledger board into the blocks.
A Fire Wall for a Garage

Installing Type X wallboard.
• Mark the center of each stud on the ceiling and floor.
• Place a sheet of wallboard against the studs at one end of the wall and push the sheet tight against the ceiling with a foot-operated lever, such as a wedge-shaped piece of wood on a scrap of pipe.
• Align the edge of the sheet with the center of a stud and drive several 1 5/8” dry-wall screws through the wallboard into the studs to hold the board in place initially (right). Set each screw about 1/32-inch below the surface and make a gentle depression, or “dimple,” around the screw-head, without tearing the paper face of the wallboard.
• Remove the lever and drive a pair of screws every 12 inches down each stud, working from the center of the sheet outward. Insert the second screw in each pair 2 inches below the first.
• Place a single screw every 8 inches around the perimeter of the sheet, about 3/8-inch from the edges.

Fitting wallboard around a door.
• Measure from the side doorjamb to the edge of the nearest sheet of installed wall board, and from the ceiling to the top jamb. Transfer these measurements, less inch, to a sheet of wallboard and draw lines to form an outline of the doorway.
• Cut the wallboard along the shorter line with a keyhole saw (above, left).
• Score the longer line with a utility knife, prop the sheet on two long 2-by-4s as shown above right, and push down abruptly on the edge of the sheet to snap it.
• Slice through the backing paper to free the piece, and install the sheet.

Enclosing pipes and ducts. Frame pipes and ducts running through the wall to provide nailing surfaces for the wallboard.
If a pipe runs through the wall, nail a horizontal 2-by-4 below the pipe to the stud on each side. Toenail a vertical 2-by-4 beside the pipe to the horizontal 2-by-4 and to the top plate of the wall. Fasten the pipe to both 2-by-4s with a bent metal pipe strap (left).
For a duct, nail horizontal 2-by-4s ¾-inch above and below the duct. Nail a vertical 2-by-4 between these boards inch from any side not already framed by a stud.
• Measure from the ceiling to the top and bottom of the pipe or duct and to the centers of the horizontal 2-by-4s. Then measure from the nearest sheet of wall board to the left and right edges of the pipe or duct and to the center of the vertical 2-by-4s. Transfer all these measurements to a sheet of wallboard, then outline the pipe or duct and the 2-by-4s.
• Cut a hole for the pipe or duct with a keyhole saw and cut the wallboard along the centers of the 2-by-4s, so that it will fit around the obstacle like pieces of a jigsaw puzzle.
• Screw the larger piece to the wall (right), then the smaller one.
Extra Safety from a Sprinkler System:

A home sprinkler system is made to control or extinguish fires in their
early stages, providing a higher level of safety than smoke detectors alone
do.
When a fire raises the air temperature in a room to a predetermined level—about, 160-deg. F—a heat-sensitive element in the sprinkler releases a cover, allowing the sprinkler to soak an area as large as 400 square feet. Usually only one or two sprinklers per room are needed to control a fire.
In a typical system (above), water pipes, fed by the city water line and fit d with sprinklers, run across the ceiling of each story of the house. Sprinklers are available in many styles. The inset at right shows two ceiling models: an inconspicuous flush-mount design for the living spaces of a house and a less expensive industrial style for unfinished areas .

The sprinkler system and the domestic water supply are each controlled by a separate shutoff valve. A backflow check valve keeps sprinkler water out of the domestic water pipes, and a flow sensor sounds an alarm if water moves through the sprinklers. A test valve simulates the discharge of a sprinkler to check the alarm and measure the flow of water.
Some jurisdictions require a sprinkler system if you are building a new home. But even if installation is optional, it's worth considering. Cost is significant, but so are the savings. Most insurance companies offer premium reductions for a professionally installed sprinkler system, and some states offer tax advantages as well.
Previous: Ways
to Make a House Hard to Burn
Next: Portable
Extinguishers for Small Fires