Introduction
Fire is a hazard every homeowner must protect against. Each year more than 5,000 people die in residential fires, nearly 30,000 more are injured, and billions of dollars worth of property is destroyed. To avoid becoming part of those grim statistics, you must make sure your home is fire-safe. This section explains how to do six fundamental things to protect your home. Most are both easy and inexpensive; all are important.
The six fire-protection steps are:
1. Identify and correct current hazards
2. Install smoke detectors on every level
3. Plan escape routes and try them out
4. Put fire extinguishers on every level
5. Store flammable materials safely
6. Install a lightning protection system.
Fire Protection Analysis
The best way to avoid a tragic fire loss is to prevent fires from starting. Fires need fuel, heat, and oxygen. Break that trio and a fire can’t ignite. To react safely to an actual fire emergency you need early warning, the means to extinguish a small fire, and at least two ways out. The illustration at the right includes the most common home fire hazards, based on a survey by the National Fire Protection Association (NFPA). Use it to determine whether your home is at risk. Then develop a plan for fixing the problems, working from the information in this article.
Correcting some hazards will be simple, such as installing fresh batteries in your smoke detectors or removing attic insulation from around your bathroom exhaust fan. Other corrections, such as upgrading your electrical service or lining your chimney, will involve more costly home renovations.

HOME FIRE HAZARDS: KEY TO HAZARDS. (1) Smoke detector with
dead battery. (2) Undersized window provides poor secondary egress. (3) Smoking
in bed. (4) Wood-burning stove vented through dirty, unlined chimney. (5)
No screen in front of fireplace. (6) Careless use of portable heater.(7)
Over-loaded electrical circuits. (8) Matches or lighters within reach of
small children. Cooking left unattended. (10) Combustible items near cooking
appliance. (11) Improper storage of flammable liquids. (12) Unshielded porcelain
fixtures in closets. (13) Insulation against recessed electrical fixtures.
(14) Poorly maintained heating system. (15) Inadequate ventilation when using
flammable substances. (16) Lint-clogged vinyl dryer duct. (17) Bulb wattage
too great for fixture, overheats socket and wiring. (18) Exposed rigid foam
insulation. (19) No lightning protection. (20) Inadequate ventilation around
electronic equipment.
Selecting a Smoke Detector
Fire officials consider smoke detectors the best protection you can buy to escape a fire in your home. According to the National Fire Protection Association more than half of the fatal home fires in America occur at night while people are asleep, and about two-thirds of the victims die from suffocation rather than burns. Unless something wakes your family soon after a fire starts, your odds of surviving plunge.
Smoke detectors use either of two proven technologies. Ionization smoke detectors sense the charged particles that are created when things burn; photoelectric detectors react when smoke obscures an internal light beam. Both can be powered by your home’s AC electrical system, by disposable batteries, or by a combination of the two. Each kind of detector can provide adequate protection as long as it's properly certified, installed, and maintained.
Smoke detectors are widely available at home centers and hardware stores. Look for a label stating that the design has been approved by a testing organization such as Underwriters Laboratories (UL). Next, consider the power source. Finally, think about where the alit will be installed and whether the location favors a particular sensor technology or special feature.
Battery-Powered Detectors
Battery-powered smoke detectors are the least expensive and easiest to install. If you plan to put several devices around your home and your budget or electrical wiring skills are limited, this may be the way to go. However, a battery-powered unit won’t do any good unless you diligently replace the battery at least once a year and resist the temptation to remove the cell to silence a false alarm or borrow it for another use.
AC-Powered Detectors
Smoke detectors that are connected to household current cost a bit more, but they are probably more reliable. In new construction, some fire codes require AC-wired devices on each level of the home and outside each sleeping area. AC-powered devices are particularly convenient when the unit will be difficult to reach. What’s more, they can be interconnected so all sound if one senses smoke. This is particularly valuable in a large, multilevel home.
Detector Choice
Although both ionization and photo electric sensors can detect fire, one may be slightly better for a given application. A detector with a photoelectric sensor mounted near a sleeping area will react to the slightest trace of smoke. But it will also react to steam from a hot shower, dust from woodworking, or cooking smoke, so it would not be well suited for installation near a bathroom, workshop, or kitchen. A detector with an ionization sensor will not be fooled by steam or dust. and it will detect the invisible ions from a fire even if no smoke is evident.
Special Features
Some smoke detectors have features be yond just sounding an alarm. You can check some models by shining the beam of an ordinary flashlight at them, so you don’t need a stepladder to reach the test button. If false alarms are liable to be a nuisance (such as from cooking smoke or a wood stove), consider a model with an override button that will desensitize the alarm for up to 15 minutes without removing the batteries or turning off the power. Another feature is an integral security light, a real plus for marking stairway escape routes.
Finally, some detectors can be integrated into a whole-house security alarm system.
Installing a Smoke Detector All smoke detectors come with mounting and installation instructions With a battery powered detector, all you do is fasten the base plate to the ceiling or wall with two screws, in stall the battery (9-volt in most models), and snap the cover in place. 120-volt AC-powered detectors can either be plugged into wall outlets or permanently wired (“hardwired”) to the electrical system. Manufacturers recommend that hardwiring be done by licensed electricians. If you feel you can do the job, wiring techniques are covered in Section 34. The basic procedure is: Turn off power to the circuit. Connect the detector’s black lead to the black wire in the circuit cable and the white lead to the white wire. Make connections by twisting the wire ends together, screw on a wire cap, and then tape the cap in place. Some hardwired alarms can be interconnected so all will sound if one Unit detects smoke. These models feature a third (yellow) lead. The yellow leads must be connected by a separate conductor, which will have to be installed. Never connect an AC- powered detector to a wall switch. Put it on an unswitched circuit with other fixtures so a loss of power will be noticed immediately and so it can't accidentally be turned off.
|

Selecting and Using a Fire Extinguisher
Under the right conditions, portable fire extinguishers can make your home much safer. Misused, they are down right dangerous. One fact is most important: the typical home fire extinguisher is not designed to fight large or spreading fires, because it will run out in eight seconds or less.
When used, an extinguisher must:
• Be rated as the correct type for the fire that you need to put out.
• Be rated with adequate force to fully extinguish the fire.
• Be placed where it's both quick and safe to get in case of fire.
• Be fully charged so it offers reliable performance.
• Be handled by someone who has the strength and knowledge to use it properly and without hesitation.
Types of Fire Extinguishers
There are five types of portable extinguishers: A, B, C, BC, and ABC. Type A devices are exclusively for use on ordinary combustibles such as wood, cloth, or paper. They are quite dangerous if directed at burning grease or energized electrical equipment. Type A units generally use carbonated water to quench a fire. Type B extinguishers are for use on flammable liquids, including oil and grease. They usually employ powdered sodium bicarbonate or a wet chemical foam to suffocate flames. Type C units are for energized electrical equipment; they use nonconductive dry chemicals or Halon gas. A combination type BC extinguisher is available for use in kitchens and other locations where both flammable liquids and electrical wiring might be involved in a fire. Type ABC (multipurpose) extinguishers can be used on any kind of fire.
Most home fires start in the kitchen, followed in frequency by fires in chimneys, bedrooms, and family rooms. Since many common home fires involve different types of materials, a type ABC extinguisher is a good choice for many locations. However, a sodium bi carbonate B or BC extinguisher will work best against a kitchen fire. and for stereo, computer, or other electronic gear, only a Halon type C extinguisher will not leave a chemical residue that could make the equipment unusable. In addition to putting extinguishers in various rooms, you should keep one or two specialized, oxygen-starving sticks near a fireplace or wood-burning stove to extinguish a creosote chimney or stove pipe fire if necessary.
Force Ratings
Fire extinguishers also have t ratings. The higher the rating number, the more extinguishing agent the unit contains, and therefore the larger the fire it should be able to put out. However, a higher force number also means a heavier extinguisher. For ex ample, a 2BC extinguisher might weigh as little as 1 pound 5 ounces, but a force 9BC unit could weigh nearly 4 pounds. So be sure the person most likely to use the extinguisher you choose for each location can wield it comfortably.
Extinguisher Location
Keep fire extinguishers on each level of your home, including the basement and the attic. Each unit should be mounted on a wall where it will be clearly seen, easily reached even by short people, and instantly accessible. Inside a broom or coat closet is not the right place. Each extinguisher should be installed near the escape route from the room it's in, and where flames would not be likely to block access to it.
Care and Maintenance
Once a month, check the gauge or de press the test button on the top of the extinguisher to ensure that it's fully pressurized. A partially discharged fire extinguisher should be replaced or re filled as soon as possible. Although it still contains extinguishing materials, there may not be a sufficient quantity to put out the next fire.
Using an Extinguisher
Before you try to fight a small house fire with an extinguisher, make sure that every one is leaving the house and that the fire department has been called. Keep your back to a safe, unobstructed exit, and re member the word PASS, for Pull, Aim. Squeeze, Sweep, illustrated below.

- PULL the pin. There may be a latch or lever the releases the pin.
- AIM low. Point the nozzle at the base of the fire.
- SQUEEZE the handle continuously to release the extinguishing agent.
- SWEEP across the base of the fire from side to side until the flames go out.
Planning Escape Routes
Preparing a home escape plan is a family affair. Everyone should participate in identifying the best ways out, practice using them, and share responsibility for keeping them unobstructed at all times.
PROVIDING A SAFE ESCAPE
First, draw the floor plan of each level of your house on graph paper. Identify every door and window, and every obstacle that must be eliminated.
Second, designate two escape routes from each room and a central spot to assemble outdoors.
Third, inspect each route and eliminate anything that could impede an escape. Free up windows that are painted shut. Replace fixed storm windows with ones that can be opened from indoors. Hang an extra key near any door with a double-cylinder lock. Remove furniture that constricts a narrow hall. and keep stairways clear of clutter.
Finally, make sure your home meets community fire code requirements for emergency egress. Local building or fire officials will usually be happy to review your escape plan and offer guidance on critical modifications that could save lives, such as enlarging a window.
SECOND-STORY CONSIDERATIONS
For upper-level rooms, try to plan secondary escape routes onto a flat roof or an open porch where family members could wait to be rescued. Otherwise, in vest in a sturdy toss-down ladder that is capable of supporting the heaviest family member.
TESTING YOUR PLAN
Identifying and enhancing escape routes is the first half of a family escape plan. The second half is learning to use them. Have each family member test each escape path. Nighttime practice is especially important—that’s when escape is most likely to be needed. At first, young children may be frightened to venture out onto a roof in darkness with you. But they will be much better prepared to cope with an emergency if you reassure and assist them with repeated practice.
SURVIVAL BASICS Train family members to recognize the sound of the smoke alarm and to sleep with their bedroom doors closed. They should know not to open the door if it's hot to the touch. That indicates the route is already blocked by fire. Opening the door will only allow the flames and the smoke to spread faster. If an alternate escape route is compromised by smoke, crawl to the exit, keeping your face within a foot of the floor. Upper air not only contains less oxygen, but the higher concentration of toxic combustion gases in the smoke could cause you to become disoriented or lose consciousness. Breathing through a wet towel can help if you must pass through thick smoke. Anyone forced to jump from a second-story window should go out feet first, hang from the sill by both hands to minimize the distance to the ground, and bend their knees to cushion the fall. An adult on the ground may be able to break the fall of a young child who is lowered from a window, but a sole adult should never jump first leaving a child behind, If a frightened child balks, the adult will be helpless on the ground. No one should attempt to jump from a third story. If you can't move to a balcony or porch, remain inside and open the window a few inches at the top and the bottom. Breathe fresh air from the lower opening as smoke is vented through the top. Wave a light-colored object to alert firefighters.
|

FIRE ESCAPE TIP
Replace a small double-hung window with an outward-opening casement type to double the size of the clear opening in roughly the same wall space.

MAPPING A PLAN. Identify two escape routes from each room and a central meeting point outdoors. Be realistic about each person’s ability
to use the exits. Second floor escape routes; Garage roof; Bedroom; Bathroom;
Garden

ESCAPE LADDERS with standoffs and flat rungs are the safest,
easiest, and most comfortable to use.
Storing Flammables Safely
Flammable materials, both solid and liquid, are dangerous—far more dangerous than many people realize. The most dangerous are volatile liquids, those that give off invisible (and some times nearly odorless) fumes. Careful handling is very important, because even a single spark can touch off a fire or explosion. Safe storage of flammables is equally important. With the right mix of heat and oxygen, they can ignite—even in the absence of an open flame or spark. You would be surprised how far airborne fumes from a poorly sealed container can travel to find a source of ignition, such as the pilot light or igniter of a water heater or someone striking a match or cigarette lighter. In the event of a house fire, flammable materials that are not properly stored can endanger family members and fire fighters alike. and evidence of improper storage may affect insurance claims.
Among the flammable materials commonly found in homes, garages, and workshops across America are: gasoline, paints and thinners, acetone, lacquer and lacquer thinner, paint and varnish strippers, brush cleaners, furniture refinishers, contact cement, construction adhesive, quick-drying primer/sealers, and hobby supplies. The list could be extended much longer.
Of all volatile liquids, gasoline causes the most home fires and fatalities. To minimize the risks in your home, take the following precautions with all volatile liquids:
• Never store gasoline containers or gasoline-powered tools or equipment inside the home. Instead, keep them outdoors or in a well-ventilated storage shed located away from heat sources.
• Never store gasoline or other flammable materials near an escape route especially not under a stairway or near an exit.
• Store gasoline in tightly closed metal or plastic containers approved for this use. Never store gasoline in a glass container that could break.
• Allow gasoline-powered equipment to cool before refueling or storing.
• Discourage vandalism or arson by keeping gasoline and other volatile liquids out of sight.
• Never use gasoline as a cleaning agent, and never use it indoors.
• Keep gasoline out of the reach of children.
A FIRE-SAFE WORKSHOP
Using and storing flammable materials in a home workshop poses special safety concerns. The danger such materials present is compounded if the shop is located in a basement or utility room where ventilation and egress may be limited and where volatile fumes might easily spread to a furnace or water heater. If a fire breaks out in a workshop, you need to keep the flames away from the flammable vapors long enough to escape. Three measures will help.
1. Keep flammable finishing materials in sound, tightly sealed containers. Store them inside a grounded, double-walled metal storage locker that is vented to the outdoors. Grounding drains off static electricity, which could generate a spark.
2. If you save oily rags for reuse, place them in a metal container that can be tightly sealed. Safety cans (which feature flash arrestors and caps that release pressure, dissipate heat, and retard vapor ignition) are ideal.
3. Keep only small quantities of flammable materials in your shop. When you use flammable materials, always provide a steady flow of fresh air by opening windows and doors and exhausting fumes with a sparkproof fan. Mop up spills as soon as they occur, and keep your shop clean. Sawdust and wood chips will burn rapidly if ignited by an accelerant.

Store flammables in a grounded metal cabinet. Ventilate to
remove flammable vapors. Clean up sawdust and spills promptly.
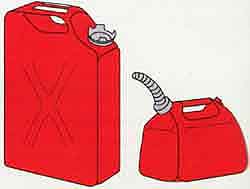
USE AN APPROVED CONTAINER for gasoline; that’s not only good
sense, its law almost everywhere. Keep other volatiles in metal or approved
plastic containers, too.
 KEEP ESCAPE ROUTES SAFE by never storing flammables in or
near them. Even a fire that starts elsewhere can ignite them, possibly trapping
you or your family.
KEEP ESCAPE ROUTES SAFE by never storing flammables in or
near them. Even a fire that starts elsewhere can ignite them, possibly trapping
you or your family.
Lightning Protection
A lightning protection system safeguards a home in the event of a lightning strike by directing the high-voltage static electrical charge into the ground. Installing lightning protection is not a do-it-your elf project. Manufacturers of lightning protection equipment sell only to UL-list d installers. Ask your fire-insurance agency or fire department for the name of a company that specializes in this service, or consult your telephone directory. Although you will not be doing the actual installation, you need to know something about lightning protection systems in order to deal effectively with a professional installer. A typical residential lightning system consists of three parts: air terminals (lightning rods), conductors, and ground terminals. In many areas it should be supplemented with a surge arrester installed at the electrical service panel.
AIR TERMINALS
Air terminals are pointed metal rods that are mounted on top of a structure. They should be at least 10 inches long, installed within 2 feet of the ends of vie roof ridge, and no more than 25 feet apart. Chimney-mounted terminals must be located within 2 feet of all four corners of the chimney.
Conductors
Conductors are metal cables, rods, or Strips that carry the charge between the yr terminals and the ground terminals. Copper, copper alloys, and aluminum conductors are used. They must not be intermixed nor put in contact with building materials of a different metal be use the incompatible metals will cause :ach other to corrode. Conductors must not bend more than 90 degrees or at less than 8-inch radius so the lightning charge will not miss a turn on its high-speed trip to the ground. In modern systems, conductors are attached directly to the house or even concealed within an exterior wall. Insulated standoffs are not used, because it's impossible to insulate against the extremely high voltage of a lightning charge.
SURGE PROTECTION
Ground terminals are buried metal rods or plates that discharge the current from a lightning strike into the ground. The design, size, depth, and number of terminals depends on the type of soil and the size and shape of the structure. However, at least two grounding de vices, at opposite ends or diagonally opposite corners of the house, are required. Grounding rods must penetrate at least 10 feet into permanently moist ground. In other soil conditions more terminals are required.
ZONES OF PROTECTION
When properly installed, each air terminal provides a 45-degree conical zone of protection. Any portion of the structure, such as a dormer, that extends outside a protected zone must have an air terminal of its own.
SURGE PROTECTION
Lightning that strikes overhead power lines or that side flashes from a tree’s roots to nearby underground lines can cause power surges of 2000 volts or more on household circuits—far greater than plug-in surge protectors of the type used to protect home computers and stereo/TV systems can handle. This kind of lightning hazard is common in many locations, especially in semirural and rural areas. For protection against such power-line surges, have an electrician install a high-voltage surge arrester on the incoming lines at your electrical service panel.

ANY PORTION OF A STRUCTURE out side the zone of protection
must have an air terminal connected into the system.

A RESIDENTIAL LIGHTNING-PROTECTION SYSTEM must be professionally
installed. The number and placement of components depends on the design and pitch of the roof. The basic spacing of air terminals, conductors, and ground
terminals is shown here, but the installer will determine the exact needs.
Protection for tall trees 10 feet or less from a structure is also recommended,
to prevent a side-flash of lightning from the tree trunk to the building.
Previous: Keeping Fire from Starting Next: Home Safety and Health