The basics of spinning are easy to learn, especially if you begin with a drop spindle; a flick sets the spindle whirling, then your fingers draw out the fleece into yarn. A bit more persistence will be needed to learn the hand and foot motions of the treadle wheel, but once they are mastered, you can concentrate on making fine thread and specially textured yarns; or you can simply relax, daydream, chat with neighbors, and delight in the feel of the fleece as it slips through your fingers.
In preindustrial America a homestead wife was more likely to spin her own thread than to perform any other traditional craft. Not only was spinning a virtual necessity of life, but the equipment required was small, light, and easily accommodated in a corner where it could be turned to in free moments. The craft even became fashionable among rich upper-class ladies, many of whom not only owned elegant parlor wheels but also had special visiting wheels to take with them when paying social calls on their neighbors. In the East, where sheep were scarce, linen was the most commonly spun thread. In the Southwest, wool yarn was the staple. A little cotton was sometimes spun, and occasionally someone experimented with silk.
Wool is by far the easiest fiber to spin. You may be able to buy fleece from a local herder; ask your county agent where one can be found. Otherwise, contact spinning supply companies and stores (check advertisers in spinning magazines) for fleece as well as for more exotic fibers. Other spinnable fibers that may be locally available are angora rabbit fur, goat hair, wild cotton, and dog hair. It is surprising how many spinners treasure a sweater made of hair combed from a favorite pet.
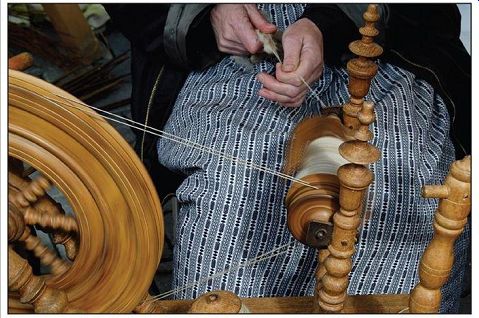
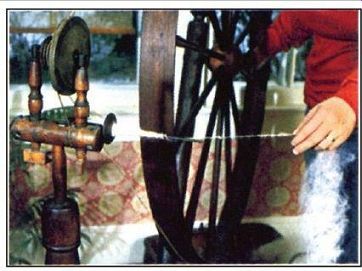
Low wheel twists fleece into yarn and winds it onto spindle in a continuous sequence. Many spinners enjoy the relaxed rhythm of treadling almost as much as the yarn that results.
----------------
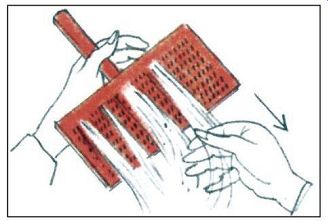
1. start carding by pulling fleece across a card so that fibers catch on teeth. spread fleece evenly across card.
----------------
2. Pull upper card gently across fleece. stroke several times until half the wool is distributed on each card.
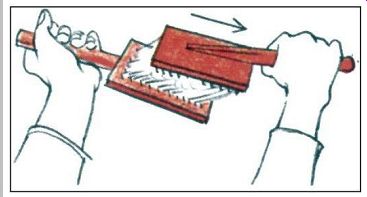
---------------- 3. Transfer fleece from top card to bottom one by first reversing
top card, then pulling it across bottom one.

---------------- 4. stroke the fleece several more times, repeating steps 2 and
3 until fibers are evenly distributed and fluffy.
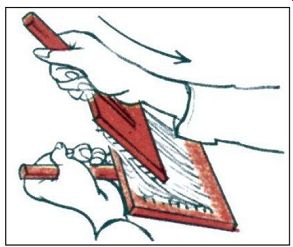
---------------- 5. Remove fleece from cards by first transferring all to bottom
card, then pulling top card across as shown.
----------------6. Shake wool from card, then roll between palms to form a "rolag" (long
roll of evenly distributed fiber).
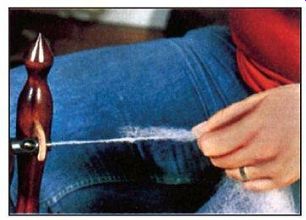
Using the Drop Spindle
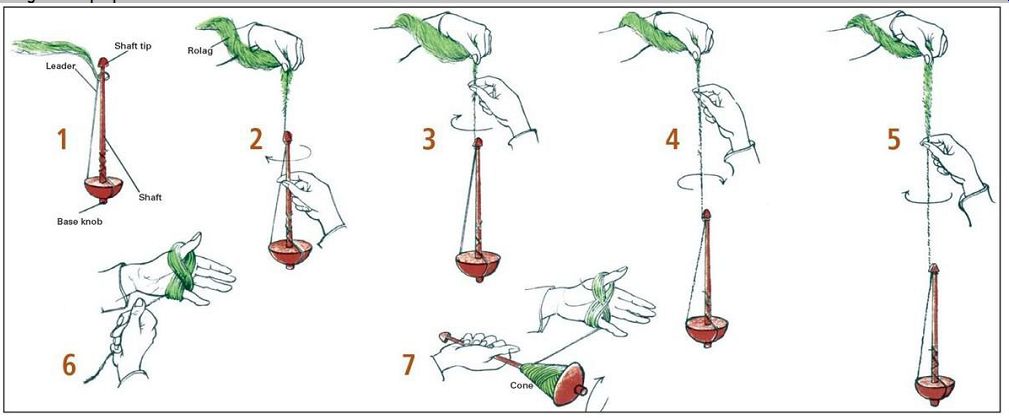
---------------- 1. Tie leader (a scrap of previously spun yarn) to base of spindle
shaft. Wrap leader around base knob, then up to and around shaft tip as shown.
Fan out end of leader.
2. Fan out rolag end and lay end of leader to overlap it by 2 in. Hold ends between thumb and forefinger of one hand as you start spindle turning with the other hand.
3. As rolag end twists around leader, shift lower hand up to hold juncture of ends. With top hand start drawing out fleece until only a few fibers remain between hands.
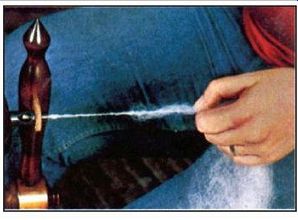
4. When ends are joined, move lower hand up again to pinch fleece at point just below top hand. Twist can now run farther up rolag but not above pinch. Maintain pinch until filaments below lower hand are twisted as tight as you wish.
5. As you pinch, use top hand to pull out more fibers. The aim is to thin out the fibers so that yarn will be as thin and even as desired. Repeat steps 4 and 5, pinching with one hand and pulling out fibers with other. As whirling slows, reach down and twist spindle shaft with your fingers. Do not spin rolag all the way to its end. instead, add new rolag as in step 2.
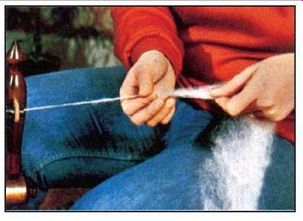
6. When spindle reaches floor, wrap spun yarn in a figure eight around thumb and fifth finger of one hand. Do not release grip at end of spun yarn or it will untwist.
7. Unwrap yarn from tip of spindle and wind onto shaft.
Wind more yarn at shaft base and less above so yarn will form cone. Rew rap yarn as in step 1 and continue to spin.
Preparing the Fleece
Many spinners prefer to spin "in the grease"--that is, with unwashed fleece--because the natural lanolin coating lets the fiber slide more easily through the fingers, making spinning faster and more comfortable. In addition, garments knitted from yarn that still contains lanolin from the sheep are naturally waterproof.
However, if a fleece is very dirty it must be washed. You will need a large basin for the job (two would be better) or a large sink. For 1 pound of fleece, fill the basin with 4 gallons of lukewarm soft water and add mild soap. Lay the fleece on the surface of the water (do not pour water over it);
submerge and squeeze the fleece gently. When the first bath is dirty, make a second, similar bath and shift the fleece to it. Most of the dirt tends to collect at the tip of each lock of sheep's wool. Gently scrape with your thumbnail to remove the dirt lodged there. Rinse the wool and dry it on a rustproof window screen.
Washed fleece should be sprayed lightly with thinned lanolin oil to recondition it. A good recipe is one part of any lanolin-containing hand lotion to five parts water. Spray one or two squirts of the mixture over each 1/2 pound of fleece and let it stand overnight.
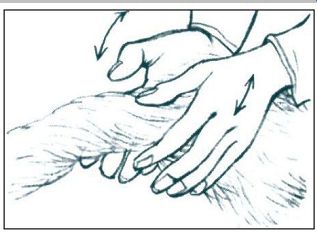
Carding the Fleece
Wool, as it comes from the sheep, is kinky, matted, and may contain dirt and burrs if it has not been washed. To prepare the wool for spinning, the fibers must be separated from one another and the foreign matter removed. The method by which this is accomplished is called carding, after the pair of paddle-shaped wire brushes, or cards, that are used in the process. (Long fibers can also be separated and cleaned by combing with a metal-toothed dog comb or even an ordinary hair comb, but working with these tools is too tedious for anything except a small quantity of fleece.) Cards are rated by fineness. The finer the card, the thinner the wires in the mesh and the tighter the mesh itself.
As a rule, No. 8 cards are adequate for wools of medium weight. For lighter wools use a finer (higher numbered) card; for heavier wools use a lower numbered card. When you buy your cards, it is a good idea to mark one card for the right hand and one for the left. Then as you use them, the pitch, or angle, of their teeth will adjust to your particular stroke. Prepare the fleece for carding by teasing it apart with your fingers. Then follow the steps for carding.
Wheels to Speed The Spinning
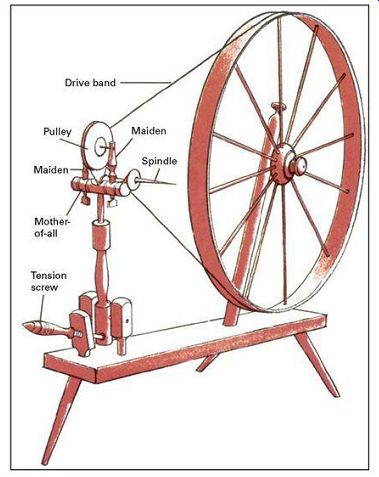
You can spin yarn six times as fast on a low wheel as on a drop spindle, primarily because the spun yarn is wound onto the bobbin automatically. The other great advantage of this wheel is its foot-powered treadle, which turns the flyer, the whirling mechanism that twists fibers into yarn and winds it onto the bobbin.
Handling the fleece is almost the same as with a drop spindle, but coordinating the hand and foot movements takes practice. You should familiarize yourself with treadling before you try to spin yarn. First, adjust the tension of the drive band by turning the tension screw. The band must be almost-but not quite-tight. If it is too loose, it will slip; if it is too tight, it will turn the flyer very fast and the yarn will be kinky. When the band is adjusted, start the wheel turning clockwise by pushing it gently with your right index finger, then treadle as slowly and smoothly as you can without letting the wheel stop or go backward. Many spinners remove their shoes to increase control over the treadle.
Others chant a simple song or recite a nursery rhyme as they work to help maintain the slow, steady rhythm that is required.
When you are ready to begin spinning, arrange several rolags side by side over one knee. Tie a leader to the bobbin-a beginner will find it easiest to use a 2-foot-long leader-and start spinning as shown below. When you have spun almost to the end of the first rolag, attach a new one just as you attached the first one to the leader.
As the spindle fills with yarn, you will need to tighten the drive band occasionally to keep the flyer turning as fast as it did when empty. This is accomplished by turning the tension screw. As you work, strive for yarn of even thickness and uniform twist. This will be difficult to accomplish at first, but in the meantime take satisfaction in the rich character of your homespun.
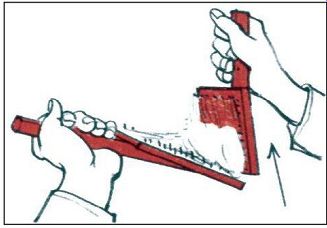
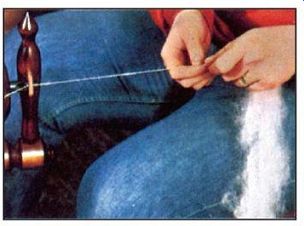
Spinning on a High Wheel
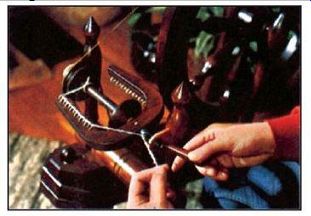
When using the high wheel, the spinner keeps the wheel constantly turning with one hand while drawing out the fleece with the other. As on the low wheel, the drive band must be adjusted to the proper tension and a leader attached before starting. Then when the rolag fibers are wrapped around the tip of the spindle and pulled away from it at just the right angle, the whirling spindle can twist the fibers into yarn. As it does, the spinner pinches the rolag until fibers between fingers and spindle are spun to the desired tightness. Then additional fleece is allowed to slip through the spinner's fingers so that it can be spun. As the fleece slips through, the spinner must step back from the spindle in order to draw out even more fleece. Eventually, when the wheel can barely be reached, the spinner walks forward to wind the yarn onto the spindle. Because the spinner must continually walk back and forth alongside the wheel--as much as 20 miles in a day during colonial times--the high wheel is sometimes called a walking wheel. It is also known as a wool wheel, since it is so often used to spin wool.
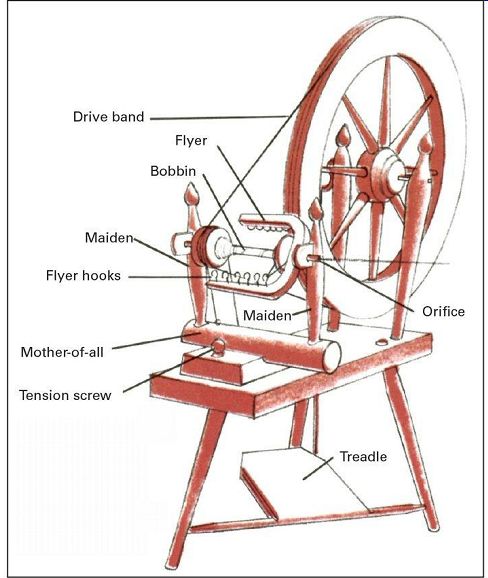
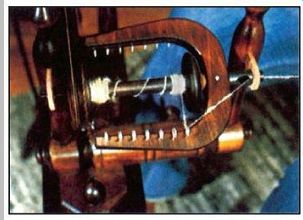
------------- Low wheel is turned by treadling. Flyer mechanism twists yarn,
draw s it into orifice, and winds it onto bobbin.
Using the Low Wheel
------------ 1. Tie leader to back of bobbin, then pass it over flyer hooks.
Draw leader through orifice with crochet hook or with hook made of bent wire.
------------ 2. Fan out ends of rolag and leader and hold them together with
one hand. Use other hand to start wheel by pushing a spoke clockwise.
------------- 3. Treadle slowly and evenly. Allow rolag end to twist around leader
so that they are joined. Meanwhile, leader is draw n toward orifice.
------------- 4. Pinch juncture of leader and rolag with right hand.
Use other hand to draw out fleece to thickness appropriate to the size of your yarn.
------------ 5. When rolag and leader are joined, move right hand to pinch draw
n-out fibers at a spot farther back on rolag. Twist can now run farther up
fleece.
------------ 6. As yarn spins to tightness that you desire, continue to draw
out fibers between left and right hands. spun yarn is drawn into orifice.
------------ 7. When enough fibers are draw n out, open fingers to let twist
travel farther up rolag. Continue to draw out fibers; add new rolag as needed.
----------- 8. Flyer hooks determine where yarn winds onto bobbin. First wind yarn at ends of bobbin, then move it from hook to hook to build even layers.
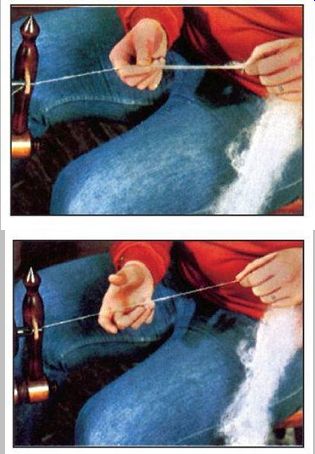
High wheel is turned by hand. spindle tip twists yarn, then spinner unwinds yarn from tip and winds it up on back of spindle.
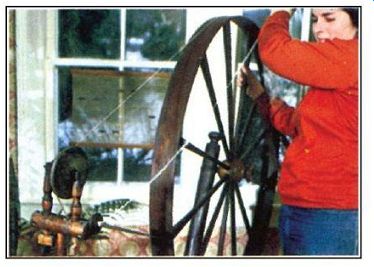
------------ 1. Tie leader yarn at back of spindle. Then hold yarn parallel
to wheel, turn wheel clockwise, and wind leader onto spindle in even layer.
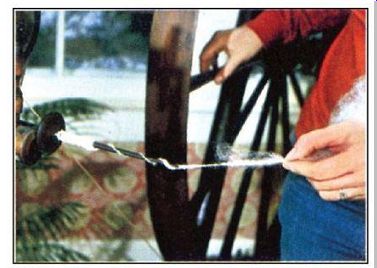
------------ 2. Wrap leader around spindle tip, pull leader away from spindle
at angle shown (approximately 120°), and hold ends of leader and rolag together.
------------ 3. Turn wheel clockwise with free hand in order to start spindle
turning. End of rolag twists around end of leader so that the two will be joined.
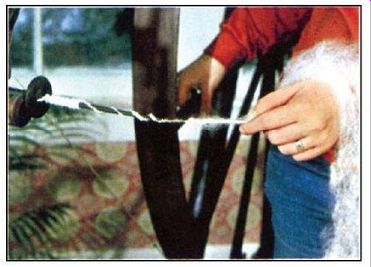
------------ 4. Keep turning wheel and slide hand farther back on fleece. Pull
out fibers, then pinch so that fleece in front of hand is spun. Then slide
hand back again.

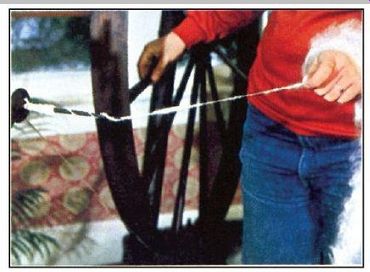
------------ 5. When a length is spun, turn wheel counterclockwise to free yarn.
Hold yarn parallel to wheel and turn clockwise to wind into cone on spindle.
------------ 6. Return yarn to spinning position and draw out fibers again. When
necessary, add new rolag by holding ends together and joining as in step 3.
After the yarn is spun
The spindle or bobbin must be emptied periodically whether you use a drop spindle, low wheel, or high wheel. To unwind yarn from either type of wheel, you must first take off the wheel's drive bands.
Next, the yarn is wound onto a wooden frame called a niddy noddy. Do not unwind all the yarn. instead, leave the last few feet on the spindle to use as a leader. The distance around a niddy noddy is about 2 yd., though the size varies from one to another. You should wrap 40 lengths before unloading it. This is about 80 yd., or 1 knot, of yarn. (A skein contains 560 yd., or 7 knots.) When you have wrapped a knot of yarn, tie cotton string around it at several points before taking it off the niddy noddy. Now wet or steam the entire knot, tie a 1/2-lb. rock or similar weight at one end, and hang the knot up by its other end to dry. This will set the twist of the yarn. To store a knot or skein of yarn, twist it as shown at far right.
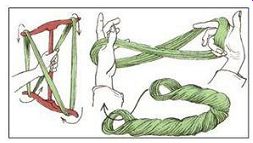
---------- Store wound yarn by twisting it several times, then pulling loop at
one end through loop a other end.
To wind yarn on niddy noddy, tie end of yarn to a crosspiece, grip shaft, and wrap in path shown above.
Sources and resources
Books and pamphlets:
Hecht, Ann. The Art of the Loom: Weaving, Spinning and Dyeing Across the World. New York: Rizzoli, 1990.
Hobdeen, Eileen. Spinning and Weaving: A Practical Guide. Portland, Oreg.: International Specialized Book Services, 1987.
Hochberg, Bette. Handspinner's Handbook. 33 Wilkes Circle, Santa Cruz, Calif.: Bette Hochberg, 1980.
Leadbeater, Eliza. Hand-spinning. Newton Centre, Mass.: Charles T. Branford Co., 1976.
Ross, Mabel. The Essentials of Handspinning. McMinnville, Oreg.: Robin & Russ Handweavers, 1988.
Simmons, Paula. Spinning and Weaving with Wool. Petaluma, Calif.: Unicorn Books for Craftsmen, 1991.
===