Though automatic sprinkler systems take the tedium out of watering, most are overly generous with water. Like rain, they blanket areas, watering plants, weeds, and unplanted soil equally and offering little selective control. An effective way to minimize water waste where you have garden plantings is to convert your sprinklers to a drip irrigation system.
Hooking up a drip system to existing sprinkler piping is a relatively easy task. You first position a water filter and pressure regulator; then you adapt one or more risers for drip tubing connections and cap the rest; finally, you lay down tubing and position emitters as for drip irrigation.
You’ll need to convert each control valve completely from one system to the other—drip and regular sprinklers don’t operate properly on the same circuit.
The parts you’ll need are avail able in irrigation supply and hardware stores.
Locating a filter and pressure regulator
To convert to drip, the water must be filtered to prevent clogs, and the in line pressure must be reduced to 20 to 30 psi (pounds per square inch). If you’re converting just one sprinkler head to drip, you can simply add a filter and pressure regulator to the line at a riser (see Ill. 16). If you’re converting more than one sprinkler, you attach the filter and pressure regulator at the valve.
Installing at a riser. Since drip lines can run 100 feet in any direction from one sprinkler riser, you may only need to convert one riser. To adapt a riser for a drip line, screw a threaded PVC elbow or tee fitting onto the riser and add a short length of threaded PVC pipe. Add the filter and pressure regulator; then attach drip irrigation tubing to the pressure regulator and extend it as needed. Remove the other sprinkler heads on the line and cap the risers with threaded caps.
Keep the filter and pressure regulator aboveground so the filter can be cleaned.
Installing at the valve. Installing a filter and pressure regulator at the valve allows you to convert all the sprinkler heads on that circuit to drip.
The fittings and adapters you’ll need depend on your system. Take a drawing or photo of your valve setup (with measurements) to the store and do a trial assembly of the parts.
To install them, you’ll need to re move a section of pipe below the control valve. Dig down just beyond where the line makes a 90° turn toward the sprinklers and remove a section of the vertical pipe. Replace it with the filter and pressure regulator. Adapt those sprinkler heads you want to convert and cap the rest.
Screwing high-pressure emitters onto risers
High-pressure emitters (see Ill. 17) are useful where you have clusters of plants around each riser rather than spread out over a large area. These emitters are installed directly onto risers.
Each emitter has from four to twelve outlets and a built-in pressure regulator and filter. You’ll need to add more filters only if your water pressure is higher than 100 psi, you irrigate with well water, or you’re using laser-drilled tubing.
If your system is galvanized pipe rather than PVC, wrap the riser three times with fluorocarbon (pipe-wrap) tape and hand-tighten the emitter onto it so the plastic doesn’t crack; or change to a PVC riser. Attach microtubing for shrubs and trees or laser-drilled tubing for closely spaced plants.
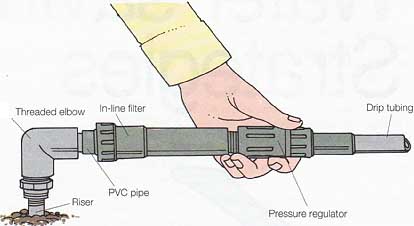
Ill. 16. Adapt a riser to drip irrigation by installing
an in-line filter and pressure regulator. Threaded elbow; PVC pipe; Pressure
regulator
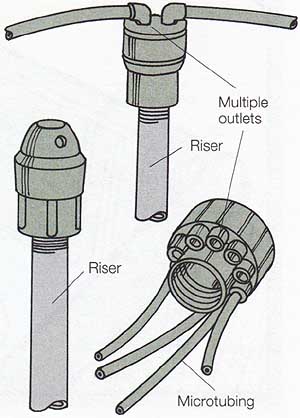
Ill. 17. High-pressure emitter heads screw directly onto risers;
on some, microtubing runs from the outlets.