| Home | FAQ | Finishing | Sump Pumps | Foundations |
|
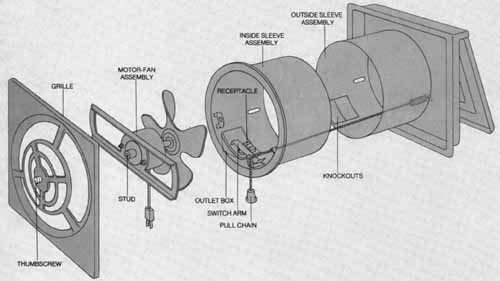
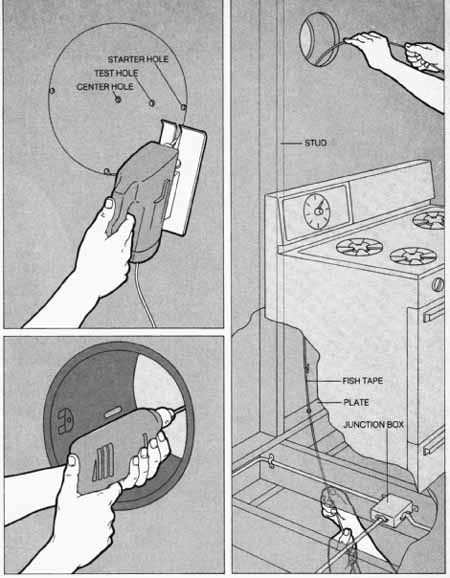
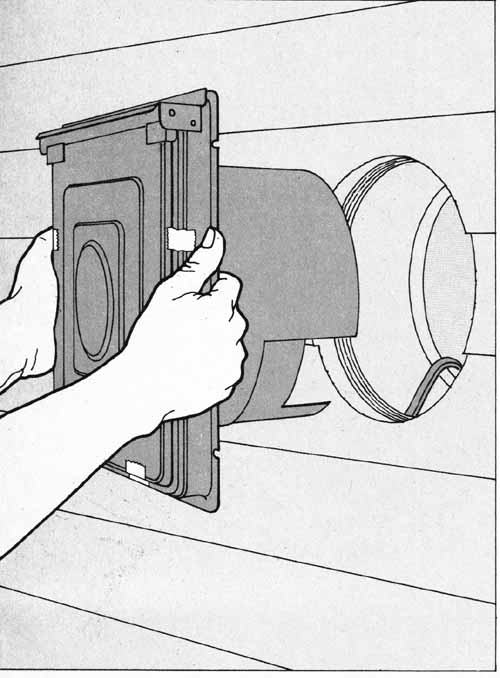
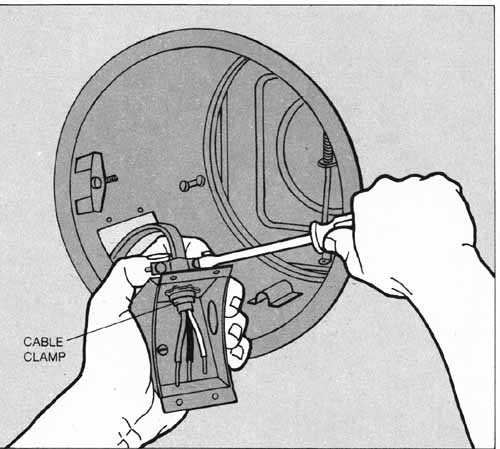
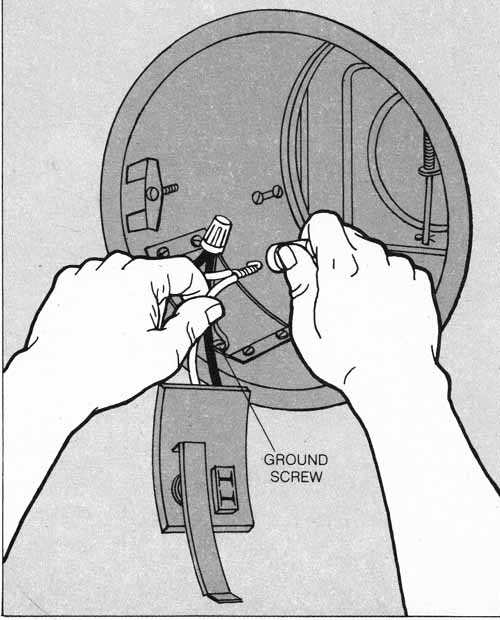
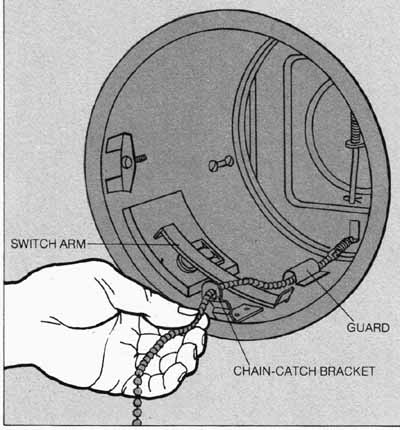
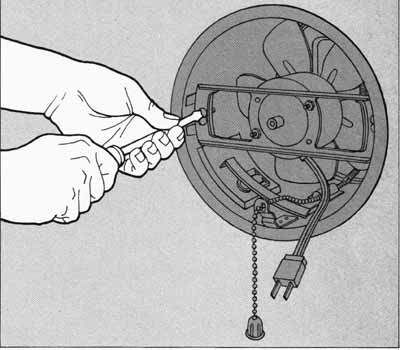
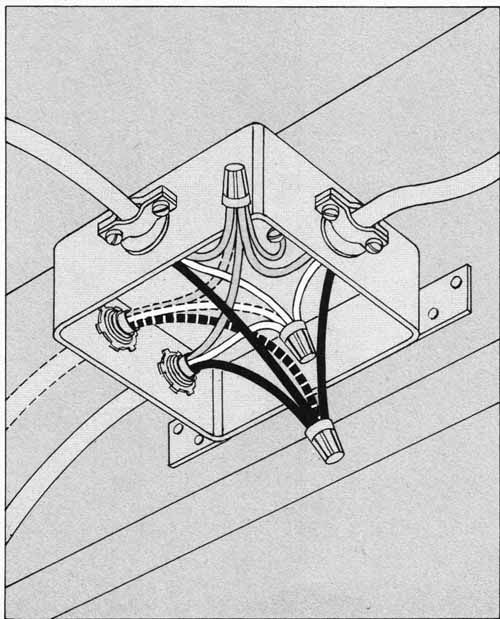
The unpowered vents in an attic can solve only a part of a family’s venting problems: cooking, bathing and washing clothes for a family of four can release as much as 3 gallons of water a day into the house, in the form of vapor. In a poorly insulated house a great deal of moisture escapes harmlessly through walls and cracks. But when you tighten your home against the weather, you seal off these escape routes. The moisture ac cumulates in the air, and it can cause peeling paint, sticky drawers and mil dew. To solve the problem, force water vapor out of the house by installing exhaust fans in rooms where it's generated: kitchen, bathroom and laundry. In an existing house, the easiest installation for the kitchen is a through-wall fan with a built-in switch (below). For the bathroom build a smaller fan into the ceiling. In the laundry you need only vent the drier directly outdoors with a drier vent kit. A fan should change the air in a kitchen every four minutes, in a bathroom every seven and a half minutes. To find the size fan you need, determine the cubic feet of space in the room, then divide that figure by 4 for a kitchen, 7.5 for a bathroom. The result is the CFM rating you need—the capacity of the fan in cubic feet of air moved each minute. A second rating indicates a fan’s sound out put in units called sones. Compare the sone ratings of different models in your CFM range and choose the lowest for Quiet operation. Installing a kitchen exhaust fan in most houses takes only a few hours, although breaking through and patching a brick wall is more involved. The only special tools you are likely to need are the fish tapes to pull the wires for the fan motor through the wall. You will also need three-wire cable and two cable connectors to wire the fan to the house circuit. Locate a kitchen fan in an outside wall, 30 inches or more above the surface of the range. If the range is placed against an inside wall, use the nearest outside wall. Since a kitchen fan pulls particles of cooking grease along with the heat and moisture it exhausts, it's a good idea to place a grease filter between the fan grille and the motor; otherwise grease may damage the motor. The parts of a through-wall fan. Disassembled for installation, the components in this drawing fit into a hole cut through the wall. The outside sleeve assembly is fastened to the wall from outdoors; the inside sleeve assembly slides into it and fits flush to the inside wall, Knockouts can be removed to shorten the sleeve assemblies for different wall thicknesses. Wires from a house electrical circuit attach to corresponding wires inside the outlet box, and the fan motor plugs into a receptacle in the box cover. The pull chain opens and closes the shutter and operates the switch arm, turning the fan on when the shutter is open, off when it's closed. A grille, held by a thumbscrew, fits over a motor-bracket stud. 1. Cutting the inside hole. Drill a ½-inch hole through the wall at the point you have chosen for the center of the fan, and probe inside the wall with a wire for the studs on either side. The fan opening must be at least 2 inches from the studs; if it's not, move the center hole. Make a tem plate matching the inner sleeve opening, and use it to mark a circle on the wall. Drill ½-inch starter holes at the 3, 6 and 9 o’clock positions on the circle, and cut out the opening with a saber or keyhole saw. If necessary, remove enough insulation to accommodate the inner sleeve. If your walls consist of cinder block or clay tile, use a masonry bit to drill the test hole; hollow out the inside with a cold chisel and hammer. 2. Cutting the outside hole. Insert the inner sleeve into the hole you have cut out and push the tem plate to the far end of the sleeve. Drill a ½-inch hole through the center of the template and on through the outside wall. Remove the inside sleeve and the template. Outside the house, center the template over the drilled hole and use it to mark a circle around the template. Drill starter holes and saw an opening as in Step 1, making the cut just outside the marked line. If the outside wall is stucco, score the circle with a utility knife and use a metal-cutting blade in your saber saw. If it's a brick wall, remove mortar and take out all the bricks within the circle and any that have the circle mark running through them. Cut each brick separately along the mark with a mason’s chisel. Mortar the cut pieces into place around the outside of the circle. 3. Bringing wiring to the fan. Run a three-wire cable to the fan hole from a junction box. The most likely place to find a box is in the basement ceiling. To locate the best path for the cable from the basement, look for utility lines coming up through the floor. If you don't find any, drill a small hole in the floor beneath the fan opening. From the basement, drill a 3 hole up through the plate near this locator hole. Lower the end of a fish tape through the fan opening and have a helper push another fish tape up through the hole in the plate. Hook them together inside the wall and draw the hooks into the basement. Disconnect the hooks, tape the end of the cable to the upper hook, and pull the cable up and through the fan opening. Tape it temporarily to the wall. 4. Mounting the outside sleeve. Tape the shutter closed to keep it out of the way while you are working. Adjust the depth of the fan sleeves, if necessary, by removing one or more knockouts in the outside sleeve and slide the sleeve into the outside wall. Align the flanges with the siding above and below, and screw them to the wall. Caulk around the edges of the flanges. 5. Attaching cable to the outlet box. Working in side the house, remove the outlet box from the in side sleeve, and run the cable through the box hole. Slide the sleeve into the fan opening and screw it to the outside sleeve. Remove a knock out from the outlet box and screw a cable connector into the knockout hole. Run the end of the cable through the connector and tighten the clamp. Refasten the outlet box. 6. Connecting the wires. Twist the stranded black wire from the outlet-box cover around the solid black wire of the house cable, then bend the end of the solid wire back upon itself and twist a wire nut down over the insulation. Connect the white wires in the same way. Secure the bare copper wire of the house cable to the green ground screw in the outlet box. Screw the outlet- box cover back into place. 63a 7. Attaching the pull chain. Align the screw hole of the chain-catch bracket with the corresponding hole in the bottom of the inside sleeve, and fasten the bracket in place. Hook the spring at one end of the chain into the bracket at the far end of the shutter, then run it through the tunnel-like guard at the bottom of the sleeve, over the switch arm and through the chain-catch bracket. Out side the house, remove the tape from the shutter. With the shutter open, cut the chain to a convenient length and attach the pendant to its end. 8. Installing the motor-fan assembly. With the mo tor cord and plug facing down, fit the keyholes of the motor bracket over the screws in the small tabs at the sides of the inside sleeve. Turn the bracket to fit the screws into the narrow ends of the keyholes; tighten the screws. Turn the blades manually to make sure nothing obstructs them. 9. Connecting wires at the junction box. Because the wires of several circuits may run through a single junction box, turn off all the house circuits at the fuse or circuit-breaker panel before connecting the new cable. Then open the junction box and remove the wire nuts. Test to be sure the power is off; touch one prong of a voltage tester to the metal of the box and the other prong to each of the wires in the box. The bulb of the tester should not light if the power is off. Remove a knockout from the box, install a cable connector in the knockout hole and run the end of the new cable through the connector; tighten the clamp to hold the cable firm. Join the new wires, shown here as broken lines, to wires in the box—black to black, white to white, and the cop per ground wire to all the other ground wires. If necessary, replace wire nuts with larger ones. Re store power to the circuits, plug in the fan and switch it on to check its operation. If you are using a grease filter, place it over the motor bracket; set the grille into position and run the pull chain through both the filter and the grille. Screw the grille thumbscrew into the motor bracket stud until the grille is flush to the wall. |
| Top of Page | Home | Prev: Airing a Dank Basement | Next: An Exhaust Fan in a Ceiling | Related Articles |