The goal of basement design is to plan a space that meets practical needs in a pleas ant and affordable way. The path to this goal is a design process that begins by identifying your needs and priorities and ends with a set of construction documents.
Good design is a fluid and dynamic process that does not follow a rigid pattern. However, once you have established what kind of rooms you will be adding, there will be two basic design phases: The first is planning to make the basement livable, which includes evaluating the space and adapting it to meet your functional needs; the second is planning to make the basement appealing by adding finish details and considering the overall appeal of the space.
Many factors will influence your design. The most critical ones are changes needed to make the space livable, such as creating more head room, solving moisture problems, or adding new windows.
The size and shape of your basement; the location of stairs, columns, and utility equipment; and possible locations for windows or a door will all influence the rooms you plan. There are also limitations on the placement of plumbing fixtures, heating equipment, and a fireplace.
Site factors can also influence your design: potential views, privacy from neighbors, street noise, the direction of the sun, and shade trees should all be carefully considered.
Among the first issues to consider are ceiling height and floor area. These dimensions determine the basic size and shape of the space and give you an indication of whether you need to make major structural changes.
Is there enough headroom?
Most codes require a minimum ceiling height of 7½ feet for habitable rooms (a bedroom, family room, recreation room, or kitchen) and 7 feet for hallways and bathrooms. If ducts, pipes, or other obstacles protrude below the ceiling, there should be at least 80 inches of clearance beneath them. When you measure the ceiling height in your basement, be sure to allow for finish floor and ceiling materials.
Increasing headroom. Although it's possible to raise a house to increase the headroom in a basement, a more practical method is to lower the basement floor. This requires breaking out the existing concrete floor, excavating to the required depth, and pouring a new concrete floor. Leave the original foundation intact by excavating only to within 1 or 2 feet of it, then pour a concrete wall that creates a low shelf all around the room.
Doing this is a major project that involves shoring up floor beams to replace supporting columns. How ever, it can be worthwhile if it means that you will be able to add several hundred feel of new living space. A side benefit is that new plumbing lines and a drainage system can be installed at the same time.
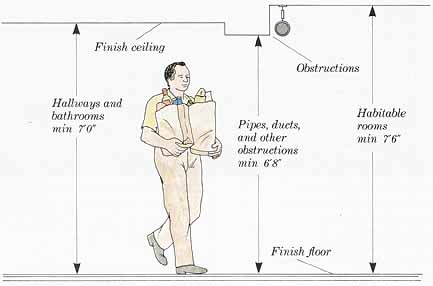
Basement headroom: Hallways and bathrooms mm 7’0”; Pipes,
ducts, and other obstructions mm 6’8”; Habitable rooms mm 7’6”
Room sizes |
|||
Room |
Minimum floor area* |
Sample size |
Preferred size |
|
|
|
|
*Floor area is defined as net floor area within enclosing walls, excluding built-in fixtures such as closets or cabinets. |
|||
Is there enough floor area?
Most basements are fairly large, with at least enough floor area for one room and usually space for more. However, if your basement is small or has many obstructions, take some measurements early in your planning to make sure the project is feasible.
Local codes specify the minimum sizes for specific rooms. The chart above summarizes typical requirements listed by HUD as well as many local codes. (Be sure to consult your own building code.) The chart includes a sample room size that qualifies for the minimum, as well as a preferred size that would make the room more livable. The minimum sizes are quite small. Whenever possible, design larger rooms. Where figures are omitted there is usually no minimum requirement.
Enlarging the floor area. If the basement is not large enough and it occupies only a small portion of the space under your home, you may be able to enlarge it. The customary technique is to dig out space under the house. To avoid undermining the existing foundation, stop the new excavation 2 or 3 feet short of the foundation. The new basement walls then help to retain the soil supporting the foundation. The resulting space has less potential window area than normal basements, but it can be useful as storage space, a wine cellar, a cozy alcove, or a recreation room.
Although excavating dirt is a cheap way to gain new living space, the costs of such a project can go up quickly if water or sewage pipes, a septic tank, or other utility lines are in the way. It is also not very cost- effective if you are adding only a small amount of space. Concrete retaining walls higher than 3 feet are complicated, and codes often demand that they be designed by an engineer. The cost of enlarging a basement may be prohibitive to gain only a few extra square feet, but worthwhile for a large space. Seek the advice of an architect, structural engineer, or general contractor experienced in basement work.
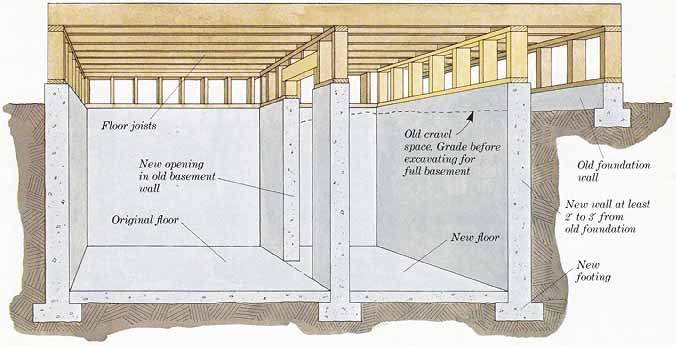
Enlarging a basement: New wall at least 2’ to 3’ from old foundation;
Old crawl space. Grade before excavating for full basement.
Is the structure stable?
Basement walls and floor should be sound. There should be no major cracks or evidence of settling or other structural problems. Survey the walls and floor yourself to get a general idea of the soundness. If you find any of the following conditions, seek the advice of an architect, engineer, or foundation contractor for further diagnosis. If none of these problems exist, and the walls, floor, and ceiling are level and plumb, you can proceed with your plans.
Problems to look for:
- Cracks wider than 1/4 inch.
- Cracks that “move” over a few weeks of observation. Draw a dark line across the crack and check it weekly to see if there is movement.
- Sunken or buckled floor areas.
- Walls that are not vertical.
- Excessive moisture.
- Separation of wood floor framing from the top of the foundation wall.
- Sagging in any floor joists or other framing members.
- Wood posts with rot at the bottom.
Is the basement dry?
Moisture can be a major problem in a basement. It causes dampness, odors, mildew, puddles, insect invasions, and even structural damage. All moisture problems should be taken care of several months, or at least a couple of seasons, before a basement is converted into living space. Make sure that the repairs have worked before proceeding with your plans.
Moisture problems
To stop moisture effectively, you must find the source of the problem. A great deal of money and effort can be wasted by treating only the symptoms and not the main problem.
Moisture comes either from inside the basement (condensation) or from outside (seepage or leaks). Leaks are easy to detect and are caused by a problem outside. The effects of condensation and seepage are similar, but you must differentiate between them because the cures are different.
Condensation is caused by cool surfaces collecting moisture from warm air. If the basement is damp or musty only during hot weather, or if water forms on cold water pipes as readily as the walls (sweating), most likely the cause is condensation. A simple test is to tape a piece of plastic sheeting to the wall and leave it up for a few days. If water forms on the outer surface but the wall under the plastic stays dry, the problem is condensation. If moisture forms under the plastic, then the problem is seep age. Repeat the test after a few weeks to be absolutely sure.
Curing condensation. Normal construction techniques for finishing a basement go a long way toward pre venting condensation. Wall insulation, with a vapor barrier over it, prevents warm basement air from contacting the cool masonry walls, which is the cause of most condensation. Exposed pipes and other cold surfaces should also be insulated.
Additional windows will increase air circulation and help prevent condensation. If this is not enough, increasing the movement of air with cross-ventilation or a fan will help. In extreme cases a dehumidifier may be necessary.
Curing seepage. The most likely causes of seepage are faulty down- spouts and improper grading around the house. Inspect the roof gutters and downspouts for leaks and fix them. Make sure runoff from the downspouts is carried at least 8 feet away from the house. Soil should be graded away from the house for at least 6 feet, sloped at a rate of at least ½ inch per foot.
If these problems are fixed and water still seeps into the basement, the cause may be a leaking water pipe, sewer pipe, or a line from a central air-conditioning unit.
To check for leaks in a sprinkler system, turn off the main valve for a few days and see if the basement leak dries up. To check for leaks in the main water-supply pipe, turn off the valve at the meter when you leave on a short vacation; inspect the basement when you return. Leakage from a broken sewer pipe will cause an obvious odor, but you can also check by putting a dye, such as food coloring, in the toilet tank and flushing the toilet. If any of these tests indicate a plumbing leak, the only solution is to dig up the pipe and replace it.
Curing severe moisture problems. Persistent leaking, puddles, or flooding are major problems that are difficult to solve. They can sometimes be fixed by waterproofing the interior walls and sealing all the cracks and joints with hydraulic cement. How ever, a more reliable method is to waterproof the outside of the walls and install drain lines. This works well when the house is on sloping ground. Sometimes a diversion drain, in stalled upslope from the house, is all that's needed.
If the house is on level ground, the problem is likely to be a high water table. This is the most difficult moisture problem of all. The water exerts continuous pressure against the lower walls and floor and can even cause the floor to buckle and crack. The only recourse is to install a sump pump and forget about using the basement as finished space.
Sometimes it's possible to keep the basement dry by installing drainage pipes around the outside of the foundation, running them into a deep well in the backyard, and installing a sump pump in the well. For these problems, consult with a soils engineer or a contractor specializing in drainage systems.
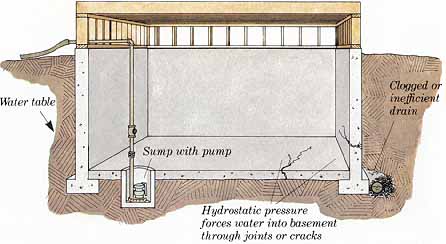
Severe moisture problems: Hydrostatic pressure forces water into
basement through joints or cracks.Water table
Is there enough daylight?
Basement windows are few and small, so one of your first design goals is to add windows and brighten up the space with as much daylight as possible. Almost any type of window can be used in a basement, but metal- framed ones are a good choice be cause they withstand dampness.
Add large windows. Any wall substantially above grade (the downslope wall of a hillside home, for example) is a possible window location. Bring in more light with large windows that extend down as far as possible or with glass doors. Avoid placing all the windows on just one wall. Doing this may result in a cave-like atmosphere with harsh glare and deep shadows.
Cluster small windows. If your basement does not have a wall in which large windows can be installed easily, cluster several small windows in one area. The windows can all be the same size as existing basement windows and as close together as is structurally possible.
Create a large window well. If it's impossible to add new windows, concentrate on enlarging only one—in a grand manner. Change it to a picture window by excavating a larger window well. Then create a garden in the well with terraced retaining walls, cascading plants, even a waterfall. Add outdoor lighting, and you will have a dramatic focal point both at night and during the day.
This type of well could even serve as an entrance to the basement if it's deep enough for a door. Add patio paving, stairs, a floor drain, and a railing to keep toddlers from falling into the well.
Window placement
In a basement, where daylight is naturally limited, it's important to make the most of each window. When choosing new window locations or planning rooms around existing windows, consider the following factors.
Orientation. Direct sunlight, especially during winter months, is a bonus in any basement. Windows facing south will give you winter sunlight at midday as long as the sun is not blocked by hills, buildings, or trees. If you enjoy a room filled with morning sunlight, take advantage of east-facing windows. West-facing windows are the most likely to cause overheating during summer months. If a window faces north, you will get little direct sunlight (other than on early summer mornings) but you can get bright light from reflected sunlight off a nearby, light-colored wall.
Views. Take advantage of pleasant views, even if it means changing room arrangements around. You can conceal undesirable views with glass blocks, obscure glass, opaque curtains, or shoji screens.
Size of light well. You can bring in more light by enlarging the size of the well. This also makes the view more appealing and dispels any feeling of being closed in.
Privacy and noise. If privacy is important, avoid placing basement windows close to a sidewalk or a neighboring house. If the problem is unavoidable, use fences, walls, and plantings to maintain privacy.
If windows for a quiet room face the street or other noisy area, consider double-glazed windows. Plan a sound barrier, such as a low masonry wall or solid fence, to protect you from noise when the windows are open. The barrier must extend all the way to the ground and should have no openings.
Skylights. If there is just no way to install windows, consider capturing daylight by cutting an opening into the basement ceiling to let in light from the room above. Doing this will cut into the upstairs floor area, but it may be worthwhile if it makes the entire basement usable.
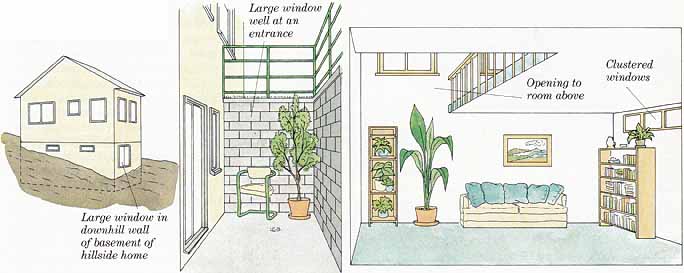
Letting in light: Large window well at entrance; Large window in
downhill wall of basement hillside home; Clustered windows; Opening to
above room.
Is there adequate access?
Access to the basement is a major design issue that should be considered early in your planning. Stairs may need to be changed or moved to make them safe, inviting, and convenient; this will affect other design decisions. In addition, codes require that some rooms, such as bedrooms, have direct egress to the outside, through a window or a separate door.
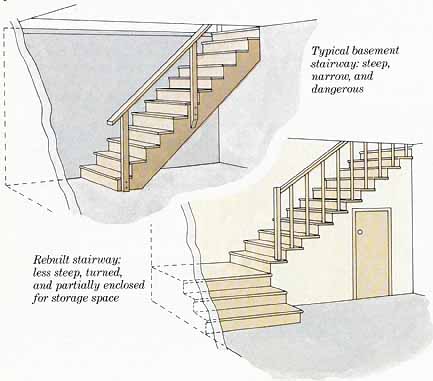
Safer basement access: Typical basement stairway: steep, narrow, and dangerous; Rebuilt stairway: less steep, turned, and partially enclosed
for storage space.
Code requirements
Most codes distinguish between primary and secondary stairs. Stairs to unfinished basements are usually considered secondary stairs, which have less stringent code requirements than main stairs between living spaces. However, when a basement is converted to living space, the stairs may have to meet the primary-stair code requirements. Even if your local code allows secondary stairs (some do when the living space is less than 400 square feet), it's a good idea to upgrade them for safety reasons.
The following dimensions are the typical code requirements for primary stairs:
- 7½-inch maximum riser height
- 9-inch minimum tread depth
- 32-inch minimum stair width between handrails 80-inch minimum headroom
- 30- to 33-inch handrail height
- 36-inch-deep platform
Other requirements may include installing a second handrail if the stairs are wider than 4 feet; conforming to a minimum width of winders; and installing a landing if an access door swings over the stairs.
If the existing stairs are not adequate for primary stairs, consider:
- Rebuilding the stairs in the same location.
- Building new stairs in a different location and either removing the existing stairs or leaving them to be used as secondary access.
- Building a new exterior entry as the primary access. This involves breaching the foundation wall, excavating a stairwell on the outside of the wall, and building the stairs.
How will the space be heated?
Heating a basement is not difficult. If the house has a central heating system with the furnace in the basement, the furnace itself may generate sufficient heat. If not, there will be ducts close at hand that you can tap into to install new registers. If the house has a hydronic (hot water) system, it should be easy to extend the pipes into the basement. Electric baseboard units or small gas appliances can also be installed. Remember that gas heaters must be vented.
Fireplace or wood stove. Although it may not qualify as the primary heat source, a fireplace or wood-burning stove adds great appeal to a basement. It must be located where a chimney can be run either up through unused space in the house or up an exterior wall. Use only chimney pipe approved by local codes and maintain minimum clearances between the pipe and any combustible materials such as wood. The typical requirements are 2 inches for framing members, 1 inch for all others. A new stove can't be vented into an existing flue if any other heaters are already vented into it.
How will the space be cooled?
In most climates, keeping the main house cool will usually keep a basement cool as long as air circulates freely. Cross-ventilation between open windows helps, although it may only move the air near the ceiling. One way to move the lower air is to build a baffle or shield against one window; it should extend almost to the floor. This allows the air near the floor to go up and out of that window but it will only work when there is incoming air from the opposite window to create a flow across the room.
You can also use fans and , if necessary, air conditioning to keep a basement cool in extremely hot climates.
How should the space be insulated?
Requirements for insulating a basement vary widely, depending on climate. Your building department will specify what is required in your area.
Upper wall. The most critical section for basement insulation is the upper wall between the frost-line and first-floor walls, particularly along the rim joist. If a basement ceiling is already in place, remove it to gain access to the rim joist area and install fiberglass blanket insulation. The rest of the upper wall can be insulated on the outside with rigid foam boards, although this is not necessary if you are insulating the entire inside wall.
Lower wall. Although the earth provides some insulation for the lower parts of a basement wall, in most areas it's advisable to insulate the entire wall.
Installing insulation. There are two ways to insulate basement walls. The first is to glue rigid foam panels to the foundation walls between vertical wood furring strips. The second is to install fiberglass blankets between conventional studs.
In either case the insulation should be covered by ½-inch wallboard. The type you use depends on whether you need to build a conventional stud wall against the masonry foundation walls. This may be necessary if the walls are too irregular to attach a finish wall directly to them.
If you live in a hot climate, it may be inadvisable to insulate at all. By absorbing the heat, the insulation will inhibit the cooling of masonry walls. Get advice from local architects, builders, or cooling specialists.
Insulating the floor. In extremely cold climates the basement floor should also be insulated. The most effective way (impossible in an existing basement) is to place rigid insulating boards under the concrete floor before it's poured. Compromise by installing a wood floor over the concrete and placing rigid insulating boards between the sleepers.
Are there obstructions?
Posts, walls, pipes, utility equipment, and ducts hanging from the ceiling create obstacles in a basement. Most of them are vital parts of the mechanical systems or structure of your home. As moving them tends to be complicated and expensive, try to design the basement space around them.
Pipes and ducts. One way to deal with an obstacle is to conceal it in a wall, ceiling, or freestanding storage unit. If there is enough headroom, you may be able to conceal overhead obstacles in a suspended ceiling. If not, they can be enclosed in a low soffit (providing there is 80 inches of clearance below) or a wall.
Large equipment or clusters of pipes and ducts can be concealed in a separate closet.
Posts. If you are planning a large, open area, you may have to deal with posts. Moving them is a major structural change that should not be considered without getting professional advice. Less drastic solutions include designing a countertop or built-in seating that wraps around the post, boxing in the post with simple framing and wallboard to disguise it as a column, or leaving the post exposed and painting it a bright color.
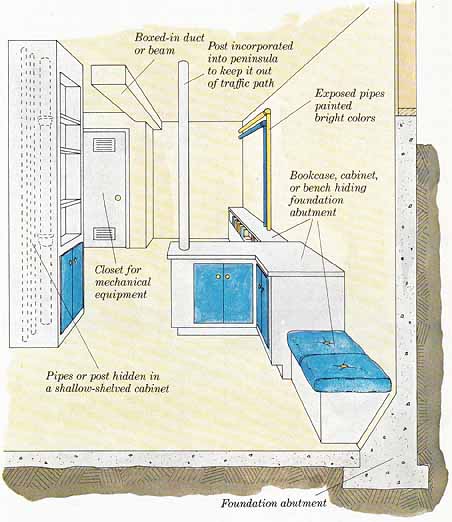
Obstructions: Pipes or post hidden in a shallow-shelved cabinet;
Boxed-in duct or beam.
Are plumbing hookups possible?
Before you plan a bathroom, laundry, or sink for the basement, determine how much plumbing work will be necessary. Although you should consult with an architect or plumber, you can use the following tips for preliminary planning.
Existing fixtures. If there are existing fixtures in the basement, there is a good chance that you can leave them intact, upgrade them, or install new fixtures elsewhere. First deter mine if the existing fixture is connected to a proper sanitary drain system. If it's a toilet, the drain system is most likely adequate. However, a laundry tub, sink, or other “gray water” fixture may drain into a floor drain or sump. This condition should not be continued and you should proceed as if installing new fixtures.
Existing drain lines. If there are no fixtures in the basement or if the ones that exist are not connected directly to proper drains, look for the main house drain. This is usually a 3-or 4-inch-diameter pipe suspended below the basement ceiling. When you find it, follow its downward path. If it disappears through the basement floor, you can tie new fixture drains into it.
If the main drain disappears through the basement wall instead of the floor, it may not be low enough to tie in new fixtures. If it's just a few inches from the floor, you can build a platform so that the outlets of a toilet, bathtub, or shower are above the main drain.
If the main drain is more than a few inches higher than the floor, you may still be able to connect certain fixtures. A sink drain can be up to 16 to 20 inches off the floor; a washing machine drain can be 18 inches off the floor. Again, a raised platform may enable you to meet these requirements, as long as there is enough headroom.
Installing drain lines. If the main house drain is too high to connect basement fixtures directly to it, there are two other options. One is to install an ejector system. The expense of such a system may be worthwhile if it enables you to install a bathroom.
Individual up-flush fixtures are also available, but make sure that your local codes allow them.
The second option is to install a new branch drain under the basement floor and run it into the main house sewer outside the foundation walls. This is possible only if the main sewer is buried lower than the level of the basement floor. It will take a lot of digging, but that may be worth while if you have to excavate around the basement walls anyway in order to cure seepage problems.
Plumbing vents. All plumbing fixtures must be vented to the roof. If fixtures already exist, you can use the same vents. If there are no fixtures, you need to run new vent pipes up through the house and attic. The easiest runs are through closets.
Vents can be run through interior walls, but be prepared to hit problem obstructions such as wiring or fire-blocks. Exterior walls pose even more of a problem because of windows and insulation. Some codes allow vents to be installed on the outside of the house. This is an easy run even though it will not be attractive.
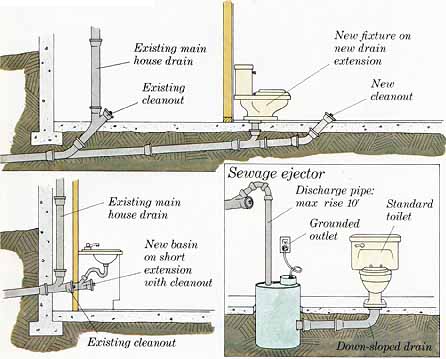
Plumbing: New fixture on new drain extension; Existing main house
drain; Existing cleanout; Existing cleanout
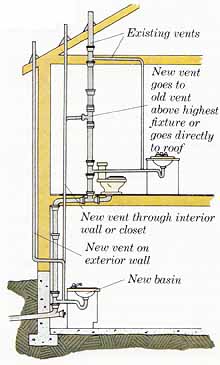
New vent options: Existing vents; New vent goes to old vent above
highest fixture or goes directly to roof; New vent through interior wall
or closet; New vent on exterior wall; New basin
What wiring is necessary?
Any new living space requires additional wiring. It may be necessary to upgrade the main system to accommodate new basement wiring, but the actual arrangement of the basement space will not be affected by wiring requirements. New wiring can be planned around the space but must meet code-required safety and convenience needs. If you prefer, you can plan the wiring after the final design is complete.
Install basement wiring as you would in any other room unless you are dealing with masonry walls. If you are furring out new stud walls from the foundation walls, install the boxes and wiring in the wood framing. If you are leaving the foundation walls bare, mount surface receptacles to the walls with concrete fasteners and run the wiring through conduit.
GFCI protection. Basement wiring requirements are no different from other rooms except that you may be required to have GFCI (ground fault circuit interrupter) protection on receptacles. Codes require this type of protection for outdoor receptacles and in bathrooms, garages, and basements to protect against possible electric shock.
The GFCI devices monitor the current going to the outlets and shut them off instantly whenever there is any danger of shock. The outlet stays dead until the GFCJ device is reset. This can cause problems when refrigerators, freezers, computers, and entertainment equipment are plugged into this type of outlet. If you plan to install any such equipment in the basement, hire an electrician to advise you on the best way to ensure reliability as well as safety.
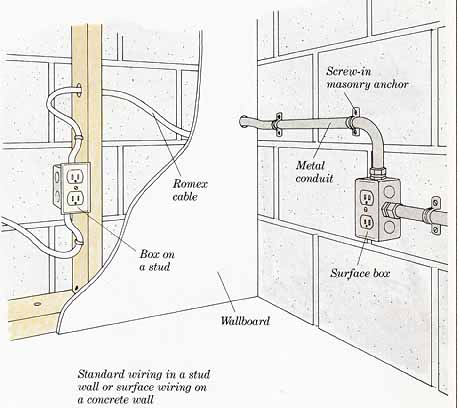
Installing wiring: Standard wiring in a stud wall or surface wiring
on a concrete wall;
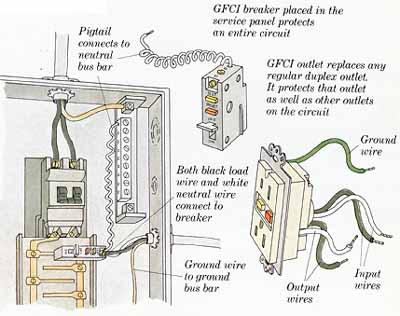
GFCI protection: GFCI breaker placed in the service panel protects
an entire circuit; GFCI outlet replaces any regular duplex outlet. It protects
that outlet as well as other outlets on the circuit;