It doesn’t matter whether your basement is finished or you use it as just a storage room – the basement itself is for the structural integrity of your home. So it’s vital that you address a wet-basement problem as soon as you discover it. There are many solutions to tackling a wet basement. The first step is trying to figure out the type of problem you are encountering. Then, check the grading around your home, downspouts for any leaks or pooling, and cracks in the driveway. Fix all of the problems you encounter as well as patching cracks in the basement walls and floors, as water in the home can cause mold problems as well as a wet basement.
Applying a Concrete Sealer
Sealers are available for coating basement walls and floors. They offer a quick waterproofing measure and can be decorated. They are easy to apply (see steps below), provided you follow the manufacturer’s guidelines. They can be applied to damp surfaces but any standing water should be removed.
Fitting a Polyethylene Membrane
An alternative to epoxy coatings is to use a polyethylene membrane. Although it holds back water, it may be necessary to install channels and a sump pump to collect and remove water from behind the membrane. Seek professional advice on whether this is required. Measure the surface area you need to cover and make sure you buy enough membrane for your needs.
Questions:
Should I really do-it-myself? How much does the average wall-crack repair cost, anyway?
Say you know exactly where the crack in the foundation is. A single wall crack can usually be repaired for around $1000. That's just one crack, and the contractor didn't need to find it -- you did that work for him or her. Realistically, there are arguments to be made for and against DIY basement waterproofing -- see this page for more details.
Let's continue on to the DIY project...
Tools and Materials needed for this Job:
- Walls under pressure: Masonry chisel, trowel, mixing receptacle, mortar
- Filling cracks and holes: Stiff brush, trowel, mixing receptacle, hydraulic cement, fine sand
- Parging: Applying waterproofing
mix to walls: Brush or sponge,
paint brush, latex waterproofing mix
Filling Cracks and Holes
When cracks and holes appear in basement walls and floors, there is the opportunity for water runoff to enter the basement. It is important to fill small cracks before they have the opportunity to become more serious problems. Small cracks and holes can be filled with a simple concrete paste. For cracks that are 1/4-inches (4 mm) wide or larger, use a hydraulic cement, which expands as it dries.
Before you begin...Surface must be structurally sound and clean for
best adhesion. Clean surface thoroughly using a
wire brush or chisel to remove any loose mortar,
paint, dirt, grease, or oil. Chisel crack to an
inverted V (undercut shape) or square cut to
minimum 3/4” x 3/4” size. Remove any white,
salt-like deposits (efflorescence) with a concrete
cleaner or mild acid.
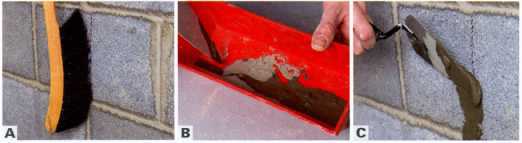
A. Clean out the crack with a stiff brush.
B. Mix one part cement and two parts of fine sand with just enough water to make a paste.
C. Use a putty knife to fill the mixture of mortar cement into the crack.
Walls Under Pressure
Walls that are already showing signs of leaks through cracks need a more extensive repair solution. You must remove the damp material surrounding the crack so that the mortar has sound material to bind. If filling the crack with mortar does not solve the problem, you may need to install a sump pump or re-grade around the exterior of your home.
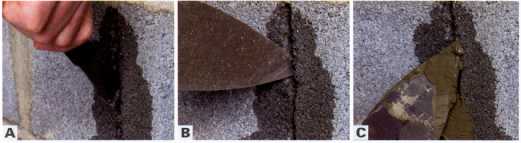
A. Chip a dovetail groove out for the entire length of the cracked area.
B. Remove any excess material from the groove.
C. Fill the hole with a mortar mix and a trowel.
Parging: Applying Waterproofing Mix to Walls
Parging is a process of applying a waterproofing mix or a concrete sealer to walls. This stops the moisture from entering the basement. If you are experiencing consistent wet basement symptoms, sealing walls may not be the best solution. When you seal walls, the moisture is then trapped inside the walls, which can damage the structure. Parging is best used with a sump pump or a perimeter drain system.
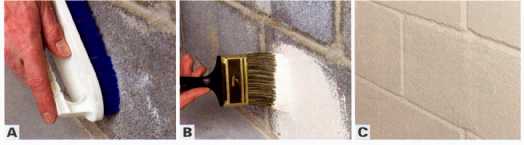
A. Dampen the walls using a wet brush or sponge.
B. Starting at the bottom, rub a latex waterproof mix into the wall with a circular motion. Completely cover the area where there was a leak.
C. Soak the wall with water and let the wall set for 12 hours. Reapply the waterproof mix again.