| Home | FAQ | Finishing | Sump Pumps | Foundations |
|
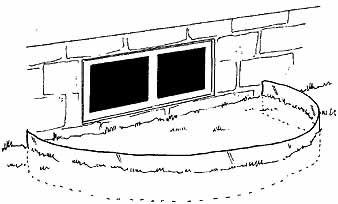
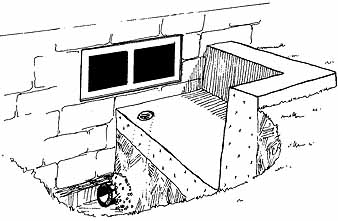
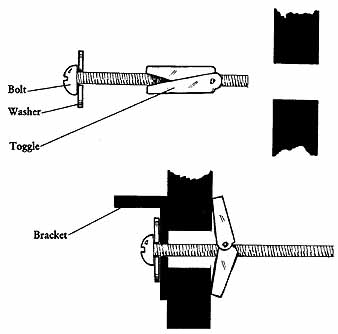
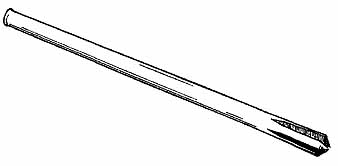
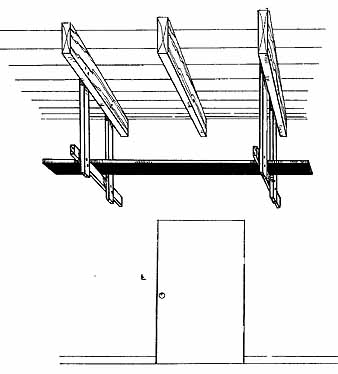
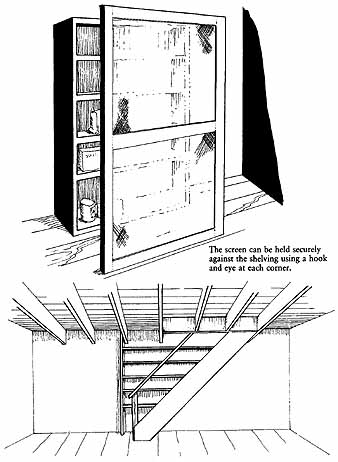
In general terms, a basement refers to the lowest level of a building, when sunk at least partially below ground. It need have no specific purpose other than its structural role as the base of the building. The older term “cellar,” on the other hand, which originally referred to a storeroom located anywhere, is now used primarily for a room excavated below a building and designed specifically for storage. In our discussion, we’ll use the term basement for all such spaces. Some houses, such as those built directly on a slab foundation (see Fig. 1), simply have no basement storage. At the other end of the scale is a house with a full and improved basement. Such a basement may have finished walls, floors, and ceilings, and sufficient headroom (the term full basement implies at least 6 1/2 feet floor to ceiling) to walk upright in. There may well be windows, if the basement walls rise above grade, a proper entrance from the inside down a flight of stairs, and even an outside entrance. Such a basement may constitute a finished living space, and as such be used as a family room or a recreation room. Older buildings were very often built on basements excavated to a certain depth, with the space enclosed by dry stone walls laid up against the raw earth. Depending on the customs and conditions of the area, a floor may or may not have been installed. In between these two extremes exists an endless variety of lower-level spaces, more or less finished as the case may be. Some are so small that they constitute no more than what is called a “crawl space.” If the building is supported not by a perimeter wall enclosing a subterranean space at all but by a series of posts or stone pillars, it's said to have a “pier foundation.” Such minimal spaces, often open to the elements, are not very valuable for storage purposes. ASSESSING THE CONDITION Obviously, within such a range of possible structures, conditions will vary greatly; the basement may well need certain improvements before it can be used for storage of any kind. Some basements may have been designed for a now out-of-date storage purpose, such as a root cellar or a coal cellar, and may be difficult to convert to modern uses. Some more recent houses, even those provided with full basements, have these areas left largely unfinished, for reasons of economy. The spaces may well be cut up by the “works” of the modern house: the furnace and duct work, the electric service box with its snarl of wiring, pressure tanks, hot water heaters, and other plumbing necessities. All of these can present problems when planning for storage. As a result, a basement area may well need more preparation than any other area of the house. Nevertheless, since the basement usually extends under the whole house, it can comprise a substantial area worth improving. Dampness and Moisture Because there is often only a porous concrete floor, because the water table is so close to the surface, or because drainage from the roof or outside the building is poor, the basement can be anything from merely damp to decidedly wet. Few things fare well if stored under such conditions; the problem should be identified and corrected if possible. High water table. If the floor is wet but the walls are dry, it's likely that the problem is from ground water seeping up through the floor. Installing a properly waterproofed concrete floor is the only permanent solution, but cost may make it entirely impractical. If the problem is not continuous and manifests itself only after heavy rains, it may prove more practical to install a sump pump to deal with the temporary flooding whenever it occurs. Leaking walls. A more common cause of basement moisture is water leaking through the walls. Ideally these should have been built to be completely waterproof, and today many building codes do require various waterproofing measures. Older buildings may not be so fortunate, especially those constructed with stone walls laid up dry (without mortar joints). If the leak is not too serious, it may be possible, with the help of various waterproofing patching compounds, to seal the wall from the inside. If the leaking is serious, the best approach is to deal with the source of the water rather than try to waterproof the walls. This involves excavating the ground around the outside of the basement walls, a major undertaking. Among the most common sources is water that runs off the roof and , because of clogged or broken gutters and downspouts, is not led away from the foundation. Another common source is water that runs down outside slopes and is not properly drained away from the foundation of the house. The cure for gutter problems is obvious: proper maintenance of gutters and downspouts, and attention to draining their flow away from the house. At least twice a year, clear all leaves and debris from the gutters and check that the strainers at the top of the downspouts are in good condition. Make sure that water will flow from the farthest end of every gutter to the down spout end, and that the downspouts themselves are both unobstructed and so designed that they will empty at least eight feet away from the building. Fig. 2 Basement window flashing If the land around the house is improperly graded, laying new drains around the perimeter of the house may solve the problem. This is a major operation, however, since it can involve excavation down to the bottom of the foundation and proper siting and sloping of perforated drainpipes in a bed of gravel. At the very least, the grading should be improved, ensuring that the surface slopes down and away from the house at all points. Pay attention to flower beds that abut the foundation; prevent any pooling of water in them. Another culprit in this area can be leaky or improperly protected basement windows, which allow water to flow in during heavy rains. Very often all that need be done is to install a small barrier—a 12-inch strip of metal flashing is ideal—around the perimeter of the window well (see Fig. 2), though a properly constructed concrete or steel window well is best (see Fig. 3). Condensation. A damp basement can simply be the result of excessive condensation, caused by warm interior air meeting the cold surfaces of uninsulated walls and cold water pipes. To determine whether basement moisture is the result of condensation rather than leaking, tape a 6-inch square of metal or metal foil to the wall. If, after a day or so, the metal is wet on the wall side, the problem is seepage through the wall; if the metal is wet on the room side, condensation is the cause. (It’s possible that both conditions may pertain.) If the problem is indeed condensation, insulating the walls will prevent moisture from forming on them. Once the basement becomes a little warmer, however, the cold water pipes are likely to sweat even more. If there is a good deal of such piping, you should wrap it with insulating material and seal that with a vapor barrier. Special pipe-jacketing material is available at hardware stores and lumberyards precisely for this purpose. Other measures for minimizing condensation include improving the ventilation by using fans, opening (or even creating) a window, and installing a dehumidifier. Moisture problems in the basement must be solved one way or another if you are to use it for any real storage. The Right Temperature Far less important than moisture problems is the question of temperature. The level of warmth maintained in the basement will depend on what you intend to store here. Cold storage is often a plus for certain things. For other items, it's always possible to make the basement warmer. Windows can be double-glazed or fitted with storm windows; walls can be insulated and finished; and the heating system can be changed to provide some extra heat to the basement. Project 16 shows how to insulate basement walls. Fig. 3 Concrete basement window well Since furnaces are often located in the basement, the provision of an extra length of ducting fitted with a register open to the basement itself is usually a relatively easy operation. If both warm and cool storage areas are needed, consider partitioning off part of the basement, to accommodate both temperature ranges. Spatial Arrangement Assuming you have resolved the problems of moisture and temperature, consider the way the basement is arranged. There may be little logic to the placement of the various utilities; the units may have been installed wherever seemed most convenient at the time. Within reason, almost anything can be moved, although you may need a plumber and an electrician to do it. With a few moves, a surprising proportion of the area might be opened up to provide good access and usable storage. Furnaces, however, are best left in position, since they are often very large units installed on their own slab or foundation. Have a conference with your plumber or heating contractor to discuss what you’d like to do. If the house has had several electrical upgrades over the years and has more than one service box, call in the electrician and discuss consolidating the web of wiring and boxes into a safer, more convenient system. More recent houses may require only surface treatments, such as wall finishing and better lighting. In some cases, you may be able to improve the access to the basement. So far we have been talking mainly about full basements, but some areas that are less than “full” can still offer storage facilities. A crawl space, if made accessible by the provision of a short flight of steps instead of a trap door, or by an opening from the outside, can be useful. Some basement areas combine a full basement with a crawl space, especially if the house is built on sloping terrain. It may be possible to extend the crawl space by a certain amount of excavation, but before you try this, get the advice of a qualified builder or architect. Taking the opposite approach and restricting the area may also make sense. By partitioning off an unusable area and finishing the remaining space, you may be able to create a proper, safe area for storage, protected from the creatures and conditions that might be prevalent in the unfinished area. If you do this, however, be sure that you provide for access to the unfinished area if it contains water pipes, sewage lines, heating ducts, or other vital components. As you prepare the basement for storage, consider fire safety: check for possible hazards such as exposed wiring and insufficient clearance around furnaces and electrical appliances. Consider installing a smoke detector and a fire extinguisher in the basement. Insect damage is the other major hazard to consider in a basement or crawl space that's likely to be less finished and consequently more exposed than other areas. Make periodic inspections of all exposed wood for telltale signs of insect infestation, such as little piles of sawdust (indicating beetles or carpenter ants) or fresh entrance holes or tubes possibly caused by termites. An annual inspection by a qualified agency is the best way to prevent damage not only to the house but also to the stored items. SHELVES, RACKS, AND BINS There is virtually no end to the list of items that might be stored in the basement. It can serve as an overflow for other areas in the house, as well as provide storage for items that can find no home elsewhere. As an adjunct to the kitchen, the basement is ideal for preserved and canned food. Part of the basement can be used as a wine cellar. It can double as a utility room and laundry room, providing a place for washing machines and workshop items, as well as emergency supplies. It can even hold garden supplies, especially if there is an outside entrance and you are not lucky enough to have a garden shed at your disposal. Furthermore, there is no reason why at least part of the basement may not serve as a room in its own right—a den, game room, study, or hobby room. Even crawl spaces under houses built on piers can be used for wood storage or garden supplies, especially if made secure from animals by the installation of a screened entrance. Wood storage requires a special word of caution, however: keep the area clean and be sure to use the wood in rotation. Don’t leave a section unused for a long time, since stacked wood presents an invitation to all kinds of insects that might easily make their way into the house itself. Shelving and Racks If the basement walls have been finished, attaching or building shelves and racks should present no greater difficulty here than in the rest of the house. But if the basement area still has the original unfinished masonry walls, the procedure is a little different. If you’re dealing with a block wall and need a secure anchor, it's always preferable to attach something to the masonry itself rather than to the mortar joints between blocks. If you’re dealing with a brick wall, a whole brick can be removed and replaced with a wooden block, known as a noggin, to which screws or nails can be attached. Attaching anything to masonry will usually require drilling. Always wear some form of eye protection. The exact type of fastener will depend on the kind of masonry involved. There is a large range of fasteners available at a good hardware store; a clerk should be able to help you select the right kind. Concrete blocks, being hollow, require either very short plugs or some form of toggle bolt. To install a toggle bolt, drill a hole just large enough to allow the folded wings of the toggle bolt to be pushed through. As you do, the wings will open up and allow you to draw them back tightly against the interior surface of the wall (see Fig. 4). Plugs, or expansion anchors, are made of various materials, including plastic, fiber, or wood types for relatively lightweight construction, or metal fittings if heavier objects are to be attached to or hung from the wall. In either case, drill a hole the same diameter as the plug, making sure it's deep enough to contain the plug completely, then hammer in the plug. Inserting a bolt or screw into the plug forces it tightly against the walls of the hole and creates a firm fitting. Drilling the hole is done either with an electric drill using a special masonry bit or with a hammer and a special cold chisel called a star drill, which is given a slight turn after each hammer blow (see Fig. 5). Another alternative, when attaching anything to a masonry wall, is to use masonry nails. These are especially hard steel nails that are driven in either with a hammer or, more easily, with a cartridge-powered stud gun. This tool can be rented from hardware and rental stores and is useful for attaching wood studs or furring strips to masonry walls. Make certain you learn how to operate the stud gun safely; you should be able to get instruction at the store from which you rent it. Ceiling-Hung Units If the ceiling of the basement is unfinished with the joints of the floor above exposed, you can attach hanging racks (see Fig. 6). Simply nail vertical supports to the sides of the joists, then attach crosspieces to these supports. Such racks can be designed in various sizes to hold many things conveniently off the floor. Bins and Cabinets Simple bins with hinged lids are another useful storage facility for basements. These have the advantage of providing discrete and safe storage in basement areas not completely finished or secure from the outside. Cabinets built against the wall can be useful for items that don't require any special temperature control but must still be protected from other potential problems, such as mice. Shelving units provided with a removable screen front can accomplish the same thing (see Fig. 7). The stairs that lead into the basement from above can provide a ready made framework for extra shelving or closet space, as can the walls at either side of the staircase (see Fig. 8). However, don’t narrow the stairs too much; they are often narrow to begin with. Large items such as a replacement water heater may occasionally have to be accommodated. The screen can be held securely against the shelving using a hook and eye at each corner. |
| Top of Page | Home | Related Articles |