Working with Beams and Posts
Beams and posts are part of the structural system that holds a house up and must never be altered, moved, or eliminated without the advice of a structural engineer. Unfortunately, posts and beams often are in the way when it comes to remodeling plans.
Posts
Basement posts typically provide inter mediate support for a beam. In most cases, the concrete slab immediately beneath the post has been thickened to form a footing that distributes the structural loads. The top and bottom of each post is toe-nailed or bolted into place to prevent lateral movement. Posts in older houses usually are made of solid wood, but those used in newer houses are Lally columns. A Lally column essentially is a steel tube that can be adjusted to various heights. It ranges from 3 to 5 inches in diameter and may be filled with concrete. It sometimes is secured to a wood beam with nails or lag screws that run upward through the top flange.
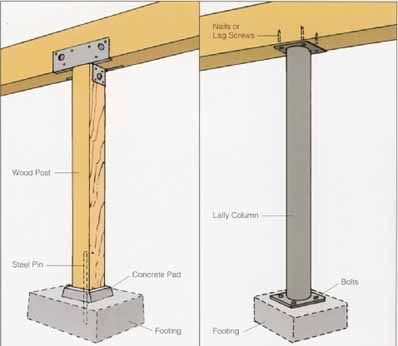
Posts. The posts located in the basement rest atop a footing
of some type . A Lally column is a steel post that ranges from
3 to 5½ in. in diameter. It sometimes is secured to a wood beam with
nails or lag screws that run upward through the top flange .
Burying Posts. If a post is not ideally placed in relation to remodeling plans, try to revise the plans rather than deciding immediately to remove the post. The option of moving the post is a last resort. One or more posts may be concealed by “burying” them in a wall that separates two rooms. If the post is unusually wide in diameter, the wall can be framed with 2x6 lumber rather than 2x4 lumber.
If it's not possible to bury the post, it can be disguised. Plywood paneling or drywall can be nailed to a wood post, and the edges can be treated just as walls finished with the same materials. Or simply sand the post smooth; round over or chamfer the edges with a router; and paint it.
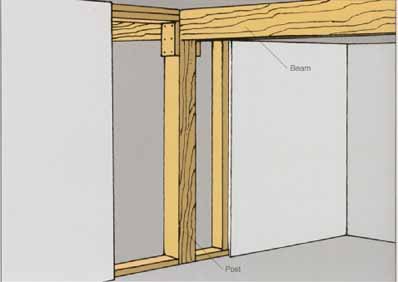
Burying Posts. A wood or steel post can be concealed within partition
walls. Unusually large posts require a wall framed with 2x6 lumber.
Concealing Posts. If the post is metal, there are several ways to conceal it. One possibility is to apply carpet to t. First test-fit the carpet to make sure it's the right size. Then spray or brush both the column and the carpet backing with contact adhesive. When the adhesive becomes tacky, wrap the carpeting around the column. Another option is to build a shelving unit around the post.
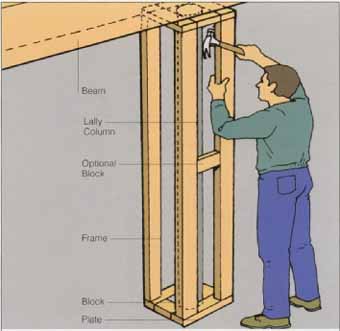
Framing around a Post
One of the best ways to conceal a post or Lally column is to frame around it using lumber. The frame provides a base for other finishes.
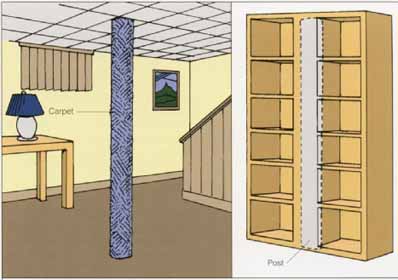
Concealing Posts. Carpeting can be applied to the post
to conceal it . Another option is to build a set of open shelves
around the post .
1. Laying out the Frame. The out side dimensions of the box can be any dimension as long as the inside dimension is large enough to accommodate the post. It is usually best to minimize the overall size of the box, however, to keep it from overpowering the room. Use a framing square to lay out the inside dimensions of the plates.
2. Installing the Frame. Use 2x3s or 2x4s for the framing lumber. Assemble two opposite walls of the frame to fit between the beam and the floor. Using the layout lines as a position guide, tip the walls into place. Then use a level to make sure that the frames are plumb. Nail the plates to the floor (using masonry nails if the floor is concrete) and to the underside of the beams above. Cut blocks to fit between the frames at the top and bottom. Toenail the blocks to the plates. If the frame walls are at all bowed, blocks can be added halfway up the walls to straighten them.
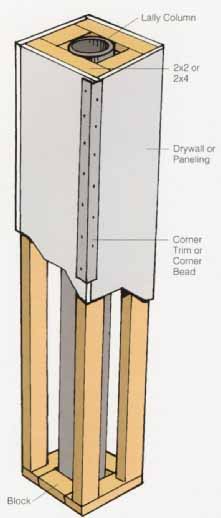
3. Applying the Finish Surface. Once the framing is secure, nail or screw drywall or wood paneling to it the same way it's done for a standard framed wall. Miter the edges of wood paneling or cover them with corner trim. Use standard corner bead when installing drywall.
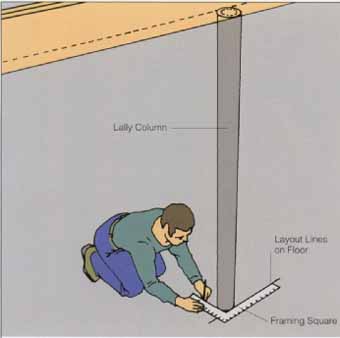
1 Use a framing square to lay out the locations of the plates. Align
the square so that the layout is perfectly square.
2. Assemble the two side “walls” of the framing. Check them for
plumb, one by one, and secure them to the floor and the beams above. Use
blocking to fill in the spaces between the walls.
3. Cover the frame with dry wall or paneling.
Boxing around a Column
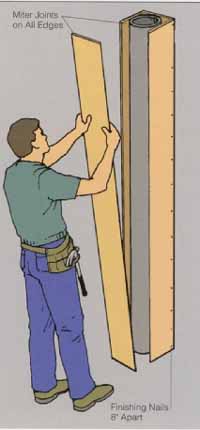
Another way to conceal a Lally column is to create a wood box to surround it. This method consumes less space than the frame. For a concrete floor, glue blocking to the floor to provide nailing. Use - inch-thick stock to build the box; pine boards or a hardwood such as oak are appropriate. Pine can be painted or stained, while hardwood can be stained or left natural and then coat ed with a clear varnish.
1. Laying out the Box. Use a framing square to lay out the inside perimeter of the box. The outside perimeter then can be drawn % inch outside of the first line, providing the exact outside dimensions of the sides of the box.
2. Cutting the Sides. Measure the distance between floor and ceiling, and subtract 1, inch from this measurement to provide a fitting allowance. Cut four pieces of stock to length. Use a table saw to miter each edge. Then test-fit the assembly around the post.
3. Assembling and Installing the Box. Spread a thin film of wood glue on the edges, and use finishing nails to nail three sides of the box together. Then slip the three sides over the post, and nail the fourth side into place. Toenail the box into the floor as well as the beam above.
4. Finishing the Box. Use sand- paper or a rasp to round over the edges of the box. Typically, a post is located in the middle of a room and sanding it minimizes impact damage, both to the box and to those who may bump into it accidentally. Sand it smooth, stain it, and then fill the holes with putty. The box can also be painted.
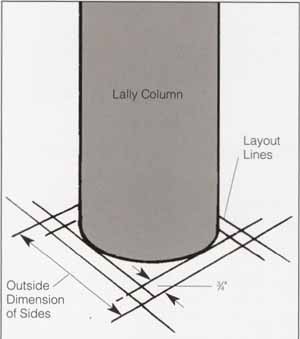
1. Use a framing square to draw a full-scale layout on the floor.
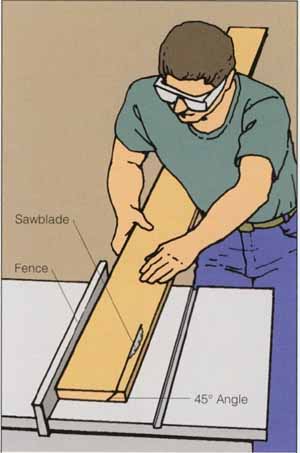
2. Use a table saw or circular saw to miter the sides. For safety,
use a blade guard (not shown here for clarity) on the table saw.
3. Glue and nail three sides together, and then slip the assembly
over the post and nail on the fourth side. Toenail the box to the floor and the beam.
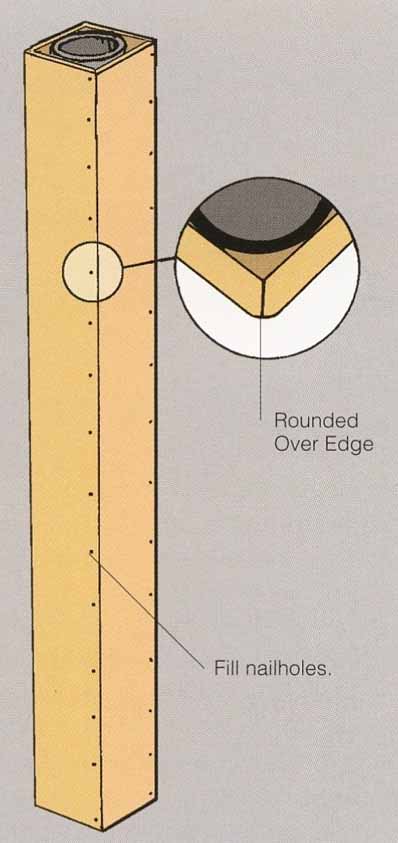
4. Round over the corners, and then fill the nail holes with wood
putty. Paint the box to match the walls. Or stain and then use putty.
Types of Beams
A beam provides intermediate sup port for floor joists. Like posts, beams can't easily be removed or re located. Luckily, however, they don't obstruct floor plans as much as posts do. Remember, though, that building codes call for at least 84 inches of headroom beneath a beam.
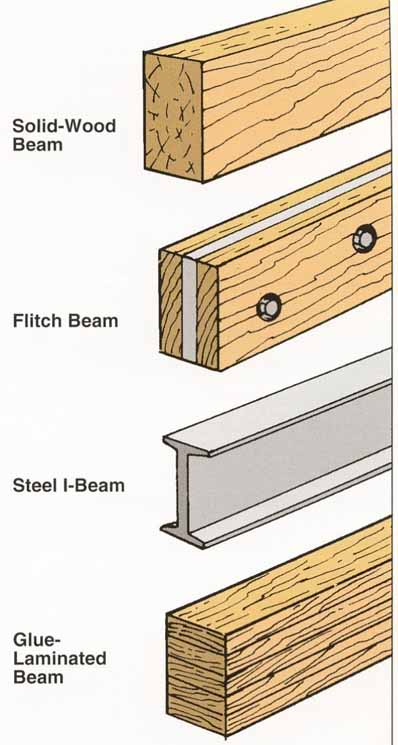
Types of Beams. Numerous types of beams can be used to sup
port joists in a basement. Shown here are the most common.
In newer homes, steel or glue-laminated wood typically is used for beams that span more than 8 feet. A solid-wood beam is sufficient for smaller spans. Flitch beams, made up of a sandwich of wood and metal, combine the strength of steel with the look and lighter weight of wood.
Beam Connections. The connection between a post and a beam must be rigid. Depending on the type of post and the type of column, there are several ways to achieve a rigid connection. A metal saddle is sometimes installed around the beam. This type of saddle has flanges that are nailed to wooden posts. Another type of saddle goes around the beam and is welded to a metal post. Two beams that meet over a single post must be connected to one another as well as to the post. This is usually done with a metal strap.

If drywall or paneling is to be applied to the beam, these connections may get in the way. However, never remove a connection without replacing it with something of equal strength.
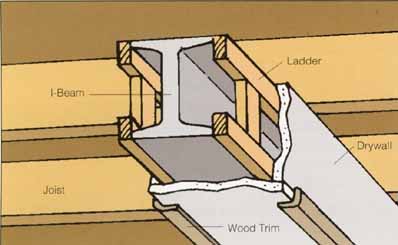
Using Drywall. Build “ladders” to support drywall that will
cover a steel I-beam.
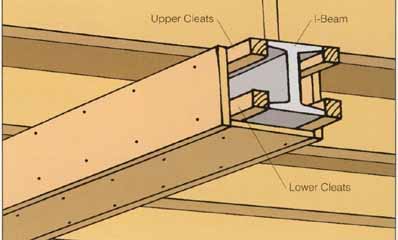
Using Wood. Simple cleats are used to support wood around
a steel I-beam.
Concealing a Beam
The task of concealing a wood beam, like the task of concealing a post, is not difficult. A steel beam, on the other hand, is not easy to conceal. (It is never easy to drill into a steel beam.) To get around this problem, paneling or drywall is secured to a wood framework that's nailed to the underside of the ceiling joists.
Using Drywall. First, build two wood ladders made of lx3s. Place the ladders against the beam and then toe nail them to the joists. Attach drywall on all three sides. Before finishing the walls, cover the drywall joints with drywall corner bead or wood trim.
Using Wood. To make the job of covering the beam easier, use 3/8-inch or thicker paneling, either plywood or solid wood. Attach cleats to the joists against both sides of the beam. Then use glue and finishing nails to attach cleats along one inside edge of the wood side panels. (Nail through the panels into the cleats.) Glue and nail the side panels to the upper cleats. Then glue and nail the bottom panel to the lower cleats.
Concealing Ducts
A large, rectangular sheet metal duct (called a trunk) often leads from the furnace to the farthest points of the basement. Smaller ducts branch away from the trunk and distribute air to each room above. The ducts in a central air-conditioning system may have a similar layout. If the ducts obstruct headroom, it may be possible to move them, but this definitely is a job for a heating or cooling contractor. In most cases, it's much easier and less expensive to leave the ducts in place. It may be possible to enclose them within the confines of a suspended ceiling. If a suspended ceiling is not feasible, however, the ducts can be boxed within a wood and paneling framework.
Concealing Soil Pipes
The soil pipe (the main drain line of a house) conducts water and waste away from the house. Typically, it's the largest pipe in the basement and may be plastic or cast iron. If possible, enclose the pipe within a box or a soffit. It is a good idea to wrap the pipe in insulation before it's boxed, especially if it's plastic. The insulation reduces the sound of rushing water. Be sure to take measurements in several places along the length of the pipe, however, because it must slope at least ¼ inch per foot in order to drain properly. If the soil pipe’s cleanout plug is covered up, include a door for access to the plug.
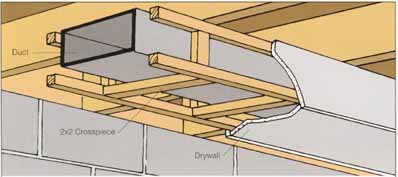
Concealing Ducts. Heating and air-conditioning ducts are concealed
as if the were beams. Ducts that run alongside beams c be enclosed iii
the same box.
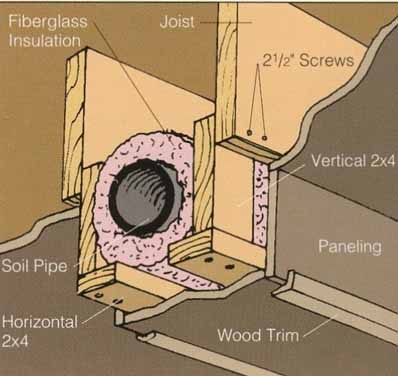
Concealing Soil Pipes. A soil pipe can be boxed-in as if
it were a steel beam or a heating duct.
Painting Masonry Walls
Great lengths can be taken in trying to make a basement seem less like a basement, but maybe your goal simply is to brighten up the place without devoting so much time to the project. If maximum impact and minimum expense and effort are what you are after, consider painting the walls. Poured concrete and concrete block walls can be painted successfully, but the paint can't cover defects. Cracks, flaws, and mortar joints show just as clearly after painting as before. In fact, they may stand out even more when the walls become a consistent color.
For paint to adhere properly, it must be applied to a surface that's free of dirt, dust, and grease. In a basement, it's especially important that the surface is dry. If the wall is susceptible to moisture problems, the problems must be corrected first or the paint will flake off the wall. The care that's invested in cleaning, scraping, and patching the walls makes the effort of painting worthwhile.
Types of Paints
Standard latex paints are water- based, easy to clean up, and quick to dry. Instead of water, oil-based paints use natural or synthetic oil as the vehicle for carrying the pigments. They take longer to dry and require solvents for thinning paint and cleaning tools. They also call for plenty of ventilation to dispel fumes. Basements are not easy to ventilate, so it's better to use latex paint. No matter what kind of paint is used, the masonry surfaces have to be cleaned and primed before painting can begin. (Various priming products are available.)
Though not quite a paint, another colored surface coating can be applied to basement walls, particularly if minor moisture problems are evident. Called masonry waterproofer,” it's a ready-mixed coating that contains synthetic rubber and portland cement. (Some formulations are latex-based to reduce fumes.) The product comes in several standard colors and can be tinted lightly to produce other colors. Two coats of this product actually seal the surface from minor moisture penetration, even f that moisture is driven by hydrostatic pressure. Masonry waterproofers are applied with a brush, not a roller, to ensure that the pores of the masonry are sealed adequately There is no need to paint over waterproofer that's tinted, although you can paint over it with a latex paint.
Brushes and Rollers. Basement walls can be painted entirely with a brush, but a roller completes the job faster. A roller consists of a frame and a cover. Covers vary in thickness and nap composition. A short nap, about 1/4 inch thick, applies a thin, smooth layer of paint and is suitable for the smooth surface of a poured- concrete wall. A longer nap, about 1 inch thick, deposits a large amount of paint and is better for porous or irregular surfaces such as concrete block. Other necessary items include a roller pan for loading the roller with paint and a 3- or 4-inch paintbrush for painting into corners and around details. A natural-bristle brush is best for oil-based paint; use synthetic-bristle brushes for latex paint. (The water in latex paint ruins natural bristles.)
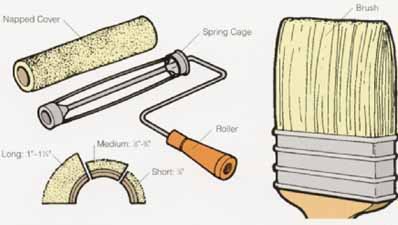
Brushes and Rollers. Masonry surf particularly concrete
block, are fairly rough. To paint these surfaces quickly, use a roller
frame and a long-napped roller cover. A brush is needed for touching up
corners and edges.
Drywall
Drywall (also known as plasterboard, gypsum board, or wallboard, or by the trade name Sheetrock) is a popular option for finishing walls. It is readily available, relatively easy to work with, and inexpensive.
Types of Drywall
Regular drywall has a dark gray kraft paper backing. The front is covered with smooth, off-white paper that takes paint readily. The long edges of each sheet are tapered slightly to accept tape and joint compound. Standard drywall comes in several thicknesses; ½ inch is suitable for basements. Some types of drywall have special purposes.
Water-resistant drywall, usually blue or green in color, is made for use in areas of high moisture, such as around bathtubs. Fire-resistant drywall, called Type X, sometimes is required by building codes in certain areas, such as around a furnace enclosure.
Estimating Drywall
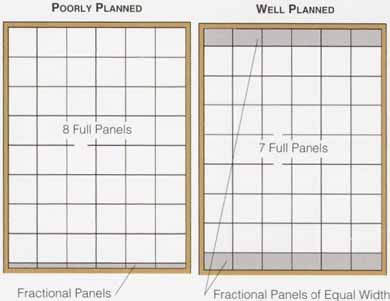
Calculate the square footage of the ceiling and each wall, then add these figures to get a total for the entire room. Add about 10 percent to this (to account for waste), and divide by 32 (the number of square feet in one 4x8-foot sheet). The result is the approximate number of 4x8-foot drywall panels needed for the job. If the room has complicated or odd shaped surfaces, a more detailed estimate can be done. Draw each surface to scale, and then determine the most efficient layout of panels.
--
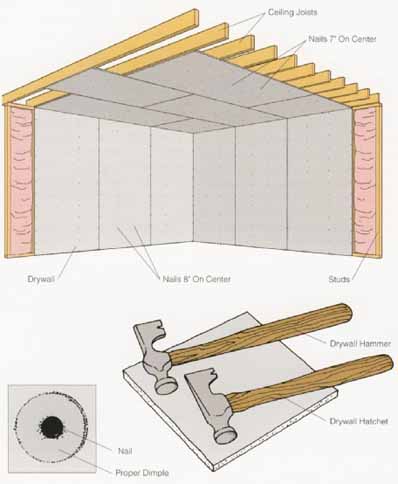
Tips for Nailing Drywall
To install 1/2-inch-thick drywall, use nails that are 1 3/8 inches long. Use only nails specifically designed for use with drywall.
Space nails 7 inches apart on ceilings and 8 inches apart on walls. Do not nail closer than 3/8 inch or farther than ½ inch from the edge of a sheet. Sheets can be placed horizontally or vertically but there must be a nailing surface behind every seam.
Drywall Hammer. The head of each nail is set slightly below the surface of the drywall. This is called “dimpling” and allows the nailhead to be concealed later with joint compound. A standard hammer can't form a proper dimple because it's likely to damage the face paper of the dry wall. If the nail is driven too hard and the face paper is damaged, the nail will not hold well. To ensure proper holding, drive a second nail nearby. Use a special drywall hammer, which has a slightly concave face, instead. Rather than claws, this hammer has a flat edge that can be used to pry drywall into tight spots. A similar tool with a sharpened edge is called a drywall hatchet.
--
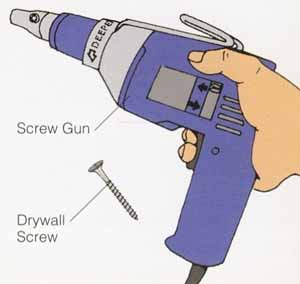
Nails vs Screws
Nails suffice for small drywall jobs and patches. Use 1 3/8-inch ring-shank drywall nails for 1/2-inch wallboard, and 1½ nails for %-inch material. For larger jobs, such as an entire room, consider using drywall screws that are at least 5/8 inch longer than the thickness of the wallboard.
Drywall Screwdriver. A variable-speed electric drill fitted with a Phillips-head bit or a dry wall screwdriver (an electric drill with a special head) is used to drive drywall screws. The latter can be rented from a tool rental store. These screw guns” come with a clutch that sinks the screw just below the surface of the drywall without breaking the paper surface. These small dimples are easy to fill with joint compound.
--
Installing Drywall
1. Cutting Drywall. Plan your cuts so that end joints on walls and ceilings will be staggered. This will look better when finished than continuous joints, and it makes for stronger construction. Place one sheet on a flat work surface, and use a utility knife guided by a straightedge to score the face paper. Shift the dry wall so that the score line overhangs the work surface, and snap it along the line. Then slice through the paper backing to remove the piece. When using a utility knife, keep your fingers well away from the cut line.
2. Installing Drywall on the Ceiling. A 4x8-foot sheet of drywall is heavy and awkward to handle, so get some assistance. Cut a sheet to size (if necessary); lift it into place; and hold it firmly against the joists. To hold the sheet in place, drive several nails into its center. With a helper or two still supporting the sheet, use a chalk line to mark the position of joists and complete the nailing. (A simple T-brace can also be used to support the drywall temporarily.)
3. Installing Drywall on Walls. Install the drywall vertically so that the tapered edges of each sheet fall over a stud (or over a wood cleat). If the panel has to be lifted slightly to maneuver it into position, use scraps of wood to make a foot- operated lifting lever. The top edge of the wall panel butts against the ceiling panel that's already in place. If the concrete floors remain exposed, lift the drywall about inch above the floor before nailing it. This prevents the drywall from absorbing moisture from the concrete.
4. Marking for Cutouts. To accommodate electrical boxes, cut holes in the drywall. Measure the location of the box, and transfer the measurements to the drywall. Or mark the outside edges of each box with lipstick, and then cut a sheet of drywall to the proper size and push it firmly into position. (The print of lipstick indicates where to make the hole.) Use a keyhole saw or drywall saw to cut the hole.
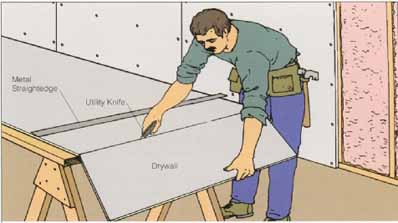
1. Score a straight line on the face of a drywall sheet, then snap
it along the line.
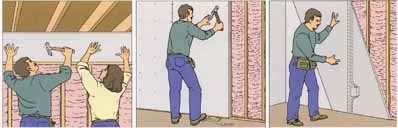
2. Press the sheet against the ceiling joists, and nail from
the center of the panel toward the edges.
3. Use a lever to help lift drywall sheets into place. Another approach is to rest the sheet on a small scrap of wood.
4. Mark obstructions, such as an electrical box, with lipstick, and press the drywall against it. This transfers a layout mark to the back of the panel.
Finishing Drywall
After the drywall is in place, you’ll conceal all of the seams and nail dimples (as well as imperfections such as accidental gouges) in a multi-step process called finishing.” Even the smallest dents and ridges show through paint and wallpaper, so this work must be done meticulously.
Tools and Materials
A thick, paste-like material called joint compound is the main ingredient for finishing drywall. Several layers of compound are spread over seams and imperfections, and each layer is sanded smooth if necessary after it dries. Compound comes in several formulas but “all-purpose compound” is suitable for most applications. Inexpensive paper tape, which is sold by the roll, is embedded in the com pound to reinforce seams. It prevents cracks from appearing at these locations. A 100-grit sandpaper is used to smooth dried joint compound. Any type can be used but silicon-carbide paper does not wear out as quickly as standard papers. Even better, if available, is drywall sanding mesh. It lasts a long time and does not become clogged with drywall dust.
Several taping knives of different sizes are used to spread the com pound and smooth wet seams. Each knife has a thin, spring-steel blade. Though knife size is partly a matter of personal preference, a 4- to 6-inch knife works well for the first coat and for filling nail dimples. On the other hand, 10- and 14-inch knives are good for smoothing joints.
Filling Flat Joints. Use the smallest knife to apply compound to a joint. Force enough compound into the tapered drywall joints to level them. At butt joints (where the non-tapered ends of two panels join), fill the crack, creating a slight hump. (This hump is flattened later.)
2. Embedding the Tape. Cut a length of joint tape, and center one end of it over the joint; then embed the tape by using the 4-inch knife to smooth it into the compound. Spread a layer of compound about 1/8 inch thick over the tape while holding the knife at a 45-degree angle. Then go over the joint again to scrape away the excess compound.
3. Finishing Inside Corners. Start by spreading a 2- or 3-inch swath of compound on both sides of the inside corner joints. Fold a length of paper tape along its centerline, and apply it to the joint. (The tape is pre-creased for this purpose.) Remove excess compound. (See Step 2.) An angled taping knife (called an inside corner taping tool) makes this task easier.
4. Finishing Outside Corners. When working with outside corners, use aviation snips to cut a length of metal corner bead to the height of the wall. Angle the cut ends inward slightly to ensure a better fit. Use drywall nails to nail the bead to the wall. The nails must be set below the level of the edge of the bead. To make sure that they are, run a dry knife over the bead before the com pound is spread. If the nails are too high, the blade will hit them. After all of the nails are set, use the edge of the bead to guide the knife as it fills the corner bead with joint compound.
5. Filling Nail Dimples. Use the smallest knife to fill nail dimples and other minor imperfections with compound. No tape is required.
6. Applying Finish Coats. After the first coat is dry, inspect the seams and smooth out ridges that might interfere with the smoothness of subsequent joints: Use the 4-inch knife to scrape off the ridges or lightly sand them. (With practice, the first coat will be smooth enough that this step can be skipped.) Then use the 10-inch knife to apply a thin second coat of compound to the joints. Use the small knife to “spot” the dimples again. After the second coat dries, use the 14-inch knife to spread the third and final coat. Spot dimples only if they are not filled completely.
7. Sanding the Compound. After 24 hours, or when it's completely dry, sand all joints and dimples smooth. Shine a bright floodlight across the walls to detect ridges and improperly filled nail dimples. (Under the light, imperfections become immediately apparent.) Fold a sheet of 100-grit sandpaper in quarters, and go over the compound lightly. Do not sand through the drywall’s paper facing. To make the work easier use a universal pole sander. This tool has a pad with clamps to hold sandpaper or drywall mesh. The pad is swivel- mounted to a pole. A pole sander is particularly handy for reaching ceilings, but it can be used almost everywhere because it extends your sanding stroke. Sanding dust is very fine, so use goggles and a dust mask (or respirator) when sanding. Brush or vacuum all traces of dust before painting or papering the walls.
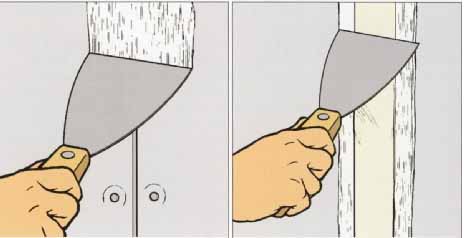
1. Use the smallest knife to apply joint compound to a seam. The
compound fills the tapered area between two dry wall sheets.
2. Cut paper reinforcing tape to the length of the seam; then center it over the seam and use the smallest knife to smooth it into place.
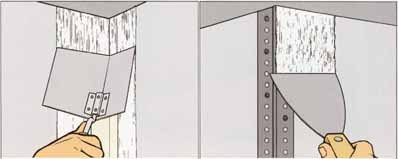
3. It is easy to finish inside corners with a special corner knife.
4. The knife rides along the edge of the corner bead as compound is spread. Make sure nails are set below this level.
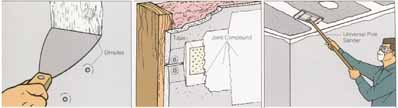
5. Cover dimples and other imperfections. Depending on how deep
they are, it may take two coats of compound to fill them.
6. Joints are covered with three layers of compound spread in successively wider swaths. The top layer requires a light sanding.
7. When the compound is completely dry, sand all joints and dimples smooth.
Suspended Ceilings
Deciding what kind of ceiling to install in a new basement room is not just a matter of appearance. More importantly, it's a matter of how much head room there is and how many ducts, pipes, and wires crisscross the under side of the joists. Often the best way to solve the latter issue is to install a suspended ceiling system (if a lack of headroom does not prevent it).
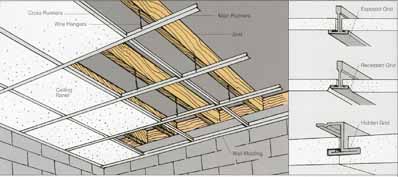
A suspended ceiling (sometimes called a dropped or exposed-grid ceiling) is a grid-like framework of metal channels that hangs beneath the joists on short lengths of wire. The metal channels support lightweight acoustical panels that form the finished surface of the ceiling. The beauty of this system is that it conceals obstructions attached to the underside of the joists yet allows easy access for fixing pipes or adding wiring later on. Another advantage is that the ceiling is leveled as it's installed; the existing joists need not be level or even straight. A suspended ceiling system also makes the job of installing ceiling lights easier: simply remove an acoustical tile, and replace it with a special drop-in fluorescent fixture.
Parts of a Suspended Ceiling
There are five key parts of a suspended ceiling system. Main runners are the primary support members and are arranged in parallel rows that run the length of the room. Main runners come in a variety of finishes and in several shapes. Cross runners are lighter-gauge supports that fit between the main runners at right angles. Hangers are lengths of lightweight (usually 18-gauge) wire. One end is hooked into holes in the main runners while the other end is attached to the joists. Acoustical ceiling panels fit into the grid that's created by the runners. They can be square or rectangular and come in a variety of sizes and patterns. Wall molding is a metal channel that's attached to the walls. It supports ceiling panels around the perimeter of the room.
--
Tips for Using Snips
• Wear work gloves when using snips. The cut edges and corners of metal ceiling runners are sharp.
• To improve control over the cut, cut near the throat of the tool rather than near the blade tips.
• Do not tilt the snips as they cut. Doing so twists the edges of the metal and results in rough edges.
• Do not snap the snips closed at the end of each cut. Doing so bends the metal slightly. Instead, take a good “bite” out of the metal and stop the cut short of the tips. Then take another bite to continue the cut.
--
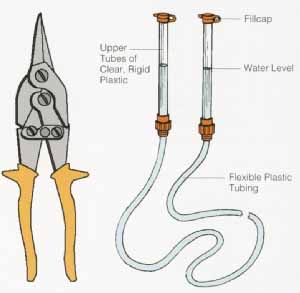
Aviation Snips. The leverage provided by the hinged
jaws of the snips makes it easy to cut metal ceiling runners. Water
Level. This tool is used to locate points around the room that are
exactly at the same level.
Types of Runners. There are three styles of runners, each of which gives the ceiling a different look. The runners can be completely exposed beneath the panels; they can be recessed into lips on the panel edges; or they can be hidden in slots in the panel edges.
Types of Runners: Suspended ceilings are composed of the
parts here.
Tools
Many of the tools needed for this project are basic: a hammer, chalk line, combination square, levels, a hack saw, plumb bob, and a utility knife. The following describes a few special tools needed for the job:
Aviation Snips. This tool easily cuts the light-gauge metals used to sup port acoustical ceilings. The snips are designed for maximum leverage on the workpiece. They have a spring action that opens the tool after a cut. Snips are available in right-hand, left hand, and straight-cut models.
Water Level. The premise behind this tool is simple: water always seeks its own level. Thus, water contained in clear plastic tubing can be used to locate points around the room that are exactly at the same level. Though professional ceiling installers use a laser level to do the same thing, a simple water level is inexpensive and foolproof, and it can be purchased at hardware and home center stores.
Installing a Suspended Ceiling
1. Planning the Job. Panels are available in 2x2-foot and 2x4-foot sizes. The latter works best if fluorescent lighting is to be placed in the ceiling because it fits the standard fluorescent tube length. Smaller panels require more cross runners, so the job is more time-consuming. Wall molding and main runners are sold in different lengths up to 12 feet and can be overlapped to reach greater distances. Cross runners are 24 inches long. To help estimate the amount of materials needed for the job, draw a plan view of the ceiling.
2. Establishing Benchmarks. The key to success is making sure that the ceiling is level across the entire room. Existing floor and ceiling surfaces may not be level, so never use them as reference points for measuring. Instead, establish benchmarks on the walls at every corner. (Use a water level to ensure that every benchmark is precisely located.) Benchmarks can be placed at any height, but 60 inches is most convenient. Future measurements are taken from these benchmarks.
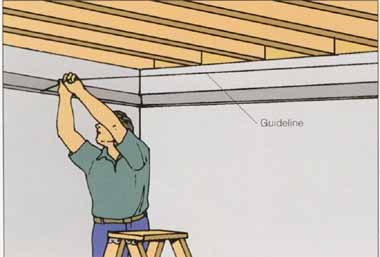
3. Determining Ceiling Height. The standard ceiling height is 90 inches; it also is the minimum height for lighting in a suspended ceiling. The ceiling must not be closer than 3 inches to projections. Hang it completely below projections, or use drywall or wood paneling to box-in the projections. (See page 68.) Once the ceiling height has been determined, measure up from the benchmarks to locate the position of the wall molding. Snap a chalk line on the walls around the perimeter of the room. It is best to draw this line in the place where the top edge of the molding is to be located; the chalk marks will not be visible after the ceiling molding is in place.
4. Installing Wall Molding. Nail molding to the walls, making sure that each nail penetrates a stud. Use the aviation snips to miter the molding at inside and outside corners. When cutting wall molding to length, remember to account for the thickness of the adjacent wall molding. Butt lengths of wall molding where they meet midwall.
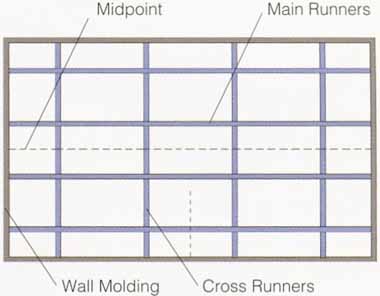
5. Establishing Centerlines. Measure the length and width of the room, and divide these measurements in half to get the center- point of each wall. Use layout strings to connect opposing midpoints, stretching them tightly between the wall molding. Check the intersection of the two strings to make sure that they are square to each other. If not, adjust one or the other slightly until they are square. It is easier to adjust layout strings when they are attached to nails that can be wedged behind the wall molding.
6. Adjusting the Layout. Plan the layout of ceiling panels to minimize the need for small pieces around the border of the ceiling. Doing this creates a better-looking job. If the border tiles will be less than half the width of a field tile, adjust the layout one way or the other to eliminate this unsightly condition.
7. Installing Guidelines. Plan to install the first main runner approximately parallel with the wall and at a distance from the wall that's equal to the width of the border units. Make measurements from the center lines rather than from the wall itself. (The wall might not be square.) Stretch a guideline between the wall moldings at these points.
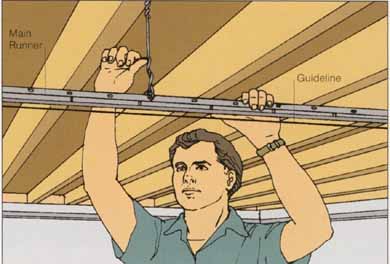
8. Attaching Hanger Wires. Start with the joists at either end of the ceiling. Install an eyescrew (or fastener supplied by the ceiling manufacturer) into every fourth joist directly above the guideline. Twist a piece of hanger wire through each eyescrew so that it hangs about 6 inches below the guideline. Cut a main runner to length, and hang it from the wires so that it's lust barely above the guideline. Twist the wires to secure the runner in position.
9. Installing Cross Runners. Slip the first cross runner between the main runner and the wall molding. (It locks into the main runner’s pre punched holes.) Install the next main runner by using cross runners to gauge its spacing. Continue to work across the room until all of the runners have been installed.
10. Placing Ceiling Panels. Lift each ceiling panel into place by turning it at an angle and pushing it into the grid of runners. Use a utility knife and a straightedge to cut panels
1. Use the plan view to deter mine the number of cross runners and ceiling panels needed, as well as the lineal footage of the main runners.
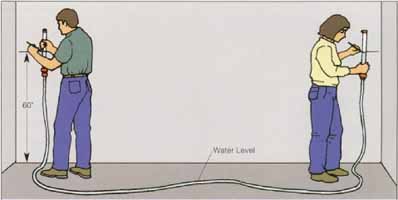
2. Use a water level to establish benchmarks at each corner of the
room.
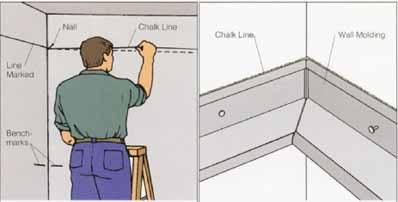
3. Measure up from the benchmarks to locate the ceiling height; then
snap a chalkline between the marks.
4. Use the chalk line as a placement guide to nail the wall molding in place.

5. Use a square to check the angle that's formed where the layout
strings meet. Adjust the strings so that they make a 90-deg. angle.
6. Adjust the layout so that border tiles on opposite sides of the
ceiling are the same size.
7. Stretch a guideline between opposite wall moldings; this line
acts as a sight line to gauge the height of the first main runner.
8. Attach eyescrews directly above the guideline, and loop hanger
wire through each eyescrew. Secure the main runner to the wire.
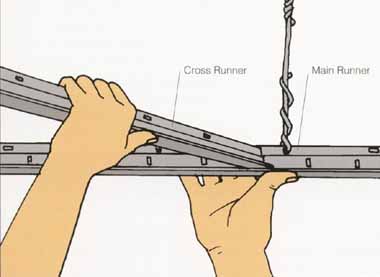
9. Install cross runners into slots in the main runner. Maintain
the proper spacing according to the size of ceiling panel used.
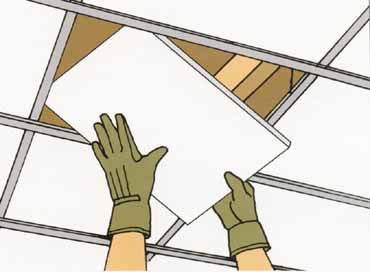
10. Install and wire lighting panels. Then angle the ceiling panels
through the grid, and set them into place.
Working around Obstructions
1. Hanging Runners below the Obstruction. If a pipe or duct intrudes below the level of the ceiling, it can be boxed in with pieces of the grid system. U-shaped channel molding and extra wall molding is needed for this job. Include the box in original layout plans, and leave the ceiling open for now. Use the aviation snips to cut 90-degree notches in lengths of main runner; then bend the runners at these points to form the “ribs” of the box.
2. Attaching U-Channel. Fasten U-channel to the ceiling grid along the length of the obstruction. Then use pop rivets to attach the ribs to the U-channel. (A pop rivet gun is an inexpensive tool available at hard ware stores).
3. Installing the Panels. Connect the ribs with lengths of wall molding, and cut ceiling panels to fit the box as needed. Install the vertical panels first; they are locked in place when the horizontal panels are in stalled. Use hanger wire as needed to provide additional support for the box.
4. Working around Posts. There are two ways to deal with posts that penetrate suspended ceilings. Either cut a panel in half and shape the pieces to fit around the post, or use additional runners to box in the post. If the panel is cut in half, the seam between halves usually is self-supporting and unobtrusive.
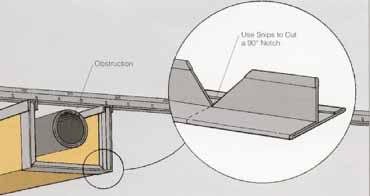
1. Cut 90-deg. notches in the spine of main runner stock; then bend
the runner at the notches to form a U-shaped “rib” that surrounds the obstruction.
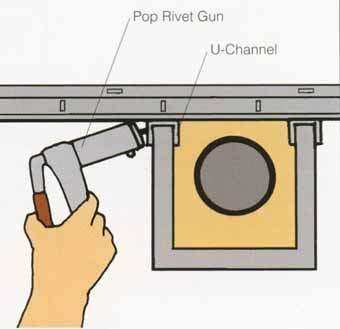
2. Drill pilot holes for pop rivets; then use a pop rivet gun to
attach the ribs to the U-channel.
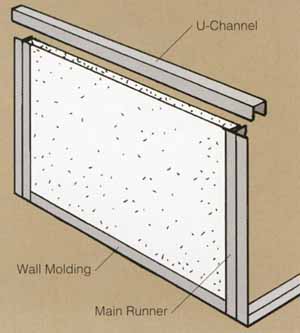
3. Use wall moldings to connect to install the ribs and install the
ceiling panels.
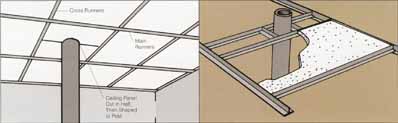
4. To work around a post, either cut a ceiling panel in half and cut each half to fit the post or add runners and small pieces of
ceiling panel to enclose it .
Finish Flooring
Once the subfloor is in place, carpeting and sheet-vinyl floors can be installed in the usual way. An additional layer of plywood underlayment is usually required beneath sheet vinyl, but carpeting and a carpet pad can be installed directly over the subfloor.
Hardwood flooring can be installed over concrete, but it's not recommended for use over a below-grade basement slab because of potential moisture problems. If the slab is unusually dry, however, consult a flooring specialist to see whether an exception can be made.
Vinyl Flooring. If the slab is smooth and dry, vinyl flooring may be in stalled directly over the slab. If moisture is a potential problem, install a wood subfloor before installing sheet vinyl. This approach also makes for a more comfortable, resilient floor. Some flooring products require that the vinyl be imbedded entirely in mastic. Others, however, require only a perimeter band of mastic to hold the flooring at the edges of the room.
Carpeting. Most carpets can't be installed directly over concrete be cause of the way in which they are stretched between tack-strips. Many nails are used to secure the tack strips (an unrealistic proposition if the substrate is concrete). Cushion- backed carpet may be installed directly on the slab, but before doing so discuss this possibility with the manufacturer—some manufacturers don't recommend this type of installation because of potential mildew problems. Cushion-backed carpeting is not recommended for use on stairs.