| Home | FAQ | Finishing | Sump Pumps | Foundations |
|
The areas most commonly turned into new living spaces are basements and attics. The following refs show how to lay down a smooth floor in each location. Layered Flooring: To give floors a comfortable amount of spring, they must be built up in layers (be low). In an attic, the first layer consists of joists. Make sure these are the right size; a 2-by-6 joist should span no more than 8 feet, and a 2-by-8, 11 feet. If joists don't meet these guidelines, double them (ref. 64). On the concrete floor of a basement, boards called sleepers, made from 2-inch, pressure-treated lumber, substitute for joists. When installing sleepers over a concrete slab, it's essential first to make sure the slab is level and water resistant (ref. 63). TOOLS:
MATERIALS:
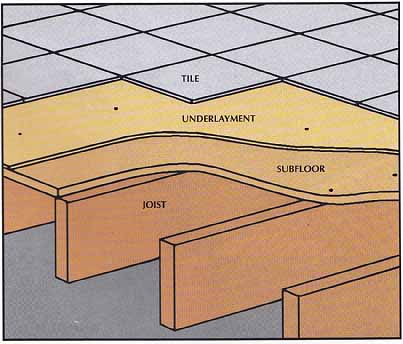
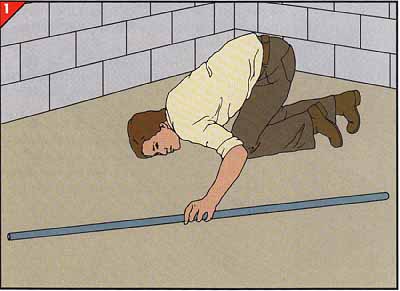
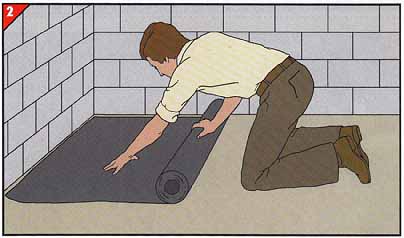
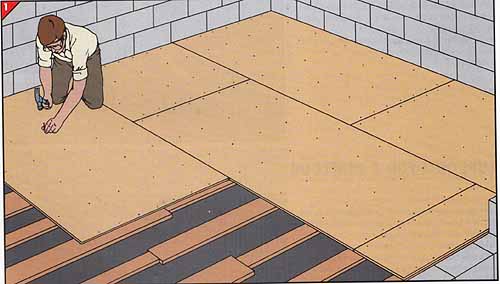
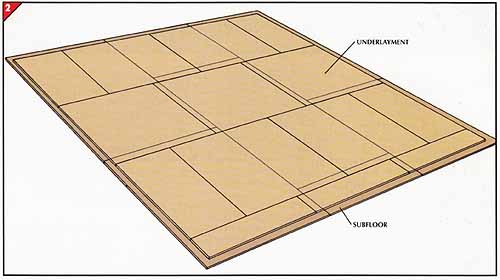
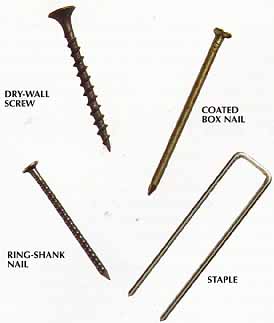
SAFETY FIRST: Goggles shield your eyes when you are hammering and sawing. When using power tools, protect your ears with earplugs. Wear gloves when handling pressure-treated lumber, and wash your hands thoroughly afterward. Anatomy of a floor. All floors share a similar structure. At the bottom are joists or sleepers, usually spaced 16 inches apart. Nailed to these boards is a subfloor of i-inch-thick plywood, installed before walls are erected. Grade C-D tongue-in-groove plywood is commonly used for subflooring, with the smoother C side facing up. An additional layer, called the underlayment, provides a smooth base for the floor covering, in this case tile. Made of i-inch hardboard or Grade A-C tongue-in-groove plywood (C side up), the underlayment is nailed to the subfloor after walls are in place. Preparing a Concrete Slab Graphic: 1. Smoothing the slab. • Check for irregularities in the slab by rolling a length of pipe over the surface while you look for slits of light under the pipe. • Flatten bumps less than inch high with a rented electric concrete grinder. • Fill in low areas with flash patch, a fast-drying cement-sand-epoxy compound that retains its resilience when set. Apply it with a trowel, then smooth the patches with a straightedge. If you discover bumps more than inch high, you can create a flat surface by shimming the sleepers that support the subfloor. Graphic: 2. Damp-proofing the slab. • Cover the concrete with 55-pound roofing pa per, available in 36-foot rolls. You need not fasten the paper to the slab; simply press it in place so that it lies flat. • As additional protection against moisture, you can lay 6-mil polyethylene sheeting atop the roofing paper. Supports for a Subfloor Graphic: Sleepers for a slab. Use pressure-treated 2-inch lumber for the sleepers. The boards need not all be the same width, but they must be neither warped nor twisted. • Lay rows of sleepers atop the roofing paper at 16-inch intervals on center. Shim each row as necessary to compensate for low spots in the slab. • Fasten the sleepers to the concrete with 2 cut nails, hammered in with a maul, or special- purpose nails driven with a powder-actuated hammer. Two or three nails per board are sufficient to keep the sleepers from shifting until the subfloor is in place. Graphic: Reinforcing an attic floor. Consult ref. 62 to determine whether you need to double the attic joists. If so, proceed as follows: • Cut duplicate attic joists, and rest them next to the originals on the 2-by-4 plates that run the length of the attic. • Using 2 nails, fasten each joist to the sides of the existing ones at several points along their lengths, and toenail the ends to the plates. If the original joists are spaced more than 16 inches apart, install additional joists midway between them; if the original joists are doubled, double the new ones as well. Cut the new joists to the same dimensions as the originals and toe nail them to the plates. Installing the Subfloor and Underlayment • First, plan a pattern for the subfloor that avoids alignment of joints and uses as many full sheets as possible. Orient the sheets lengthwise across joists or sleepers. Leave 1/16 inch between sheets where they meet end to end, and 1/32 inch—the thickness of a matchbook cover—where they meet side to side. • Then cut the plywood as necessary and fasten it to the sleepers or joists every 10 inches with coated No. 8 box nails. At the ends of each plywood sheet, space the nails 6 inches apart and 3/8 inch from the edges. Stagger the nails at ad joining ends to keep from split ting joists or sleepers. • With the subfloor in place, check the surface for evenness. Smooth small bumps with rough sandpaper, and fill holes with flash patch. Unusually high places may be a result of swelling of joists or sleepers; if so, pry the plywood up, trim the boards with a plane, and refasten the sheets. Graphic: 2. Installing the underlayment. • After erecting walls (not shown for clarity), plan the underlayment installation so that joints between underlayment sheets don't coincide with subflooring joints (light lines). The sheets are best laid perpendicular to those of the subfloor, and must be installed inch in from the walls, and 2 inch from each other. • Cut the plywood or hardboard sheets as necessary, and attach each one to the subfloor—not the sleepers—with the fastener of your choice. Space the fasteners 4 inches apart over the entire sheet, and inch from the edges. To fit the last sheet in each row, follow the procedure used for border tiles. Graphic: Four Fastening Methods: There are a number of different types of fasteners you can use for underlayment: Coated Box Nails are covered with a film of resin that's melted by friction during driving and then re-hardens to hold the nails firmly in place. The nails also have thin heads that will sink flush with the surface. Ring-Shank Nails have ridges around the shank from top to bottom that grip the wood very tightly. Dry-Wall Screws, driven with a screw gun, can be sunk flush with the surface of the underlayment. Although screws have the best holding power, they can be time consuming to use. Staples must be driven by a power tool, available at tool- rental shops. Though very fast, a power stapler requires some practice, since it's easy to drive staples either too far into the surface, not far enough, or sideways. |
| Top of Page | Home | Prev: (coming soon) | Next: Laying Vinyl Tiles or Parquet| Related Articles |