How to Restore a Dishwasher to Health
| HOME | Troubleshooting | DIY Tips |
|
.. The most common complaints about dishwashers—they leak, don’t drain, or don’t clean well—often arise from clogs or mechanical breakdowns that are easily fixed, and in some cases the dishwasher may not be at fault. Hot Water Helps to Clean: Dirty or spotted dishes, for example, may simply be the result of insufficiently hot water. To check your water sup ply, place a candy thermometer or meat thermometer in a coffee mug, then turn the kitchen tap to its hottest setting and run water into the mug for 2 minutes. If the temperature is below 120°, raise the setting on your water heater to 120°. Fixing Those Leaks: Inspect the gaskets around the door, and check hose connections at the water inlet valve, pump, and drain valve. Reseat a slipped gasket in its track, and tighten or replace any loose hose clamps. Replace hoses that look as if they are cracked or brittle. More serious are problems involving the pump, motor, or timer, as these three parts are the hardest to fix. Only disassembling and cleaning the pump is shown—in all other cases you should call for service. CAUTION---Before attempting any repair of a dishwasher, turn off the power to the machine at the house service panel. TOOLS:
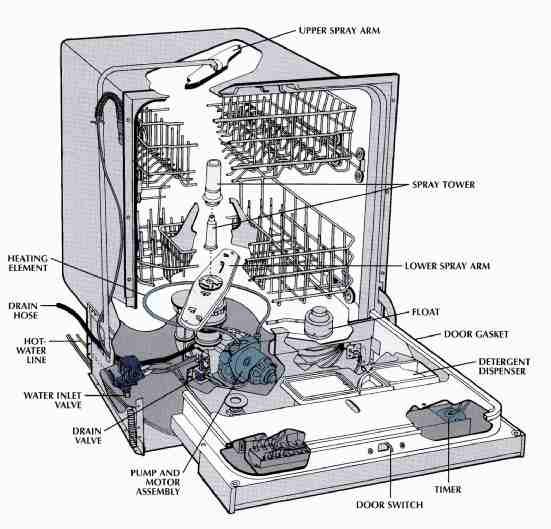
Anatomy of a dishwasher.
To begin a cycle, the timer signals the water inlet valve to open, allowing water into the tub. The water mixes with detergent, is heated to about 140° by the heating element, and is pumped through the small apertures of the spray arm against the dishes to clean them. Then the dishes are rinsed and the tub drained, and the heating element turns on again to dry the dishes. To drain the tub at the end of the wash cycle, a dish washer will have either a drain valve or a reversible motor to pump out the water. Most models have a spray tower—a pipe that carries water to the upper spray arm, as shown here. HEATING ELEMENT; DRAIN; HOSE; HOT WATER LINE; WATER INLET VALVE; PUMP AND MOTOR ASSEMBLY The versatile multitester.
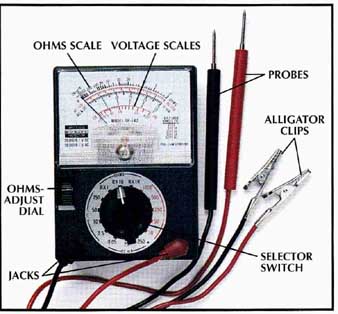
A multitester can measure the voltage and current (amperes) reaching an electrical component, as well as its resistance in ohms. • Turn the selector switch to the correct value of amperes, AC volts, DC volts, or ohms you want to measure, and read the scale on the meter. Always use a setting higher than the value expected. The ohms scale is particularly useful in appliance repairs for identifying which part of the ma chine has failed. • To calibrate the multitester for resistance measurements, select the RX1 (resistance times 1) scale and touch the probes together. Turn the ohms-adjust dial until the meter reads 0 ohms. For other tests, follow the directions in the owner’s manual. Troubleshooting Guide
FIXING COMMON PROBLEMS
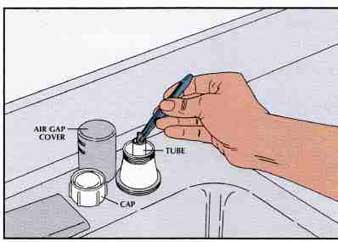
Opening a dogged air gap. • Find the air gap on the back rim of the sink between the dishwasher and the sink faucet. Pull off the chrome cover, and unscrew the plastic cap. • With tweezers, remove any debris from the small tube in the center of the air gap --. • Clean the cover and cap if necessary; screw on the cap and snap the cover in place. Cleaning the spray arm and filter screen.
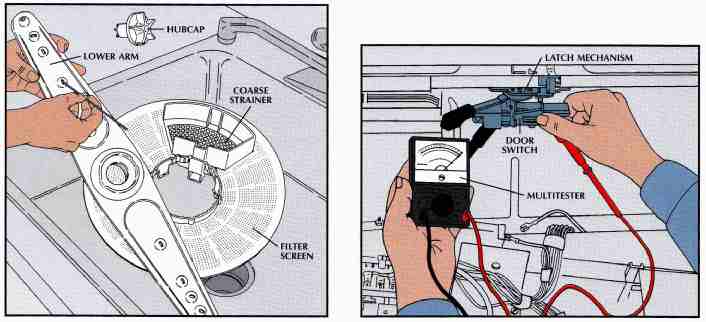
• After sliding out the lower dish rack, twist off the plastic hubcap, if there is one, that holds the lower spray arm in place, and lift off the arm. • If your machine has a removable coarse strainer and filter screen, unsnap and remove them; otherwise, clean them in place. • Clean out the slotted holes in the spray arm with a wire. Scrub the strainer and filter screen with a stiff brush, and then rinse all three before reinstalling them. • Unclog the holes in the upper spray arm with out removing the arm from its holder. Checking the door latch and switch. • If the latch is difficult to close, lubricate the mechanism with light machine oil. On many models, the latch can be adjusted for a better fit by loosening the mounting screws, sliding the latch in or out, then retightening the screws. • To test the door switch, remove the screws on the inside of the door that secure the control panel. Close and lock the door. Gently pull off the panel and disconnect the wires from the door switch terminals, behind the latch. Attach multitester clips to the terminals, and check switch resistance ( 31); any reading other than 0 ohms indicates a faulty switch. • Replace the switch by removing its retaining screws, installing a new switch, and reconnecting the wires. CHECKING THE WATER CONTROLS Servicing the water inlet valve.
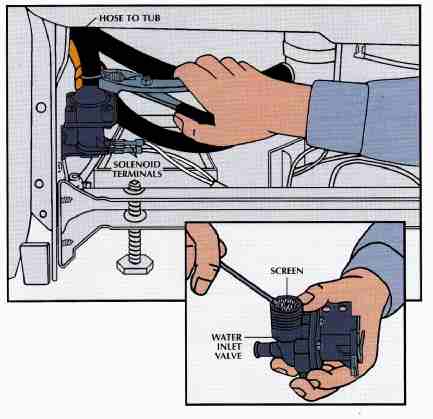
• Turn off the power and water supply to the dishwasher. • With a shallow pan handy, use slip joint pliers to remove the hose that connects the inlet valve to the tub. Then disconnect the flexible copper hot-water line with an adjustable wrench. • Unscrew the valve from its mounting bracket. Without removing the filter screen, scrape it clean (inset) and rinse. If the valve appears cracked or otherwise damaged, replace it. • With the multitester, check the solenoid. You should get a reading of between 60 and 500 ohms. Replace the valve assembly if the solenoid is faulty. • Reinstall the valve, then reattach the hot-water line and hose, and tighten all connections. Cleaning and testing the float and its switch. 
• Lift the float out of its sleeve, and remove any debris from the bottom of the float. Clean out the sleeve as well. • Slide the float into the sleeve and run the dishwasher. If no water enters the machine or if it overflows, turn on the power to the dishwasher at the main service panel, bail out any water in the tub, and remove the access panel below the door. • Test the float switch (inset) located under the tub by touching the multi tester probes to the terminals. You should get 0 ohms with the switch on (float down) and infinity with the switch off (float up). Inspecting the drain valve assembly. 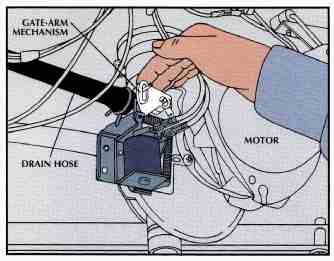
Remove the panel below the door and count the number of wires attached to the motor. Two or three wires indicates a nonreversible motor; four or more is reversible. Only nonreversible motors have drain valves. Locate the valve and its gate-arm mechanism. Move the arm by hand; if it doesn’t move freely up and down on its two springs, replace them. Testing the drain valve solenoid. 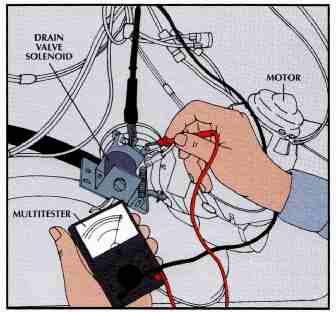
Disconnect the wires from the drain valve solenoid terminals and check resistance. If you don’t get a reading between 60 and 500 ohms, replace the solenoid. DRAIN VALVE SOLENOID CLEANING THE PUMP 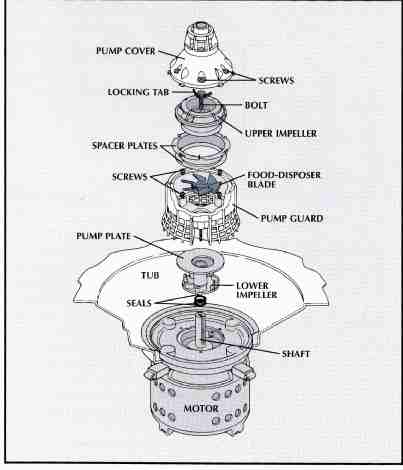
Getting to the impellers. • Take off the lower spray arm (32), then remove all screws from the pump cover, exposing the upper impeller. • If there is a bolt-locking tab, bend it up to clear the bolt, then unscrew the bolt, freeing the upper impeller. Check the impeller for debris and for worn or broken blades; clean or replace it as necessary. • Lift out the spacer plates and the food-disposer blade under the impeller; clean the blade. • To reach the lower impeller, unfasten the screws holding the pump guard and remove it. Pull off the pump plate and clean the impeller. • If the lower impeller is damaged, pry it off the motor shaft with a screwdriver or remove it with a pair of locking pliers. When installing a new impeller, replace the underlying seals before pushing the impeller onto the shaft. If the impeller won’t slide on easily, sand any rust off the shaft to make it smoother. • To reassemble the pump, first replace the pump plate and screw on the pump guard. At tach the food-disposer blade and spacer plates, then the upper impeller. Secure with the bolt, and put the locking tab, if there is one, on top of the bolt. Screw on the pump cover, and replace the spray arm. Prev: Intro Next: Dealing with a Stuck Garbage Disposer Home Similar articles top of page |
 ---32a