Simplified Guide to Major Appliance Repair: Electric Water Heaters
| HOME | Troubleshooting | DIY Tips |
|
Electric water heaters normally have two heating elements, with each element controlled by a thermostat. Mounted on the outer wall of the tank above each element, the thermostats sense the water temperature through the wall of the tank. To reduce energy demands, the thermostats work in tandem, one thermostat operating at a time. First the upper thermostat turns on the top element to heat the water in the top of the tank. When the water gets hot, the thermostat turns off the top element, and the bottom element comes on to heat the remaining cold water at the bottom of the tank. The hot water leaves from the top of the tank and cold water enters from a tube near the bottom of the tank. The bottom thermostat senses the cold water and turns on the element. If enough hot water is used so that the water at the top drops below the setting of the upper thermostat, the top element comes back on to provide additional heat. As a safety measure, a high-temperature cutoff on the upper thermostat turns off the power to the water heater when the water temperature reaches 210 degrees Fahrenheit. Before you begin any repairs, always turn off the power to the heater at the circuit breaker. Don’t remove any access panels until the power is off. Tools & Materials:
TROUBLESHOOTING GUIDE: Problem:
Probable causes:
Solutions:
Step 1-1. Getting started. First turn off the circuit breaker to the water heater. Remove both access panels to the thermostats. Push the insulation back clear of the thermostats. Fiberglass can irritate the skin, so wear gloves for protection.
Step 1-2. Checking for power. Set the volt-ohmmeter on 250 volts ac. Hold the meter probes by the insulated covers and touch a probe to each of the top two terminal screws of the high-temperature cutoff. These screws are where the two wires from the electrical panel are connected. Now touch one probe to the exposed metal wall of the tank (or a mounting bolt) and the other probe to each of the terminals. In all cases, the meter should read 0 volts. (If it doesn’t, don’t touch anything—the power is still on.) If voltage is not present, turn the power back on and carefully repeat the test. The meter should read 220 volts across the terminals and 120 volts between each terminal and the wall of the tank. If it doesn’t, you’ll probably need an electrician, because power is not getting to the water heater. If voltage is present, go to the next step. Remember, do all work with the power off.
Step 1-3. Checking the reset button. Turn off the breaker at the service panel. Retest for voltage at the water heater to make sure none is present. Then push in the cutoff reset button. If you hear it click, water might have seeped into one of the heating elements, causing a short. The short will show up later, when you check the elements.
Step 1-4. Checking the high-temperature cutoff. Disconnect one of the wires to the heating element (it doesn’t matter which one). Set the volt-ohmmeter on the R x 1 scale and touch a probe to each of the two screw terminals to the left of the reset button. Repeat the test on the two terminals to the right of the button. The meter needle should move to 0 each time, showing a connection. If it does, your next step is to check the thermostat and elements (Step 1-6). If it doesn’t, replace the high-temperature cutoff.
Step 1-5. Replacing the high-temperature cutoff. Before disconnecting any wires, label the wires and draw a wiring diagram. Now disconnect the wires and the two metal straps going to the thermostat. Pull up on the cutoff and remove it from the spring clips holding it in place. Push in the reset button on the new cutoff and install it behind the spring clips. Connect the metal straps and wires to their corresponding places on the new cutoff.
Step 1-6. Checking the top thermostat. Make sure the power to the heater is off. Disconnect the wire to the top element. Use a screwdriver to turn the thermostat clockwise to its highest setting.
Step 1-7. Completing the test. With the meter set on R x 1, touch one of the probes to each of the two screw terminals on the left side of the thermostat. The meter should move to 0. Now turn the thermostat to its lowest setting and repeat the tests. This time, the meter should not move. If the thermostat fails the tests, install a new one.
Step 1-8. Checking the bottom thermostat. Make sure the power to the heater is off. Disconnect one of the wires to the bottom element. Turn both the top and bottom thermostats to their lowest settings. With the meter set on R x 1, touch a probe to each of the two terminal screws on the bottom thermostat. The needle on the meter should not move.
Step 1-9. Completing the test. Now turn the bottom thermostat to its highest setting. The needle should move to 0. If not, replace the bottom thermostat with a new one. If the thermostats are good, check the elements (Step 1-12).
Step 1-10. Removing the thermostat. Make sure the power is off. Before disconnecting any wires, label the wires and draw a wiring diagram. To remove the top thermostat, first remove the screws connecting the two metal straps to the high- temperature cutoff and the two wires from the thermostat. Slide the high-temperature cutoff up out of the way. (The bottom thermostat, shown here, does not have a high-temperature cutoff.) Loosen the two bolts on the thermostat’s bracket. The bracket holds the thermostat against the wall of the tank. Now slide the thermostat up and out from behind the bracket.
Step 1-11. Installing a thermostat. Making sure that the back of the thermostat is flush against the wall of the heater, tighten the mounting bolts on the bracket, and press the cutoff back into place. Reconnect the wires and set both thermostats to about 140 degrees.
Step 1-12. Checking heating elements. To check for continuity, make sure the power to the heater is off at the service panel. Remove both access panels on the heater. Check again for voltage. Wearing gloves, carefully pull the insulation back to get to the terminals. Disconnect one of the wires to each element. Set the meter to R x 1 and touch a probe to each of the two screw terminals on the elements. The needle should move to somewhere in the middle of the scale—about 10 to 20 ohms. If it doesn’t, replace the element with a new one. If the element tests as good, check it for a short.
Step 1-13. Checking the element for a short. While the power to the heater is still off, adjust the meter to a higher setting (R x 1K or more) and touch one probe to one of the element’s mounting bolts and the other probe to one of the element’s terminals. The needle should not move at all. If it does, a short circuit exists between the element and the tank. Install a new element.
Step 1-14. Draining the tank. Make sure the power to the heater is off. Shut off the cold water supply to the heater at the valve on the cold water pipe coming into the heater. Open a hot water faucet at a convenient sink to equalize the air pressure in the system. Attach a garden hose to the heater’s drain or place a bucket underneath the drain. Open the drain. If the water drains slowly, open more faucets. If you are draining the heater with a bucket, watch to make sure that the bucket doesn’t overflow. After the tank has drained, disconnect the two wires from the element. Remove the four bolts holding the element and the thermostat bracket. Now remove the element and the old gasket.
Step 1-15. Ensuring a tight seal. Scrape away any scale or rust around the opening with an old screwdriver so that the new gasket will make a tight seal.
Step 1-16. Installing a new element. Install the new element and gasket. Mount the thermostat bracket and thermostat. Connect the two wires to the element. Push the insulation back in place and install the access panels. Close the drain on the tank and open the water supply to refill the tank. When water runs from the hot water faucet at the sink, the tank is full. If you turned on additional faucets to make the tank drain faster, be sure to turn them back off. Turn the power back on.
Step 1-17. Testing the pressure relief valve. Stand clear of the valve outlet. Remember that the water is hot. Now lift the spring lever. About a cup of hot water should spurt out. Operate the lever a few times to remove any sediment in the valve. If the water does not come out or the valve drips, replace it. NOTE: If the heater is old, the valve might stick open. If it does, quickly shut off the cold water supply and go to the next step.
Step 1-18. Removing the old valve. First turn off the power and close the cold water valve to the tank. Drain a gallon or so of water from the tank if the relief valve is on the top of the water heater. Drain about five gallons if the relief valve is on the side of the tank. Use an adjustable wrench to remove the discharge pipe. Use a pipe wrench to turn the relief valve counterclockwise. Apply firm, steady pressure to loosen the valve. Remove the valve and take it with you when you buy a new one.
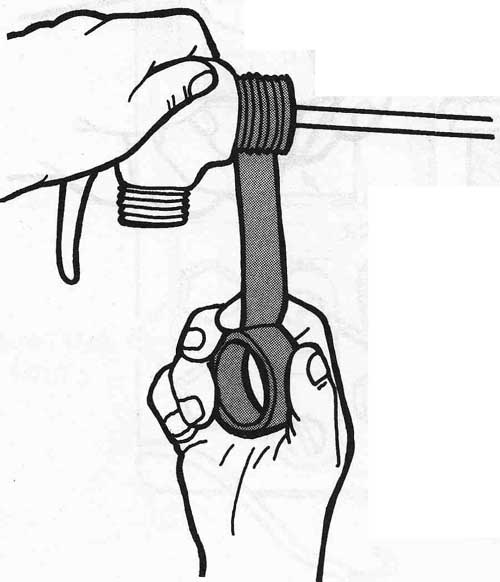
Step 1-19. Installing the new valve. Wrap a couple of turns of pipe tape clockwise over the threads of the new valve. Thread the new valve into the opening in the tank. Use a pipe wrench to tighten the valve. Reinstall the discharge pipe and open the cold water valve. Turn the power back on.
Home Guide/index top of page |