There is no more pleasant place in a garden than a shady corner where you can while away an hour or two on a lazy summer afternoon. If you are fortunate enough to have a large shade tree in your backyard, you need only place a comfortable piece of lawn furniture beneath its leafy boughs. But if you are not so blessed, you can build your own shade exactly where you want it: a structure that may be a simple arbor covered with vines or an ornate gazebo like the ones that adorned so many Victorian gardens.
If, on the other hand, you have all the shade you need but are short of storage space, construction can solve that problem, too. There are many strictly utilitarian structures you can build, ranging from covered bins to hold tools or firewood to a potting shed or even a fully equipped work center where you can store tools, raise seedlings and start cuttings.
Of the many kinds of garden shelters, probably the most common—and among the easiest to build—is a terrace roof consisting of a simple framework of wooden posts, beams and rafters attached to a wall of the house+. Four-by-four posts are strong enough to support most terrace roofs, although unusually large structures or those that are built in snow country may require 4-by-6s. Check the requirements of your local building code; the structure may have to withstand heavy wind, not to mention your own weight as you build it.
The size of the beams, or horizontal supporting members, depends on the distance between posts. As a general rule, the depth of the beam in inches should equal the span of the beam in feet. Thus, a 4-by-4 beam can be expected to span 4 feet, while a 4-by-6 beam will span 6 feet. The size of the rafters, which rest across the beams, is also determined by the distance they span and the weight of the load they will have to support. Relative post, beam and rafter sizes are shown in the chart.
---

A wire enclosure supported by a skeleton of 2-by-4s protects the broccoli, peppers and other comestibles of a vegetable garden from marauding birds and animals. Posts are bolted where the top was added on.
---
If your building code permits, you can set roof posts directly in the ground, using wood that has been treated with a preservative or the naturally rot-resistant heartwood of cedar or redwood. Set each post at least 3 feet below grade, or below the greatest depth of winter frost, leaving at least 8 feet above the ground to allow for comfortable headroom.
In unstable soils, posts will need concrete anchors like those used to set fence posts solidly ( -- 66). Posts can also be anchored to the surface of a concrete floor if metal post anchors are set in the concrete when it’s poured. When the posts are in place, attach the beams across their tops with T braces or metal post supports designed for this purpose, then nail the rafters on edge across the tops of the beams. The rafters should also be nailed or attached with metal joist hangers to a ledger board that has been screwed or bolted flat against the side of the house.
OPEN GRIDS ABOVE
Many gardeners like the light and airy feeling of this basic framework and leave it unroofed, getting some shade and maximum ventilation. A popular variation, called an eggcrate grid, is constructed by nailing short pieces of lumber between the rafters. The deeper the boards in this grid and the closer their spacing, the more shade such an eggcrate pattern will give. However, it won’t provide much shade when the sun is directly overhead, at the hottest time of the day, and you may want to add a man-made cover or cultivate a natural one of vines.
Almost any open rafter or grid structure makes a fine arbor for climbing plants. Once the vines are established, they provide sun- dappled shade and rustle in each passing breeze. Overhead foliage acts as a natural air conditioner, absorbing heat and giving off moisture to the air nearby.
A CHOICE OF-ARBOR VINES
Flowering vines such as jasmine and honeysuckle are particularly popular as arbor plants because of their sweet perfume, but don’t overlook the possibility of planting fruit-bearing vines, which offer sustenance as well as shade. One West Virginia gardener uses the grape arbor outside her kitchen as a shady retreat. When the kitchen gets uncomfortably hot, and according to neighbors, the fruit from the vines is the source of some of the finest grape conserves in the Greenbrier Valley.
It’s possible to choose vines that will produce a specific kind of shade. Clematis, with its finely divided leaves, provides bright, lacy shade; bushy, solidly leaved English ivy casts a denser shadow. Evergreen species give shade the year around, but in northerly areas, where the sun is especially welcome in winter, many gardeners choose a deciduous variety of vine like wisteria or Virginia creeper so the leaves will drop in the fall and let the warming rays of the sun stream through.
If you need more permanent, year-round shade than that provided by an open or vine-covered framework, you can superimpose narrow boards atop the rafters, spacing them so they will give a pattern of alternating shadow and light. Structures covered in this way are called lath houses, named by some long-ago gardener who discovered that laths, the thin wood strips that were used in plastering walls, could be nailed up in a crosshatched pattern to give plants, and the people working with them, protection from the blistering rays of the sun.
Lath strips are about 3/8 inch thick and 1 1/2 inches wide and are sold in 4-, 6- and 8-foot lengths. They need to be soaked in wood preservative unless you buy more expensive, naturally rot-resistant lath made of redwood or cedar.
---
SHADY TERRACE TOPPING
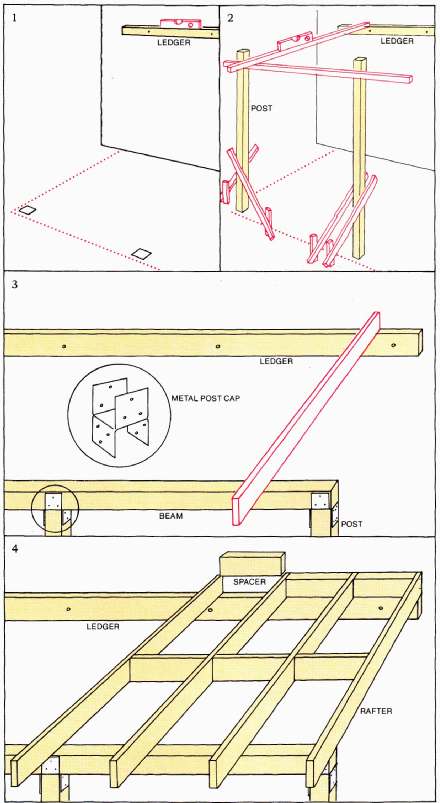
1. To build a lightweight overhead arbor to shade a terrace, first dig postholes and fasten a ledger board to the house. Lay out the desired dimensions on the ground, using the 3-4-5 method to square the corners. Position the ledger with the aid of a carpenter’s level. Attach it to the studs of the house wall with galvanized lag screws or bolts. Dig the postholes, position the posts, then anchor them in place with gravel, soil and a collar of concrete.
2. To trim the top of a post so it will support a beam even with the, top of the ledger, use a carpenter’s level to align a 2-by-4 between the ledger and the post; use the bottom of the 2-by-4 as a guide to position the beam that will span the posts. Pencil a cutting line below the beam. Before sawing the posts, brace them with scrap lumber and make sure that the concrete collars have hardened.
3. Span the posts with a beam running parallel with the house; it will support the outer ends of the rafters. Use metal post caps (inset) to secure the beam, nailing the downturned flaps to the posts and the upturned flaps to the beam. The chart lists safe beam and rafter sizes for various spacings.
4. Toenail rafters to the ledger board and beam, then use shorter lengths of lumber as cross braces to hold the rafters in place. Additional rows of crosspieces can be used to stabilize rafters more than 8 feet long. This is desirable if further shade roofing is to be added ( -- 75) or to make the structure into an eggcrate grid to’ provide more shade.
---
TESTING SHADE PATTERNS
Before you cover a structure with lath, put up several small trial sections, leaving spaces of various widths. Nail the lath strips lightly in position. After a couple of days of observation, you will be able to pick the pattern and spacing that pleases you most. When you have decided on an optimum spacing, cut a spacer board of that width, using it as a guide to line up the laths as you nail each strip permanently in place.
As a labor-saving alternative to laths, some gardeners use inexpensive snow fencing, which is made up of lath-sized pickets held 1 to 2 inches apart by wire strands. Snow fencing is sold in building-supply stores in rolls of 50 or 100 feet and is available in such colors as green, white, red and redwood stain. Other widely used lath-house materials are battens (strips ¼ inch to ½ inch thick and generally 1 to 3 inches wide), grape stakes (2-by-2-inch strips), furring strips (3/4 to 1 inch thick and 2, 3 or 4 inches wide) and larger boards such as 2-by-3s, 3-by-3s or 2-by-4s.
One of the easiest ways to build a lath-house shelter for a terrace is by fabricating modular units in advance. During the winter or periods of bad weather you can build lath-roofing squares in your workshop, nailing lath strips to individual wood frames. When spring comes, you can build a framework of posts, beams and rafters over your terrace, then rest the lath-covered frames on top of supporting strips nailed to the sides of the rafters. With this setup, you can move the modular units around to get any pattern of sun and shade you want, and after the hot-weather season the lath panels can be removed and stored away for the winter.
Another way to gain precise sun control without sacrificing air circulation is to slant closely spaced roof boards over a terrace so that they act as louvers. For example, if you set boards 4 to 8 inches wide on a north-south axis and angle them upward toward the east, they will admit welcome morning sun but give increasing shade in hot afternoons.
There are several materials lighter in weight than laths or boards that are suitable for shading terraces. Woven reed, sold in rolls at shade shops, casts a fine, filmy shadow pattern, is easily stapled in place and is inexpensive enough to be replaced every few years. Woven bamboo and split bamboo, which are made primarily for interior window blinds, are also widely used outdoors to provide a fine, filtered shade.
RAIN-AND-SUN SHELTER
When protection from rain as well as sun is needed, canvas is a very popular roof material. It can be either nailed to a wood frame or lashed to lightweight pipes anchored in concrete. Canvas, which is made of closely woven cotton, has been used for centuries to make tents, tarpaulins and garden pavilions. The most durable modern canvas, vinyl-coated duck, may last 10 or 15 years in a garden if it’s given good care. To prevent mildew, always let a canvas awning dry thoroughly after a rain before folding it. The, main drawback to canvas is that its dense weave blocks air as well as water, permitting uncomfortable heat to build up beneath it. If possible, leave a gap of a few inches between a sloping awning and the house wall to let warm air escape. Some opaque awnings cast such deep shade that few kinds of plants can survive beneath them.
---
QUICK COVERS FOR COOLER ARBORS
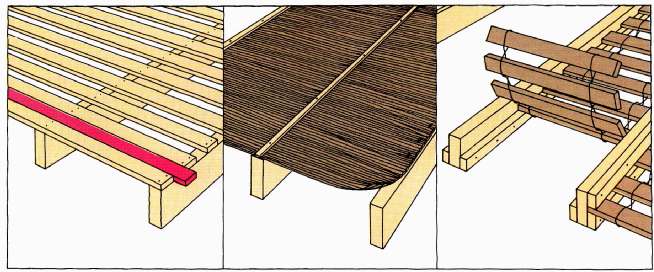
To add a lightweight roof to an overhead structure, nail wooden laths across the top of the rafters. Use a scrap board (red) to space the laths at uniform intervals, depending on the amount of shade desired.
For a roof of matchstick bamboo or woven reed, cut the material to align its edges with the rafters, then staple it on. Furring strips on top, nailed to each rafter, will prevent wind from lifting the roof.
To roof with snow fencing, rest it on inch-square wooden cleats nailed to the sides of the rafters. Cut the fencing to fit before mounting. Secure it by placing other cleats on top and nailing them to the rafters.
---
Many gardeners are taking a cue from nurseries and using shade cloth made of woven plastic, which lets in a lovely, filtered light much like that admitted by woven reed. Shade cloth is easy to handle and light in weight, and it can be stretched taut and tacked to a roof structure. One California gardener covered an entire deck with panels of shade cloth, providing just the right amount of filtered light for his scores of ferns and begonias ( -- 82). Small-mesh insect screening provides the lightest shade of all; it’s useful only where minimal sun protection is sought. It can also, of course, be incorporated into a framework to convert an open terrace structure into a bug-proof screened porch.
PLASTIC-PANEL ROOFING
Overhead panels of translucent fiberglass plastic are a practical and attractive way to shield a terrace from rain as well as sun. They let in a soft, diffused light, are available in many colors, patterns and sizes, and can be bought in kits complete with caulking compound, fasteners and filler strips. Plastic panels are sold in 26 to 40-inch widths in flat, corrugated and square-ribbed profiles. Because clear or lightly tinted plastic panels transmit nearly 90 percent of available light, they have gained popularity in greenhouse construction. The more opaque panels, which may allow as little as 20 per cent of sunlight to pass through, are generally used to reduce the intensity of strong summer sun.
Plastic panels, which can be cut to size with a fine-toothed hand saw, are commonly nailed or screwed to the tops of rafters spaced to accommodate them (2 feet apart for standard 26-inch ribbed or corrugated panels overlapped one rib). For drainage, slant the panels away from the house at a pitch of 1 inch per foot (3 inches per foot in areas that get heavy snow). As with canvas awnings, a narrow ventilation gap should be left between the panels and the house wall to avoid heat build-up.
Ribbed and corrugated plastic panels have great strength; a panel that weighs 5 to 8 ounces per square foot will support 100 pounds per square foot, far more than building codes require. If you object to the corrugated look, which reminds some people of World War II Quonset huts, you can mask the edge with a trim board attached to the framework at a right angle to the plastic, leaving a slight gap between board and plastic to allow for drainage. Flat plastic panels can also be used as roofing. In addition, they can serve as skylights in a solid roof or as rain shields over seating areas in a planted terrace that is otherwise left open to the sky.
Most of the construction techniques and materials used for overhead structures attached to the house can be adapted for building detached arbors, gazebos, storage sheds and work centers. An arbor, an open framework with plants climbing over it, forms a cool, leafy tunnel. Arbors can be as practical as they are romantic. One gardener whose garden is very small makes every inch count; his rose arbor conceals a compost bin and storage area. “ You can’t see the garbage for- the flowers,” he explains. (Vertical latticework that does not extend overhead is called a trellis; an open overhead structure that is built of heavy rafters and beams is called a pergola.)
THE ROMANTIC GAZEBO
A garden shelter that is newly popular after many years of neglect is the gazebo, a roofed, freestanding structure that can range from the simple open platform covered with a canopy to an enclosed playhouse or poolside cabana with facilities for serving meals.
The gazebo is descended from the viewing pavilions of ancient China. Its Western beginnings can be traced to the great walled estates of 16th Century Europe, which were equipped with watch- towers where sentries were regularly posted and the ladies of the manor could safely tarry to contemplate the countryside. Gradually, ground-level versions of these watchtowers began to appear in elaborate gardens as little roofed summerhouses. They eventually became known as gazebos, a combination, some say, of the English “gaze” with the Latin ho, meaning “I shall.” Others hold that the word is a corruption of “gaze about.”
Whatever the name’s origin, gazebos reached their height of fashion in Victorian times. Round, square, hexagonal or octagonal, capped by peaked or onion-shaped roofs, festooned with ornate latticework or wrought-iron filigrees, Victorian gazebos were genteel retreats where proper ladies and gentlemen could savor the wonders of nature as they sipped their tea. Larger versions became focal points in public squares and parks as sitting pavilions, politicians’ platforms and bandstands.
The gazebo’s return to favor may be partly nostalgic, but many gardeners also- realize that a gazebo is a practical way to provide shade where none exists naturally. Because it’s usually situated at some distance from the house, a gazebo can take off on any architectural tangent, from a Victorian bird cage to an Oriental teahouse to a space-age geodesic dome.
MORE SPACE FOR STORAGE
Less romantic but also very practical are structures that are designed to make gardening easier and more enjoyable. Even the gardener who has a good-sized carport or garage finds that it has its limits as a catchall for lawn mower, rakes and shovels, bags of fertilizer, garbage cans, firewood, a potting or workbench and the like. When it becomes so crowded that there is barely room for the family car, it may be time to consider a storage structure designed to fit specific gardening needs.
The simplest utility structure, an enclosure large enough to hide a garbage can and a compost heap, can be built of 2-by-4s and plywood. One Philadelphia gardener has a durable compost bin built of unmortared decorative concrete blocks. The structure also houses firewood and a garbage can.
You can sometimes economize and conceal a storage or utility structure by building it against an existing house wall or a fence. In the latter case, if the hinged doors across the front of the enclosure are of the same board pattern, the structure will appear to be a natural jog in the fence.
---
SETTING SUN LOUVERS
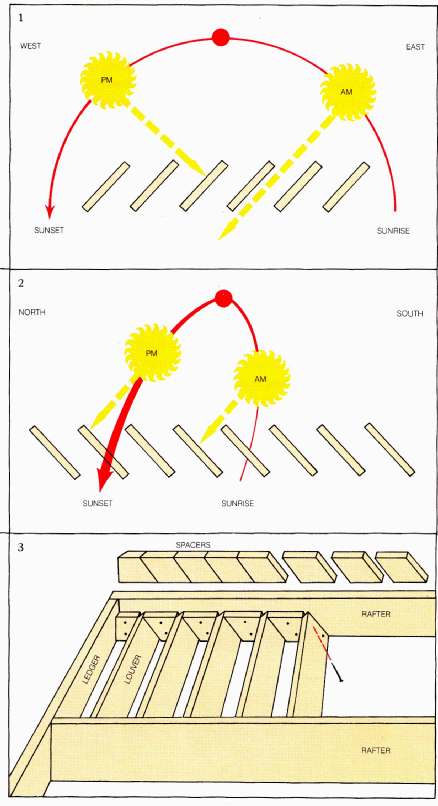
1. When you install permanently fixed louvers on a north-south axis between the rafters of an overhead structure, slant the louvers upward toward the east so their width allows morning sunlight to penetrate but blocks out the hot afternoon glare; if you want shade in the morning and sunlight during the afternoon, reverse the slant of the louvers. Desirable winter sunlight reaches under such shade structures to bring welcome warmth to the terrace.
2. If your louvers run east to west, you probably will want to slant them upward toward the north so their width deflects the hot sun’s rays at midday. Early morning and late afternoon sunlight passes under the edge of the overhead to reach the terrace. However, if you slant the louvers toward the south, the midday sun will also penetrate to some extent. If your terrace does not sit squarely on the compass points, plot its location on paper and sketch in the summer sun’s path overhead; experiment with your diagram until you have determined the best angle for your louvers.
3. When you have selected an angle for your louvers, cut wooden spacers to brace the louvers in the correct positions between the rafters. Nail the first pair of spacers to the rafters. Position a louver against them and toenail it to the rafters, then add the next two spacers. All spacers except those abutting the ledger board on the side of the house will be identical and may be cut from one board. Most louvers are 4 to 6 inches wide and are set up to 4 inches apart; narrower louvers must be positioned closer together to give adequate shade.
---
A GARDEN WORK CENTER
By building a higher, wider shed and adding a workbench, you can convert a storage area into a work space suitable for repotting plants, rooting cuttings, starting seedlings and many other gardening chores. The work surface should be as long as possible, at least 4 feet long and 2 feet wide, and if it’s positioned at a comfortable work height you can use it easily while either standing or sitting on a tall stool. You can build a workbench on its own legs, as a freestanding unit, or hang a sturdy shelf braced with diagonal 2-by-4s from the frame of the structure.
Make the top of your workbench of boards butted tightly together so that spilled soil and small objects like nails and screws don’t fall through the cracks. The space underneath the bench can be organized to provide storage facilities for bulky items: shelves to hold stacks of empty flowerpots and gardener’s flats, containers for frequently used potting materials like topsoil, peat moss, leaf mold and sand ( you can build roll-out boxes or tilt-out bins for these, or you can simply use ordinary galvanized-steel garbage cans). Install some shelves above the work surface to hold smaller cans, bottles and gardener’s tools; these shelves can also serve as convenient display racks for shade-loving potted plants that must be sheltered from direct sunlight. Add one or two lock-up drawers or cupboards for small items and for toxic substances like garden chemicals and wood preservatives that you want to keep out of children’s reach. You may also want to have a durable, quick-draining floor of crushed rock or bricks laid in sand, and a hose connection with a sink for watering flowers and washing pots.
Whatever kind of work-storage area you decide to build, you can design it so that it can be closed during off-seasons against rain or winter snow. Or you can leave it open to the breeze year round, roofing it appropriately to provide just the amount of shade and shelter that you and your favorite plants require.
Articles in this Guide are based on now-classic Time-Life Encyclopedia of Gardening Series from the 1970s ... a timeless series, some titles of which are still available in libraries and bookstores... see our Amazon Store for purchasing options.