The oldest known garden construction plan, intended for the estate of a wealthy Egyptian who lived approximately 3,300 years ago, depicts trellis-lined walks, garden pools and plant beds. History does not record whether the garden was ever actually constructed, but it had much in common with one that was—the great garden that was built in the 17th Century at Versailles, with its tree-lined walks and shimmering fountains.
Through the ages, every great garden, from the storied Hanging Gardens of Babylon to the Butchart Gardens near Victoria, British Columbia, has consisted of more than a collection of plants. Each was integrated with structural elements that not only made the growing of plants more practical but added beauty in their own right. The next time you go for a walk, take a close look at the most successful gardens in your neighborhood. Near or below nearly every outstanding display of plants you will see some sort of structure that enhances it: a neatly raised plant bed to show off prized perennials, a trellis that displays vines and climbing roses, a reflecting pool that magnifies the garden and provides a cool, refreshing touch on hot summer days.
These structures make any garden more pleasant to work in and to savor, and many are within the capabilities of anyone who can stretch a string between two stakes, hammer a nail through two boards or set bricks on a bed of sand.
One Baltimore gardener had long admired the lovely serpentine brick walls that Thomas Jefferson designed for the University of Virginia campus in Charlottesville and for his beloved estate, Monticello. Although the design seems complex enough to challenge an engineer, during several weekends of leisurely work she built a low version of such a wall beside the terrace in her own backyard. “It was my first experience with bricks and ready-mixed mortar,” she told friends who came to admire her handiwork, “but it won’t be my last. It was as satisfying as anything I’ve ever done in the garden— and the wall makes a great background for my begonias.”
Of course, she did not just haphazardly slap down some bricks. She took time to study the kind and amount of materials required for her project, including its shallow foundation, and she drew detailed plans in advance, showing how the wall would be built and how it would fit into the overall scheme of her garden. She knew that the curves would give her wall great stability—enough so she did not need any reinforcing rods—but only if she made the depth of the curves at least half the height of the wall. Such planning is the key to success in building any kind of garden structure, from a simple path to an elaborate arbor.
Without an integrated design, the various elements in a series of projects tend to look unrelated, leaving the impression of a busy living room filled with odds and ends accumulated over many years.
Begin your planning by measuring your garden and mapping it to scale. You can make an accurate map with graph paper, letting each square represent one square foot. Be sure to indicate the lay of the land on your map, since hills and hollows will, to a large extent, determine how much of the work you will be able to do yourself. If you are going to want a masonry wall on a slope that is steeper than 30 per cent, For example, special bracing techniques will be required, and you should anticipate leaving that job in the hands of a professional contractor.
Start with the most urgent projects. If your yard is open to passersby, for example, a privacy screen should get top priority. If wind is the most serious problem, plot a fence to break its force before you proceed to more decorative projects. If insects are abundant, find a place to install a bath to attract more birds. In a small city garden with soil that is compacted or exhausted, your first—and perhaps most practical—course may be simply to cover the area over with decorative stones and do your planting in raised beds filled with a fertile potting mix.
As you decide what structures you want and where they should be placed, use stakes and string or lengths of garden hose to mark tentative locations for terraces, paths, walls and other elements. Once you are satisfied that each structure is in the right position and fits well into the overall plan, measure the locations accurately and add them to your scale drawing.

above: Mongol emperor Babur, who introduced garden construction to India, oversees
the building of his Garden of Fidelity at Kabul in 1508. The Persian
inscription describes the pomegranate trees surrounding the pool.
--
== READING WOOD GRAIN ==
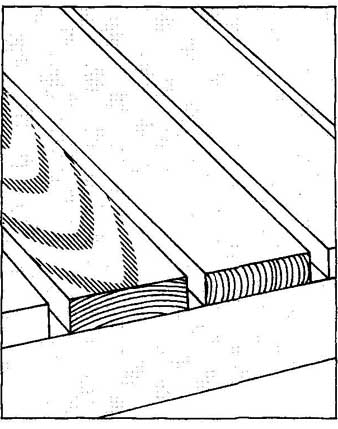
When a Jog is cut into lumber, its growth rings form patterns visible at the end of each board. If these rings, the wood’s grain, parallel the thin edge of a board, the wood is called vertical-grained or quarter sawed; if they parallel the faces the wood is called flat-grained or plain-sawed. Either side can face the weather but flat-grained boards should be positioned so the outer convex ring, which was closest to the tree’s bark, is exposed. This retards splintering, a bothersome problem on benches, railings and decks.
== ==
OUTDOORS, A GRANDER SCALE
Think large instead of small. A common mistake is to size structures in a garden as though they were inside a house. The outdoors demands a larger scale: elements in your garden will be measured against the outer limits of the property in all directions, including adjacent streets, boundary fences or hedges, high tree branches, even clouds and sky.
Furthermore, outdoor activities, informal and frequently energetic, need plenty of room. If you think, for instance, that a 12-by- 12-foot area is about right for a terrace, you probably will enjoy it more if you increase your estimate at the outset and, if you can, make it 14-by-14 or 16-by-16. You can be sure the terrace will be filled all too quickly with furniture, people and plants.
Wherever possible, major walkways should be at least 5 feet wide so two people can walk comfortably abreast rather than Indian file. Garden steps should be generously wide and less steep than indoor stairs. An all-purpose garden bench is typically 6 feet long and 18 inches wide, offering room enough for two people to sit and talk without being crowded or for one person to spread out a few cushions for a sun bath.
UNOBTRUSIVE BACKGROUNDS
Whatever structures you decide to build, keep the design as simple as possible. In a garden, the best-designed elements serve as muted backdrops for plants and people. And the simpler you make something the less it’s likely to cost. A loose-stone terrace of crushed rock or gravel, for instance, can be quite adequate, and you can always cover it later, if you wish, with concrete, tile, stone or brick. Similarly, a simple fence made of boards may provide all the privacy you need at a fraction of the cost and time that would be involved in having a stone wall built.
Before you make final plans, check local zoning and building codes to see if they contain any restrictions that apply to your project. The oldest known codes go back to the ancient Babylonian King Hammurabi, whose laws decreed death for any builder whose house collapsed if someone died in the mishap. Today’s penalties are hardly that harsh, but modern building codes may be just as stringent about certain things you can and cannot do. You should also check your house deed or neighborhood zoning regulations for special restrictions regarding the setback of structures from property lines, the permissible height of walls and fences, perhaps even the materials you may use to build them.
OFFICIAL GUIDANCE
In most communities, you also will need a building permit for any major permanent structure. Your town or county building inspector will tell you what you can legally build and advise you on how to submit plans. Furthermore, his knowledge of building conditions in your community—the composition of the soil, For example, or the depth of winter frost—can be invaluable.
If you plan a fence or wall near or on a common property line, talk it over with your neighbor. Make sure the fence will be as attractive on his side as it’s on yours. You will avoid ill will if you do so, and you may even get him to share the cost.
Before undertaking major work, you may want to consult with professional landscape architects. They have the training, and usually the imagination and taste, to prepare a comprehensive program that you can execute over a period of years if you like. Most landscape architects are willing to confer on an hourly fee basis before making general recommendations.
USING PROFESSIONAL HELP
Once your plans are firm, decide what work you can handle and what should be done by a contractor. Major grading and drainage projects—driveways and large retaining walls, For example—are best left in the hands of professionals who have the necessary heavy equipment. On some jobs, though, you can have a contractor do the heavy part of the work, then do the lighter but more time-consuming part yourself. For instance, you could hire a concrete specialist to dig holes and pour footings for a sizable deck, then complete above- ground work at your convenience.
If you have had little building experience, try small projects first. You can build a wooden plant container, a window box or a bird house indoors on winter evenings or rainy Sundays, using these projects to develop your skills for larger outdoor jobs that you can tackle when the weather is right.
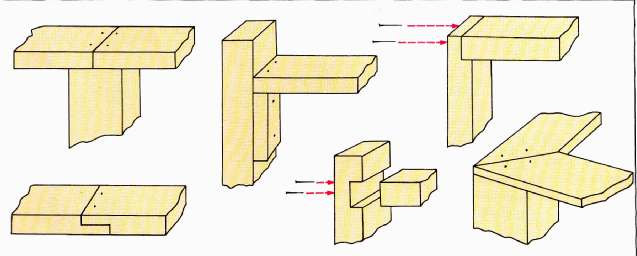
==USING PROFESSIONAL HELP SIX WAYS TO JOIN BOARDS==
10---
Two boards, butted end-to-end and nailed to a supporting upright (top), form a basic, utilitarian joint. Matching notches cut in two boards and glued and nailed together (bottom) form a stronger joint that sheds water.
Glue and nail a block to the face of an upright to support a horizontal piece (top). For a stronger joint, saw and chisel a notch into the upright (bottom) and glue and nail the end of the horizontal board into it.
To join two boards at right angles, notch one to the thickness of the other; glue and nail them together (top). For a miter joint atop an upright, saw the two horizontal pieces at 450 angles and nail in place (bottom).
==
Whether you handle a garden construction project yourself or hire someone to build it, you need to be familiar with the advantages and limitations of materials that might be used. Choose materials that are appropriate for the job, that will blend comfortably with your house and garden, that will stand up under local weather for many years, that are available at a reasonable cost and that are not difficult to work with.
The encyclopedia of construction materials -- presenter later -- will help you choose those materials that are best for your project. But compare available materials and costs by visiting a number of suppliers: lumber and building-supply companies, nurseries and garden centers, masonry-product yards, even wrecking company salvage yards where you may find bargains in used materials. One Cleveland handyman, with the help of a few friends armed with crowbars, was able to salvage a large old storage shed near his home. The wood had weathered beautifully to a silvery-gray patina; it was well worth hours of pulling old nails to make the old lumber usable. The fence that the gardener and his friends built from the old boards blended serenely into the background and looked as though it had enclosed his garden for generations.
Most building materials are cheaper if you haul them home yourself. If you are buying large amounts of lumber or a heavy material like flagstone, balance the cost of delivery against that of renting a truck or trailer for the day. If you do have the materials delivered, have them unloaded as close as possible to your work site. Flagstones, concrete blocks, bricks and other heavy materials should be stacked neatly to prevent breakage.
HEAVY LOADS TO LIFT
When you choose materials, consider what you and your helpers can reasonably accomplish without undue strain. A brick weighs about 4 pounds, but a concrete block weighs about 40 or 50 pounds, a 1-cubic-foot sack of cement weighs 94 pounds, and a sizable flagstone (thick enough to be used in a terrace laid on sand) can weigh more than 100 pounds—enough to give someone unaccustomed to handling them a serious injury. When you lift a heavy object, keep your back as straight as possible, flexing your knees and using the large leg muscles to take the brunt of the load. For moving loads of materials, a well-balanced utility cart with two rubber-tired wheels is easier to handle, has greater capacity and is less likely to tip than an ordinary wheelbarrow.
Of all garden building materials, wood is the most widely used. It’s suitable for everything from edging strips to decks. It’s very much at home among growing plants, and is relatively light in weight and easy to handle. Wood is classified as either hardwood or soft-wood. Hardwoods such as oak, maple and walnut are generally used indoors; they are too expensive for most garden construction. The mainstays of garden construction are softwoods such as hemlock, fir, spruce, pine, redwood, cedar and cypress. These softwoods, from cone-bearing, needle-leaved trees, are easier to cut as well as less expensive than hardwoods.
HOW WOOD IS GRADED
Softwoods are graded by quality. The designations of quality may vary depending on where you live in the United States or Canada. Boards marked Select A or B, or B and Better, or First and Second Quality, or No. 1 and 2 Clear are nearly flawless—and too good for anything but fine cabinet work. Even lumber that is marked Select C and D, with small imperfections, is better than a garden builder needs. Most garden projects can be built with lumber that is graded No. 1 Common through No. 4 Common. No. 5 Common, which may have large holes, splits and other defects, has some limited uses, such as in subflooring and for temporary bracing.
Load-bearing structural lumber is graded by strength. It’s best to use Construction or Standard grades for framing. Use Utility and Economy grades only for temporary bracing or concrete forms.
Redwood is naturally insect- and rot-resistant; it’s widely used for outdoor decks, benches, fences and siding. It has a special grading system based not only on imperfections but also on the amount of heartwood a piece of lumber contains. The heartwood, from the center of a tree, is a rich red or cinnamon color, in contrast to the yellow or cream-colored sapwood from the outer trunk. Heartwood contains more of the natural chemicals that resist decay. The top grades of redwood are too luxurious for most garden uses; garden grades are Construction Heart and Construction Common. The most economical grade, Merchantable, can be used judiciously for rustic fencing and other rough construction.
WEEDING OUT THE DEFECTS
When you buy lumber, inspect each piece. Avoid boards with especially large or loose knots, splits and rough or damaged edges. Lay long boards on the floor or some other flat surface to check against warping. If you should find a warped board in your order, you may be able to straighten it by wetting the board, placing it on a pair of supports and weighting it in the middle for several days. You can also glue loose knots in place. But, within the limitations of the grade of lumber you are buying, it’s better to avoid major imperfections in the first place.
Boards are sold in 2-foot increments, from 8 to 20 feet long.
The thickness and width of a board are given in the dimensions it had when it was rough-cut from the tree; these dimensions are referred to as “nominal” sizes. However, except for lumber that has been left rough for rustic applications, the wood you purchase will have been smoothed on all sides and stamped “S4S” for “surfaced four sides.” In the surfacing process, the measurements of the board are reduced by the amount of rough wood removed; the piece also shrinks as it dries. Thus, the common 2-by-4 actually measures 1½ by 3½ inches. For a table comparing nominal and actual lumber sizes.
Most retail yards sell lumber by the linear foot, but the basis for pricing is the board foot, a unit 1 foot long, 1 nominal foot wide and 1 nominal inch thick. To find the number of board feet in a piece of wood, multiply its nominal thickness in inches by its nominal width in inches by its actual length in feet, then divide by 12. A 2-by-10 that is 6 feet long, for example, contains 2 times 10 times 6, or 120 divided by 12, or 10 board feet. If you buy a lot of lumber the yard may give you a quote “per thousand,” which will be a slightly lower price based on the cost of 1,000 board feet.
FROM LATHS TO TIMBERS
In addition to boards—lumber with a nominal thickness less than 2 inches—wood comes in larger pieces, called dimensional lumber (2 to 5 inches thick) and timbers (5 or more inches in width and thickness). It also comes in smaller pieces called strips, including laths, battens and grape stakes. These latter pieces are useful for light fencing, trellises and arbors, where narrow, spaced members are desired for an airy effect.
=== STRAIGHTENING A WARPED BOARD FROM LATHS TO TIMBERS ===

If you have a board that is bowed but not cupped or twisted (top), you can reduce the warp enough to make it usable in a fence or deck. First dampen the warp with water to make it more flexible. Prop the ends of the board, with the warped side up, on wood scraps or bricks and center a cinder block or other heavy weight on the bow (bottom). Keep the underside damp; in a few days the warp will relax enough so the board can be used in your project.
=== ===
One of the most popular of building materials is plywood, those panels made from thin plies of wood that are glued together with the grains running in alternate directions to give strength and stability. Most common plywoods are made from softwoods like fir, spruce, lauan or pine; they are graded by the quality of the outer plies. A panel stamped “A-C,” for example, is top quality on the front, a lower quality, with knots and patches, on the back. Interior plywood should be used only indoors; exterior plywoods are required for garden construction because their plies have been joined with waterproof glue so the panels can stand up to the weather once they are treated to protect the wood. Exterior plywood comes in standard 4-by-8-foot panels that range from one quarter to three quarters of an inch in thickness. For a garden shelter or fence where a decorative appearance is desirable, plywood is available prefinished in a grooved pattern that resembles planking.
NATURAL ROT RESISTANCE
In almost all garden construction, some pieces of wood will be exposed to moisture, alternate freezing and thawing, and attack by insects and the organisms that cause rot. The kind of wood you choose for your projects should depend on the severity of these conditions. Many professionals prefer to use redwood because of its natural rot-resistance; cedar and cypress are popular for the same reason. These woods can be left unfinished and in time will weather to a silvery gray, or they can be finished with a pigmented stain that will enhance the natural color and grain. The use of a clear water repellent intended for outdoor use will give adequate protection against discoloration without changing the color of the wood. But varnish and similar clear film finishes are generally unsuitable for outdoor use; varnish in particular may turn yellow and crack if it’s exposed to moisture and sun.
CHOOSING A PRESERVATIVE
Less rot-resistant—but also less expensive—are such softwoods as fir, spruce and pine. They can be used in a garden if they are protected with a wood preservative. Creosote, the oldest preservative on the market, is effective but messy to work with, leaving a black, oily, unpaintable residue that is toxic to plants and animals. So creosote should be used only below ground and several feet away from plants. Many newer preservatives contain pentachlorophenol; they leave a light, paintable residue, but they may also poison plants. Wood that is treated with pentachlorophenol should be allowed to dry at least a week before being used near plants. The safest wood preservatives to use in the garden are products with a copper base, such as copper naphthenate or copper sulfate. They can be bought in clear form or as colored stains, or they can be covered with stain or paint after drying.
Any preservative must penetrate well into the wood to ensure its effectiveness. Fence posts, plant-bed edgings and other wood that will be in contact with the soil or exposed to severe weather should be placed directly in the preservative. After such pieces have been cut to size, stand them in large cans of preservative long enough to protect the vulnerable end grain. Even more effective protection is available in lumber that has been pressure-treated with a preservative at a factory. Such wood can be bought as boards, structural members, plywood and timbers called landscape ties. Similar to railroad ties, landscape ties can be used to build steps, retaining walls and raised plant beds. Clean, nontoxic and odor-free, pressure-treated wood can be used in the garden with no additional preservative. Its pale greenish hue will eventually weather to gray, or it can be painted or stained. Test stakes of pressure-treated wood have shown no significant deterioration after more than a quarter of a century in the ground.
RUSTPROOF HARDWARE
Your handiwork will be spoiled, no matter what kind of wood you use, if you choose hardware that leaves streaks of rust. If appearance is important, use nails, bolts and hinges made of an aluminum alloy, brass or stainless steel. For less demanding projects, galvanized fasteners are adequate.
As a general rule, a nail should be three times as long as the thickness of the wood it holds, so that two thirds of the nail penetrates the backup piece. When a nail that long is impractical, one that is driven 1½ inches into supporting wood will usually hold. If a nail penetrates the backup piece, bend the point over flush with the wood; the resulting connection will be very strong, even if it does not look very professional. Neater solutions are to use a shorter nail driven in at an angle for greater holding power or to use the kind of nails with rings or threads around their shanks or with a rosin coating designed to give them a strong grip. Nails that are driven parallel with the wood grain, that is, into the end of a piece of lumber, have little holding power; if you cannot avoid such joints use the longest possible nails.
== A PENETRATING SOAK TO WARD OFF ROT ==
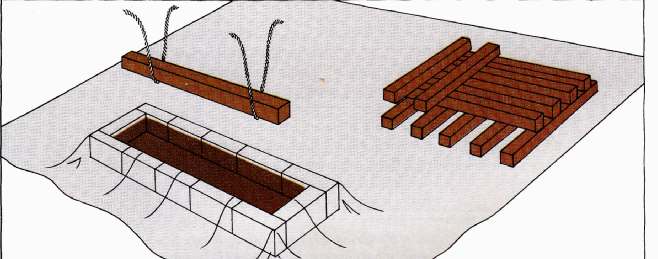
A soaking trough, built on bare ground with cinder-block walls and lined with several sheets of polyethylene plastic, makes a temporary vat for treating lumber with wood preservative. Additional large sheets of plastic nearby will provide a place to stack treated boards. Wearing rubber gloves, fill the trough with a copper-based wood preservative that is not toxic to plants. Use ropes as slings to lower boards into the liquid. Leave the boards submerged for a day, then lift them out, stack them in alternating rows (right) and let them dry for at least two days. Save leftover preservative for reuse.
== ==
HOW TO PREVENT SPLITS
A row of nails driven in a straight line may split a board. To avoid this, stagger the nails so that they don’t line up along the grain. You can also forestall splitting by blunting the points of the nails, giving each a tap or two with a hammer. The blunt point shears the wood fibers instead of wedging them apart. An even more effective method is to drill pilot holes of a slightly smaller diameter than that of the nails.
For joints that must bear heavy loads, such as those in supporting railings and decks, use fasteners with more holding power than nails—galvanized wood screws for smaller pieces, lag screws or bolts for larger ones. Plant containers that will hold heavy loads of wet soil may require joints that are glued before they are screwed together.
=== SNUG HOUSE FOR BLUEBIRDS ===
The panels for a bluebird house can be Cut from 3/4-inch exterior-grade plywood or from weather-resistant redwood. Cut the tops of the side walls at an angle of about 60-dregrees so the roof will shed water. For ventilation, make the front panel ½ inch shorter than the sides, and trim off the corners of the bottom piece to allow drainage. Drill two screw-mounting holes in the back panel, and use a 1½-inch bit to cut the bluebird entry hole.
Assemble the birdhouse panels with eightpenny coated nails. Attach the front with nail pivots through the sides; secure it to the floor with an eye screw. Mount the house 8 feet from the ground, facing away from the wind.
== ==
For this, use a waterproof adhesive such as epoxy resin, acrylic or resorcinol resin.
AVOIDING ACCIDENTS
Most garden projects can be built with only the tools most homeowners already have. If you need certain specialized tools, you usually can save money by renting them for a few days. But whether you are using a rented concrete mixer or a claw hammer to pull out a nail, the following common-sense rules will make your work easier and safer:
• Don’t stuff pointed tools or sharp nails into a pocket. Carry them in a tool belt or in a carpenter’s apron.
• Check metal-headed tools such as hammers and files to be sure the heads are firmly attached to the handles.
• Keep cutting tools such as saws and chisels sharp and clean. Dull edges slow the work and can slip easily because extra pressure has to be applied to them.
• Don’t wear loose sleeves, shirttails, neckties or jewelry when you are working with tools. They get in the way, and they can be caught in power tools. If you have long hair, tie it back out of the way or tuck it under a hat.
• When you use any power tool, be sure the cord is kept well away from the cutting blade or drill bit. Many craftsmen drape the cord over their shoulders so they have no doubt where it is. Don’t carry a power tool by its cord; be sure to disconnect the tool from its power source when you change bits or blades.
• Don’t use a power tool where the earth or other surface is wet or where the light is poor.
• Don’t force a power tool. It will perform better and more safely at the speed and pressure for which it was designed.
• Always wear wrap-around plastic safety glasses or goggles when you are using a power saw and when you are drilling, hammering or cutting masonry.
• Finally, don’t hesitate to use special equipment or clothing to make the job safer and more comfortable: heavy work gloves to protect your hands when you are using rough materials; earplugs or clamp-on ear protectors if you are working with a noisy machine; a respirator or filter mask if you are spray painting or using a power tool that produces a lot of dust.
It’s also a good idea to wear strap-on rubber kneepads when you lay brick or trowel concrete. After all, building your own terrace, path or planting bed is going to be more work than recreation if you wind up with sore knees, cut fingers or an aching back. In garden construction, as in gardening, it’s possible to enjoy the work as well as the results.
Articles in this Guide are based on now-classic Time-Life Encyclopedia of Gardening Series from the 1970s ... a timeless series, some titles of which are still available in libraries and bookstores... see our Amazon Store for purchasing options.