Attics are typically insulated first, and they usually receive the most insulation. People usually assume that attics are insulated because ‘‘heat rises” -- but heat doesn’t actually rise at all. The reason attics tend to get more insulation is much less glamorous: The attic is simply the cheapest and easiest place to add insulation, in both old and new houses. In fact, in a moderately insulated two—story house, there may be two to five times is much conductive heat loss (not including air leakage or windows) through the exterior walls as through the attic.
True to tradition, well start with attic insulation because it’s the easiest job. Hopefully you have already finished air-sealing up there. If not, do it now because it is much more difficult to air-seal after you insulate. Also, if you intend to vent a bath fan, install a ventilation system, change any electrical wiring, or do any other work in the attic, now is the time.
How much insulation?
Insulation is measured in R-value; the higher the R-value, the less heat loss. To some extent, there is an effect of diminishing returns in that the first 6 in. of insulation will save you more money than the next 6 in. But it doesn’t pay to skimp, either. Once you’re up in the attic installing insulation, you might as well do it right. General the minimum recommended R-value for an attic is R-38 (see the chart). In cold northern climates, aim for between R-50 and R-60.
Estimating how many fiberglass batts to buy for a job is pretty easy, because each roll or bundle is marked for the number of sq. feet it covers. Cellulose is a little trickier -- you need to consult the tables found on the bags of material. Always go by the bag count, not the inches of thickness, to figure the amount in of material and the actual R-value you’re adding to your attic.
Prepping for insulation
Many building codes require attic venting. Experience has shown that, in most eases, attic vents are not critical, but they are good backup if you can’t do a complete air-sealing job. If the attic doesn’t have any ventilation, try to put 50% to 80% of the total required ventilation area up high -- in the ridge, gable, or roof vents. The remainder should he down low, usually in the soffit.
In general, I avoid adding ridge vents and 16 inch aluminum soffit louvers because the are ugly; continuous ridge or soffit vents that are installed during a re-roofing or soffit replacement job tend to look much better. Roof vents placed near the peak on the rear of the house are inconspicuous, and the can even provide access to attics that have no scuttle.
Whether or not one installs attic ventilation, take some time baffling the eaves area before installing insulation. The idea is to allow an airspace between the insulation and the roof sheathing. The most common approach is to use standard foam or plastic ventilation chutes held in place with a wad of fiberglass. Make sure the fiberglass extends to the outside edge oldie top plate so that you can get as much insulation as possible in that vulnerable area. Cardboard baffles also work well. The top of the baffle should be several inches above the height of the planned insulation, at a minimum.
In addition to the eaves area prep, flag each electrical junction box with a piece of ribbon or caution tape stapled to a rafter above and hanging down to identify it once its buried. Make sure that every electrical box has a proper cover on it and that the wires are properly clamped.
You will need to find a way to keep blown insulation at least 3 in. away from chimneys (use fiberglass batts) and don’t cover combustion air intakes or recessed light fixtures that are not IC rated. And whatever you do, don’t insulate over old-fashioned live knob-and-tube wiring. In some cases, that kind of wiring is is already be deactivated: if you are not sure, you’ll need to hire an electrician to check it.
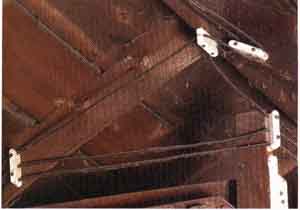
Image: If you have an older house with knob-and-tube wiring that looks like this, the wiring must be replaced before you insulate the attic or wall areas. To make sure there’s no active knob-and- tube wiring hidden in wail cavities, you may want to hire an electrician to verify that it’s inactive.
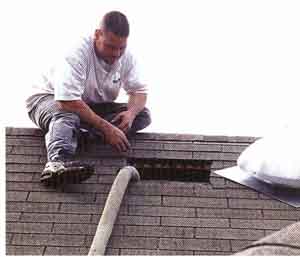
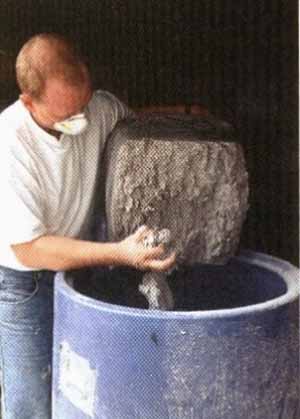
Image: If there’s no access into the attic, you can cut an
opening for a roof vent. Climb in and insulate, then install the vent to cover
the hole.
TIP: Radiant barriers and reflective roof coatings are not enough to reduce cooling loads. Adequate roof insulation is important in both warm and cold climates.
WHAT CAN GO WRONG: Don’t assume that attic insulation is optional lust because you live in a warm climate. Attic and roof spaces heat up significantly in the sun and transfer heat to the living space below; insulation helps slow this heat transfer.
IN DETAIL: If you want to add attic venting (or your local building inspector requires it), here’s how:
Calculate the square footage of your attic or roof space, then divide it by 300 to get how much net-free vent area is required. For example, if your attic is 1,200 sq. ft., you need 4 sq. ft. of net-free vent area. Most manufacturers specify the net area for their vents, but if you can’t find that information, assume that it’s half of the over all vent area (because of the screen and louvers). Thus a 12-in-by-18-in, gable vent, which is 1.5 gross sq. ft., has about 3/4 sq. ft. net-free vent area. Don’t even bother with the small round “pop” vents— they aren’t really effective.
According to Code: Most codes require passive attic venting to reduce condensation, but building scientists have found that a combination of air-sealing and indoor humidity control is the most important measure for preventing moisture damage. Attic ventilation is good: It helps the roof dry out when it gets wet. However, I would rather have a good air-sealing job and a mechanical ventilation system in the house, without attic vents, than a well-vented attic without a good air barrier. So, install roof ventilation if you can, but always concentrate on air-sealing the attic first.
R-Values of Insulation Materials (table)
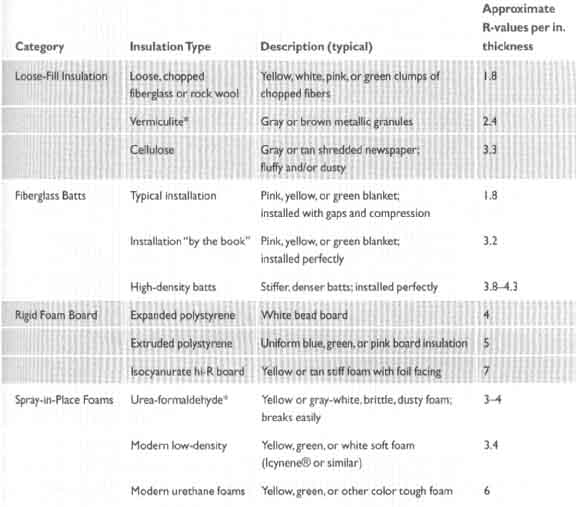
Different materials have different R-values per inch. To find out how much R-value your insulation materials have, multiply the values in the table by the average number of inches of material. Notice that fiberglass batt performance degrades significantly with the gaps and compression found in a typical installation. To obtain fiberglass’s high-density value, it must be installed perfectly, or ‘by the book?’
Category: Loose-Pill Insulation; Fiberglass Batts; Rigid Foam Board; Spray-in-Place Foams
Insulation Type: Loose chopped fiberglass or rock wool; Vermiculite; Cellulose; Typical installation
Installation ‘by the book”; High-density bans; Expanded polystyrene; Extruded polystyrene; Isocyanurate hi-R board; Urea-formaldehyde; Modern low-density; Modern urethane foams
Description (typical): Yellow white pink or teen clumps of chopped fibers; Gray or brown metallic granules; Gray or can shredded newspaper; fluffy and/or dusty; Pink, yellow. or green blanket; installed with gaps and compression; Rink, yellow, or green blanket installed perfectly; Stiffer, denser bans; installed perfectly; White bead board; Uniform blue, green, or pink board insulation
Yellow or tan stiff foam with foil facing; Yellow or gray-white, brittle, dusty foam; breaks easily
Yellow, green, or white soft foam (Icynene or similar); Yellow, green, or other color tough foam.
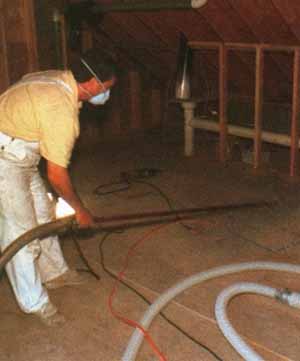
TIP: When insulating an attic, always wear a dust mask or respirator, as well as protective clothing.
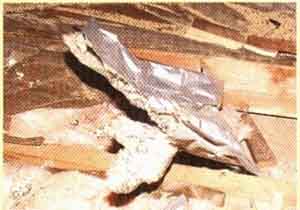
Image: At some point, 3 1/2-in-thick R-11 batts were added to the original
insulation, unfortunately with the vapor barrier facing the wrong way-Blowing
at least 14 in. of cellulose on top will add adequate insulation, ensuring
that the vapor barrier stays warm enough so that it won’t need to be flipped
upside down.

Image: Standard foam vent chutes can be held in place with fiberglass batts
and pushed in tightly to cut down on wind washing.
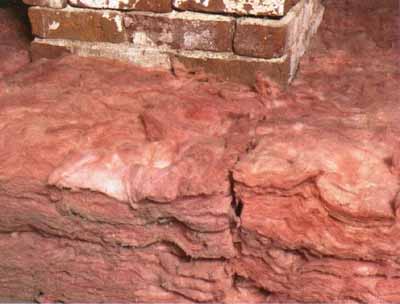
WHAT CAN GO WRONG: Poorly installed fiberglass batts, like the ones shown above, can lead to serious performance problems. Research and experience have shown that gaps between batts may eat up anywhere from 25% to 75% of the rated R value, depending on the thick ness of the batt, the size and number of the gaps, and the difference in temperature between indoors and out.
Estimating Cellulose
To determine how much insulation you need, measure the approximate thickness of any existing insulation, then multiply that by its R-value per inch (see the chart). For example, you already have 4 in. of blown-in fiberglass, you have an existing k-value of about 7. To reach k-So, you need to add R-43; 43/3.3 = approximately 13 in. of cellulose.
Cellulose is usually packaged in bags of 12 or 25 lb. After determining your target k-value, measure the square footage of the area you wish to cover. Each manufacturer provides information on the bag describing how much insulation to use for a desired k-value. In some cases, that information may be indicated by the number of square feet that a bag covers at a given k-value, which case you lust need to divide your total square feet by that number to purchase the correct number of bags.
Don’t worry about cellulose losing k-value over time as it settles. For one thing, settled material is denser and has a higher k-value per inch, so settling generally does not decrease the insulation’s performance. Second, most settling tends to occur in the first year or two after installation, and -- unlike corn flakes in a box -- once the material has reached its settled density, it cannot settle further unless it’s physically com pressed. The amount of air running through the hose with the material does have a big effect on its initial thickness, so pay more attention to the bag count than the depth of the installed cellulose, whether you are doing the job yourself or hiring a contractor.
HINT: Thee chart printed on a cellulose bag shows how many bags of material are needed per 1000 sq. ft. for a range of desired k-values.
Hazards of Insulation Materials
Some older insulation materials are hazardous, but few pose significant danger if they are isolated from the living space—another argument for thorough air- sealing. Asbestos is clearly a hazardous material; even moderate levels of exposure can cause lung cancer and other diseases, and it should never be moved or disturbed except by a properly licensed asbestos-remediation contractor. Commonly found as insulation on pipes and ducts, asbestos is rare in attics. Some types of vermiculite, added as insulation in attics and walls in the ‘60s, ‘70s, and ‘80s, contain traces of asbestos. When I find vermiculite, I leave it in place. Insulating over it is fine, but definitely wear a HEPA respirator, which I recommend for anyone working in any attic.
Urea-formaldehyde foam insulation (UFFI) is a spray foam that was retrofitted in houses prior to l980.This material was banned because of potentially toxic formaldehyde gas emissions, but gas emissions fade with time, so any UFFI that is still around is unlikely to be hazardous. If you find UFFI, be cautious, because it is likely to be fragile and may turn to a powdery dust if disturbed.
Modern insulation materials, including spray foams, fiberglass, and cellulose, are much safer but still involve some risk. Although fiberglass fibers are definitely an irritant to the skin, no increased risk of cancer has been found even at occupational exposures. Cellulose is a respiratory irritant, due to the fire-retardant chemical treatments, and produces lots of dust during installation, but it is not dangerous once it has been installed.
Vermiculite insulation is grainy, not fluffy or fibrous. Although some vermiculite contains asbestos, don’t try to remove it -- it is more dangerous when disturbed than left in place.
Fiberglass attic insulation
I generally prefer to use cellulose insulation wherever possible, but if you have trouble finding a machine, or if you have only a small area to insulate, fiberglass may be the best choice. If there is little or no insulation between the ceiling joists, start by installing a batt that will come up at least to the top of the joists. Use unfaced batts in the attic and make sure you buy batts that are the same width as the spacing of the ceiling joists.
There are three important things to be aware of when installing fiberglass. First, a new bundle or roll of fiberglass is highly compressed, and it must be fluffed to the full thickness listed on the package. Second, it must be fit neatly between the joists and come in full contact with the ceiling, with no compression, binding, or rounding of the corners. Finally, it must be cut neatly to fit around any obstructions, such as wiring, plumbing, blocking in between the joists, or other objects. Anything that compromises the installation can have a serious effect on the insulation’s performance.
Choose the first layer of batts so the top of the insulation is up to—or slightly above—joist level. Then install a second layer on top, at right angles to the first layer. Buy 24-in.-wide batts for that layer, regardless of the joist spacing. Again, make sure each batt is fluffed to its full thickness, and lay each one snugly against the next.
Don’t be satisfied with 12-in.-thick batts laid in a single layer in between the joists—the gaps that are left between the batts will really hurt the over all performance of your attic’s insulation. You may need to notch the batts at the edges near the rafters, or tuck in short pieces, to bring the insulation to its full thickness as close as possible to the roof sheathing and still leave a 1-in. space between the insulation and the sheathing.
Fiberglass Batts
Fiberglass bans are typically the insulation of choice for do-it-yourselfers. The material is easy to transport and install by yourself. It’s ideal for an attic where you may want to add living space later (or make other changes), because it is easy to remove and replace. But there is a price to pay for convenience. In my experience, no matter how carefully you detail fiberglass bans, they never work as well as the factory ratings suggest. After three winters in the house I built, I pulled out the fiberglass insulation that I had carefully installed in the attic and replaced it with cellulose: the dramatic improvement surprised even me.
Because of the annoying, itchy quality of fiberglass, and the possible danger from inhaling glass fibers, several manufacturers market encapsulated batts that have plastic or other material surrounding the fiberglass. Steer clear of these products; they are more of a marketing gimmick than a worthwhile innovation. Encapsulated bans are more expensive and harder to install properly. Although the coverings may make the material more comfortable to work with, they also increase the difficulty of detailing the bans properly.
TIP: If your roof is made with trusses, your best bet is
to use a loose-fill material, such as cellulose.
TRADE SECRET: No matter which type of machine you use to blow cellulose, it’s important to break up the material as much as possible when pulling it out of the bag. This helps prevent clogging in the hose, which is frustrating and time-consuming. And for safety’s sake, never reach down into the hopper while the machine is running. The person handling the machine should always unplug the power line if it’s necessary to clear a clog.
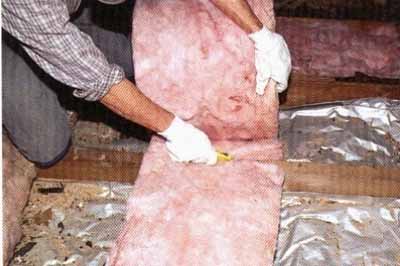
To cut a fiberglass batt to length, compress it with a ruler and
cut it with a sharp utility knife. It’s best to cut it about ½ in. longer than
you need, so that it will fit snugly.
The second layer of insulation should be fluffed to its full thickness,
laid across all the joists at right angles, and be installed neatly and completely.
Blowing attic insulation
If your roof is made with trusses, or the attic has flooring with little or no insulation under it, you’ll never get great results with fiberglass. In those cases, your best bet is to use a loose-fill material, such as cellulose. One big advantage of blown cellulose (besides the fact that it works better) is that it is fast and easy to install. You don’t have to worry about cutting, fitting, fluffing, or most of the other details that concern fiberglass batts. You can also cover the top of existing fiberglass batts with cellulose, which will settle into all the gaps and defects between the batts. This improves what’s already there and adds R-value.
The biggest drawback with blown insulation is that you need a machine and a helper to install it. Many building—material suppliers that sell bagged cellulose will lend or rent a machine to anyone who buys the insulation from them. A local rental yard, or even a friendly local insulation contractor, may rent out a cellulose machine (you’ll have to find the helper yourself).
When installing cellulose, you must do the same prep work as for fiberglass. In addition, get enough fiberglass batts to make a dam around chimneys and recessed lights to keep the cellulose away from them. Even with IC-rated recessed lights, I prefer to surround and cover them with fiberglass before installing the cellulose. Keep the batts at least 3 in. away from non-IC-rated fixtures. Also, make a dam around the attic hatch so cellulose doesn’t fall out when you open the door.
It’s important to keep cellulose away from chimneys, recessed
lights, and attic hatches.
The easiest way is to make a dam with fiberglass batts.
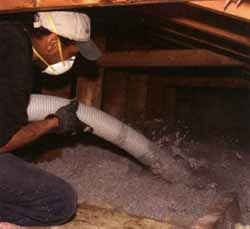
Keep the end of the hose low and pointed slightly down to reduce dust levels and keep the cellulose density high, especially near the eaves.
Set up the blowing machine in a convenient place, and snake the flexible hose and control cable into the attic. You may want to run them through a second-story window or an attic window or temporarily remove an attic gable vent. Have an assistant ready, put on protective gear, and position yourself in one corner of the attic area. Turn on the switch, and the material should start to flow within a few seconds. Start in one corner, allow the material to build to the thickness you want, then pull back the hose as you start to fill in the area.
The object is to get the insulation fairly even and avoid spraying too much into the air. You can turn off the switch occasionally to take a break, then move yourself and the hose to another area. Use a tape measure occasionally to check the thickness of the insulation, and aim for about 2 in. more total depth than the actual depth you want to end up with (to allow for settling).
When you are blowing near the eaves, push the end of the hose nearly all the way into the baffle, and fill the space between the rafters to the desired thickness. Pushing the hose deep inside helps ensure that the cellulose will be packed tightly in those critical areas. Slowly pull back the hose from the roof, being careful not to cover the upper end of the vent chute.
Start with five or six rafter bays at a time, then work your way across the attic toward the opposite eave, leaving space for yourself to get into the eaves area on the other side. Work your way back toward the attic hatch or access door, then start at the other end of the attic and work your way back toward the hatch. Make sure you don’t “paint” yourself into a corner—it’s not fun crawling through 12 in. to 18 in. of this stuff after it’s installed.
---
Cellulose Blowing Machines
Cellulose machines range in size from a box slightly bigger than a milk crate with a hopper to a large truck- mounted rig. All of them have some type of agitator to break up the material and a blower to separate the fibers, mix them with air, and send them through a hose. Most machines have a cable with an on/off switch, allowing them to be con trolled remotely, where the work is being done. Most machines also allow you to control the fiber-and-air mixture, either by adjusting a gate to control the rate of material fed through the hose or by adjusting an air inlet to introduce a variable amount of air. For open-attic blowing, set it for more material and less air. The job will go faster, and the material won’t settle as much after you’re done.
Of course, not all cellulose machines are created equal. The smaller machines are perfectly good for open attics, though they are slower. But they lack the air pressure to dense-pack closed cavities. The key for doing that is to select a machine that can supply adequate air pressure, but the easiest thing to look for is a machine that requires at least two separate electrical circuits (or a single 220-volt circuit) to run. If you plan to dense-pack cellulose, stay away from a machine that can run off a single 15- or 20-amp, 110-volt circuit.
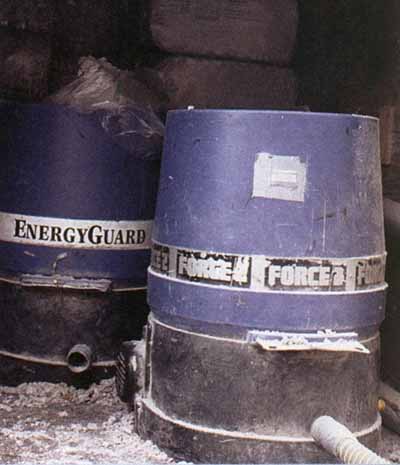
This medium-sized cellulose blower is typical of the type of
machine that you might rent or borrow from an insulation supplier.
---
Tip: The flame-retardant chemicals used to treat cellulose tend to discourage insects and rodents from nesting in it.
If your attic is floored, you must fill the space under the flooring, unless that space has already been well insulated. With a plank floor, it’s much easier to rip up a row or two of boards along the length of the attic than to blow insulation under the floor with a fill tube. A plywood floor is more difficult, you can either rip up an entire row of plywood sheets or, if that’s too much trouble, use a hole saw to drill a 3-in.-dia. hole in each joist bay, then insulate with a fill tube. Once the cavities are full, apply more cellulose on top until you have the R-value you want.
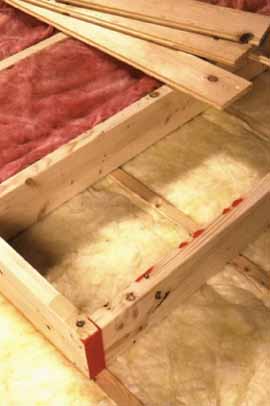
Raising a floor deck above the existing framing is the best
way to create storage space in the attic without compromising insulation
levels.
Storage areas
People often use attics for storage. My first advice is to eliminate attic storage, if possible. There are plenty of good reasons to get rid of stuff (both thermal and psychological). Still, many homes lack storage space, and the attic is a natural place for those boxes of holiday decorations. If you have a partially or fully floored attic, you can set aside an area near the access hatch or stairs by making a dam out of 12-in.-thick fiberglass batts. Insulate the rest of the attic, making sure there is insulation under the floorboards as well. Once the dust has settled, you should be able to move stuff in and out without disturbing the insulation.
Even better, you can create storage with the full insulation thickness by building a raised floor deck. Run 2x6 or 2x8 joists perpendicular to the ceiling joists at 16 in. o.c. Nail a header joist across each end to hold them vertically, insulate the cavities, and cover them with planks of ½-in. plywood. You will lose some headroom, but this way you can reserve as large an area as you like for storage without compromising the insulation job.
With either approach, be cautious about the amount of weight the ceiling joists are able to hold. A built-up floor adds dead load and storage adds live load to the existing framing—too much weight can create a structural problem. If you’re uncertain, consult a structural engineer before proceeding.
Next: Sloped Ceilings