There are several types of floors that need insulation: those over a basement or crawl space (if you choose not to insulate the foundation walls); those that extend past the house in cantilevers, on stilts, or on piers; and slab-on-grade floors that surround heated spaces. Slab-on-grade floors include the open side of a walkout basement, if it is conditioned space.

Push rods are used to hold unfaced fiberglass insulation
batts in place in the floor joists. It’s important not to compress the
fiberglass too much with the push rods.

Fiberglass batts must be carefully cut and woven around
any bridging, blocking, or other obstructions in the floor framing.
Insulating an open floor with batts (over a basement or crawl space)
If your floor is open—that is, with exposed joists to which you have access from below—the easiest way to insulate it is with unfaced fiberglass batts. Be sure to buy batts that match the size of the joist spacing (usually 16 in. o.c.) and hold them in place with insulation push rods spaced every 2 ft. or so.
Don’t depend on friction to hold fiberglass batts in place, or they will soon fall down. And don’t use faced batts, thinking that the flanges can be stapled to the joists, because the vapor barrier will end up on the wrong side of the insulation. The batts should be in full contact with the floor and not compressed too much by the push rods. Be sure to cut and fit the batts neatly around any cross-bridging, plumbing pipes, and other obstructions in the floor system. If you want a finished appearance, cover the bottom of the joists with a vapor-permeable housewrap or, better yet, drywall.
I recommend the following R-values for floor insulation: In mild climates, R-19 will meet or exceed energy codes; in cold climates, R-30 or R-38 will do. Plan to fill the floor framing close to its full depth. If you have only 6-in.- or 8-in.-deep joists and want more insulation, attach extruded-polystyrene (XPS) foam to the underside of the floor for a higher R-value. Use screws and 1-in.-dia. fender washers to make sure the foam stays in place. Check your local building code; foam insulation may need to be covered with ½-in, drywall or plywood for fire safety.
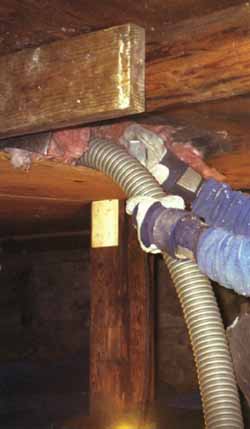
Dense-Packing Cellulose in a Floor: For floors that are enclosed
on both sides with sheathing, dense-pack cellulose with a fill tube or
a nozzle. The fill tube is preferred, because you can pack greater densities
and you don’t need to drill as many holes. A nozzle can also do a good
job, particularly if there’s some existing fiberglass that interferes
with the fill tube. Either way, watch out for blocking, cross bridging,
or other obstructions. You can use the same technique for flat ceilings
and attics with sub flooring (drill from above, or remove a floorboard).
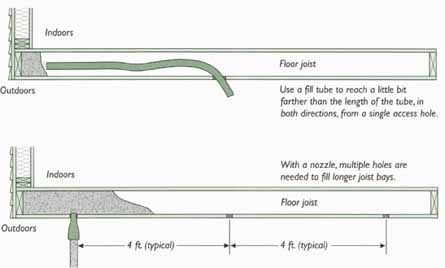
With a nozzle, multiple holes are needed to fill longer joist bays. Use
a fill tube to reach a little bit farther than the length of the tube,
in both directions, from a single access hole.
SAFETY FIRST
Be extra careful when drilling holes in any building cavities, including floors, walls, and ceilings. You may run into pipes or wires. Before you start, make a note of the general location of plumbing fixtures and pipe runs that may be nearby; wiring will be more difficult to assess. Go slowly, avoid pushing the drill or saw past the sheathing or drywall, and use the holes you have already opened to probe or look with a flashlight to find out what’s there. And make sure there is no active knob-and-tube wiring before installing any insulation.
Tips: Careful when drilling holes in the floor, walls, and ceilings – you might run into pipes and wires.
WHAT CAN GO WRONG: W hen insulating a cantilevered overhang, drill into the soffit at the bottom and use a nozzle. But be careful:
Some floor cavities open into a basement or other part of the house. If you have access, stuff the bays from inside with a big hunk of fiberglass. If there is no access, set the machine for more material (or less air pressure), to reduce the density, and to avoid overfilling the cavities.
This overhang was hidden by a porch ceiling made of perforated
vinyl soffit. The only solution was to remove the soffit and insulate
the overhang before installing a drywall ceiling. Note the patches below
the overhang that resulted from drilling and blowing the exterior house
wall.
Insulating an enclosed-cavity floor with cellulose
Any floor that is exposed to outdoor conditions or unconditioned space and has solid sheathing on the underside can be insulated with blown-in cellulose. Examples include garage ceilings, exposed heated porches, cantilevered overhangs, and sheathed floors built on piers. The process is the same as that of filling cavities in cathedral ceilings or walls. You must drill holes in each bay, then patch the holes when you are done.
First, determine whether you will use a fill tube or a nozzle to fill the spaces. A fill tube requires fewer holes and does a better job, but it takes longer to install the material, and the tube may be difficult to find. You can also use a 2-in.-dia. nozzle, which requires many more holes if you are doing a large area. If the floor is already partially insulated with batts, a nozzle may be preferable, because a fill tube can easily get caught in fiberglass. Some contractors use 1-in.-dia. nozzles, but it’s impossible to get a truly dense application with a smaller nozzle.
You will need a heavy-duty hole saw or rotary drill bit large enough to fit the fill tube or nozzle—generally 2 in. or 2½ in. Drill one hole between the joists in the middle of each floor bay Use a stud finder to locate the first joist bay, or drill a hole and probe the space with an insulated wire to find the nearest joist and the direction in which it runs.
If you are using a fill tube, drill a line of holes, one in each bay, across the space. The row of holes should not end more than 2 ft. past the length of the fill tube (see the drawing), because the tube cannot blow material farther than 2 ft. If the length of each bay is much greater than twice the length of the fill tube, drill an additional row of holes farther down, so that you can reach the entire floor. You will also need extra rows if you find solid blocking between the joists.
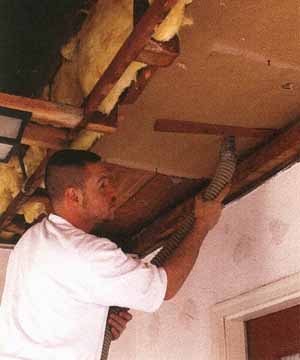
Blow in the insulation in the manner described for attic slopes. If you have a fill tube, push it in as far as it will go, turn on the machine, and keep pulling out the tube slowly as the material backs up. If you need to, hold a small piece of fiberglass over the hole so the dust doesn’t blow in your face (always wear a dust mask and safety glasses).When the end of the tube nears the hole, turn off the machine, push the tube into the joist space in the other direction, and repeat the process. When you are done with that hole, you should have a tightly packed fill that is difficult to push a finger through.
If you are using a nozzle, drill a hole in each joist bay about 2 ft. from one wall. Fill each hole until the material backs up, then go on to the next hole. Drill another set of holes about 4 ft. from the first, then fill them; work your way across until you’ve filled the entire floor.
When you are done, put a plywood plug in each hole so the surface is just shy of the drywall or sheathing material, and patch it with a good— quality instant patching compound or a non-shrinking wood filler. Prime and paint to match.
Using a piece of fiberglass to contain the air pressure
and help control dust, the cellulose is blown into a floor bay.
Protecting Foam Insulation
If you insulate a slab or foundation wall from the exterior you must protect the insulation above grade to prevent damage from sunlight
typically this is done with some type of stucco Other materials that protect foam board include pressure treated plywood and bendable vinyl coil stock Several companies also make a preformed insulating panel with a tough UV resistant surface or a layer of solid cement.
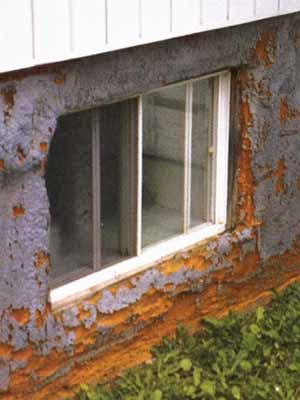
One problem with applying rigid or spray on (shown here)
foam insulation to the exterior wall of a foundation is that it is difficult
to finish reliably.
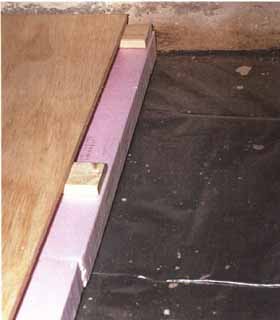
A finished floor can be installed over an uninsulated concrete
slab. First, cover the slab with a layer of 6-mil polyethylene sheeting,
followed by a continuous layer of rigid foam, then 1 X 3 sleepers at
16 in. o.c., and a plywood subfloor.
TIP: Avoid installing carpeting on uninsulated slab floors. Moisture may condense on the cool concrete, creating a mold problem.
WHAT CAN GO WRONG: In termite-prone areas, exterior foam board is not recommended, because insects can hide behind the insulation on their way into the house. However, some manufacturers have begun to make insect- resistant polystyrene-foam products. Typically, those products do not have insect-repelling qualities that will protect your home; they only prevent critters from nesting in the material. Check your local building code to see whether those products are acceptable for such applications in your area.
If your floor already has some insulation, but it does not fill the cavity, dense-packing with cellulose can dramatically improve the performance of the existing insulation—particularly if it is not fully in contact with the floor above. Dense-packing also significantly helps reduce cold drafts in the area.
Insulating an open floor with cellulose
If you want to do a better job insulating an exposed floor, consider installing some sheathing and using cellulose. This method is more expensive and takes longer than using fiberglass batts, but the results are worth it. The basic idea is to install sheet material, such as plywood, oriented strand board (OSB), or drywall, on the bottom of the joists to hold the insulation in place. Nail or screw 1/2-in.-thick sheathing to the bottom of the joists. If you use drywall, set your screws 8 in. o.c. and make sure the heads don’t tear the paper. Don’t use drywall in an area that is prone to moisture, such as outdoors or in a crawl space.
The cellulose can be blown in through holes drilled in the sheathing, as discussed above, or, if you have a fill tube, you can leave a 6-in, gap between rows of sheathing across the joist bays in the middle of the floor. Fill in the bays with cellulose, and then fill in the gap with a 6-in.-wide strip of sheathing to match.
Insulating a slab floor
An uninsulated slab floor can cause a lot of heat loss, especially if the edges are at or above grade level. It can be cold and uncomfortable in the winter, and cool and damp in the summer. If the floor is unfinished, or you are planning to remodel anyway, a layer of extruded polyethylene, with 1 X 3 furring as a nail base, makes a good foundation for a plywood subfloor. First put down a layer of 6-mill polyethylene sheet to act as a moisture barrier. Attach the sleepers to the slab with powder—actuated fasteners or concrete screws (if recommended by the manufacturer of the finished flooring you plan to install) .You will lose a couple of inches of headroom with this approach, but it may be well worth it in greater energy efficiency, comfort, and moisture control.
Because most of the heat loss from a slab—on- grade floor is at the edges, you can install rigid— foam insulation (polystyrene) vertically on the outside of the slab instead. The insulation must descend vertically at least 2 ft. from the top of the slab. The technique is not worth doing unless you are excavating around the perimeter of the house for some other reason.
FOUNDATION MOISTURE CONTROL
New foundations for any substantial addition or renovation project should be built so that they are warm, dry, and mold-free. Here are some important details that can help with those objectives. Of course, check local codes regarding additional requirements, including structural requirements.
Even when footing drains successfully carry water away from foundation walls, they usually don’t draw groundwater below the level of the footing. This means that even a “properly” drained footing can be sitting in water, and wick water up and into the foundation wall. Capillary action between footings and foundation walls can be stopped by a layer of cement-like waterproofing, such as Thoroseal, applied to the tops of footings before pouring the walls. Because large pores can also stop capillary action, footings can be poured on top of several inches of washed, uniform, graded stone (between ½ in. and 1 ½ in. dia.), as shown in the drawing below. The drain pipe should not be below the level of the footing unless the footing is poured on top of washed stone, as shown!
Note the 4-in.-dia. PVC pipe, which ends at an open tee fitting, embedded in the washed stone just under the slab. For less than $200, you can simply run the pipe through the roof to provide passive ventilation. In the event that radon is found later, all that would need to be added is an in-line fan (in the attic) to actively vent the sub-slab area. Capping the pipe just above the slab saves money up front; later, if radon is found, an in line exhaust fan can be added with an exhaust pipe venting to the outside, but it’s more expensive to add that once the building is finished.
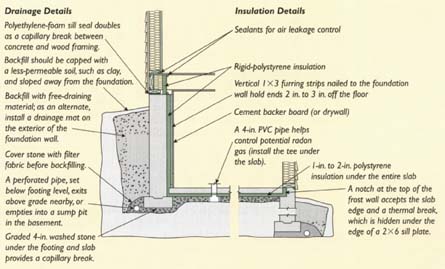
Drainage Details: Polyethylene-foam sill seal doubles
as a capillary break between concrete and wood framing; Backfill should
be capped with a less-permeable soil, such as clay, and sloped away from
the foundation; Backfill with free-draining material; as an alternate,
install a drainage mat on the exterior of the foundation wall. Cover
stone with filter fabric before back filling; A perforated pipe, set
below footing level, exits above grade nearby, or empties into a sump
pit in the basement; Graded 4-in, washed stone under the footing and
slab provides a capillary break;
Insulation Details: Sealants for air leakage control; Rigid-polystyrene insulation; Vertical 1 X 3 furring strips nailed to the foundation wall hold ends 2 in. to 3 in. off the floor; Cement backer board (or drywall); A 4-in. PVC pipe helps control potential radon gas (install the tee under the slab); 1-in, to 2-in, polystyrene insulation under the entire slab; A notch at the top of the frost wall accepts the slab edge and a thermal break, which is hidden under the edge of a 2X6 sill plate.
Tip: Most of the heat loss in a foundation occurs near the top of the wall, which is exposed to outdoor temperatures, but I recommend insulating the entire wall.
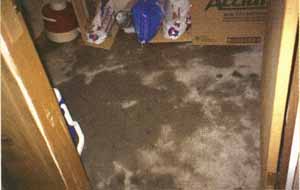
Slab floors that are more than a few feet below grade don’t cause much heat loss but, because they stay cool in the summer, they may trigger moisture condensation in humid weather. If it has carpeting on it, a slab floor has the potential to be a mold factory. For this reason alone, a slab floor may well be worth insulating for health concerns.
DETAILS: Insulate foundation walls with polystyrene foam to provide substantial contact between the insulation and foundation wall, which prevents air circulation. To meet code, the foam may still have to be covered with a fire barrier (½-in, drywall or cement tile backer board on wood studs).
The surface of this uninsulated slab floor stays damp from condensation for most of the summer.
Next: Insulating Foundation Walls
Top of page Related Articles Home