| Home | Insulation | Conserving Energy Heating | Books | Links |
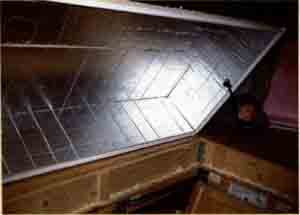
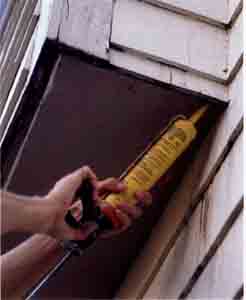
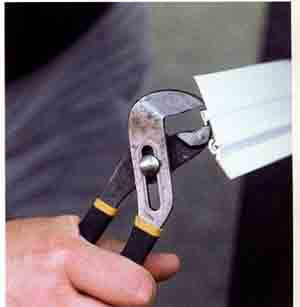
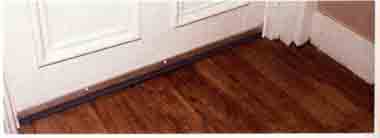
SidewallExterior walls are not typically the leakiest parts of a house. Leaks occur in walls where services enter the home, where the framing of the house makes transitions, around rough openings for windows, and through and around window sashes. Caulk for Air-Sealing We generally use two types of caulk: 100% pure silicone and siliconized acrylic latex. Our preference is pure silicone caulk. Although it’s more expensive and harder to clean, pure silicone is much more adhesive, more flexible, and less prone to shrinkage as it cures. It’s a must anywhere you are trying to seal wood, metal, or concrete to one another, because the differential movement of these materials will tear acrylic caulks apart. It can safely be used on gaps up to about 1/4 in. wide; wider gaps require you to stuff in some spongy material or insulation as a backing. Pure silicone is also much more durable, so it’s better for exterior applications that aren’t too visible; however, it is not paintable. Once it cures, almost nothing will stick to its slick surface. Acrylic can be painted easily, so we generally reserve it for interior spaces and conspicuous exterior areas. However, because it shrinks more, don’t use acrylic on any gap or crack wider than 3 in. unless you install backing. Both kinds of caulk are available in a number of different colors; try some in an inconspicuous place and wait until it cures to check the match (especially browns!). And stay away from clear acrylics. They come out white, then dry clear, but the clear material has a shiny surface that can be quite noticeable. Clear acrylics also contain fewer solids than pigmented acrylic caulks do, so they shrink more. Be sure to store any type of caulking at room temperature; if it gets too cold, it can be very difficult to squeeze out, and it may not cure properly. Service penetrations Sealing cable, wiring, plumbing, and telephone service penetrations is fairly easy. Such openings are usually accessible from the exterior and are often small because some effort is made to weatherproof them during installation. We usually use caulking to seal any gaps where services enter through the siding. Fig. 48-0: This cantilever can be a source of cold-air leaks; be sure to caulk around it carefully. Transitions in exterior wall framing One common example of a wall transition is a cantilevered floor, typically an overhang of 1 ft. to .3 ft. that is common on raised ranches and colonial-style homes. Often, the plywood soffit at the bottom of the overhang is not sealed tightly, and air can leak through these gaps, which are easy to caulk. If the cantilever is finished with aluminum or vinyl soffit material, the leakage is even worse. We’ve seen cantilevers finished with perforated vinyl and no air barrier at all! In that case, you should care fully remove the soffit and add a solid material, such as plywood. Caulk around all four edges, and replace the vinyl or aluminum soffit, if you wish. Other places where walls make transitions can be leaky, but they often take the form of a roof or an attic interrupting a vertical wall. Most of those cases are covered our earlier section on Attic Air-Sealing. Weatherstripping Doors and HatchesMost modern doors and windows have good weatherstripping built in. but older ones usually don’t. In addition, many homes have at least one less-finished, or even makeshift, door or hatchway as part of the thermal envelope. This section dis cusses replacing or repairing weatherstripping on hinged doors, access panels, and attic hatches. Fig. 48-1: Most weatherstripping available at hardware stores is not worth the packaging it comes in. Here, from left to right, are some high-quality ones. V-seal can be used for doors and windows. Silicone rubber bulb, which stays flexible and soft at low temperatures, works well for doors with a narrow clearance. Our personal favorite is the vinyl-covered V-section (Q-Ion is one brand name). It is available without backing for stapling onto unfinished areas, such as attic hatches, and with aluminum or wooden backing for stapling onto finished areas. ---------- Tip… If you have an insulated steel door with magnetic weatherstripping that is falling apart, you may be able to replace it with unbacked vinyl-covered V-section strips. Specifically… pull-down attic stairs are especially difficult to insulate and seal. You can buy a prefabricated kit like this Therma-dome, which is made of 1 ½-in.-thick foil-faced insulation, or you can make one yourself. Make sure you have a nice, flat deck around the stairway opening on which the box can sit (the deck needs to be only 1 ft. wide), and caulk the deck to the rough opening for a good seal. How the Pros Do it… If you are using a nail-in type of weatherstrip, leave the nails protruding slightly until after you check that the door operates normally. This way, you can adjust the fit of the weather strip, if necessary. This pull-down stair kit comes with adhesive, weatherstripping, aluminum tape for the edges, and hook-and-loop tabs on each end to tie it down tightly. ---------- Weatherstripping a door To seal any standard swinging exterior door, install a flexible, spongy weatherstrip on the top and both sides. First, remove old weatherstrip that may be iii the way. Take note of any storm-door hardware that may need to be moved out of the way while you work. Start with the top piece, cutting it to fit into the corners of the doorstops. If you are using one with a wooden backing strip, pre-start a few 4-penny finish nails in the wood strip. Press the piece against the door so that the spongy side is slightly compressed, then nail or screw it in place. Then cut the side strips to length. Install those pieces the same way. Starting at the top, hold a piece in place so the spongy part is shghtly com pressed against the door, then drive a nail or screw. Work your way down until you reach the bottom. The trick is to compress the spongy part enough to ensure that there will be contact year—round, as the door shrinks and swells, but not so much that it interferes with the door’s closing and latching. If the door doesn’t latch properly, you may need to move back the weatherstrip or adjust the door’s strike plate. If you have an insulated steel door with magnetic weatherstripping that is falling apart, you may be able to replace it with unbacked vinyl-covered V-section strips. Those strips often fit in the same rabbeted groove in which the magnetic strips were mounted. Door sweeps For a crack at the bottom of a door, a door sweep may be just the thing. If you plan to install weatherstripping on the sides of the door opening, be sure to do so first. Buy a heavy-duty door sweep that will sit fiat against the door and last for a while. Cut it to length (if it will be installed on the side of the door with the stops, cut it about Vs in. short, so it doesn’t get jammed between the stops). Hold it in place, again with just enough pressure to make sure it will always be in contact with the threshold, and screw it in place. If your door has a low threshold, or if there’s a thick rug or an irregular floor in front of it, a flat sweep will scrape and prevent the door from working. In that situation, use a hinged sweep, which flips down snugly when the door is closed. A few pointers: Be sure to cut the sweep ¼ in. shorter than the doorstops, so the sweep doesn’t bind. Pull out the flexible rubber strip, and use a hacksaw to cut the sweep to length on the end that will be at the hinge side of the door. Reinsert the strip, then cut it to length with a utility knife. Next, squeeze the ends of the aluminum track to pinch the rubber strip in place. we recommend pre-drilling a hole for the stop button, because the doorstop is likely to split. Open and close the door a few times to make sure everything works properly. Weatherstripping an attic or a crawl space hatch Attic hatches are often quite leaky, and it can be difficult to seal them well. We recommend using vinyl-faced weatherstripping with an aluminum carrier strip. Usually, a kit designed for a door will do at least one access hatch, sometimes two, depending on the size of the hatch(es). Cut the pieces with a pair of sharp tinsnips and screw them in place. Generally, the weatherstripping should be attached to the jamb or trim around the opening; in some cases, it may be easier to attach it directly to the door. If the hatch door is too lightweight or too warped to make a good seal, replace it with ¼-in. A/C plywood or another sturdy flat material. Either way, you may need to add a pair of eye hooks or a barrel bolt to keep the hatch snug against the weatherstripping. Don’t forget to insulate the door with rigid foam insulation. Fig. 49-0: This door sweep lifts out of the way when you open the door, riding clear of carpets and uneven floors. Fig. 49-1: After trimming a door sweep to size, crimp the ends to hold the rubber strip in place. Fig. 49-2: A regular door sweep works well if the door has a prominent threshold or the floor slopes away from the door. Prev.: Basement/Crawl
Space Air-Sealing |