- Introduction
- Our Story Solar Cooking
- Our Solar Oven
- Pre-manufactured Solar Ovens
- Cooking with Biomass
- Cooking with Biomass-Derived Liquid Fuels
- Cooking with Biogas Resources
INTRODUCTION
Because of the high temperatures required, cooking food without burning fossil fuels is one of the more challenging conversions to make. as it is an activity that generally uses a smaller percentage of a home’s energy (4 percent on average) than, say, lighting (12 percent) or refrigeration (8 percent), it may be one you want to tackle after working on larger-gain projects.
That said, cooking food using renewable energy whether it’s from the sun, biogas, wood heat, or plant oil, is highly rewarding and gives a great sense of independence for this most vital of activities. For many folks, one of the greatest fears related to failure of the energy grid or depletion of fossil energy is that they won’t be able to cook food. A house without a means of cooking isn’t habitable for long.
In pioneer times, wood was plentiful and was the sole heat source for cooking food. This worked fine indoors during the winter and outside in a detached kitchen the rest of the year. But many cooks had to work outside even in bad weather or inside in fire places or on cookstoves during hot weather, making the house uninhabitable for most of the evening. Only the wealthy had access to detached kitchens. Fortunately, today a great deal has been learned about capturing solar energy for cooking, using wood heat efficiently, converting biomass to liquid fuels, and small-scale methane production (referred to as biogas to distinguish it from fossil accumulations of natural gas, both of which are predominantly methane). By using a variety of methods for cooking when conditions are most suitable, it is quite possible with little hardship to cook all of one’s food using renewable energy in a sustainable way.
Familiarizing yourself with the pros and cons of different methods may help show the way toward what configuration you want in your home. If you’re lucky enough to have livestock nearby, you may be able to produce enough biogas for all your cooking needs. If you live in the sunny West, you may be able to do most of your cooking with a solar cooker. and if you live in the frozen North, it may be reasonable to do the majority of your cooking with wood, heating your home (and potentially your water) at the same time. Because different methods are appropriate for different seasons and weather conditions, weaning your cooking from fossil energy will take time. Whatever methods you choose, once you’re no longer dependent on lengthy connections to pipelines filled with polluting fossil fuels, we guarantee you’ll find your food more delicious and satisfying.
OUR STORY
At first, we were quite dismayed by our prospects of being able to achieve our cooking needs without any fossil fuels. We planned on putting in a woodstove, and knew we could do some of our winter cooking there, and we had been working on improving our solar oven for a while, but both of these technologies had their limitations. One by one, as we knocked out the other fossilized aspects of our lives—electricity, hot water, transportation, and so on—our propane camping stove that accomplished the bulk of our on-demand cooking needs seemed like it had started to sprout roots and dig into the countertop. Stephen had read about biogas production for some time and felt this was the missing link. But the information available was limited and lacked detail. We might have been able to rig some thing together based on what he had learned, but it wasn’t necessarily clear that it would work or produce enough gas, or that it was something we could write about and recommend that others try. From the avail able information, much of it from India, it seemed like we needed to build a concrete tank in the basement. We had been planning on building a ferro-cement tank (a built-in-place concrete tank reinforced with metal) in the basement for rainwater catchment. Before this, however, we were going to build one to catch rainwater off a detached garage in the backyard as a practice run, the water to be used for the exterior landscaping. That way, if it leaked a bit, it wouldn’t matter much and we would learn from the process.
Building a tank in the basement to catch our humanure as our first try that might potentially leak was not something we were eager to tackle. Ironically, after we purchased the house we realized that an old bathroom setup in the basement had been funneling much of the previous residents’ waste onto the basement floor rather than Out to the sewage line that ran under the street. Cleaning this inch-thick layer of stinky goo off the basement floor slab had not been pleasant, and we certainly weren’t eager to repeat the process anytime in the future, even if this time it would be our own stinky goo!
In the interim, we had a few setbacks. We purchased a beautiful old cast-iron cookstove for $250 from an antiques store. It had a few chips and cracks, but we figured our welder friend Jeremy would be able to fix them right up. Little did we know at the time (although we do now!) that you can't weld cast iron. This beauty sits in our front room as we write, making a tolerable plant stand. On another tangent, in search of an oven for use when the sun wasn’t shining, we purchased a stovetop baking oven from Lehman’s, to sit on top of our conventional woodstove. The folks at Lehman’s are great, but they missed the boat with this one. The oven was designed to sit atop a gas stovetop. Glossy black, with stainless-steel hardware, it was pretty to look at. Unfortunately, when we put it on top of our woodstove (an activity that Lehman’s had condoned) with the thought of baking dinner, the black paint began to smoke and catch fire, releasing waves of toxic gases into our house and sending us scuttling outdoors into the cold with all the windows open. Lehman’s gave us a refund, but we were still without an indoor oven, and remain so, as of this writing, although we have plans to build one before winter out of scrap metal, based on some of the many designs from Aprovecho’s publications (see Resources below).
After the oven-fire fiasco, we turned our attention to other things: solar hot water, photovoltaics, the green roof, writing the guide in earnest, and those pesky day jobs. Our year for wrapping up our house project was drawing to a close. The manuscript for this guide was due in just a few months, yet the propane stove sat there, still seeing regular use. Were we wrong? Was it not possible to quite cut all ties to fossil fuels in our daily lives? Although the amount we were using compared to the average American household was very small, less than 1 percent, still, we weren’t carbon free! Salvation came from the Internet, that vast cornucopia of ideas (and trifles and vanities, too, of course). We read about the exciting development of the Protos Plant Cooker, which uses a variety of vegetable oils as an energy source. A renewable stovetop fuel! This was very exciting, even if it meant we would not be producing the fuel ourselves. We had long ago dropped our lone-wolf, produce-everything-ourselves mentality. We already had a used-veggie-oil setup for our Mercedes 300D. and since this would be just one of several cooking options, our dependence on an outside source for our cooking fuel did not bother us terribly, although the biogas dream is still there, waiting for a free weekend or two or three.
Alas, the Protos was unavailable to us. The ethic was to get this stove, developed by Bosch and Siemens, where it was needed most, in developing countries like the Philippines, and produce it there as well to support the local economy. We couldn’t find fault with these fine intentions, of course, but still, we wanted one!
After a lovely chat with the project manager, Mr. Schiroff, he explained that, as a cooking device, the Protos needed to be tested for such things as safety, emissions, and so on, for each country where it was sold. Since the demand in the United States had not yet manifested itself, the company had not pursued this yet. Our renewable stovetop cooker was not yet legal.
This created some despair, but we turned our minds to other things. Time was running short. As if to prompt us, the propane stove gave out when some part of the regulator clogged. Coleman makes some dozen or so versions of the two-burner propane cooker but neglects to put any model numbers on the actual stove itself. We literally couldn’t figure out which was the correct replacement part among the multitude of models.
Sometime during that frustrating time spent simultaneously on hold with Coleman and on the Internet searching for parts, the words camping and stove yielded something about a homemade alcohol camping stove. Well, of course! Alcohol burns and it’s made out of plants! Therein lay our salvation. There are dozens of designs for homemade alcohol stoves. We were looking for something a little more permanent, and that’s when we found Origo, which has been making alcohol stoves for boats for 50 years. It even makes one with an oven, although at over $1,000 this was out of our price range, not to mention we didn’t want to neglect our solar oven and future woodstove oven, so we stuck with the Origo 3000, a two-burner model at around $350. It burns denatured alcohol, which is 90 percent plant-based ethanol mixed with 10 percent wood-based methanol (the methanol will make you go blind if you consume it, and it thereby avoids drinking- alcohol taxes). This is a clean-burning unpressurized fuel, making it extremely safe (no pressurized propane fireball worries). The denatured alcohol costs between $13 and $15/gallon, which is a little steep. Generally, a gallon lasts us a month or two, and longer in the winter when we mostly use the woodstove. We suspect that this price is what E85 (the ethanol-gasoline mix touted as a replacement for straight gasoline) would be if that product were wholly unsubsidized, which is about five times its current selling price. If we can find a source for 100 percent ethanol (rather than E85), we will switch to using that with the Origo. The 15 percent gasoline in E85 makes for hazardous indoor air quality and creosote buildup if it is burned in the stove.
We’ve saved fuel on our alcohol stove by using a pressure cooker we received from Stephen’s mother. It’s one of the new generation of pressure cookers and has three distinct safety measures to ensure that it will not explode. By raising the cooking temperature to 250 degrees F from 212 degrees F, pressure cookers are able to cook many foods in a fraction of the usual time. Beans especially benefit from this, as most can be completely cooked in less than 30 minutes, even without presoaking (although they’ll cook faster and use less energy if you presoak them). This means we can use dried beans whenever we need them, even if we didn’t plan in advance. Once we discovered how well it makes a risotto with no stirring (and in just 8 minutes), our pressure cooker became worth its weight in gold!
Our variety of cooking options serve us well. Since we’re already keenly aware of the weather (a result of obtaining most of our energy from the daily avail able sunshine and being solar nerds generally), taking advantage of the solar cooker has not been a problem. The top of the conventional woodstove gets used for cooking many winter nights, and the alcohol stove is available when the first two options aren’t, mainly for on-demand needs like pan-frying and making coffee in the morning. and , of course, our non-fossilized locally grown food tastes great!
Another thought we’ve had that we’re still ambivalent about but feel is worth mentioning is using a microwave. Now, we know microwaves have been castigated for irradiating food and making it tasteless. Nevertheless, they do an excellent job of heating up food in a hurry and doing it with much less energy than a traditional electric range. Especially for off-grid folks, using some of the surplus 0 solar electricity on sunny days to reheat leftovers for lunch can basically mean tapping into some free energy.
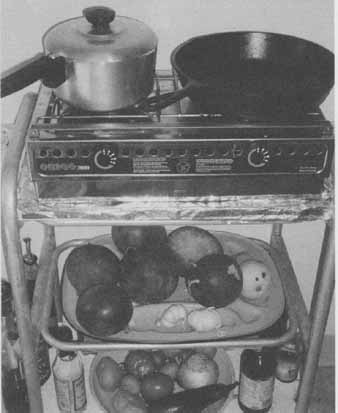
FIG. 4.1. Origo ethanol stove. First made for boats, ethanol (or denatured
alcohol) stoves are clean burning and easily adapt to use in the home.
Larger models with an oven are available.
SOLAR COOKING
Perhaps nothing is better capable of demonstrating the power of solar energy than a well-built solar cooker. Even simple inexpensive designs are capable of temperatures approaching or exceeding 300 degrees F in full sun, hot enough to cook stews, roasts, and even breads and cookies. Many cost little to construct and are small and light enough to be easily portable. They do what solar energy does best: turn the sun’s rays directly into heat for our benefit. and they are an almost universally applicable technology working well from the tundra to the tropics.
Cooking with the sun is exceptionally rewarding. Although its utility varies depending on location, even in the rainier parts of our country solar cookers can still be used several times a week on average. On the downside, relative to a stovetop range and oven setup inside the home, solar cooking can seem burden some and overly limiting. Primarily, things are baked or slow-cooked, meaning well-planned meals and a somewhat limited menu. Solar cookers will not meet your on-demand cooking needs.
Don’t let solar cooking’s limitations lead you to neglect this most rewarding of cooking methods, however. Using a solar cooker for what it does best will ensure a satisfying experience. For those readers who would like to learn more about renewable energy but are often intimidated by the costs and complexities of such things as photovoltaics or solar hot water, solar cooking provides an excellent, inexpensive, and empowering introduction. The wonder and possibility of living a life powered by the sun is revealed by constructing and using any of the designs listed below.
Solar ovens and cookers invite tinkering and creative design. There are almost as many solar-cooker designs are there are folks who have built one. For the three we’ve detailed here, we’ve stuck with tested models that have been refined and perfected over time.
The first two designs detailed here are courtesy of Solar Cookers International. The third solar oven detailed is the Barbara Kerr Solar Wall Oven. The wall-oven model incorporates a solar oven into the structure of the house and makes it accessible from the inside, possibly even the kitchen if yours has a south- facing wall. Eventually, we all need to figure out how to incorporate solar cooking into our lives and make it as easy as possible. Barbara Kerr has gone a long way toward realizing this achievement with her oven. Presented here is a thorough summary that we hope will be sufficient for most handy folks to build and install one of her models. Readers are encouraged to peruse a more thorough presentation, which can be found at the Web site http://www.solarcooking.org/bkerr/default.htm
Finally, we’ll show you what we built. We pieced together leftover construction materials from various other projects we were working on to build a solid outdoor solar oven that we have found to be easy to use, effective, and weatherproof.
The first solar cooker below is a simple box cooker that can be made primarily from cardboard boxes, aluminum foil, and Plexiglas.
Simple Box Cooker
Renter friendly.
Project Time: Afternoon.
Cost: Inexpensive ($5 - $20).
Energy Saved: Low. Cooking’s relatively low energy requirements (4 percent of average energy budget) and solar cooking’s intermittent availability make dependence on at least one other cooking system all but certain.
Ease of Use: Moderate. Cooking can be done only on relatively sunny days and works better in summer than in winter.
Maintenance Level: Medium. How long this solar oven lasts depends on how well you take care of it. If it gets wet repeatedly, it will eventually turn to mush, so bring it inside when it’s not in use.
Skill Levels: Carpentry: Basic.
Materials: Two large, shallow cardboard boxes—the inner box should be at least 18 x 22 inches, prefer ably just a little bit taller than your pots; the outer box should be a little larger in all dimensions so there is at least 1—2 inches of space between the two boxes when they are nested. You’ll also need corrugated cardboard at least 6 inches longer and wider than the outer box to make the lid; window glass (or Plexiglas) at least 20 x 24 inches and longer and wider than the inner box by 2 to 3 inches; a thin, black metal sheet, sized equal to or slightly smaller than the inner box; 50 feet 0 aluminum foil; dry plant fibers such as leaves or straw or at least 50 sheets of newspaper, quartered and crumbled; glue silicone caulk; and rigid wire (hanger wire, for instance).
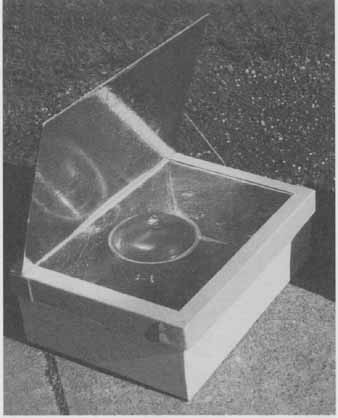
FIG. 4.2. The completed solar box cooker.
Tools: Paintbrush, utility or other knife, pencil, straightedge.
Caution: Solar cookers, especially parabolic varieties like the CooKit (described next), have the potential to cause retinal damage from the concentrated solar rays. Be careful to avoid looking at the bright reflections from any of these solar cookers.
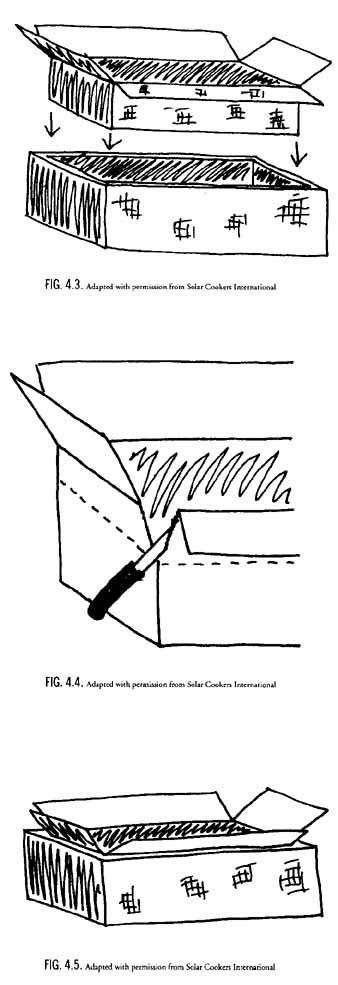
FIG. 4.3.; FIG. 4.4.; FIG. 4.5
Construction Steps
Cut the window opening in the outer box. See figure 4.3. Turn the outer box upside down. On its bottom, center the inner box and draw a line around it. Cut out this piece to make a window opening the same size as the inner box. There should be a small rim on all four sides, 2 - 3 inches wide. On the lid piece- the extra piece of cardboard—center the outer box and trace around it (these are the fold lines). Extend these lines out to the edges of the lid piece. Center the inner box between the fold lines on the lid (that you just drew) and trace around this box as well. Cut only three sides of the inner line, two short sides and one long one. Fold up the resulting flap for the reflector, creating a window frame opening the same size as the inner box.
Adjust the height of boxes, if needed: See figure 4.4 Set a cooking pot next to both boxes. The inner box needs to be just a little taller than your pot. The outer box needs to be just a little taller than the inner box.
If the boxes are too tall:
On the inner box make a mark about 1 inch above the top of the pot and draw a fold line at this height straight around the four box walls. Score the fold lines with a blunt edge such as a spoon handle.
On the outer box make a mark about 2 inches above the top of the pot and draw a fold line at this height straight around the four box walls. Score the fold lines with a blunt edge such as a spoon handle.
Cut the corners of both boxes down to the fold lines. Fold the sides outward along the creases.
Trim the inner box flaps. When the walls of the inner box are folded down to the right height (or if you didn’t need any adjustments), trim the flaps to make them as narrow as the small rim around the window opening on the outer box (refer to the first step if necessary).
Join the boxes. See figure 4.5. Turn the outer box right side up, so the window opening and rim are down. Spread glue on the inside of the rim. Turn the inner box upside down and lower it into the outer box, onto the glue. Press the small flaps against the inside of the rim around the window opening to join the two boxes into one double-walled box, now open at the bottom (which should be facing up at this point).
Insulate and seal: Without disturbing the drying glue, carefully spot-glue aluminum foil on all four walls and the underside of the inner box, covering all surfaces between the two boxes. This layer of foil helps insulate the cooker. Lightly fill the gaps between the two boxes with crumpled newspaper, plant fiber, or other insulation. Add a few strips of cardboard and more crumpled newspaper or other insulation on the underside of the inner box (which should be facing up at this point). Close and glue the flaps of the outer box to seal the bottom of the cooker.
general, it is good to get the food in early and not worry about it until mealtime. For most dishes you should start cooking by 9 or 10 AM.
To cook an evening meal orient the cooker so that the front side faces westerly, or approximately where the sun will be mid-afternoon. For most dishes, it’s best to start cooking by 1 or 2 PM.
For all-day cooking orient the cooker toward where sun will be at noon or early afternoon. The food will be ready and waiting for the evening meal.
Adjust the reflector. With the adjustable prop, angle the reflector so that maximum sunlight shines on the pots.
Leave the food to cook for several hours or until done. There is no need to stir the food while it is cooking.
Remove the pots. Using pot holders, remove the pots from the cooker. (CAUTION: Pots get very hot.) If you won’t be eating for a couple of hours, you may want to leave the pots in the cooker and close the lid. The insulative properties of the cooker will keep the food warm for a while.
Enjoy!
Care and Storage
Store your cooker away from rain and animals, preferably indoors. Keep the glass clean.
Panel Cooker
Renter friendly.
Project Time: Afternoon.
Cost: Inexpensive ($5-20).
Energy Saved: Low. Cooking’s relatively low energy requirements (4 percent of average energy budget) and solar cooking’s intermittent availability make dependence on at least one other cooking system all but certain.
Ease of Use: Moderate. Typically, solar cookers get used outside. Cooking is often an all-day affair, and the range of items that can be cooked is limited.
Maintenance Level: Medium. How long this solar oven lasts depends on how well you take care of it.
If it gets wet repeatedly, it will eventually turn to mush, so caution must be taken when leaving it for long periods outside when there might be rain.
Skill Levels: Carpentry: Basic.
Materials: 3 x 4-foot section of cardboard, 10 feet of aluminum foil, glue (nontoxic).
Tools: Cheap paintbrush, utility knife.
This panel cooker, known as the CooKit, is a simple, portable solar cooker. It can be made in one to two hours and can cook one large pot of food for about six people. For larger families, make a larger CooKit or several this size.
Construction Steps
Draw “cut” and ‘fold” lines on cardboard See figure 4.9. Freehand drawing should suffice.
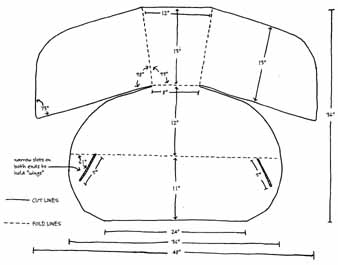
Cut out the CooKit shape and slots. Cut out the CooKit shape and the two 61-degree angled slots in the front panel. Be sure to make the slots narrow so the 73-degree angled corners from the back panel fit snugly to hold up the front panel. (Refer to the third step in the cooking directions below.)
Score the fold lines. With a blunt edge such as a spoon handle, score the fold lines. Make straight folds by folding against a firm straightedge such as a board. Score the optional fold lines only if you intend to fold the CooKit for compact storage (see “Care and Storage” below).
Glue foil on the CooKit. Dilute the glue 1:1 with water. Using a paintbrush, spread the diluted glue on the dull side of the aluminum foil and press the glued sheets of aluminum foil tightly and smoothly like wallpaper onto one entire side of the CooKit. A few wrinkles won’t hurt.
Leave flat until dry. Trim any excess foil.
Cooking Directions
Put food in a dark pot with a dark, tight-fitting lid.
Enclose pot in a transparent heat trap. Put the pot in a clear, heat-resistant plastic bag (a specialty product usually found in larger groceries) and bind the open end of the bag or simply fold it under the pot in such a way as to prevent air from escaping. The bag should be loose enough that a small, insulating layer of air exists around the pot. Alternatively, clear salad bowls, plastic or glass, can be turned upside down over the pot.
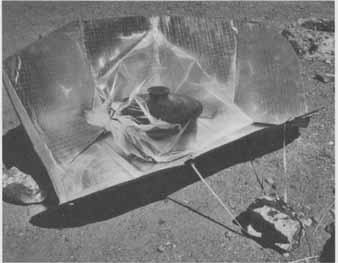
Fig. 4.8. A panel cooker in action.
Optional: Cooking efficiency may be marginally improved by placing the pot on a pot “stand,” e.g., three or four stones, a couple of twigs, or a small wire rack, located inside the bag. This helps create a thin layer of air under the pot, reducing heat loss to the cooker itself. For optimal performance, Dr. Steven Jones of Brigham Young University recommends raising the pot just over 2 inches with a homemade open-mesh wire stand located inside the bag. This allows sunlight to be reflected underneath the pot as well as on the sides and top. For best pot stability, make the wire stand slightly wider than the pot and a little taller, resting the pot on two crossed bars just over 2 inches in height.
Assemble the CooKit. In a shaded area, lay the CooKit shiny side up so that the wide (back) panel is away from you. Tilt the back panel toward you and carefully slide the ends of its flaps into the slots on the shorter front panel that is nearest you. (As you do this, you will need to also tilt the front panel up.) Clamp the inserted flaps on the underside of the front panel using clothespins or a similar device.
Choose a cooking location. Set the cooker on a dry level surface in direct sunshine away from potential shadows. For best results, solar cooking requires continuous, direct sunshine throughout the cooking period.
Orient the cooker according to the details below. Once oriented, the cooker doesn’t need to be moved again during three to four hours of cooking. For longer cooking, or for large quantities of food, reorienting the cooker every couple of hours speeds cooking a little. Food cooks fastest when the shadow created by the cooker is directly behind it.
To cook a noontime meal orient the cooker so that the front side (opposite the reflector) faces easterly, or approximately where the sun will be mid-morning. In general, it is good to get the food out early and not to worry about it until mealtime. For most dishes you should start cooking by 9 or 10 AM.
To cook an evening meal orient the cooker so that the front side faces westerly, or approximately where the sun will be mid-afternoon. For most dishes, it’s best to start cooking by 1 or 2 PM.
For all-day cooking orient the cooker toward where sun will be at noon or early afternoon. Food will be ready and waiting for the evening meal.
Adjust the front flap. Raise or lower the front flap so there is a small shadow, no more than half its width, under it. The flap should be angled higher when the sun is high and lower when the sun is low. You want the front flap to reflect the sun, not block it.
Set the bag-enclosed pot on the flat part of the CooKit. Optional: On windy days, to anchor the cooker, large stones or bricks can be placed on each side of the flat part of the CooKit that extends beyond the side reflective panels, as well as under the front panel.
Leave the food to cook for several hours or until done. There is no need to stir the food while it is cooking.
Remove the pot. Using pot holders, remove the pot from the CooKit. CAUTION: Pots get very hot! To prevent steam burns, open the bag away from you when removing the pot, and slide the pot lid toward you when opening the pot.
Enjoy a delicious meal!
Care and Storage
Store the CooKit in a safe place away from moisture and animals, preferably indoors. Periodically wipe reflective surfaces gently with a dry cloth. If the card board accidentally gets wet, lay it flat, shiny side down, until dry.
Allow plastic bags to air-dry or gently wipe them dry with a towel. Heat-resistant bags, handled properly, should last 10 or more uses. Bags gradually become brittle from exposure to sunlight and heat and will eventually develop small tears. Cellophane tape can be applied to the outside of small tears to temporarily extend bag usefulness.
The CooKit is designed to be compact and portable. When not in use it can be simply folded lengthwise into thirds or, if needed, folded flat to about 13 square inches.
Solar Wall Oven
Project Time: Several weekends.
Cost: $50 - $100.
Energy Saved: Low. Cooking is typically only 4 percent of a home’s energy needs, and a solar wall oven can't be used for every meal.
Ease of Use: Easy. Works when sun is shining.
Maintenance Level: Low.
Skill Levels: Carpentry: Advanced.
Materials: Plywood, 2 x 4s, glazing, silicone, insulation, screws.
Tools: Saw, drill, caulking gun, tape measure, pencil.
Note: The following description is a condensed version of “How to build a through-the-wall solar oven” article. A solar wall oven will not be for everyone depending on the orientation of the home (discussed in more detail below). Where possible, incorporating an accessible oven into one’s home can greatly increase the solar oven’s ease of use, an important factor in bringing solar cooking into the mainstream.
This section describes the considerations for designing and building a slant-faced, reflectorless, through the-wall solar box cooker. The discussion assumes a northern hemisphere location. Readers “Down Under” will need to reverse north and south in the following description.
The solar wall oven also works very well as a portable freestanding cooker. However it is used, the rear opening door of this design is a major convenience compared to conventional top-opening cookers. For maximum convenience, you may want both a free standing and attached cooker. This section will emphasize aspects of the through-the-wall oven.
Reflectors. The basic design concept of the solar wall oven is to eliminate the need for reflectors to as great an extent as practical. Despite that, one may be tempted to add reflectors to “soup up” the performance beyond the original design objectives. Although there are situations where adding reflectors would be necessary; it comes at a cost in design complexity; difficulty of operation, danger in overheating and damaging the oven, risk of overcooking unattended food, and wind vulnerability
One way to approach the reflector issue is to construct the oven without reflectors, then add them later if the cooking situation seems to warrant it, such as when cooking in the winter at higher latitudes where the sun will be low to the horizon, or during partly cloudy days.
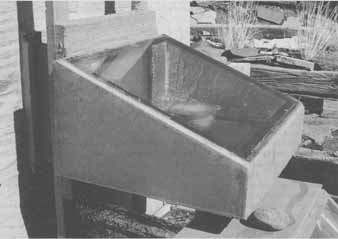
FIG. 4.10. The completed solar wall oven.
Site. Slant-faced, reflectorless cookers mounted in a wall are suitable for temperate latitudes only. In tropical regions, the sun will be on opposite sides of the home during summer and winter, progressively restricting the seasons of usefulness of a fixed mounted cooker the closer to the equator it is installed.
In northern temperate regions, the structure must have a south-facing wall available for installing the cooker. True due south (as opposed to magnetic south) orientation is preferred for the cooker. A wall-mounted cooker can't be turned to follow the sun. A cooker aimed southeast or southwest will limit afternoon or forenoon cooking, respectively. A cooker facing true south will be effective from about 9 AM to 3 PM solar time from mid February to the beginning of November (northern hemisphere). It will still work for more easily cooked foods for the balance of the year from about 10 AM to 2 PM.
The wall must be relatively free of shading by nearby structures, geological features, and trees for a large percentage of the day throughout the seasons. The roof overhang may partially shade the cooker in some seasons, hindering cooking, particularly in the latitudes nearer the tropics. Refer to the installation guidelines below for details.
Retrofitting an existing home for a solar cooker can be difficult. Smaller, south-facing windows are great candidates for filling in with a through-the-wall cooker. It would be relatively straightforward to remove the lower sash and then construct angled brackets out of 2 x 4 to hold a platform for a solar oven. (See the “Northern Window Conversion to Cold Box section in section 5 for ideas.) Alternatively, a solar wall oven could be designed into the construction of a passive solar wall or greenhouse. If an oven is being inserted into a finished stud wall, the load of any studs that are removed must be deflected with a header. Another idea well worth considering is to place a solar wall oven on a shelf outside a window. This makes it easy to install, to move to another location, and to turn it to follow the sun to extend hours of cooking time. A post extending up from the shelf through the bottom of the cooker will prevent it from falling off when it is turned or subjected to high winds.
Cost and difficulty of construction. Building a durable, effective, slant-faced, through-the-wall box cooker to attach to a house is not as easy or as inexpensive as one might suppose. There are problems with angled construction, providing a door, proper sealing, and obtaining proper materials—particularly the glazing. The materials inside and outside the oven must with stand for the life of the cooker (potentially 50 years). The amount of potential abuse is substantial, including 350-degree F heat, high humidity, UV radiation, freezing, impact, sandstorms, moisture infiltration, abrasion by cooking vessels, and food spillage all while we expect to achieve good cooking capability, attractive appearance, food safety and easy maintenance and cleanability.
Material considerations are paramount. Wood directly exposed to the extremes of a solar oven can warp, insulation can get wet, and plastic can turn brittle. Proper construction will ensure that the materials last as long as needed.
Dimensions. Size counts. Make the cooker big enough to cook a full meal for your family on a good solar day. A big solar oven also will successfully cook smaller amounts under less-than-ideal sun conditions. Furthermore, big pots, skillets, cookie sheets, and the like will fit in with room to spare for other cookware. A 20 x 30-inch interior floor space works well. It will require glazing about 24 x 32 inches overall. This much floor space will accommodate six “standard” 3-liter cooking pots (although cooking would be slow, even in strong sunlight, if this many pots were heavily loaded and all put in at the same time). Most of the cookers we have made over the years actually have been an inch or so larger than this.
When not in use on sunny winter days, the solar oven can also potentially be a source of meaningful solar heat simply by having the door propped open. The larger the oven, the more heat it will make available.
The angle is not critical. Anything between 20 and 30 degrees is acceptable, but generally cookers have been built with angles between 20 and 25 degrees. Glazing in the 25- to 30-degree range might be a better idea farther north, say 45 degrees north latitude. The 14-inch height allows the upright placement of gallon-sized jugs across the back of the cooker for water pasteurization.
Table 4-1
Floor 20” x 30”
Back Wall Height 14”
Front Wall Height 5”
Door Width 26.5”
Door Height 11.5”
Glazing Angle 24 degrees (9 rise in 20)
You may choose to increase the floor size some. The heights are well proven in practice, and you change them at your peril. Too low and your pots may not fit. Too high and the effectiveness of heat transfer into the food may suffer.
The door. The door generally will be the biggest problem in construction. Beware of metal door frames or a metal rim on the door itself. Even thin metal foil will rob a surprising amount of heat by conduction from inside to outside. Gaps around the door allow air infiltration and therefore can cause heat loss. If heat loss seems to be a problem, try adding some weather stripping. Generally, even rather loosely fitting doors seem to work fine for solar wall ovens. The problem with freestanding cookers used outdoors likely comes from wind-infiltration losses.
The door (as well as the rest of the interior of the cooker) must be made of nontoxic materials that do not outgas when hot. Since the door does not receive direct UV rays, it can be made out of wood, although some shrinking and expanding can be expected. It’s best for the cooker door to open downward and to stay open in a horizontal position, able to support the weight of dishes of food that will inevitably be placed on it. A chain on the side of the door that holds it open at the desired position is one effective way to accomplish this.
When an oven is tightly constructed all over, another problem often arises. Moisture from the food condenses on the undersurface of the glazing, blocking sunlight from entering the cooker and reducing the cooking capacity A pot with a tighter-fitting lid will likely solve this problem except when baking. Two holes about ¾ inch in diameter drilled through the door will provide enough airflow to draw out the moisture, although some heat loss will occur. One may use ¾-inch plastic hot-water pipe to line the holes. One hole should be down low; the other should be up high. The upper hole should be closable to prevent unnecessary air circulation when the oven is dry A plug of cloth or cotton will work, although it will be easily lost. A small sliding door over the hole is ideal. The lower hole may be left open unless there are rodent and /or insect concerns.
The wider the width of the door the better. We suggest 26.5 inches to clear a full-size 26 x 18-inch baker’s tray slid in sideways. A tray this size allows cookware placed on it to be moved in and out en masse. With a door this wide, the upper doorjamb must be configured to carry a major portion of the structural load across the back of the cooker. A 26.5-inch door will open into the space between three studs on 16-inch centers if the center stud is cut out. This produces an opening 30.5 inches wide, providing enough room at either side (a couple of inches) for external door flanges and for the construction of insulated pass-through tunnel walls. This width is our preference, although narrower doors have been used and may be preferable on some houses, depending on construction details and the layout of the kitchen.
For a latch to hold your door closed, a small piece of wood screwed into the top of the doorjamb is very effective, assuming the door closes flush with the jamb. The screw is left just loose enough so that the piece of wood can pivot down and hold the door closed.
Insulation. Many materials have insulative properties, and you should consider insulating your solar oven with what you have on hand. However, some do better than others, and it’s worth discussing the pros and cons in a little detail. Probably the best choice if you’re purchasing new material is polyester batting purchased from a hobby or fabric store.
It’s important not to allow any thermally conductive sheet metal or metal foil paths from interior metal surfaces to exterior metal surfaces anywhere, such as around the top where the glazing meets the rim. This will create a thermal bridge, and the heat loss via such a path can be substantial.
The walls, door, and floor should employ at least R-8 insulation, or close to it—the higher, the better. For most materials, 2-inch-thick insulation will be sufficient. Often 4 inches will give somewhat better performance, but heat loss through the walls is not of overriding concern in any case.
If you use foamboard insulation, you must check to make sure that it is rated for higher temperatures (300+ degrees F). Thermax is a commonly available brand that fits this purpose. Typical Styrofoam is not rated for high-enough temperatures for a solar oven.
A less appreciated consideration is the thermal mass of the interior walls that cover the insulation. Use very lightweight materials. It has been determined, for example, that in real-world cooking situations an 1/8 inch-thick Masonite hardboard oven liner soaked up 20 percent of the available heat, compared to the 10 percent passed by 4 inches of rice hull insulation. All of this heat loss becomes unavailable for cooking food. Use low-thermal-mass interior materials such as sheet metal or foil-faced or black-painted cardboard.
Fiberglass batt, an old down quilt, new quilt poly ester fiber, feathers, rice hulls, sawdust, and crushed newspaper (each full-size sheet crumpled to the size of a lemon) are all effective. Be wary of fiberglass batting, as it compacts severely if it gets wet. Do not use wood ash. It settles over time. Beware of wool; weevils will eat it. Cotton has durability issues and is not recommended. Multiple layers of cardboard with aluminum foil adhered shiny side out to both sides (use diluted wood glue) gives excellent results. Slip straw (loose straw coated in clay, as described in section 7) probably has too high of a thermal mass to be effective.
Water vapor from cooking food will condense in the insulation if the oven cavity is not well sealed. Take special care to seal the inside of the oven and make sure it sheds water properly on the exterior. In Arizona we have never had a problem with this due to the low humidity and tightly sealed construction of our ovens. In Minnesota, which has humid summers, crushed newspaper insulation in an unsealed cooker settled into a pile of paper mush in a single season.
An excellent candidate for insulation that will take the heat is polyester fiber from a fabric store. This is sold in “fiber fill” form (bulk for stuffing pillows) and in batt form (sheets for making quilts). Polyester plastic typically is rated to withstand 425 degrees F. In a 350-degree F oven test that deformed test samples of high-heat foam insulation, polyester fiber showed no sign of degradation. This inexpensive and easily obtainable material does not sag, drains water when wetted, does not rot or deteriorate, is easily handled, produces no harmful fiber “dust,” is easily cut with scissors, and is simple to install by stapling or stuffing. ‘When saturated under a faucet, a sample compressed about 50 percent, then ceased to collapse, suggesting that when using bulk fiber to stuff a cavity it ought to be compressed 50 percent to forestall formation of voids. We have not tested the insulation R-value to date, so a thickness of 4 inches is suggested to be on the safe side.
Sealing. Silicone makes the best heat-resistant sealer, and food-grade varieties are available. Pure silicone is not paintable, however, and is a real mess to work with. Despite its messiness, silicone is our choice for all-purpose adhesive in solar-cooker construction. It is nontoxic during curing and inert when cured, producing no off-gassing, and does not conduct heat. Once cured, silicone remains flexible, which means it can accommodate the thermal expansion of the glazing.
For a wall-mounted oven, seal the oven and pass-through tunnel against rainwater entry. This is particularly important if the cooker is integrated with the structure of the building rather than simply mounted externally in the fashion of an air conditioner. If condensation from food or rain entry is not controlled, the water may leak out the bottom of the cooker and do damage to the building. To keep water from running along the underside of the oven back toward the house, add a line of silicone or a few indention lines (by making a few cuts with a saw a quarter- inch deep) along the underside of the oven parallel to the front edge.
Interior. Raise the floor plate a little so it does not directly contact the bottom of the oven box. Several thin wood strips will do the trick. Creating this air gap significantly reduces heat loss from the floor plate down through the insulation of the floor, as the floor plate is the primary solar energy absorber and gets very hot. The upper surface of the floor must be black (or another very dark color) to absorb sunlight and convert it into heat.
We suggest the use of a 0.062m (62-mil) black aluminum floor (best if “hard” anodized for durability and easy cleanup). The heavy aluminum readily conducts heat to cooking pots.
One can blacken oven surfaces and cookware with BBQ black paint. Black tempura paint, such as produced by mixing the dry powder with white glue, is used by some solar-cooking practitioners, but others point out that the paint develops a chalky white surface over time, lessening effectiveness in absorbing sunlight to produce heat.
Glazing. The glazing must be double-pane. Single-pane does not work for a reflectorless cooker except in very strong and direct sunlight, and then only if the cooker is free to be aimed at the sun. Triple-pane provides little advantage over double-pane.
Retail plastic sheets will not work satisfactorily as glazing. They will warp, cloud up, and disintegrate. Use Plexiglas only if it has a UV-rated surface.
For commercially purchased glazing, we use 5 overall, 3 spacing, double-pane, 1 thick, tempered, clear glass insulated windows with a black or dark bronze spacer bar separating the two sheets of glass. We specify butyl sealant for heat resistance. This substance does not outgas toxic vapor. Such glazing works very well, although it can be costly and heavy. Manufactured double-pane glass can often be special-ordered to a specific size from hardware or glass stores.
For a 24 x 32-inch window, we have paid as little as $50 and been quoted as much as $150, so it pays to shop around. Used double-paned windows can often be found at reuse centers, although it may be difficult to find the appropriate size. New double-pane glass often contains a low-E (low emissivity) coating. Avoid low-E coatings that block anything but infrared radiation.
Double-pane UV-resistant greenhouse plastic glazing is also a potential candidate. Using two separately purchased sheets of tempered glass with a homemade spacer won’t save much money but does have the advantage of allowing disassembly of the glazing if crud builds up between the two sheets. If your homemade double glazing is experiencing condensation problems, a few 1/16-inch weepholes can be drilled very carefully into the top sheet, a few at the bottom and at the top. This will allow enough air to pass through to remove the moisture but not so much as to affect the insulative properties of the glazing.
Regular window glass is relatively inexpensive but is not recommended, as it is vulnerable to cracking from either heat stress or impact. However, cracks rarely allow airflow and hence heat loss and thus do not adversely affect the oven’s performance. Cracks can be semi-permanently fixed using clear 3M Magic Tape.
Tempered glass is very strong in some respects. It is quite likely to survive a hard blow from a baseball bat. However, be very careful not to nick tempered glass. If you do, you will end up with an expensive pile of glass pebbles. One touch with a metal screw, and the whole pane will magically crumble before your eyes. Take pains to carefully pad the glass during handling and storage, paying particular attention to the edges. If the glass is placed with its weight on a grain of sand on a hard surface, the effect will have you on the phone ordering replacement glass.
At some point in the life of your oven, you may very well need to replace the glazing no matter what you use. Keep this in mind as you build your oven, and don’t make it too difficult to replace.
Solar Wall Ovens and Eaves In order to clear the eaves and be in full sun the oven must be extended out from the house. This is accomplished via a pass-through tunnel. Note that some passive solar homes or retrofitted passive solar homes have very large eaves. This can mean that the oven projects very far out from the house. The higher up the oven is placed, the longer the pass-through tunnel will need to be, as the eave produces more shade the closer something is to it. A trade-off exists between the accessibility of the oven and the length of the pass-through tunnel. Very long pass-through tunnels could potentially be difficult to support structurally, as well as being inaccessible from the interior (and just plain looking weird). One potential solution to this is either to make the oven removable in summertime so that it can be placed away from the eave or to have a secondary solar oven for cooking in the summertime. In addition to making construction of the pass-C through tunnel easier by making it much shorter or nonexistent, this would ensure the heat from the oven did not enter the house. If the southern wall does not contain much additional glazing (if solar heating in winter is obtained by solar air heaters on the roof, for instance), then additional overhangs (including trellising) are not as necessary and may be abandoned in f of an accessible solar wall oven. |
Installation guidelines. The floor of the pass- through tunnel should be set such that the oven floor is at elbow height. Assuming the door opens downward onto the pass-through floor, the upper surface of the door then will also be at the oven floor height, or close to it. This is about 42 inches high for a person 5 feet, 6 inches tall. The tunnel opening itself ought to be something like 18 inches in height to allow adequate access and visibility into the oven. The tunnel walls ought to be insulated to prevent heat loss from the home in winter or heat infiltration into the home in summer. Having the top surface of the opened door and the floor of the oven at exactly the same height makes it very convenient to slide vessels and trays in and out of the cooker (see figure 4.11).
One should consider installing a door at the kitchen (indoor) end of the tunnel. This would be a second door in addition to the oven door proper at the far end of the tunnel. The kitchen door may open downward 90 degrees to form a shelf or fold 180 degrees in any direction against the wall to allow closer approach to the oven. The kitchen door provides a barrier against loss of room heat via the pass-through tunnel walls—a potential problem in winter. Ditto for unwanted heat infiltration from outside in the summer. This consideration is significant if the tunnel walls are not insulated. Another benefit of having doors at both ends of the tunnel is that the space between them is often at a good temperature for raising bread dough or making yogurt. For security against intruders gaining entry via the cooker, say by removing the glazing, one might consider making this kitchen door stout and securely lockable.
On a southerly facing wall oriented somewhat to east or west, consider slanting the cooker relative to the wall so that it faces due south. For a house not oriented on a true north-south/east-west axis, location of the cooker on the most southerly facing wall as close as practical to the southernmost corner will give good results. In this position, the cooker will not usually suffer shading in the afternoon either from the roof overhang or from the house walls.
For a cooker mounted in a true south-facing wall, installing it close to the east or west corner will extend cooking time, particularly in summer when the sun rises and sets considerably north of the due east-west axis. For example, if mounted at the west corner, it will catch late-day sun for a longer time, particularly if fitted with a reflector that can be brought into play to scoop in the low-angle light until the sun hits the horizon. As is the case for all fixed-mount cookers, this optional reflector would have to be hinged or removable to keep it from getting in the way during portions of the day.
The cooker may be installed flush against the house if there are no eaves. However, if the house does have eaves, one must space the cooker out from the exterior of the house far enough to clear the shadow of the roof overhang. This means that the pass-through tunnel must extend beyond the exterior wall of the house to reach the rear of the cooker. The length of this projection will be greater the closer to the equator the cooker is installed. The worst case will be at solar noon at the summer equinox.
Determining the pass-through projection.
Assuming the cooker is installed in a vertical rectilinear wall oriented due south, the following formula applies to determine how far the top corner (northernmost edge) of the glazing must be positioned beyond the exterior wall of the house, given the latitude, the depth of the roof overhang, and the distance of the top corner of the glazing below the roof overhang.
Fill in the appropriate numbers to see how far your oven needs to project from your south-facing wall.
L = latitude
F = latitude factor from table 4.2
R = roof overhang (horizontal distance from eave edge to wall)
G = glazing distance below the roof overhang (vertical distance from horizontal plane of eave edge to horizontal plane of topmost edge of glazing)
P = projection of pass-through (distance from house exterior wall surface to edge of glazing).
P = R - (F x G)
This equation is presented below as such calculations appear on tax forms.
1. Enter latitude degrees 2. Enter latitude (L) factor (F) from table4.2 3. Enter glazing distance G 4. Enter roof overhang R 5. Multiply line 2 times line 3 and enter the result here 6. If line 5 is greater than line 4, enter zero on line 8 7. If line 5 is less than line 4, subtract line 5 from line 4 and enter the result on line 8 8. Pass-through projection distance (P) |
1 2
3. 4. 5.
8. |
OUR SOLAR OVEN
Since a solar oven is essentially just a small box with some glass, shiny metal, and insulation, it wasn’t too hard for us to come up with scrap materials from other house projects to build a substantial and durable wooden one. We built our solar oven before reading much of the literature included in this section, and we’ve been satisfied with how this solar oven works, so we’d like to take a few moments to describe it.
Our solar oven sits outside on our green keeping our plants, solar hot-water heater, and PV panels company. This is where we worship the sun, and where the sun returns our praise with delicious food, flowers, electricity, and hot showers.
To begin with, we built out of scraps of half-inch plywood a double-walled box that looked like figure 4.12.
This was done with wood glue and 1½-inch screws; we predrilled for each hole to lessen the odds of splitting the sides of the plywood. Three-quarter-inch plywood would be easier to work with if you have some. We made the gap between the two layers of plywood a bit larger than 2 inches to fit in some scraps of 2-inch foam insulation we had lying around. Heat retention becomes increasingly difficult as the difference in temperature becomes greater; the problem is acute in solar ovens since the difference in temperature inside and outside the box can be over 200 degrees E This means effective insulation is critical, so using a high-R value insulation like foam seemed like a good idea.
Foam insulation has the potential to be compromised at temperatures greater than 300 degrees F. In the summer it may be wise to place a few dark rocks in the oven to regulate its temperature and keep it from going above 300 degrees F if overheating is a problem. This also helps even out the oven temperature so that a steadier cooking heat is maintained when clouds pass over.
Scraps of foam are easy to come by. Packing peanuts, crushed-up coffee cups, and takeout containers are potential sources. Pack these in your solar oven instead of throwing them in the garbage, since most places don’t recycle them. Dipping these materials in a clay slip (see the “Insulation” section of section 7) can lessen the chances of these materials being degraded by the heat or potentially catching fire, although you want to keep the amount of extra thermal mass you add to your oven to a minimum so it doesn’t steal heat away from your food. If you have any doubts about the insulation you are using, it might be worthwhile to make a removable panel that will allow you to periodically check on it to make sure the heat of the oven has not degraded it.
After the box was assembled as shown in figure 4.12, we built out a perimeter of wood to 2 inches thick on the underside of the bottom piece of plywood, filled in the gaps with the insulation, and then covered it with plywood. Elsewhere we filled in the plywood with the insulation and then capped it with strips of wood 1 inch thick that we ripped with a circular saw to the proper width.
On the bottom of the cooker we ran two strips of 1-inch-thick wood to elevate it and keep it dry.
To make the glass door we ripped 2 x 4s in half and built a simple rectangle with these, screwing through the sides (flat angle irons would also have done the trick), then tacked strips of 1 x is around the perimeter as shown in figure 4.13.
We made sure the door was square so that the glass would fit in there easily. We had a piece of glass cut to the dimensions of our opening minus 1/4 inch on each side. The glass went in and then we glazed it. Double glazing, as suggested in the solar wall oven project above, might have made the need for our reflectors less necessary. We could also have decided on fixed glazing and an openable back door to avoid the glare when we put items in and out, and potentially save on heat loss when we open our oven from the top.
The box and door were primed, caulked, and painted as needed. On the interior we tacked up extra pieces of aluminum flashing we had lying around and then painted these black with flat paint. These pieces do an excellent job of absorbing the sun’s rays and reradiating them back into the oven. If you don’t have these, you could just paint the inside black and forget about the metal, although the air gap in between the sheet of metal and the wood helps prevent heat loss through the walls.
Next we ran two strips of 1 x 6 material up the back side of the oven, starting at the bottom. We needed these to stick out high enough above the oven to hold the cover open, so we made them stick up a few inches more than the height of the glass door. We ran them up the sides of the oven, then put three or four screws in each one to hold it in place. Then we ran a board between them at the top for a crossbar.
The glass door hinges on the bottom and opens outward. We had to run an additional piece of 2-inch- thick material to support the door hinges. The metal cover over the glass hinges above the door on the two strips of 1 x 6 sticking up.
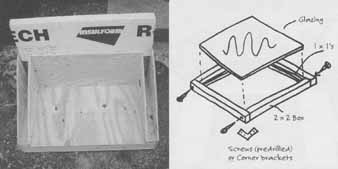
FIG. 4.12 (L). Inserting the insulation into the frame of oven. FIG. 4.13 (R). Assembling the door of the oven.
When the cover is closed, it protects the oven from rain and the glass from hailstones or other damaging objects. When it’s open, it concentrates the solar gain when the sun is lower in the sky by having reflective flashing on its underside. We had extra material around from our roofing project for this. Scraps of roofing tin went on top for rain protection, and reflective aluminum flashing covered the bottom for reflection.
Weather-stripping runs around the perimeter of the glass door and there’s a clasp to close it down tight. The cover is held up with a chain that loops into a screw set in the back side of the crossbar. By adjusting which loop of the chain we hook on the screw, we are able to adjust the angle of the cover according to the season to direct additional sunshine into the oven. Around the summer solstice, this provides little additional heat, but rarely is it needed then.
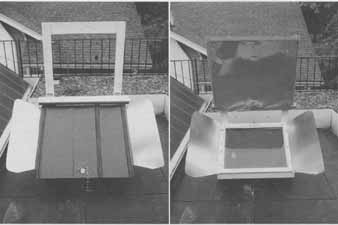
Fig 4.14 and 4.15
On the door we screwed in two “ears.” These are two pieces of 24-gauge sheet metal we cut from a section left over from our woodstove installation. The 24- gauge metal is stout enough not to be bent in the wind but thin enough to cut with tin snips, and it helps direct additional sunlight into our oven. We rounded the edges so they wouldn’t cut anyone. The bottom of these two ears stick out just enough so that when we open the glass door it’s propped upright, resting on the lower edges of the two ears, which are stout enough to support the door.
Typically while we’re cooking we don’t turn the oven, leaving it facing due south. It will spin if necessary, and sometimes if we don’t get started cooking until lunchtime we’ll spin it a little to the west. If necessary we could always put it on a peg on a platform for easier rotation. Our finished oven weighs around 40 pounds and likes to stay put. It’s definitely not portable, but it’s not difficult to move with two people if necessary. Wind gusts, even with the cover up, have not bothered it, probably because it’s so bottom-heavy, and it’s held up very well exposed to the elements so far.
For cooler months we’ve added an aluminum reflector that props up on the bottom. Again, this has little additional benefit in summertime.
Typically on a sunny day with at least four good hours of sunlight we can cook most anything we want. We cook large batches of different varieties of beans, typically four dry cups at a time, which produces about double that amount cooked. We take these four pints, use one shortly thereafter, and freeze the other three in pint-size containers. Bread, stews, and chilies we make in quantity as well, freezing the extra if necessary.
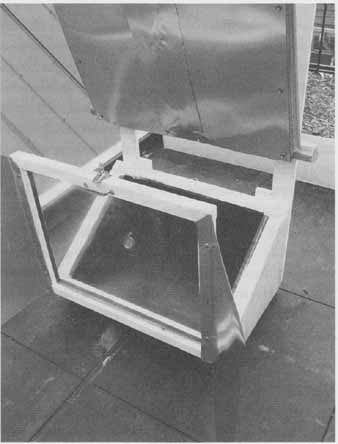
Fig 4-16
On sunny days the oven stays between 250 and 300 degrees F from midmorning to mid-afternoon, usually around five hours. The hour on either side is usually between 200 and 250 degrees F and can still be a useful cooking temperature, although not for baking.
The solar oven does excellent double duty as a dehydrator. We have three wire racks that fit in the oven quite nicely. Extra fruit and /or mushrooms are stacked in the racks with the clasp propping the oven open rather than sealing it down tight. Propped open like this, the oven typically stays between 150 and 175 degrees E Depending on the water content of the food you’re dehydrating and the amount of sunlight available, it may take more than one day for proper dehydration, although this is rare. Obviously, nothing can be cooked in the oven when this is happening, and there are times when it would be nice to have a separate solar dehydrator. As the bounty of our fruit trees is increasing annually, we will probably need to build one in the future.
PREMANUFACTURED SOLAR OVENS
We have been happy to note the increase in the number of companies making pre-manufactured solar ovens over the last few years. Ideally, every home should have one. Those recently available include the Hot Pot Simple Solar Cooker ($120), Global Sun Oven ($240), and Tulsi-Hybrid Solar Oven with electric backup ($300). Tried and true is the Sport Solar Oven ($150) from the Solar Oven Society. We wish we could say we’ve tested them all, but we can’t. If you want to go for reliability then the Sport is the only one that has been consistently recommended to us, and it’s made by a nonprofit.
COOKING WITH BIOMASS
Wood is the most common and readily available biomass for cooking, at least in the eastern half of the country. The same clouds that limit the use of solar heating and cooking also bring rain, vital to the accumulation of stored carbon energy in plant materials. So on days when direct solar energy is inaccessible because of cloudy weather, we can still access it sustainably by judicious and responsible use of biomass, although we must bear in mind that the transfer of direct solar energy to stored biomass results in efficiency losses. For this section, we’ll focus on cooking with wood. Cooking can also be achieved by using liquid fuels derived from biomass, such as plant oils and ethanol, and we’ll discuss this in a minute.
Burning wood can produce a tremendous amount of heat. Unfortunately, only a fraction of it can be directed to the pots and pans holding our food. Great strides have been made in understanding how to improve the transfer of heat from fire to cooking vessels, thereby increasing the efficiency of biomass combustion. Unfortunately, these have not yet translated into improved manufactured products that a homeowner can purchase and install. Stoves more efficient than purchased products can be built at home, and existing Stoves can be modified to improve the efficiency of their combustion and heat transfer. These principles are dealt with in greater detail in the “Rocket Stoves and Homemade Mass Heaters” side-bar in section 7.
Combustion produces radiant heat, which is dispersed in energy waves in many directions. For this reason, it’s important to limit our use of cooking with wood to those times when our homes also need heating. Having alternative methods of cooking avail able ensures we can make the best use of our wood resources and keep our homes from being unbearably hot in the summer. Wood fires also have the potential to produce hot water when it’s cloudy.
New wood cookstoves can be quite expensive. Determine the exact model for your needs, making sure to match the heat output of your stove with your house heating requirements, and shop around. You’ll want to check a local retailer, although our experience has been that individual dealers usually have a very selective display of what’s available. To make sure you’re aware of all the available models, an hour or two of Internet research will pay off handsomely, even if you decide to order the stove through a local retailer. See the resources section for nationwide dealers. Before you order from a national dealer, it’s always worthwhile to call and see if a floor model is avail able for a discount, and remember that shipping costs can run into the hundreds 0 dollars. If you own or can borrow a pickup truck, you can save even more. Picking up a stove at a nearby shipper’s warehouse rather than having direct home delivery should save about half the shipping cost.
Used cookstoves are occasionally available. Keep in mind that these old stoves are unlikely to work properly and will almost certainly need some repair work. Broken cast iron is almost impossible to repair, so even small cracks or chips can mean a leaky stove. Since death by carbon monoxide poisoning is a possibility with a leaky stove, you’ll need to proceed with extreme caution if you’re considering purchasing a used stove. Basically, unless you already have one or can get one for free, they are likely to be too much of a hassle and potential danger. An outdoor firing will let you know how badly any woodstove leaks.
Cooking can be done on existing installed wood-stoves, but much depends on the amount of fiat space on top of your stove. We use clay tiles and copper trivets on top of our stove to give us a range of cooking temperatures.
For ovens, the only working option we know of for existing stoves is the Coleman camp oven. It’s flimsy, small, and uninsulated, but it works if the fire is hot enough. We’ve heard tell of other options, including one that replaces a section of stovepipe, but we haven’t been able to get our hands on any. Other options include Dutch ovens (cast-iron pots with tops) or clay ovens. Fireplaces are inherently inefficient and should not be used at all without some type of insert.
If cooking with wood during summer months is unavoidable, a cob oven outdoors is relatively straight forward to build and will keep the extra heat out of the home. Make sure to combine as many cooking tasks as possible for each firing.

FIG. 4.17. A tested rocket-stove design that greatly improves both
combustion and heat-exchange efficiency. Running the heat of the fire
around pots instead of under them greatly reduces the need for firewood.
Wood Cookstove
Project Time: Several weekends.
Cost: Expensive ($2,000—5,000 for new installations).
Energy Saved: Low if used only for cooking; high if also used for home and /or water heating.
Ease of Use: Medium. Takes time to get fire started and must be maintained. Temperature can be irregular and hot surfaces increase odds of accidental burning.
Maintenance Level: High. Maintaining a steady supply of cured wood is definitely a chore that requires lots of physical labor. Having wood delivered can lessen this but not eliminate it, and it comes at the cost of energy independence. The firebox requires periodic cleaning and the stovepipe must be occasion ally checked.
Skill Levels: Carpentry: Advanced.
Materials: A purchased or assembled cast-iron cook stove, regular stovepipe to length, insulated stove pipe to length, a ceiling/roof chimney kit (available from hardware stores or woodstove dealers).
Tools: Tin snips, saw, drill, screws, hammer, roofing sealant, caulking gun.
Caution: Installing a heavy cookstove is an onerous task and will require three or four healthy adults with strong backs. Holes must be cut in the ceiling and roof and great care taken to maintain the required clearances dictated by the particular model of stove you are installing. More so than in other projects, cutting corners is not acceptable, as the consequences could be a fatal house fire. If you have any doubts about your carpentry skills, hire a professional carpenter to assist you. In most locations woodstove installations require notification of both the fire marshall and your house insurer.
Classic wood cookstoves are beautiful and substantially better for cooking than a standard woodstove, especially since they include an oven. They can be quite expensive and difficult to install, so be sure you’ll get your time and money’s worth before proceeding.
Most wood cookstoves have a common basic layout. There is a firebox to one side under the stovetop, and it is filled with wood from a small door on the front. Once the fire is started, the smoke and heat are carried over the oven door and below the four to six burners located on the top. Often, there is a place on one side of the stove for an optional chamber to hold gallons of water that will be gradually heated as the fire burns. Newer stoves have combustion-control knobs to moderate the temperature of the burners and the oven. Older stoves might be lacking this feature and temperature must be controlled by adding wood or controlling the draft.
Temperature is regulated in the oven by how close the dish is to the fire. To ensure even baking, it is necessary to periodically turn the dish. In addition, most wood cookstoves have optional warmer boxes that can be placed above burners to keep already-cooked items warm.
The importance of using properly cured wood can't be overemphasized, as cured wood has several times as much available heat as green, or unseasoned, wood. Read the Section “Heating with Biomass” in section 7 for the basics on cutting, storing, and using wood.
Once you’ve determined where you want to locate your cookstove (presumably somewhere in your kitchen), then installation follows the same procedure as for a standard woodstove. Read the section “Woodstove Installation “elsewhere in this guide.
Outdoor Cob Oven
Renter friendly.
Project Time: Several weekends.
Cost: Inexpensive ($50 - 100).
Energy Saved: Low.
Ease of Use: Medium. Takes an hour or so to really get up and going.
Maintenance Level: Medium. Requires a supply of seasoned wood.
Skill Levels: Carpentry: Moderate. Masonry: Basic.
Note: Some experience with cob is helpful but not required.
Materials: A cubic yard of sand, half a yard of clay, straw, strips of rot-resistant wood such as cedar or oak, scrap pieces roofing tin or equivalent wood shingles, 4-foot ridge cap, 4 feet 0 5-inch or 6-inch black stovepipe with cap, two 80-pound bags of cement, unglazed tile (optional), foundation stones, gravel, landscaping cloth, four to eight 2½-foot pieces of rebar.
Tools: Shovel, masonry hoe, tarp or masonry basin, saw, drill, screws.
An outdoor cob oven makes much more efficient use of firewood than an open fire or grill and keeps heat out of the home on warmer evenings. It’s a great alternative when the solar oven isn’t getting any rays and makes a great neighborhood gathering spot.
This design allows multiple dishes to be cooked for each firing and has a roof to protect the unfired masonry (the cob) from water damage. This allows for multiple uses from each firing: baking of breads and pizzas, cooking of grains and legumes for stews and soups, and , as the oven cools, dehydration of fruits and vegetables for preservation.
This oven is a hybrid of a few different prototypes. The firebox is made of cement block filled with insulation. Cooking is done on a slab covered by a sloping A-frame cob oven. The fire heats the slab from underneath and the smoke exits through the stovepipe. The cob helps retain heat and allows the stove to be used for an extended period of time. The high thermal mass of this stove means that a great deal of wood will need to be burned to heat it up, although the retained heat will provide for a great deal of cooking and baking. The design 0 this stove could certainly be improved by incorporating elements of high-efficiency rocket-stove principles, although we are unable to offer detailed directions in this regard because of our lack of experience. We highly recommend reading Aprovecho’s publication on building high-efficiency cookstoves before undertaking construction of an earth oven so that you can make sure the oven described here fits your needs. See the resources section at the end of the section.
Building with cob is time consuming, so we want the finished product to last. Fortunately, finished cob with adequate water protection has the potential to stick around for several centuries. To ensure this happens, we need a proper foundation.
Preparing the foundation. The footprint of the cob oven will be 3 x 3 feet. If the subsoil where you are building is clay, this is an excellent time to obtain the necessary clay for the cob oven you will soon be building. Dig out to below the frost line the entire footprint of the oven plus a few extra inches all around, making sure to separate the topsoil from the clay. You don’t want topsoil in a cob mixture, as it contains too much organic matter. Save it for your garden.
Lay down landscaping fabric. This is a petroleum product but will ensure that the foundation lasts a very long time. After you lay down the landscaping fabric, fill the hole with gravel, pouring it in a few inches at a time and tamping after each layer to make sure it is well compacted and settled. Rainwater that accumulates in this hole will drain through the gravel and seep away underground. Limiting the amount of water that gets in this hole will make sure the footing functions properly, so try to berm soil around the perimeter of your foundation to drain water away from your oven.
Once your gravel has filled the entire hole to ground level and is properly tamped down, it’s time to lay the aboveground foundation. The easiest if not the most attractive aboveground foundation material is cement block. Although in general this guide gives aesthetics short shrift compared to energy efficiency, your cob oven, soon to become a prominent feature of your landscape, might deserve a little extra time and effort in this department. Depending on your masonry skills, you may want to lay some finer-looking fieldstone or brick. Note that if these materials are laid dry, it will be necessary to parget, or stucco, over the inside of the foundation to ensure a properly functioning firebox. If you do use cement block, you can hide it with a quick stucco job on the outside. Whatever you use, it should be about 16 inches high, and the top of the foundation wall needs to be solid (with caps if you’re using block) and at least 8 inches wide.
Building the slab. To complete the “first floor,” or firebox part of the cob oven, you first need to build your slab. This will be the portion of your oven that gets heated up and cooks any pizzas or breads that will be placed directly on it. If the idea of cooking directly on concrete does not appeal to you, you can finish off the top of the slab with clay cooking tiles or a cob floor.
To make the slab, build a simple square frame from scrap lumber, securing it with screws, such that it has a 2½ x 2½-foot interior. Put the frame on a flat surface, ideally a scrap piece of plywood or bare dirt (i.e., not something concrete will adhere to), and center a section of the stovepipe in the box 8 inches from one side, tapered end down.
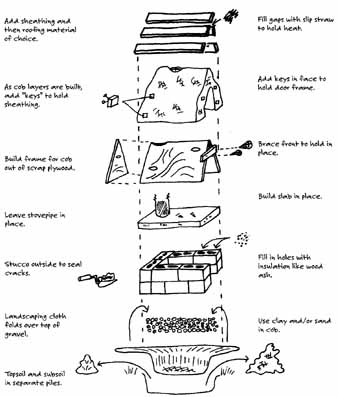
Fig. 4-19:
Prop up the pieces of rebar with pieces of gravel or wire so they’re about an inch up in a crisscross pattern (hardware stores sell what are called rebar “chairs” specifically for the purpose of elevating rebar off the ground). Don’t skimp on the rebar, as the slab will be very difficult to replace later if it breaks. Mix the cement (which should be marked “S” for structural as opposed to “N” for nonstructural) and sand, in the ratio given on the label, in a wheelbarrow or masonry tub with some of the leftover gravel. Shovel this mix into the frame, making sure it doesn’t knock over the rebar or stovepipe, and making it about 2 inches thick. If this will be your cooking surface, smooth the concrete with a trowel by jiggling it, which causes any of the larger pieces to sink, and use the unscored side of the trowel or float to make the face as smooth as possible, especially in the middle where most of the cooking will be done. Write your name and date along the edge and then go inside and make arrangements on the phone with a friend to come by the next day and help you lift the slab onto the top of the foundation.
After a day or so the slab will have set up. Remove the frame and then heave the slab onto the foundation, placing it all the way to the front with the stovepipe hole at the back. This should leave you with several inches of overlap onto the foundation wall and several inches of foundation wall still exposed. It’s almost time to start cobbing.
The cob frame. To hold the cob build a frame out of scrap plywood in the shape 0 a triangle. See figure 4.19. The idea will be to build the cob layer by layer up the side of the forms and around back, with the stovepipe running up the inside. Once the cob has been built all the way up the plywood frame, you will then disassemble the frame and remove the plywood pieces Out the front, so bear this in mind as you build your frame.
As you build up the layers, you will need to place “keys,” or small blocks of wood with nails sticking out of them, into the face of the cob. You will be attaching your roof sheathing and door frame to these pieces of wood once you have completed the cob. Nails or screws that stick out of the keys allow it to embed in the cob and become locked in place after it dries.
Layering the cob. Mix the cob (see “Cob How-To” in section 7) and plop it onto the foundation wall around both sides of your plywood frame and around the back of the oven where your stovepipe is. At some height, the cob will begin to “ooge,” or press out at the sides, probably at about 4 - 6 inches depending on the wetness of your mix. Once you’ve determined at what point your mix of cob will ooge, keep your fresh layer a little shorter than this. Once your first layer is done, add a few keys to hold your roof sheathing and door frame. It’ll take a day or two of drying before this cob layer will firm up enough that you can add another layer, although you don’t want the cob to dry out completely. Make sure to give it a good soaking before you add the next layer or if you can’t get to it for another week or two. To keep the cob from getting too wet from rain or drying too fast in the sun, it’s best to cover the oven with a tarp. Direct sun can lead to too-quick drying and excessive cracking and structural weakness.
From here on out it’s mostly repeat and wait until you get to the top. A strip of wood to catch the roofing material should be placed into the cob on the sloped sides horizontally every 12 - 16 inches. These strips also need to be well keyed, as they will support the roofing material.
As you near the top, the more of an arch you can create the better, as this will distribute loads better and contribute to the longevity of your oven. Remember to continue the stovepipe out the top before you finish your cobbing. Once you’re done and the cob has set, remove the bracing you built to hold the cob in place.
Adding the door frame and door. You can safely build a wood door frame that won’t burn as long as there is some cob separating it from the interior of the oven. Attach two strips of wood that come up to a point and make a triangle to the keys embedded in the cob. It’s best to use rot-resistant wood such as cedar or oak (pressure-treated wood should not used near food preparation areas) or to protect the wood with linseed oil before application. If there are any gaps between the wood door frame and the cob, fill these gaps with some spare cob.
The door will need to be made of metal. Use some scrap thick metal (24-gauge or stouter). If you can double this metal up to make an air gap, that will help keep the heat in your oven. Leave the door separate from the oven so that it can be removed, holding it in place with eye locks, dead bolts, or a clasp.
Adding a rack. You can get extra mileage out of your oven with a rack halfway up. If you want to do this, get two pieces of rebar and an extra grill rack. Before placing the roofing material on, use a masonry bit to drill out two holes larger than the rebar into the side of your oven.
Slide the rebar through one hole and , using a level, mark the spot where the rebar hits the opposite wall. Remove the rebar and drill a hole about 2 inches deep at this spot, then put the rebar back. If the rebar is still sticking out, you’ll either need to drill out the hole in the other wall more or cut the rebar with a metal blade. Repeat this in the other hole and fill the holes with cob. Place the grill rack on the two pieces of rebar. This makes an excellent place for baking and keeping foods warm.
The oven roof If you’ve ever had a hankering to try out some new or forgotten roofing material, this may be the time to do it. Nothing beats roofing tin for ease of installation, and recycled rusty stuff has a classic look that complements the color of cob. Slapping some linseed oil on rusty tin yearly will get you a long- lasting roof even out of the roughest-looking pieces. Be sure to leave a few inches of roof overhang on the front and back to keep the cob out of the rain. Cut the ridge cap around the stovepipe and screw it on. Put on your stove cap if you have it.
You may find that the naturalness of cob calls for a more natural roof. In that case, you may want to consider wood shingles. These can often be purchased from lumberyards, and you won’t need many. Sometimes they’re sold as framing shims, so ask for that also. Or you could make your own. Since we’re not too particular about a leak or two for this project, you may want to try out making some.
Making wood shingles by hand is a dying art and uses specialized equipment like a froe and mallet. But for a small project, a chopping maul and a pair of wedges will do. Round up a dozen 2-foot sections of wood (preferably white oak) 8 - 10 inches in diameter. Draw parallel lines about a half inch apart across the top of the log section.
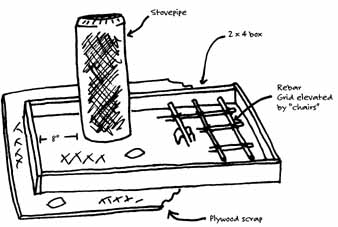 FIG. 4.20.
Then, working from one side to the other, use the wedges to separate the sections, alternating hits between the two wedges. This will produce a fair number of not very useful pieces in addition to the shingles, but these will make great kindling for your oven. If your wood is reasonably cured and dry, you can go ahead and affix the shingles after you make a few, leaving 6 - 12 inches of overhang for each layer. Be sure to leave a few inches of space between your wood shingles and the stovepipe, and cover the gap with some metal flashing. The pipe needs to extend at least a foot above the roofline.
Your cob oven is ready to go. Collect some firewood, invite some neighbors over, fire up the oven, and start making your pizza dough.
COOKING WITH BIOMASS-DERIVED LIQUID FUELS
Plants concentrate energy, and it’s possible to take this concentrated energy, found in various plants’ sugars and oils, and refine it into stored liquid energy People run their cars on vegetable oil and ethanol, so it shouldn’t be a surprise that you can cook with these liquid fuels, too.
What a much better use of these fuels it is to cook delicious and nourishing meals rather than expending it in the gluttonous automobile, with efficiencies typically less than 1 percent (see section 11). A typical taxi burns as much fuel in one day as a small family uses cooking in a year. However, the current problem is the lack of bio-fueled stoves on the market. We hope to see many more available in the future.
Two methods of cooking food with liquid biomass derived fuels are possible, the first being ethanol, or drinking alcohol, which is derived from things like sugarcane, sugar beets, and , in the United States (because of massive subsidies), corn. It’s also possible to run a cookstove using plant-derived oils, or what we commonly call vegetable oils, although the oils are actually derived from seeds and nuts, and not things like broccoli and spinach. Both of these stoves played an interesting role in our final departure from our formerly fossilized lives; we discuss them in more detail in the “Our Story” section earlier in this section.
Haybox Cooker
Renter friendly.
Project Time: One hour.
Cost: Free.
Energy Saved: Low.
Ease of Use: Easy.
Maintenance Level: N/A.
Skill Levels: None.
Materials: Cooler, haybales, OR box and cushions
Tools: None.
Haybox cookers refers to any insulated boxes that finish the job of cooking begun on another stove by retaining the heat in the food. The first and easiest method of constructing one of these cookers is with bales of hay or straw, materials that are highly insulative. Things that need to be simmered for long periods of time can instead be brought to a boil and then covered with insulation. The haybox cooker then accomplishes the rest of the cooking, doing as good a job as the simmering would, but without using any additional fuel, although it does take longer. Effective cooking can continue as long at the food remains at about 180 degrees F or higher. The best thing about haybox cooking is that you don’t have to worry about overcooking or burning resulting from forgotten simmering pots!
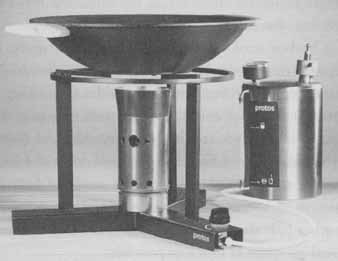
FIG. 4.21. PROTOS PLANT OIL COOKER. This stove, developed by BSH Bosch and Siemens, can use a variety of plant oils for cooking rather than firewood.
This means much less pollution, fuel use, and unwanted heat in the kitchen.
Since the principle of the haybox is so simple, there are a variety of ways to create an effective one. If you have a solar oven, then this can do double-duty as a haybox cooker on cloudy days or after nightfall. A simple insulated box with an insulated top will work just fine. For instance, a cooler could do double-duty as a haybox cooker. The less additional air space, the better. The pot could be placed in a cardboard box and covered with cushions on all sides (including the bottom). The pot could be put inside two bags with insulation sandwiched in between. and , of course, once brought to a boil and removed from the stove, the pot could be placed in a box made of four hay bales, with some scattered straw on the bottom and another bale thrown on top, again limiting the additional air space as much as possible.
The concept is simple and saves precious cooking fuel. Integrating a haybox cooker into your kitchen will help reduce your need for other forms of fuel, fossilized or not.
COOKING WITH BIOGAS
Biogas is another name for methane (CH) a commonly occurring product of anaerobic decomposition. Anaerobic means “without oxygen,” and anaerobic decomposition is what happens when organic material is broken down in a water-saturated environment, typically underwater. When this happens, an entirely different set of bacteria are involved than with typical aerobic decomposition, which is what generally happens in your compost bin and everywhere else outside not underwater. The primary bacteria involved in anaerobic decomposition are members of the family Methano-bacteriaceae, the main by-products from their consumption of submerged animal waste and plant matter being methane gas, carbon dioxide, and an inert slurry of simple organic solids. As it happens, methane is flammable and is one of the finest cooking fuels known, and the inert organic solids make a fabulous garden fertilizer.
Today, biogas is produced from landfills and the waste from large animal farms and is often burned to produce electricity But it is possible to produce a significant amount of biogas from human waste on a home-sized scale as a supplementary cooking fuel, and where additional animal manure is available, the amount of biogas produced can be substantial. We will discuss biogas production in greater detail in section 9, along with directions on how to make some of your own. Although cooking does not have a large share of the fossil energy used in the home, biogas nevertheless is worth pursuing because it is such an excellent home made cooking fuel and it accomplishes the additional energy-saving task of composting and recycling your home’s humanure production.
Food |
Boiling Time (minutes) |
Hay-boxing time(hours) |
Rice Potatoes Soup and Stock Creamed Soups Lentils Pintos Split Peas Quinoa Millet Polenta Winter Squash Steamed Bread Chicken Beef |
5 5 10 2 10 10 10 5 5 1 5 30 6 13 |
1—1.5 1—2 2—3 1 3—4 3 2 1.5 1 1 1—2 3 2—3 3—4 |
RESOURCES
Books:
- Anderson, Lorraine, and Rick Palkovic. 2006.
- Cooking with Sunshine: The Complete Guide to Solar Cuisine. New York: Marlowe.
- Bryden, Mark, et al. 2004. Design Principles for Wood Burning Cook Stoves. Eugene, OR: Aprovecho Research Center. Excellent booklet covering the basic principles in building a well-designed biomass cooker. A must-read. Downloadable from www.aprovecho.org.
- Sass, Lorna. 2004. Pressure Perfect: Two Hour Taste in Twenty Minutes Using Your Pressure Cooker. New York: Morrow. Good recipes and information on cooking with a pressure cooker.
Web:
- Aprovecho Research Center. Research papers on stove types and designs. Great site for those interested in building their own biomass cooker. www.aprovecho.org
- Solar Cookers International. Great nonprofit and an excellent Web site. Also sells the CooKit premade panel cooker for around $25. www.solarcookers.org. Many how-to designs are archived at their plans page: www.solarcooking.org/plans
- Solar Cooking Wiki. Collection of ideas and plans for solar cooking, including discussion and an excellent compendium of solar cookers so you don’t reinvent the wheel. If you’re looking to branch out and try your own solar-cooking design, this Web page is the place to start. http://solarcooking.wikia.com
- Solar Oven Society. Nonprofit promoting solar ovens and makers of the highly regarded Sport Solar Oven, retailing for around $150. www.solarovens.org
- Zen Stoves. Fabulous compilation of make-your-own alcohol stoves. Many can be made in just a few minutes. Great for camping and emergencies. http://zenstoves.net
Products
- Lehman’s Non-Electric Catalog. Lehman’s sells new wood cookstoves. www.lehmans.com
- Protos Plant Oil Cooker. www.plantoilcooker.com
Next: