Underfloor heating is typically used as a supplemental system to warm tiled floors. An advantage is that there are no baseboard heaters cluttering up wall surfaces, and the heat it provides is particularly even and comfortable. You can embed plastic heating pipes or electric cables in a solid floor, but this is a realistic option only for new projects such as additions. If you want to warm an existing floor, it is easier to use electric under-floor heating kits, which are designed to be laid on an existing floor surface and then covered with ceramic floor tiles. Check with the local authorities to see if these systems meet code requirements.
SAFETY FIRST!
Always follow all manufacturer’s guidelines and local building codes when attempting any new DIY project, especially when the project involves electricity and heating elements. Check if you are allowed to install a new radiant flooring system in your jurisdiction. Even if you are, you may need to file paperwork and plans with your local planning office for approval before you begin a project involving the heating system in your home. If you are not confident about completing any projects yourself, contact a professional organization for qualified leads.
BUILT-IN UNDERFLOOR HEATING
Systems that use pipes or cables buried in concrete floors cannot easily be installed into an existing house because of the upheaval involved in excavating the existing floor. This has to be undertaken to avoid raising the floor level by pouring a new concrete floor. However, these systems can be easily built during construction of a new home. Modern under-floor heating systems are efficient and reliable, and can be used with almost any type of floor covering. The heat provided by the system is even from floor to ceiling—there are none of the hot and cold spots that are created by wall-mounted registers, radiators, wood stoves, and fireplaces. Once the floor slab warms up, its temperature is thermostatically controlled, and it needs very little extra energy to keep it warm.
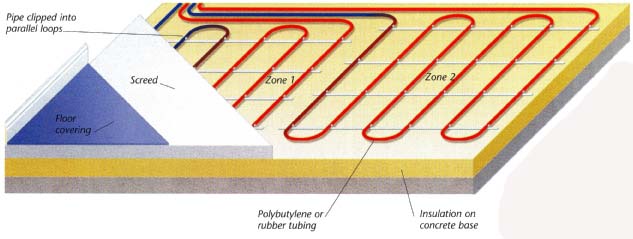
Above:
Hot-water heating system: In an addition, floors can be heated
by hot water from the existing central-heating system, if it has sufficient
capacity. It is best to leave the design and specification of the system
to a specialist supplier. They will also put you in touch with approved
installers, or supply all the equipment and instructions if you plan
to do the installation yourself.
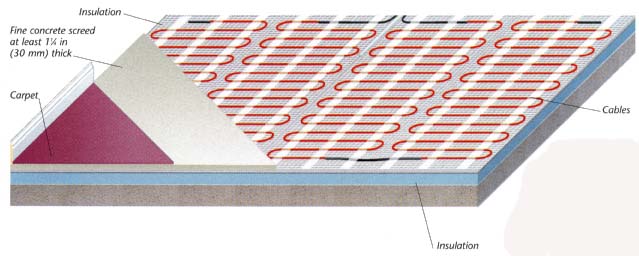
Above: Electric Heating System: This type of system uses electric conductors
contained in fabric are covered in thinset or floor adhesive. A sensor connects
to a thermostat. The National Electrical Contractors Assn. requires these
systems to have a ground-fault circuit interrupter (GFCI).
RADIANT HEATING
Radiant floor systems are designed to warm the air from the surface where the system is installed. This means the heat concentration is actually greatest near the floor. With forced-air heating systems, the hottest part of the room is typically near the ceiling. Some radiant panel systems are also capable of cooling by circulating cool water instead of hot. Some experts say that radiant heating is a cleaner way to heat a home, as there is no air passing through ducts or filters that attract dust and pollutants. As tile floor can be quite cold to the touch in early morning hours, the bathroom is the most common place a radiant heating system is considered, but is a worthwhile consideration for other rooms. Some people install floor heating systems under driveways to melt away snow. Others install radiant systems in the walls, instead of the floors.
There are many types of radiant systems available, too. Featured on these pages are electric and water systems. Air systems are available, but less common. The water systems can be heated by a variety of sources: natural gas, oil, wood, electricity, and even solar. When considering the size of a radiant heating system you require, keep in mind that the larger the surface area of the mat, the lower the actual surface temperature required to heat the space.
Mesh mats
This system uses heating cable fixed to preassembled mesh mats in evenly spaced parallel loops. The mats are available in a range of sizes. One or more mats can be laid side by side to cover the required floor area. The mat is laid on a bed of flexible tile adhesive and is covered with more adhesive, into which the floor tiles are bedded. If the mat is laid over a wood floor rather than solid concrete, you may need special thermal boards put down first to direct the heat output upward. The temperature sensor is placed between cables in the heated floor area, concealed in flat oval conduit, and is connected to the wall-mounted thermostat that controls the heat output of the mat(s). Follow the manufacturer’s instructions for testing the heating mat prior to installation. Wait for thinset to completely dry before attempting operation.
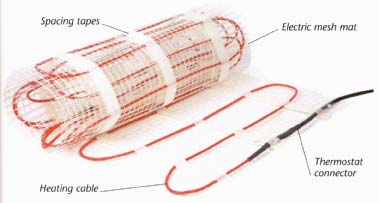
Mesh heating mat: Each mat has a connection to the wall-mounted
thermostat at one corner, so the mat should be oriented to allow easy connection.
You can trim the mesh to fit the floor area, but you must not cut the heating
cables or overlap adjacent mats or cables. Non-heating leads cannot overlap
the mat’s heating area.
INSTALLING A HEATING MAT
As well as the right size of mat, you will need enough thinset to cover the floor to the thickness needed, plus a similar quantity to cover the heating mat when the tiles are laid over it to finish the floor. You will also need duct tape or conduit to protect the power cords and the sensor cable. Make sure you have enough power on the branch circuit to supply the mat. If you are laying the mat on a wood floor you may need thermal boards to cover the mat area. Lay these first, using the fasteners supplied, and tape over the joints.
If you are installing the mat in a bathroom, it must be protected by a ground fault circuit interrupter (GFCI). A digital multimeter is supplied with the kit so you can check the mat’s insulation and cables before installing to confirm that the mat is undamaged. Repeat the test once the mat has been laid, and again before its power supply is finally connected.
![]()
A. Do an insulation test on each mat to begin with. Then, lay out the mats side by side, and trim the mesh backing if necessary.
B. Plan the power supply to the mats, so you can decide where to site the thermostat. Run the cables up the wall to this position.
![]()
C. Spread thinset on the floor using a notched trowel and allow it to dry. Unroll the mat on top of it.
D. Lay the mat on to the floor by hand, or use a board offcut. Enclose the sensor cable in oval conduit and place it between coils in the mat.
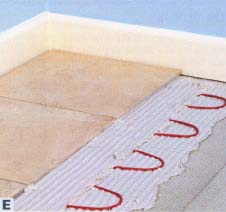
E. Connect the conductors and the thermostat, following the wiring instructions supplied. Carry out the second insulation test on the mat. Cover the mats with more thinset, and bed the floor tiles in place. Allow the floor to dry out before using the heating.
Previous: Radiators and Baseboard Heaters | Next: