Flooring Installation: Installing Trim Details
Baseboards, thresholds, and other trim and finish details are important parts of your new floor. Visually, they integrate the floor with the walls, and functionally, they conceal and protect the perimeter gap. When making selections you have many options, and they are generally a matter of personal preference. Baseboard materials range from simple square- edge lumber to intricate wood moldings, vinyl cove base, and fancy ceramic border tiles. Wood and vinyl baseboard materials are bought by the linear foot, and each length is cut to fit as you go. Ceramic tiles are bought by the tile and installed individually. There are a variety of trim pieces to cover carpet or resilient flooring edges where they abut adjacent floors.
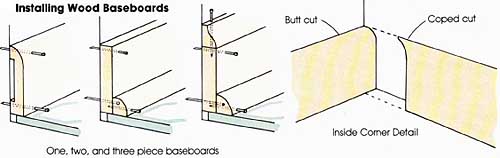
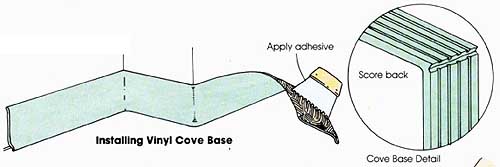
Thresholds are available in hardwood (usually oak), metal, and real or synthetic marble. Wood and metal are easy to cut to length. Both are fastened to the subfloor with screws or nails. Marble thresholds can be cut to size by the supplier, and are glued down with special adhesives. Install wood baseboards. To install wood baseboards, measure each length of board carefully so that you can cut them to fit tightly. Wherever the boards join along the wall, cut the ends at 45-degree angles rather than square. That will prevent the joints from opening up as the material shrinks or the building moves, Make miter joints at all outside corners. Inside corners should have butt joints for square-edge boards and special coped joints for molded boards. Nail the boards in place at each stud, using 6- or 8-penny finish nails. Install vinyl cove base. To install a new cove base, glue it to the wall, length by length, fitting and bending each piece as you go. To fit an inside corner, cut a V-notch in the base flange, and lightly score the back from the notch to the top edge. To fit an outside corner, cut a V-groove down the back, removing excess material from the groove. Don’t notch the base flange, since it will stretch to wrap around the corner. To install the cove base, use a notched trowel or putty knife to apply adhesive to the wall only as high as the base will cover. Or, apply adhesive directly to the back of the cove base. Press the base firmly into place. Install ceramic-tile base borders. To install tile base borders, use ceramic tile with one bull-nosed edge so the border’s top edge will be finished. Alter the floor has been installed, cut and fit each base border tile so that the floor’s grout lines continue into the border. Start in one corner. Dry-fit the first tile, and cut it to size to match the floor’s grout line. Then apply adhesive to the buck of the tile. Place spacers at the floor, and press the a into place. As you mount each successive tile, use both side-spacers and floor-spacers to keep the grout lines consistent. Grout as shown earlier.
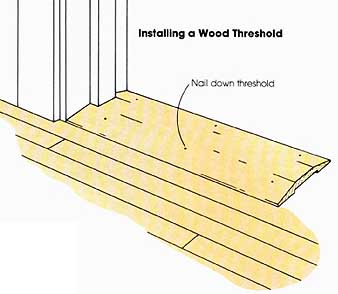
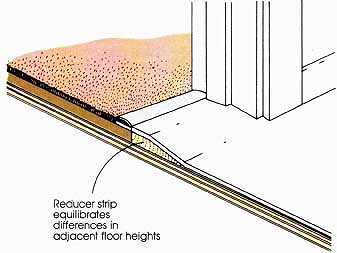
Install thresholds. Before installing a new wood threshold, undercut door stops if necessary. Then cut the threshold to length. Pre-drill pilot holes, and nail it to the floor with 8-penny finish nails Install reducer ships. When floors of different heights meet, you can use a wood reducer strip instead of a surface—fastened threshold. The reducer is bevel-cut so that its high edge is flush with the higher floor and its low edge is flush with the lower floor. This adjusts the new flooring level to the existing adjacent floor. Prev.: Cushion-Backed Carpet Next: (none) |


Wednesday, 2011-05-11 12:39