Refinishing a Wood Floor
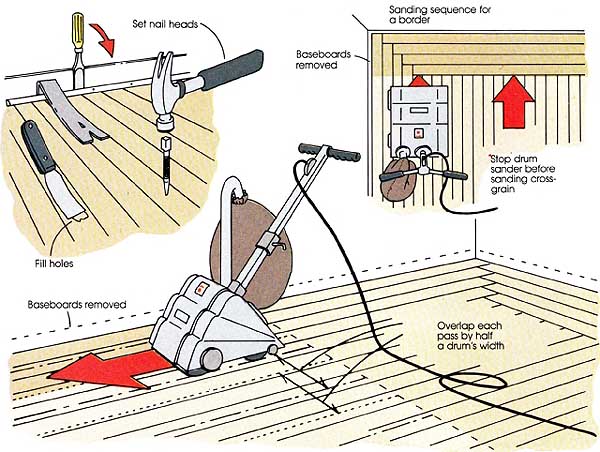
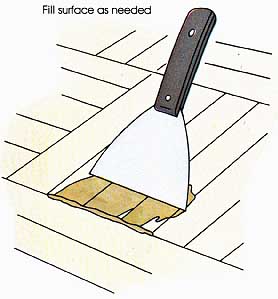
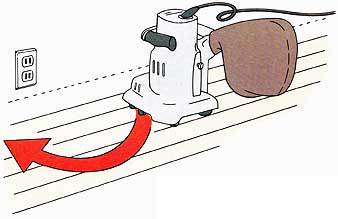
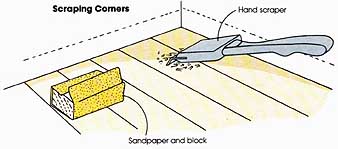
Before you decide to refinish your wood floor, make sure it isn't just dulled by several layers of old wax and grime that make it look like it needs refinishing. To check for this, dip fine steel wool in kerosene or alcohol, and rub in a circular motion to remove the old layers in a one square-foot section. Wipe off the residue with a damp sponge, apply a layer of paste wax, and buff it up to a shine. If the results are satisfactory, you may have saved yourself a lot of trouble. Clean and rewax. Before proceeding, set any protruding nails or screws and make any necessary minor re pairs. Then scrub the floor with a rented buffing ma chine, using a steel wool or screen pad. Pour kerosene or alcohol on one small area at a time, and scrub with the machine. Mop up the residue with a damp mop (rinse often), and then allow to dry thoroughly for several hours. Apply a new coat of paste wax, then two more coats in the areas of heavier traffic, and buff with the buffing machine, using soft cotton pads. Refinish. When your floor no longer looks nicely finished-in spite of spot repairs, stripping, and re-waxing -- or when it has scratches and stains that cannot be re moved, it's time to refinish. Refinishing a wood floor is a big job, but it requires more patience and practice than special skills, and many people do it themselves with great success. Before you proceed, however, make sure the wood is thick enough to, sand. To determine this, remove a floor register or pry up a piece of flooring from a closet or other inconspicuous place. If the wood is inch thick or less, it might not take another sanding. If it's 3/4 inch thick, there is no risk of sanding through it. Before sanding, remove all the furnishings, including curtains, and anything that's movable. Cover built in units and doorways with plastic sheeting to contain the dust from sanding. Remove any shoe moldings and baseboards that are easily replaced; if you want to rein stall them, mark them for later identification, and re move the nails. Set any protruding floor nails ½ inch below the floor's surface with a nail set. Make sure you have a dust mask ready, and shoes with clean soles (not black rubber, which may mark the wood). You may also wish to wear ear protectors, since most sanders are quite noisy. Fill holes and gaps. The techniques and tools for refinishing wood block and parquet floors are the same for strip or plank floors. For both types, holes and gaps should be filled before sanding. Use a wood filler close to the same color as the bare wood--scrape a corner to get a look at the color. Apply the filler with a large putty knife. Allow the filler to dry thoroughly before beginning sanding. Rent the equipment. Most rental agencies carry the specialized equipment required for sanding-a drum sander for the main part of the floor and a floor edger for corners and edges. Both machines are heavy-duty and require some strength to operate. Have the rental agent give you some operating instructions; not all machines are alike. Pay attention to procedures for changing sandpaper, lowering the drum, and emptying dust bags. You will need three grades of sandpaper-coarse, medium, and fine-in both sheets and disks. Take home plenty, because you won't be charged for paper that you return unused. Six sheets and six disks of coarse grade sandpaper, and eight each of the finer grades should be more than enough for one room. The finer grits clog up more quickly. Start with the drum sander. The actual process of sanding with a drum sander is like flying an airplane, in that takeoffs and landings are the tricky parts. The drum itself is always rotating and should be in contact with the floor only when you are pushing or pulling the machine along the floor, and not while it is standing in one spot. You must lower the drum to the floor as you roll the machine, and raise it up just before reaching a wall or other stopping point. Otherwise, you will gouge the floor. To begin, plug in the sander in another room, in order to keep the electrical cord out of your way. Start along the right side of the room, a few inches away from the wall and behind an imaginary centerline. Sand toward the wall. Then pull the sander back over the imaginary centerline and, overlapping the previous pass by half a drum-width, sand toward the wall again. When you have finished half the room this way, turn around and sand the floor on the other side of the imaginary centerline in the same manner. Always sand with the grain, unless the floor is parquet or is uneven and must be leveled. For parquet or uneven floors, sand across the floor diagonally one way with the coarse paper, the opposite way with the medium grit, and parallel to the walls with the fine grit. Go over each section twice, first walking behind the drum sander, then pulling it back behind you. Overlap each section half the width of the drum. Use the edge sander in the same way as it is used for strip and plank floors. Finish by sanding with the grain using the finer grits. If the floor has a border with boards laid perpendicular to the direction you are sanding, stop before sanding across their grain. When you finish the main boards, sand the border separately, going with the grain. Sand the entire floor once with the coarse paper. It will become rough and fuzzy, so the next step is to smooth the wood by sanding it with the medium-grit paper. Check and replace your sandpaper when you don't see any action. When this second sanding is complete, fill any remaining open cracks or nail holes with a wood filler. Use a type specified for floors, and spread it with a broad putty knife. When it dries, sand the floor with the finer grits. Sand the edges. The drum sander cannot reach every part of the floor, so you need an edger to sand along walls and in tight spaces like closets. The edger is a rotary sander, and uses sandpaper disks. It is faster than the drum sander, but is also more prone to gouging, and it sands across the grain. Therefore, start out in closets or other back spaces until you get the feel of it. Using a scallop motion of small semicircies rather than a straight back-and-forth motion helps to avoid gouging. As much as possible, avoid leaning the sander to the right or left, which forces the disk to gouge across the grain. In corners where the wood strips join at right angles, turn the edger to go with the grain, and go back and forth around that turn several times. To get at corners and other spots inaccessible to the sanding machines, use a hand scraper. Finish up those spots by hand-sanding with fine paper. Vacuum, buff, and tack the floor. Vacuum up the dust, and then check again for any holes or gaps that have been uncovered during the sanding. Fill them with putty, sand the filled areas by hand with the finest sand paper, and then vacuum again. You may want to go over the floor with a buffing machine using fine steel wool or screen pads. This will give you a very smooth, professionally-finished-looking floor. Next, vacuum the floor again thoroughly to remove as much dust as possible. Then remove the final residue of dust before applying the finish. To do this, use a painter's tack cloth or a terrycloth towel wrapped around a broom and moistened with alcohol or kerosene. Wipe the corners, edges, and gaps in the floor, as well as open spaces. Any dust left will be caught in the finish coats. At this point you should also remove any stains. Apply ordinary household bleach in carefully controlled doses to stained areas. Rinse thoroughly and allow to dry. You may need to lightly sand again and vacuum the area that was bleached. Apply the sealer or stain. It's a good idea to seal a wood floor on the same day that you give it the final sanding, 56 that the bare wood won't get dirty or absorb moisture from the air. Sealers can be clear, tinted in wood hues, or even colored. No matter which type you use, it is important to note that excess sealer that does not penetrate into the wood must be removed, or it will leave dark splotches that obscure the wood. Read the manufacturer's specifications for spreading techniques. Test a spot in a back closet or on a scrap of wood to see how many coats or how much drying time gives the best results. A sheepskin applicator will spread the stain or sealer evenly without foaming it into bubbles. Or, if you use rags, wear rubber gloves. Be careful to apply sealer and stain sparingly, and wipe away any residue alter 10 to 15 minutes. Buff the floor. Alter the sealer dries, buff it with No. 2 fine steel wool. If the room is small, simply wrap fine steel wool around a padded 2 by 4 and buff by hand. For larger rooms, you can rent a buffer. A buffing machine requires a steady hand to operate. Start in the middle of the room to avoid banging into walls until you get used to it. You will probably need to change pads once or twice, since they clog with the excess stain or sealer. Do the corners by hand with a scrap of steel wool. Alter buffing, remove dust with a vacuum and tack cloth. Apply finish. Use a finish wax or a plastic floor finish like polyurethane, and apply it according to the manufacturer's specifications. The liquid types can be applied with a paint brush or roller, although some rollers leave bubbles (a mohair roller works best). Work slowly, and brush or roll the finish with the grain. Apply two coats, with a light buffing of steel wool between them. After the second coat dries-in anywhere from 8 to 16 hours-the floor is completely finished. To be safe, wait 24 hours before moving furniture back into the room.
Floor Finishes for Wood There are so many different sealers and finishes available that making a choice can be difficult. Go to a hardware store and look at the effects of various products on samples of the same kind of wood you have on your floor. Read the labels to determine how to apply the finish, and whether it will give you the kind of performance you want. You may want to test the effect on an inconspicuous spot, perhaps inside a closet. The different types of sealers and finishes and their characteristics are listed below, to give you a starting point in the selection process. Penetrants Penetrants are products that are absorbed into the wood and seal the pores of the grain against moisture and dirt; they include a variety of sealers, stains, and oils. Some penetrants can serve as final finish coats—though in most cases, the wood will still have to be covered with a more durable surface finish. Plastic scalers. Plastic sealers such as polyurethanes are commonly used on wood floors underneath additional finish coats. They are easy to apply, and many can simply be waxed over. Stain-scalers. These products tone or stain the wood, and semi-seal it at the same time. Some provide a matte finish and require no additional surface coats. For other types, cover with a compatible surface finish (read the label for manufacturer’s instructions), and/or wax and buff. Stain-sealers are easy to apply. Oils. Tung or linseed oils are readily absorbed by wood and provide a soft, natural finish. Some contain color stain as well. They are easy to apply and easily touched up by rubbing more oil on the floor with a soft cloth. Oil finishes do not last long, and may attract dust and dirt. Renew frequently by applying more oil. Oils are not compatible with most other finishes— once you have an oiled floor, you will have to stick with this choice. They can be waxed with a compatible paste wax once the oil is absorbed into the wood. Stains. Stains add color or tone to wood while allowing the natural grain pattern to show through. They are not finish coats, and the floor must still be sealed, oiled, waxed, or otherwise finished with compatible products. Consult the manufacturer’s label for instructions. Surface Finishes Shellac, varnish, lacquer, and polyurethane and other plastic finishes provide a hard, protective surface over color stains and sealers. These are intended to be permanent surface finishes. Not all share the same working characteristics, though each has certain qualities to recommend it, in terms of durability, renewability and the particular finished look it gives. Shellac. Shellac finishes are durable, though they do show scratches, Shellac goes on easily, spreads evenly, and dries quickly. It seals the wood’s pores, and can be touched up. However, it has little resistance to water, heat, or alcohol, and it has a short container life. Varnish. Varnish dries hard, withstands moisture, and can be rubbed or buffed to a high gloss. However, it is easily dam aged by heat; and should be applied when the room is warm (about 70°). Except for fast-dry varieties, it dries slowly. Thin the first coat to be applied to bare wood by 25 percent, then use it full strength for subsequent coats. Sand between coats. Lacquer. Lacquer is a quick-drying, heatproof, water-resistant finish which can be rubbed to a matte or glossy luster. It can be sprayed on or applied by brush, to give a very beautiful, finished look. Polyurethane. Polyurethane is a hard, clear, durable plastic finish which is impervious to water, alcohol, chemicals, and heat. Under normal to heavy traffic and wear, it will stay intact without chipping or cracking. It is fairly easy to apply but dries slowly, especially if humidity is high. Prev.: Wood Block & Parquet Next: Resilient Sheet Goods |

Thursday, 2020-02-27 10:33