Preparing a Concrete Slab
To install new flooring over a concrete slab, see the preparation guidelines indicated on the charts. In many instances, you may have to make some basic surface repairs to insure that there is an appropriately clean, smooth, even, and bondable surface for the new flooring, Remove grease, oil, paint, and dirt. To install any flooring directly on concrete, remove grease, oil, paint flakes, and dirt by scrubbing the surface well with a solution of trisodium phosphate and hot water, or use a special concrete degreasing agent available at most hardware stores. Rinse with clear water and let the floor dry thoroughly. Fill cracks or holes. If the floor has minor cracks or holes-entry points for water-but is otherwise sound, widen and clean them out. Then fill the cracks or holes with a quick-setting hydraulic cement. Correct low and high spots . To locate low spots which need to be filled and high spots which need to be leveled, roll a long straight pipe across the slab and watch for gaps between it and the pipe. Fill depressions with patching compound, feathering (smoothing) the filler in to the surrounding floor. To correct high spots, grind them down with a carborundum rubbing stone ("rotten stone"). If extensive smoothing is required, rent a concrete grinder, and use a dust mask. If you need to do extensive leveling and smoothing, consider using a liquid underlayment. Consult your concrete products sup plier and flooring supplier for recommendations. Break slick surfaces . Adhesives will not bond well to a concrete floor with a slick surface. Test to see if the surface has been sealed by sprinkling water on the slab. If the water beads, you'll have to remove the sealer in order to make a bondable surface. To break the sheen caused by paint, sealers, or a steel trowel finish, sand the concrete lightly with sandpaper wrapped over a block of wood, Wear a dust mask to avoid inhaling the dust. For large or very hard surfaces, you will have to scarify (scratch) the floor with special tools or machines which are available from tool rental agencies. Consider moisture conditions . Not all flooring materials need to be installed over a smooth surface, but all flooring needs to be laid over a dry one. The single most common problem with on-grade and below-grade concrete slabs is that they are prone to moisture collection. There are several factors which contribute to this, Moisture problems might issue from outside the building, where downspouts are not properly directing roof water away from the foundation line. In addition, the grade or slope of the earth around the building may be both insufficient and poorly oriented, so that water tends to collect at the building's base, and from there, gets absorbed into the slab. Or perhaps there is no sub surface drainage system around the perimeter of the building, which might cause excessive amounts of moisture to collect in the surrounding soil. These moisture conditions are fairly easy to correct. You can re-orient downspouts to carry water away from the slab, you can re-cut the grade to give a minimum half-inch-to-the-foot slope so that runoff water is carried well away from the slab, or you can install a subsurface drain pipe around the perimeter of the slab. Concrete, no matter how old and well-cured, is a water-permeable material. Unless a moisture barrier was laid over the soil before a below-grade or on grade slab was poured, the slab may wick up moisture from the ground. Test for moisture . A simple test to determine whether moisture is wicking up through the concrete is to tape a 2-foot by 2-foot square of clear plastic to the floor and leave it for 1 or 2 days. If small droplets of water form under the plastic or if the plastic looks cloudy, there may be a moisture problem. In addition, if a slab has alkali deposits on the ex posed concrete surface; or if the finish flooring over the slab feels wet or damp, or looks puffy, buckled, or eroded from beneath the surface, this indicates a moisture problem. It should be corrected before you install a new finish floor. Unless you have a lot of experience with concrete, moisture conditions can be tricky to assess and hard to correct. You may find it worthwhile to hire a contractor who can give you an evaluation, recommend corrective measures, and carry them out if necessary.
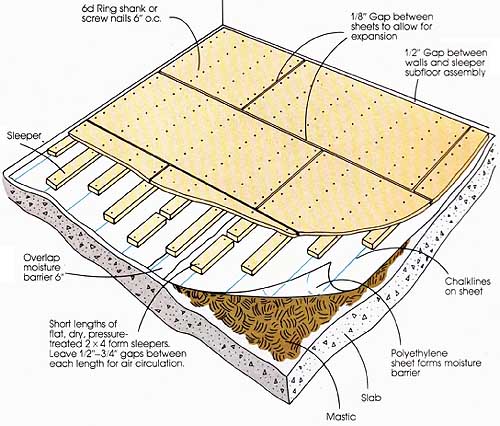
Wood Sleeper Sub-floors Wood sleeper subfloors can be installed over a concrete slab to form the subfloor structure for various types of finish materials. Usually this is done to provide a nailable surface for those types of flooring materials that can- not be fastened by other means. Wood-frame subfloors also tend to be more resilient and warmer underfoot than concrete, but not all flooring materials are appropriately installed over this type of system. While the instructions and illustration below show 2 by 4 sleepers laid on the slab, sometimes sleeper systems are constructed with up to an 18-inch crawl or ventilation space below the subfloor surface itself. This is most often done when the concrete slab suffers from serious moisture problems or surface defects which can’t otherwise be accommodated. In any case, your flooring dealer, your local building department, or a professional contractor advise you. Constructing a wood subfloor over concrete. Sweep the concrete slab clean, seal it with asphalt primer, and spread a layer of asphalt mastic over its entire surface, 1/8 inch to 1/4-inch thick. Lay 15-pound building paper or sheets of 6-mil plastic sheeting over the mastic, overlap ping the edges by 6 inches. Walk over the surface to press the paper or plastic into the mastic. Snap chalk- lines every 16 inches across the width of the floor, Then lay short lengths of preservative-treated 2 by 4s along the chalklines. These will serve as sleepers, or support members. Leave a 1/2-inch to ¾” clearance between the ends of the sleepers and at the walls to allow for air circulation. Check the sleepers for level with a long straightedge, and shim them as needed, Nail the sleepers to the slab with concrete nails long enough to prevent them from moving. Nail either a 5/8-inch or 3/4 plywood subfloor over the sleepers, leaving a 1/16”-inch to 1/8-inch gap between panels, and a 1/2-inch gap at the walls. Provide under-floor ventilation to prevent musty odors or possible rot. Cut out 2-inch by 8-inch sections of the plywood subfloor along the two walls which are perpendicular to the direction of the sleepers. Make these cutouts at 6-foot intervals, and cover them with floor register grills after installing the finish floor.
Prev.: Removing Existing Flooring |

Thursday, 2020-02-27 10:24