FREEING STUCK WOODEN WINDOWS
Wooden windows can swell in wet weather. Try rubbing candle wax along the sticking edge of the window. If that does not work, plane away some wood as shown here. For protecting exterior wood, see our dedicated section on wood.
TOOLS AND MATERIALS NEEDED:
- Plane, hammer, screwdriver
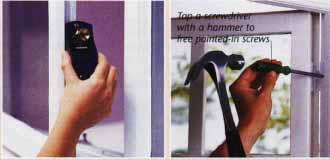
Sticking opening edge (above, left): You can plane
the opening edge of a casement. Take off enough extra wood to allow
for painting. Sticking
top or bottom edge (above, right): Unscrew the casement from
its hinges so that you can plane the sticking edge.
REPOSITIONING FASTENERS: Movement of wood due to damp weather can also make fasteners difficult to close, or lead to loose, rattling windows. Fix the problem by adjusting the positions, as if you were installing from scratch. If adjustment only requires minimal movement, you may have to move the fastener so you can attach into solid wood.
MAINTAINING VINYL WINDOWS
Vinyl windows need little maintenance, apart from washing to keep them clean (see below). Hinges may sometimes need lubricating, and occasionally you might need to replace a catch.
TOOLS AND MATERIALS
- Screwdriver, oil
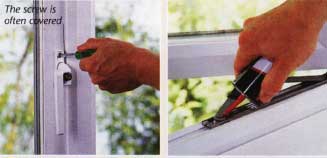
Broken catch (left): Pry off the fixing cover with a screwdriver
then remove and replace the catch. Stiff friction hinges :
Lubricate metal hinges with low- viscosity oil. Spray plastic hinges
with polish containing silicone.
CLEANING VINYL: With warm water, remove as much dirt as possible. Use a mild detergent on stubborn marks, then rinse well, especially the seals. Some cream cleaners can be used on vinyl, but keep them off the seals and rinse very thoroughly. Some cleaners are only suitable for smooth, white vinyl, not wood-grain effect types. Never use an abrasive cleaner on vinyl.
ADJUSTING A MORTISE-PLATE
If the mortise-plate for a mortise-type catch is poorly fitted, it makes the catch difficult to use and can prevent it from holding the window closed securely. Remove the mortise-plate and refit it properly.
TOOLS AND MATERIALS
- Screwdriver, pencil, chisel
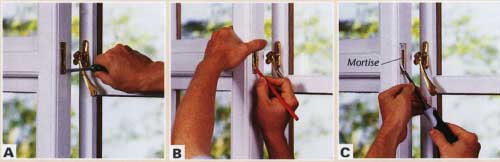
A. Unscrew the mortise-plate from the window frame. B. Reposition the
mortise-plate. Draw around the outside and the inside of the mortise-plate
with a pencil. C. Use a chisel to adjust the size of the mortise
if necessary. Reattach the mortise-plate and check that it fits snugly.
REPAIRING A ROTTEN SILL
If a small area of a wooden sill is rotten, but the rest of the window is sound, you can just replace this part of the sill. For protecting exterior wood.
TOOLS AND MATERIALS
- Pencil, saw, router, wood, screws, drill-driver, plane
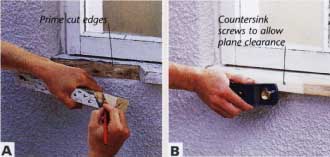
A. Cut back the sill to sound wood. Use it as a template for the patch.
Mark the position of the groove under the sill (the drip groove). B.
Cut the patch slightly larger than the rotten section you removed.
Rout out the drip groove. Screw the patch in place, and plane it smooth.
OTHER WOODEN FRAME REPAIRS:
- Another option for fixing loose joints is to strengthen them with dowel.
- If a whole section of your window is rotten, then pry the piece out and make a replacement, using the old section as a template. For woodworking joints, see our dedicated section. If rot is more widespread, you should replace the entire window.
REMOVING GLASS SAFELY
Broken glass can cause serious injuries. Always wear protective gloves, work boots, and goggles when you are removing glass from a window. Remove the glass safely and clean old putty and fixings from the rabbet, as shown here, before re-glazing.
The technique for glass fixed with glazing beads is similar. Tape the glass before prying off the beads (you can reuse them). You should be able to free the pane from any glazing silicone fairly easily by cutting around the silicone with a craft knife. With the glass removed, scrape out the old caulk, prime any bare wood, and re-glaze.
TOOLS AND MATERIALS
- Goggles, gloves, masking tape, hammer, hacking knife/old chisel, pliers, paintbrush, exterior primer
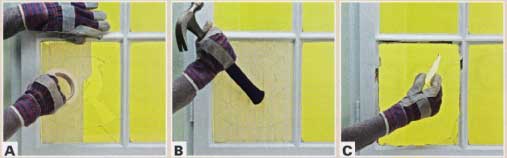
A. Apply strips of masking tape over the surface of the window pane
to prevent shards from falling when you remove the remaining glass.
B. Protect surfaces below the window with drop cloths to catch broken
glass. Tap the glass with the butt of a hammer to loosen it. C. Carefully
remove the loose, large sections of glass first, then pick out the
smaller shards. Dispose of broken glass safely.
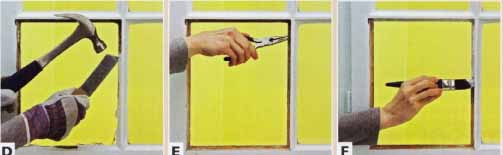
D. Use a hacking knife or old chisel to remove the old putty and stubborn
pieces of glass from around the glazing rabbet. E. Remove any old pins
or glazing sprigs using pincers or pliers. F. Dust off surfaces.
Use an exterior wood primer on any bare wood before installing a
new pane of glass.
REPLACING GLASS IN LEAD LIGHTS
You can repair single-glazed lead lights using caulk sealant. Take a cardboard template to a specialty supplier to buy replacement glass. Caulk can also be used to repair old putty.
TOOLS AND MATERIALS
- Putty knife, caulk glazing sealant, sealant dispenser, replacement glass, cloth
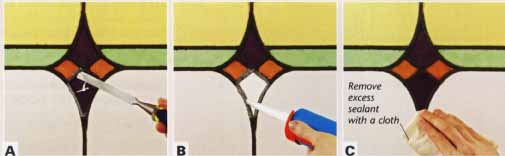
A. Carefully fold up the lead around the broken pane using the end
of a chisel. You may find this easier if you run a craft knife under
the lead first. B. Apply a continuous bead of caulk sealant, using
a dispenser, around the folded lead. C. Position the new pane. Fold
the lead back in place and smooth its edge flush with the glass surface.
REMOVING VINYL BEAD TRIM
With beaded and double-glazed units try to remove the trim carefully so they can be reused. Only carry out DIY work on old double-glazed units -- if they are still under guarantee, get the manufacturer to repair them.
TOOLS AND MATERIALS
- Scraper, packers
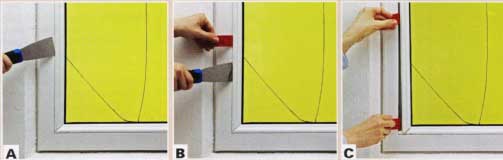
A. Work a scraper blade under the edge of the first bead. B.
Pry up the bead so you can position a packer underneath, beside the scraper.
Insert another packer on the other side of the scraper. C. Move
the packers outward to unclip the bead from the frame. Repeat for all beads.
Remove the double-glazing unit carefully.