|
TOOLS AND MATERIALS:
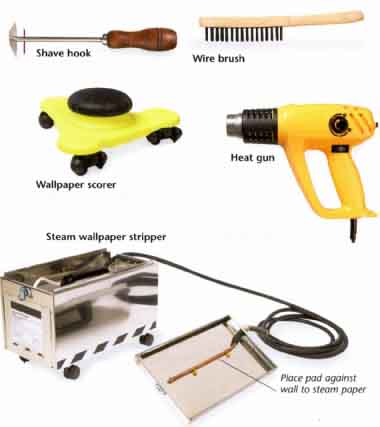
Stripping wallpaper: Drop cloths, steam stripper, warm water, garbage
bags
Washing down and filling: TSP, hot water, sponge, oil- based undercoat
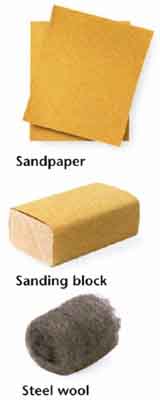
(optional), brush, spackle, 2-in (50-mm) knife, sandpaper
Filling cracks: Caulk, caulk gun, sponge, brush, oil-based undercoat*
STRIPPING WALLPAPER
Steam strippers work most efficiently when top layers of paper have
been removed, exposing the more absorbent backing paper. The impermeable
surface layer of vinyl papers often peels dry, relatively easily. Always
follow the manufacturer’s guidelines. Wear protective gloves, if the
tool’s manual recommends them, and goggles. Steam and drips may burn,
so take all possible precautions to protect yourself. Never use a steam
stripper to remove paper from a ceiling. Instead, simply soak the paper
with warm water and then scrape the paper off the ceiling surface,
an option that can also be used on a wall if you prefer.
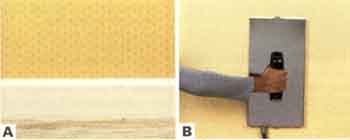
A. Lay drop cloths over the room, and remove as much loose paper from
the wall by hand as you can.
B. Fill the stripper with warm water before plugging it in. When it
starts to steam, place it flush on the wall.
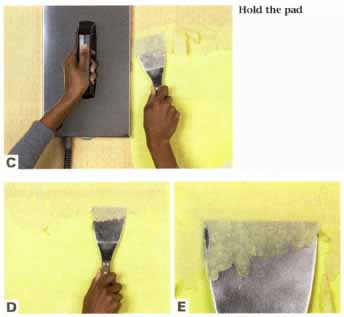
C. Hold the pad completely flush on the wall surface. After 5 - 30
seconds, move it along and scrape paper off the wall in the steamed
area. The thicker the layer(s) of paper, the longer you will need to
hold the pad in place. But do not hold it still for too long or the
wall surface itself may crumble.
D. Work your way across the wall, steaming areas and removing paper.
E. Continue removing paper. Put it in a garbage bag as you remove
it, so that it does not stick to the drop cloth or other surfaces.
WASHING DOWN A WALL AND FILLING HOLES
After a wall has been stripped, wash the surface thoroughly to remove
all traces of adhesive. Use soapy hot water to sponge the wall. Then
rinse with clean water. You can now repaper the wall. If you wish to
paint the wall, apply an oil-based undercoat before a water-based latex
paint. However well the wall has been cleaned, traces of adhesive may
bleed through a water- based paint; oil-based undercoat prevents this.
It is needed on a previously painted wall only if the wall is in poor
condition.
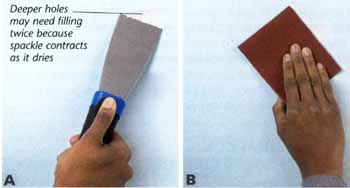
A. Clean out the hole with a dry brush. Apply filler by pressing it
in place with a 2-in (50-mm) knife. Deeper holes may need filling twice
because spackle contracts as it dries.
B. Once the spackle has dried, sand it back to create a smooth surface
flush with the surrounding area.
FILLING CRACKS
Cracks are best filled using caulk. It is supplied in a tube and is
applied along cracks or joints with a caulk gun. It can't be sanded, and must therefore be smoothed by hand before it dries. Some caulks
may be over-painted when dry. Choose a latex caulk if you think you
may paint. Others need an oil-based undercoat to prepare them for water-based
paints, which may crack if there is no undercoat. A ceiling-wall junction
is shown here.
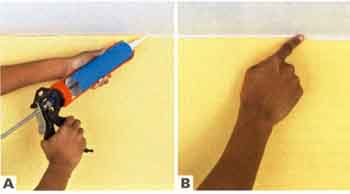
A. Clean out the joint. Prepare the sealant and gun. Apply even pressure
to the trigger, moving the gun along the joint.
B. Gently smooth the sealant with a wet finger. You may also use a
damp sponge to smooth the caulk.
NEW WALL AND CEILING SURFACES
Plaster in a good condition can be directly over-painted with full-strength
paint, Alternatively, first apply a mist coat of diluted latex paint
(1 part water to 10 parts paint), which provides a base for further
coats. Drywall ceilings must be coated with a special sealer before
paint is applied, otherwise paint may dry differently on the board
than on the jointing compound.
WORKING WITH WOOD
Woodwork provides the finer detailing in a home and its finish is
a stamp of quality. To produce good results you must prepare surfaces,
including doors, windows, and decorative woodwork for moldings or paneling.
TOOLS AND MATERIALS:
Using a heat gun: Shave hook
Solution stripping: Old paintbrush, scraper or shave
hook, cloth, mineral spirit or water
Paste stripping: Filling knife or small trowel, stripper,
covering cloth, cleaning cloth, neutralizing solution/white vinegar,
water
Covering old paint: Oil-based eggshell paint, paintbrush,
brush-cleaning solution, mid-oak wood stain, varnish, oil, or shellac,
two cloths
Priming and filling before painting: Knotting solution,
paintbrush, filling knife, sanding block, filler, primer
Filling for a natural wood finish: Filling knife,
filler, sanding block
Stripping wood
A good finish is often achievable by recoating the existing surface.
However, you may need to strip woodwork before redecorating—the existing
coating may be so bad that it can't be successfully recoated; it may
be painted, but you want a natural wood finish; or it could have a
natural finish but you want to paint it or apply a different finish.
Beware of surfaces with lead-based paint, which is toxic and now found
only in older properties. It is a health risk if heated with a heat
gun, and fine particles created by sanding are also toxic. Paint-testing
kits are available to identify lead-based paintwork.
USING A HEAT GUN
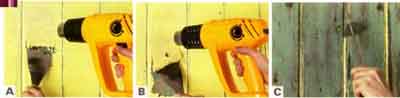
A. Turn the heat gun on and direct the nozzle at the wood surface,
leaving a gap of a few inches between the two.
B. After a few moments, the paint will begin to soften and bubble,
which point use a shave hook or scraper to lift the old paint free.
C. Move the gun along to the next area and repeat the process. Use
a shave hook to remove paintwork in recesses, such as on paneling.
WORKING SAFELY
- Take great care using a heat gun. Wear goggles and a respiratory
mask, and perhaps gloves. Take any other precautions that are advised
by the tool’s manufacturer.
- Do not hold the gun for too long over the wood, to avoid the risk
of scorching it or even setting it on fire.
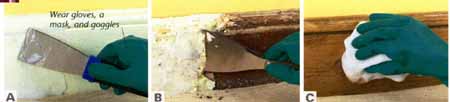
SOLUTION STRIPPING
A. Wearing gloves, a mask, and goggles, use an old paintbrush to apply
the stripper. Use dabbing strokes to build up a good layer of the stripper
on the wood’s surface. Allow it to soak in and react with the paint.
This may take only a couple of minutes or up to half an hour.
B. Once the paint has bubbled up, scrape it off using a scraper and /or
a shave hook.
C. Thoroughly clean the surface afterwards. Mineral spirit and cold
water are usually best, but check the stripper manufacturer’s guidelines.
PASTE STRIPPING
A. Apply the stripper with a filling knife or small trowel to a depth
of about in (2.5 mm) -- or deeper if there are many coats of paint.
B. If your manufacturer specifies it, cover the entire surface with
a special cloth. Leave for 24 hours. Use a scraper to peel away the
paste.
C. Thoroughly clean down the area. If the manufacturer suggests it,
use a “neutralizing solution”; or use white vinegar and then clean
water.
DIPPING DOORS
Removable items such as doors can be “dipped” professionally. The
whole item is submerged in a tank of powerful chemicals, which lift
all traces of paint from the wood surface. Many companies offer a pickup and delivery service.
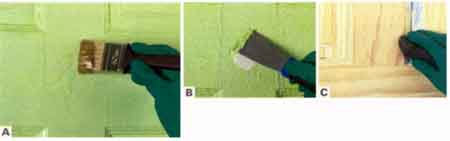
COVERING OLD PAINT
Sometimes a natural wood finish may not be possible—if the wood is
too rough, or the paint too ingrained to strip. Old beams may have
stained finishes or may have been painted at some stage. You can have
the paint sand- blasted away by a professional company but this is
expensive, and extremely messy. An alternative is to apply the paint
effect shown here.
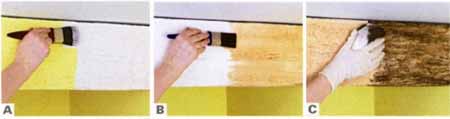
A. Completely paint the beam, using an oil-based white eggshell.
B. Apply a wood stain over the top of the eggshell. A mid-oak color
is very effective.
C. Rub varnish, oil, or shellac across the whole surface to provide
the effect of an oak beam.
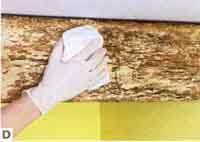
D. After half an hour, buff off the varnish, oil, or shellac with
a clean cloth. Some will remain embedded within the wood grain, resulting
in the appearance of a natural wood beam.
PREPARING BEAMS
Natural wood beams are often tricky items to prepare for decoration,
because of flaky surfaces and often very crumbly edges where the beam
meets plaster. Trying to fill the edge is difficult and often ineffective,
as the filler too crumbles and falls away.
One way to secure the edge is to apply a clear matt varnish to the
beam, overlapping slightly onto wall or ceiling surfaces. The varnish
both binds the surface and provides a natural look. The wall or ceiling
paint may then be cut in along the edge to create a neat finish.
FILLING AND SANDING WOOD
Wooden surfaces are seldom completely smooth. Filling dents and sanding
improves the finish. The type of filler to be used depends on whether
the wood is to be painted or a natural finish applied. If it's to
be painted, use powder filler—flexible filler can be used in joints
or cracks. If a natural wood finish is to be applied, use a “stainable”
filler the same color as the finish. See this page for choosing a suitable
primer.
PRIMING AND FILLING BEFORE PAINTING
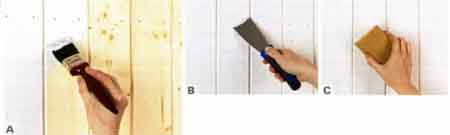
A. Prime bare wood before using filler, to make it
adhere better. Primer also makes it easier to see areas that require
filling. If wood is painted, use primer only if there are large, bare
patches—for instance, on external woodwork. Any knots in bare wood
must first be coated with knotting solution.
B. Allow primer to dry. Mix up filler, and apply to holes, dents,
or divots, using the flexibility of a filling knife blade to press
in the filler.
C. Allow filler to dry. Sand to a smooth finish. Deep holes may require
refilling and sanding to provide the best finish.
FILLING FOR A NATURAL WOOD FINISH
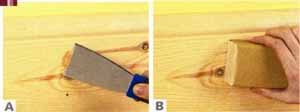
A. Apply colored putty to holes in the wood surface with a putty knife.
The putty color should match the natural wood finish to be applied.
B. Once the putty has dried, sand it smooth. Then apply coats of your
chosen finish.
FURTHER INFORMATION
Sanding
Sandpaper should be chosen according to the condition of the surface.
So, for rough surfaces, begin by using a rough paper. As the surface
becomes smoother, reduce the coarseness of the paper.
Remember that sanding produces dust. This should always be brushed
away before a coating is applied. A vacuum cleaner nozzle is ideal
for removing dust from baseboards or the profiles of moldings.
The best finishes are normally achieved when the wood has been wiped
down with a damp cloth before coating, removing the finest residues.
This is essential when sanding flat surfaces such as window sills.
|