While a solidly built wood frame house stands an excellent chance of surviving an earthquake, one with an exterior masonry chimney does not. When the ground starts shaking, the house and chimney tend to behave as separate structures, pounding against each other or pulling apart.
To prevent chimneys from collapsing and destroying houses, most new homes in areas subject to quakes have steel rein forced masonry attached to the frame with built-in steel ties. On older homes, chimneys can be safeguarded with exterior metal bands secured to the joists between the floors as shown below. The bands, which are made of 3 inch strap iron or steel strapping, can be cut and shaped with hand tools and a vise—or fabricated to fit by a metal sup ply or welding house. Drilling holes in the straps and installing them calls for a ½-inch electric drill with ¼- and ½-inch bits—and 3/8-inch lag bolts.
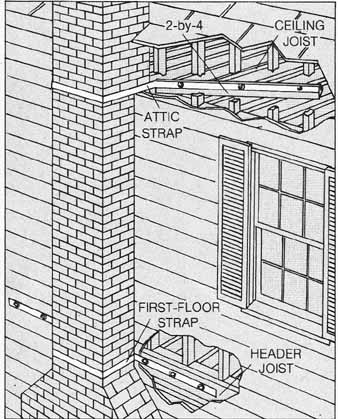
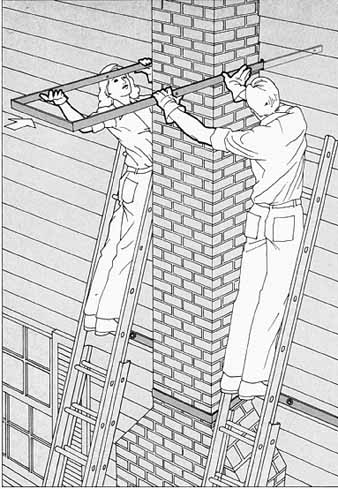
Tying a chimney to a house.
Metal straps wrapped around the chimney are secured to the header joist between
the first and second floors, and to the ceiling joists in the attic. Be cause
trouble starts at the top, the attic strap is inserted through the exterior
wall and attached to 2-by-4s laid diagonally across three joists. In a finished
attic, this will require rebuilding the floor at a higher level to cover
the strap.
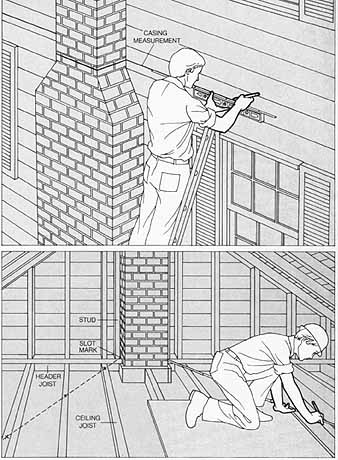
1. Planning the first-floor strap.
To position the strap horizontally on the first-floor header joist, measure
inside the house from the top casing of a window near the chimney to the
ceiling; add 2½ inches. Outside the house, mark this distance above the window.
Using a carpenter’s level, draw a line around the chimney, ex tending about
3 feet on either side. To determine the length for the strap, measure t perimeter
of the chimney at the line and add 6 feet. If there is no window nearby,
drive a nail 6 inches long through the wall at the top corner of the ceiling
beside the chimney. Mark the exterior 2½ inches above the tip of the nail.
Remove the nail and patch the hole. Draw a horizontal line at the mark as
described above. 2. Planning the attic strap. If the chimney
is ex posed in the attic, mark the locations for the wall slots by drawing
a vertical line 1¾ inches high above the sole plate on top of the header
joist at each side of the chimney—between the nearest stud and the exposed
masonry, as shown. To determine the strap length, lay the ruler at a 45°
angle away from the stud to ward the outside wall at one slot mark. Extend
the ruler across three ceiling joists. Double this length and add the outside
perimeter of the chimney plus 1 foot to figure total length.
If the chimney is not exposed in the attic, you can determine the locations for the slots by driving a nail through the wall beside the chimney from the exterior. The top of the header will be about level with the bottom of the eaves.
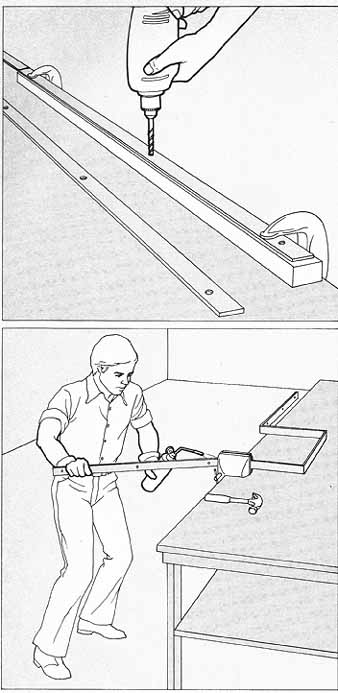
3. Making the straps. Wearing
goggles, cut both straps to length with a hacksaw. For the first- floor strap,
use a nail to scribe a pair of lines across the width 3 feet inside each
end and another pair of lines inside the first set at a distance equal to
¼-inch less than the side measurement of the chimney. With a ½-inch high-speed
bit in a ½-inch drill, bore three holes at each end of the strap—one 2 inches
from the end, another 2 inches inside the first line, the third midway between.
For the attic strap, scribe a pair of lines at a distance from each end equal to the diagonal measurement made in Step2, and a second pair inside the first set at a distance equal to the exterior side measurement of the chimney plus 6 inches. Drill three holes at each end—one 2 inches from the end, the second 2 inches inside the first line and the third midway between. 4. Shaping the straps. For the first-floor strap, clamp the metal band into a vise with the first scribe line set at the edge of the jaws. Holding a propane torch at the scribe line, bend the end back along the line with your hands to form a sharp 90-degree angle. Turning the strap over each time to reverse the direction of the bend, make 90° angles at the three remaining scribe lines. For the attic strap, make9o° angles at the inner pair of scribe lines, turning the strap so the angles create a U-shape.
5. Installing the first-floor strap.
Hold the strap against the walls on both sides of the chimney, aligning the
bottom to the line drawn in Step 1 Make a mark at each hole in the strap
before taking it down. Then, with the ½- inch electric drill and a ¼-inch
bit, drill holes through the wall into the header joist at each mark. Using
a socket or crescent wrench, secure the strap with 3/8-by-3-inch lag bolts
with washers.
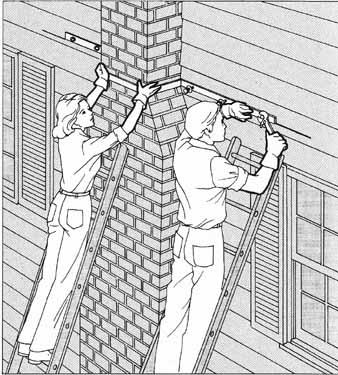
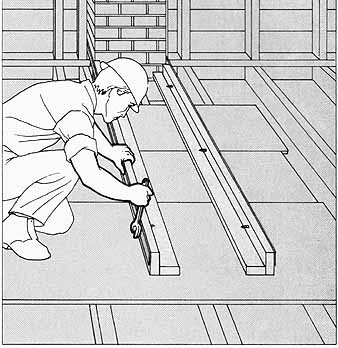
6. Inserting the attic strap. Working
inside the attic, drill ¼-inch holes through the wall at the top and bottom
of each slot line drawn in Step 2, shown earlier; then finish the slots with
a keyhole saw. With a helper, lift the strap up to the exterior attic level and slide the ends into the slots. Push the strap tight against the chimney.
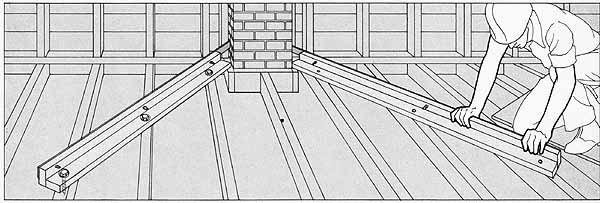
7. Bracing the attic strap.
Cut four 2-by-4 braces to the diagonal length measured in Step 2 (see “Planning
the first-floor strap” above). Stand two 2-by-4s on edge with the other two
against them lengthwise. Attach each pair with 3½-inch nails. Lay the braces
against the inner sides of the attic strap and mark each strap hole. Drill
¼-inch holes into the 2-by-4s and use 3-inch lag bolts to secure them to
the straps.
8. Anchoring the attic strap.
To bend each end of the strap at a 45-degree angle, press the brace away
from the chimney, using the stud next to the chimney as a leverage point.
Nail the braces temporarily to the ceiling joists. Then drill ½-inch holes
through the braces where they cross each joist but don't drill into the
joists. With the ¼-inch bit, drill the holes another 1½ inches deep. Insert
3-inch lag bolts with washers; remove the nails. Fill the gap at the wall
slots with caulking.
Next: Warding Off Lightning Damage
Prev.: Tying Down a Mobile Home