Many homeowners need fences to guard against accidents rather than intruders. Sturdy fences, for example, are required by most building codes to keep toddlers from tumbling into swimming pools. For a dog run, you may want an enclosure that can be put up and dismantled quickly.
Planning: For swimming pools, codes typically specify a fence 6 feet high, with a gate latch 4 feet off the ground. Depending on the locality, these fences can be made from chain link or from posts, rails, and pickets of traditional wood or maintenance-free vinyl.
For a wood fence, you can buy ready-made stockade panels, 8 feet wide, and nail them to the outside faces of 4-by-4 posts erected 8 feet apart, or you can fasten individual boards to posts and rails as described earlier. Plan wood fences as you would a chain-link fence, varying the post spacing as needed. For a post-and- rail fence, you can set the posts at any equal intervals up to 8 feet.
Dealing with Slopes: To build a fence with a level top on gently sloping ground, increase the posts’ length to compensate for the slope of the terrain. On steeper slopes, the fence top should follow the contours. Build fence bottoms to clear the ground by no more than 1½ inches to prevent children or large pets from crawling under.
Rules for Gates: On level ground, gates hinged on the side closer to a fence corner provide maximum access when opened. On steep slopes, gates should be hinged to the down hill post. Gate boards can be cut to match the slope, but the braces to which hinges are fastened should re main horizontal even if the rails on adjoining fence sections are not.
At the Lumberyard: Use pressure- treated lumber for wood fence and gate parts. Hot-dipped galvanized nails or aluminum ones prevent rust stains. In calculating post lengths, re member that they are sunk 32 inches belowground. To maximize the life of wood posts, buy matching post caps.
TOOLS:
- Shovel
- Hammer
- Carpenter’s level
- Water level
- Folding ruler
- Trowel
- Combination square
- Chalk line
- Circular saw
- Electric drill and wood bit
MATERIALS:
- 1 x 2 stakes and braces
- 4 x 4 posts
- 2 x 4 fence rails
- 1 x 8 gate bracing
- Fence boards
- Gravel
- Ready-mix concrete
- Galvanized nails (1½”)
- Gate latch
- Gate hinges
- Wood screws (1¼” No. 10)
- Post caps
SAFETY TIPS: Wear safety goggles when nailing. Add a dust mask when you cut pressure treated wood, and wash your hands after handling any fence parts that are pressure treated.
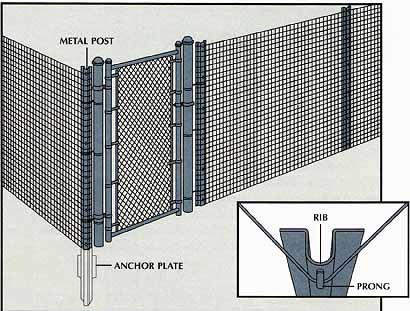
A wire-mesh enclosure. Rust-resistant metal posts, firmly anchored
by attached metal plates, support this wire-mesh fence at intervals of up to
10 feet. Lightweight wire mesh, preferably coated with vinyl to resist rust,
is stretched taut by hand and hooked to metal prongs on the posts. Corner posts
are placed at a 45-degree angle so that the wire can easily be stretched around
the curved rib (inset). A ready-made chain-link gate, complete with its own
posts, is secured to the fence posts with tie wire to complete the installation.
Putting Up a Post-and-Rail Fence
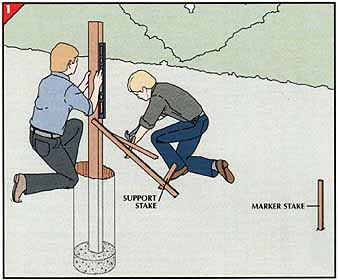
1. Installing the first post.
• Mark the locations of fence posts and gateposts with 1 -by-2 stakes.
• At the highest point along the fence line, dig a hole 1 foot wide and 3 feet deep.
• Drive two stakes at 45-degree angles on adjacent sides of the hole.
• Pour 4 inches of gravel into the hole and set the post in place. As a helper plumbs the post, nail 1 -by-2 braces to the post and the stakes.
• Overfill the hole with a thick mixture of ready-mix concrete, tamp the concrete down into the hole, and trowel the excess concrete downward from the post to provide for water runoff.
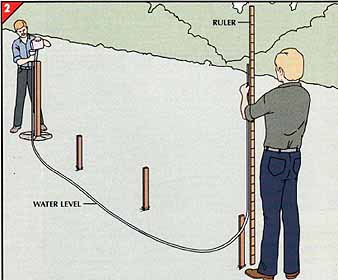
2. Leveling the posts.
• Run a water level from the top of the first post to the stake at the lowest point along the fence line. Have a helper hold a folding ruler upright at the stake, fill the water level even with the top of the post, and have your helper read the height of the water at the stake.
• Cut a second post to this height plus 32 inches, and anchor it as in Step 1.
• Stretch a string between the tops of the two posts. At intermediate stakes, measure from the string to the ground to determine the heights of the other posts.
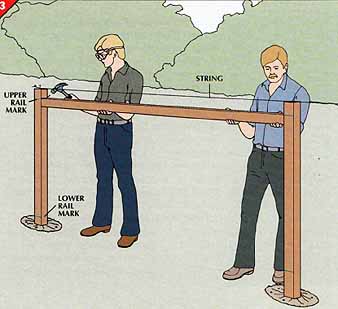
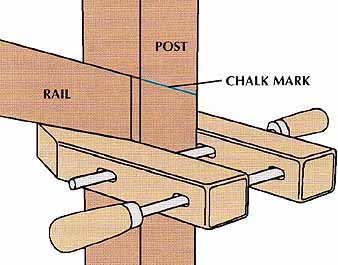
3. Securing the rails.
• With a pencil and a combination square, mark a top rail position on the side of each post, 6 inches from the top.
• For the bottom rails, mark the side of the first post 6 inches above the ground. Use a water level to mark the other posts at the same height.
• Measure the distance between adjacent posts and cut pairs of 2-by-4 rails to fit.
• Align the upper edges of top rails and the lower edges of bottom rails with the rail marks. Hold the rails flush with the front face of the posts and secure them to the posts with galvanized nails or screws . To avoid splitting the wood, drill pilot holes for screws; when toenailing, blunt the tips of the nails.
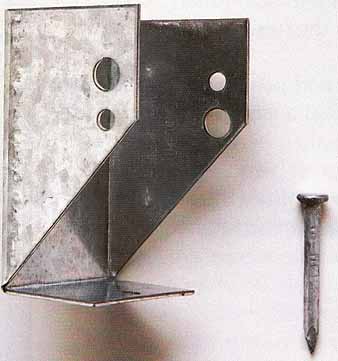
Hardware for Hanging Rails
As an alternative to toenailing or screwing, fasten rails to posts with brackets called rail hangers Made of galvanized steel, hangers are designed to support rails installed on edge, as shown in Step 3, above. The hangers are attached with special galvanized nails that come with them or are screwed to posts, and they can be mounted so that the rails are flush with one face of a post (The brackets are thin enough that pickets can be nailed over them.) Use the nails supplied with the hangers to fasten the side and bottom flanges to the rails.
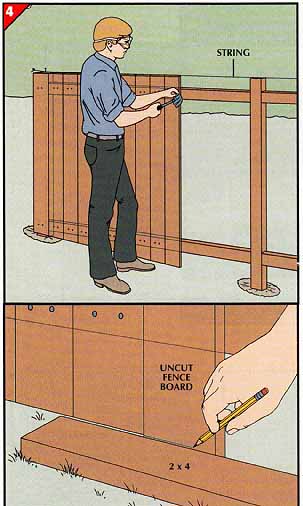
4. Attaching the fence boards.
• For each board, measure the distance from the string installed in Step 2 to the ground. Rough-cut a 1-by-4 or 1 -by-6 board to that length.
• Nail the board to the upper rail temporarily with the top of the board at the string (left, top), making sure that the first board is plumb.
• Lay a length of 2-by-4 on the ground along the fence line and flush against the front of the fence board. With a pencil, mark the bottom of the board along the top of the 2-by-4 (left, bottom).
• Remove the fence board and cut it along the mark. Reposition the board and fasten it to each rail with two 1½” galvanized nails or screws.
• Butt each successive board against the last one installed, aligning the top with the string. When boards overlap posts, nail them at the same level as the rails.
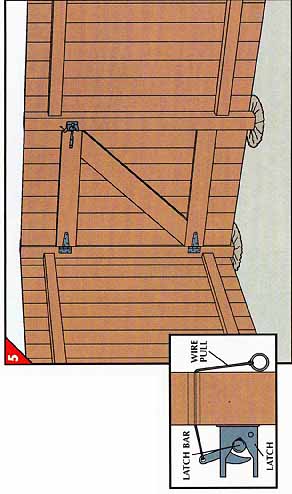
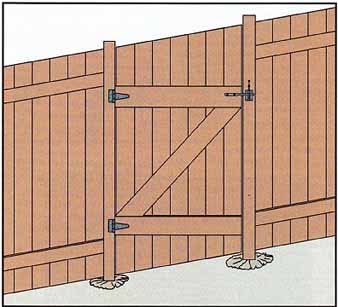
5. Building and hanging the gate.
• Cut fence boards for the gate (Step 4). Also cut two 1 -by-8 braces to the width of the gate opening.
• Lay the fence boards on a flat surface and screw the braces to them, 10 inches from the top and bottom. Cut a third brace to fit diagonally between the first two, and screw it in place.
• Set the gate on scraps of wood to center it in the fence opening, flush with the back of the hinging post. Mark the post at the top and bottom of each horizontal brace, remove the gate, and with 1¼-inch-long No. 10 screws attach a hinge centered between each pair of marks. (Screws that come with most packaged hinges are too short.) Reposition the gate, mark the hinge locations on the braces, and screw the flange of each hinge to a brace.
• Nail a strip of 1 -by-2 to the latch post as a gatestop. Position the stop so the gate closes flush with the back of the latch post.
• Install a latch bar on the upper brace, a latch on the post; to open the gate from outside, drill a hole through the post and tie a wire to the latch (inset).
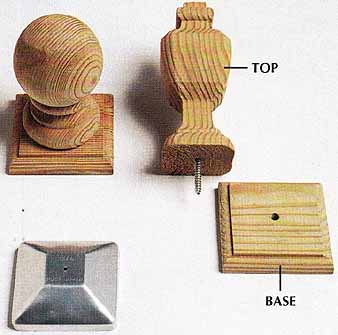
Caps for Fence Posts: The tops of wood posts, even those made
of pressure-treated lumber, should be covered to prevent warping or splitting
caused by moisture penetrating the exposed end grain. Post caps , made from
rust proof metal or pressure-treated wood, are available at lumberyards and building-supply stores. For a functional, streamlined appearance, push an aluminum
cap (lower left) onto each post and secure it with a galvanized nail. To complement
more decorative fence styles, choose a matching two-piece wood cap. Drill a
1/2-inch pilot hole in the center of each post top. Push the screw of the top
of the cap through the hole in the base, then thread the screw into the pilot
hole.
Fences for Steep Slopes
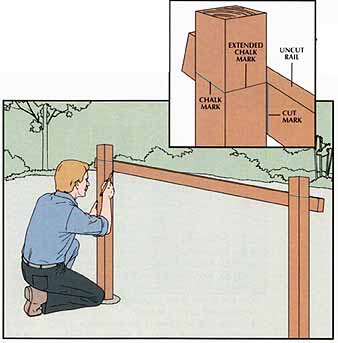
Putting in rails at an angle.
• Install the posts with their tops the same height aboveground.
• Mark the faces of the first and last posts 6 inches from the top and snap a chalk line between the marks.
• On each post, use a combination square to extend the chalk mark onto ad joining sides where rails will be attached.
• With a helper, align the top edges of an uncut length of rail with the marks on the sides of adjacent posts, and tack the rail temporarily to the posts.
• Mark the rail along the edges of the posts (inset).
• Cut the rail at the marks and position it between posts, then toenail or screw it in place.
• For bottom rails, measure 6 inches up and repeat the top rail procedure.
• Mark the bottom of fence boards using a 2-by-4 and the top with a string stretched between post tops.
Tricks of the Trade: A Clamp for Support
A wood clamp can substitute for a helper to hold one end of a fence rail in position for marking and fastening. Simply tighten the clamp snugly against a fence post about 4 inches beneath the positioning mark for the rail top. Adjust the clamp as necessary to bring the top of the rail even with the mark; then rest one rail end on the clamp while you work at the other end.
Hanging gates on slopes.
• Cut two rails of scrap 2-by-4, mitered to fit horizontally between the hinging post and the latch post. Toenail the rails in place, upper rail 6 inches from the top of the downhill post, lower rail 6 inches from the bottom of the uphill post.
• Cut boards for the gate as you would for a steep fence , using the 2-by-4s for temporary support while you mark the boards for angle cuts.
• Lay the cut boards flat and add braces as shown above, Step 5. Note both that the hinging post is downhill from the latch post so that the gate will not scrape the ground when opened and that the diagonal brace angles upward from the hinging post toward the latch post.
• Remove the temporary 2-by-4s between posts, hinge the gate, and install a gatestop and latch.
Previous:
A Plan for Lowering Radon Levels
Next: How to Make Stairs Safer