Plastic windowpanes, far superior to glass in protecting against break-in, offer two levels of security: Acrylic plastic (often known by one of its trade names, Plexiglas) generally stops a thrown rock but breaks if attacked with a hammer. it's often used in garages and outbuildings, where vandalism is more of a concern than burglary is.
Polycarbonate resin plastic (which goes by the trade names Lexan and Hyzod) is even stronger—it can withstand a sledge-hammer blow—but it's about twice as expensive as acrylic.
Preparing the Frame: If the glass is held in place by glazing com pound—found on wood frames and some metal frames—brush linseed oil on the compound, wait 30 minutes for the oil to soften it, then scrape it off with a chisel. If linseed oil doesn’t work, warm the compound with a heat gun set to a low temperature and held 10 to 15 inches away:
Beneath the glazing compound, glazier’s points secure the pane in a wood frame; spring clips serve that purpose on some metal frames. Spring clips can be removed by hand to free the glass (opposite). Force glazier’s points away from the pane with a putty knife, pull them out with long-nose pliers, and push the pane out of the sash. Clean the channel with a wire brush, then sand and paint it—silicone-base caulk bonds better to paint than to bare wood.
Working with Plastics: To deter mine the size of the new pane, measure the length and width of the sash between the bottoms of the glass channels. To allow for expansion (unless you are working in weather hotter than 85°F) subtract inch from each dimension.
Plastic sheets closely correspond to the standard thicknesses of window glass. For extra security; consider sheets that are or - inch thick for a wood sash if the channel is wide enough to accommodate them. In the case of a metal sash, the new plastic pane must match the old glass in thickness.
Install plastic panes as shown below. For ordinary glazing compound, which cracks when subjected to the thermal expansion and contraction of sheet plastic, substitute a silicone-base window-and- door caulk. and because both types of plastic scratch more readily than glass, leave the protective shipping paper on until the work is finished.
TOOLS:
- Chisel
- Heat gun
- Long-nose pliers
- Circular saw or saber saw
- Framing square Wire brush
- Paintbrush
- Caulking gun
- Putty knife
- Clamps
MATERIALS:
- Linseed oil
- Naphtha
- Paint
- Silicone-base window-and-door caulk
- Glazier’s points
SAFETY TIPS: Wear gloves when removing glass panes from a sash. Goggles protect your eyes when you are sawing plastic sheeting.
CHOOSING A SAW BLADE:
|
Thickness |
Circular Saw Teeth per inch |
Saber Saw Teeth per inch |
Acrylic |
1/16 – 1/10 inch |
6—8 |
18 |
|
1/10 – 1/3” |
5—6 |
10-14 |
|
more than 1/3” |
5—6 |
6 |
Polycarbonate Resin |
1/16 – 1/10 inch |
10—12 |
10-18 |
|
More than 1/10 inch |
3—5 |
8-12 |
Cutting plastic.
Plastic sheets can be cut with a circular saw or saber saw. The type of blade depends on the material and its thickness. With circular saws, best re suits are obtained using a plywood finishing blade adjusted to protrude no more than inch through the material to avoid chipping. In saber saws, use a metal-cutting blade.
Setting Plastic in a Wood Sash
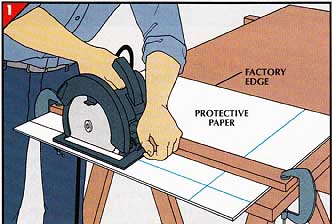
1. Cutting the pane to size.
• Mark the windowpane dimensions on two adjacent factory edges of the plastic sheet, then draw the other two edges on the protective paper with a pencil and a framing square.
• Clamp a straight board parallel to the marked line to guide the saw, and cut slowly along the line. Pushing the saw too fast will chip the plastic.
• Peel back 1 inch of the protective paper from each edge of the new pane and cut away the paper with scissors, taking care not to scratch the plastic.
• Wash the exposed plastic with mild detergent and water. If any adhesive remains, wipe it away with naphtha.
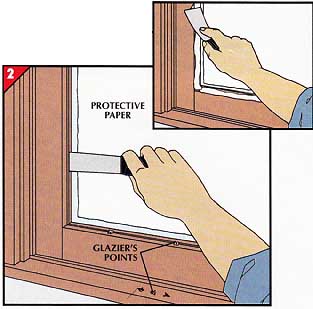
2. Installing the pane.
• Clean and paint the sash channels.
• When the paint dries, apply a 1/4-inch bead of silicone-base caulk in the channels, center the pane in the opening, and press it into the caulk.
• Using a putty knife, press glazier’s points in to the window frame at 4-inch intervals to hold the pane in place.
• Apply a bead of caulk around the edges of the pane, covering the glazier’s points. Smooth the bead to a bevel (inset).
• When the caulk has cured, peel the paper from both sides of the pane, dissolve any adhesive that remains with naphtha, and wash the plastic with mild detergent.
Procedures for Metal Sashes
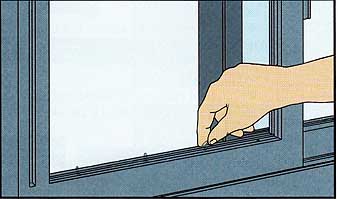
A sash with metal clips.
• If the channels are sealed with glazing compound, remove it. Then pinch together the now-exposed spring clips, and pull them out of their holes. Push the old pane out of the sash.
• Line the channel with silicone-base caulk, press the plastic pane into the caulk, and replace the clips.
• Cover the clips with caulk and bevel it neatly.
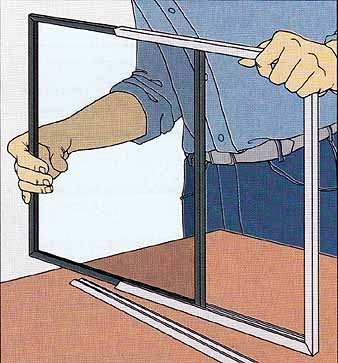
A sash with rubber gaskets.
• If the glass is held by U-shaped rubber gaskets, unscrew one side of the sash and pull it off, then slide gaskets and glass out.
• Fit the gaskets onto the new pane, slide it into the sash, and refasten the side piece you removed.
Previous: Windows That can't Be Forced OpenNext: Ready-Made Window Grilles