A safe and secure home requires protection against fire and accidents as well as bur glary. Yet for many homeowners, break-ins remain the principal concern, largely because many residences are poorly equipped to bar intrusion. The improvements on the following pages—a chain-link fence, well-placed yard lights, sturdy locks and window grilles—can provide all the protection most homes need, simply and economically.
A Boundary of Chain-Link Fence
Any fence is a psychological barrier, but a high chain-link fence is a real obstacle to illegal entry. Burglars also know that such a fence makes removal of valuables awkward and highly visible.
Anchors or Concrete: Posts for a chain-link fence must be set in concrete only when the soil is rocky or very sandy. Elsewhere, metal anchors (right) simplify the job. They also make the installation go fast: Using anchors, two workers normally can erect 300 to 500 feet of fencing, complete with gates, in a weekend. Concrete footings, on the other hand, require at least 2 days to harden before the mesh can be installed.
Selecting Materials: If you have a choice, buy heavy-gauge posts; lighter ones cost less, but the tops may deform as they are driven into place, complicating the job. Consider cosmetic issues when you choose the chain-link mesh. The least expensive and most common is galvanized to prevent rust, and it weathers to a dull gray. At addition al cost, you can buy mesh and posts with a colored vinyl coating; dark green is popular because it blends with shrubbery.
Planning the Job: Where you can place a fence and how high it's allowed to be are generally regulated by code. it's wise to set a fence a foot or so inside your property line to avoid accidentally infringing on the next lot.
Before ordering materials, draw a rough scale map. Mark the locations of terminal posts—thick posts needed at gates, corners, and other positions as described in Step 1, opposite. Sketch in additional posts, known as line posts, so that no posts are more than 10 feet apart. Using the map, a fence distributor can supply wire mesh, posts, and hardware for the job. Many distributors also rent special tools, such as post drivers, stretcher bars, and cable jacks, or “come-alongs,” to pull the fencing taut.
TOOLS:
- Posthole digger or shovel
- Torpedo level
- Post driver
- File
- Sledgehammer (12-lb.)
- Hacksaw
- Ropes
- Lineman’s pliers
- Cable jacks
- Stretcher bars
- Hammer
- Adjustable wrench
- Electric drill with carbide bits
- Grindstone attachment
MATERIALS:
- Wood stakes
- Metal post anchors or concrete
- Line posts and caps Terminal posts and caps
- Chain-link mesh
- Rail bands and cups
- Top rails Tension bars Tension bands, nuts, and bolts
- Tie wires
- Prefabricated gate, hinges, and latch
SAFETY TIPS:
Put on goggles whenever you are hammering something at or above waist level, and have your helper don a hard hat to steady posts that you are driving. Gloves protect your hands when you work with individual strands of wire or with wet concrete.
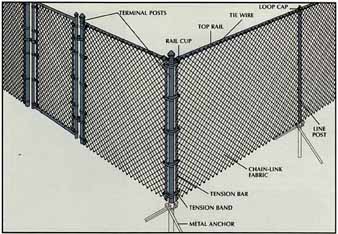
Anatomy of a chain-link fence.
Every component of this fence—the posts, the wire-mesh fabric, and the hardware—is prefabricated. The mesh attaches to heavy- duty terminal posts at corners, ends, and gateways and to lighter line posts between terminals. Both types of posts are set in concrete or secured with metal anchors as shown here. A top rail runs through looped caps on the line posts. Secured to the terminal posts with fittings called rail cups, it pro vides lateral support. Metal tension bars, slipped through links of mesh and clamped to terminal posts with circular clips called tension bands, hold the mesh taut. Tie wires attach mesh to line posts and top rails.
Anchoring the Posts
1. Digging the postholes.
Some metal anchors require no holes; others are started in holes that are 4 inches deep by 10 inches wide. For concrete footings make holes 12 inches deep by 12 inches wide.
• Drive stakes to mark the locations of terminal posts at corners, gates, and fence ends. In locations where the property slopes more than 1 foot in 4 between gates or corners, mark for terminal posts at the top and bottom of each slope.
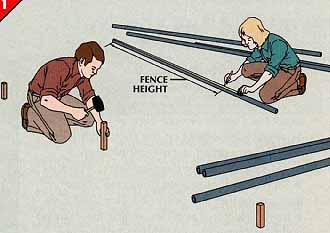
• Have a helper mark the height of the fence on the terminal posts, measuring from the tops (right).
• String a line near the ground between the corner and end stakes and mark the line in equal segments of 10 feet or less. Drive a stake at each mark.
• At each stake, use a post-hole digger or a shovel to dig a posthole appropriate for the anchoring method you have chosen.
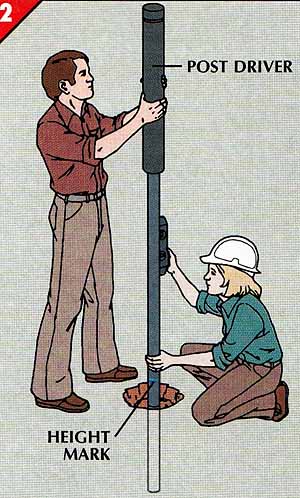
2. Driving the posts.
• Center a terminal post in its hole and , while a helper with a torpedo level holds the post plumb, pound it into the soil with a post driver until the mark on the post is even with the ground (right). Drive all the terminal posts the same way.
• String a line 2 inches below the tops of the terminal posts.
• Drive the line posts until their tops meet the line.
• If the driver deforms the tops of the posts, reshape each one with a file or a grindstone in an electric drill so that a cap will fit.
When a post driver is not avail able, hold a block of wood over the top of the post as a protective buffer and drive the post with a sledgehammer.
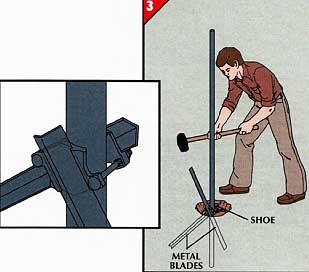
3. Anchoring the posts.
• Bolt a metal anchor shoe loosely to the bottom of the post; orient the slots so that at least one blade will enter the ground at right angles to the fence line.
• Insert the metal blades in the shoe slots and drive them into the ground with a 12-pound sledgehammer (left).
• Tighten the bolts on the shoe (inset).
• In sandy soil, attach a second shoe and drive another set of blades at right angles to the first.
If you dug postholes for concrete instead of for metal anchors, fill around each post with a thick concrete mix. Some professionals overfill the hole slightly, beveling the concrete down from the post so that rain will run off; others underfill the hole somewhat to allow room for soil and grass above the concrete. Let the concrete set for at least 48 hours.
Installing the Top Rails
1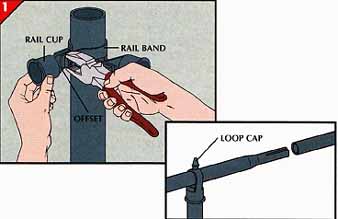
1. Supports for the rail.
• Bolt a pair of rail bands and cups at right angles, 2 inches below the top of a corner post; to set the centers of both cups at the same level, reverse the offsets on the cups (right). Re peat the procedure at other terminal posts.
• Slip loop caps over the intervening line posts.
• Slide a 20-foot section of top rail through the caps of two line posts and into a rail cup.
• Insert additional sections, sliding the crimped end of each section into the end of the preceding one (inset) until a section extends beyond the next terminal post along the fence.

2. Fitting the top rail.
• At the terminal post, mark the end of the rail about inch from the inner end of the cup (left), and cut the rail at the mark with a hacksaw.
• Turn the cup upward and place the end of the rail against the lower lip of the cup (inset). Then push the rail and the cup downward until they lock together.
Hanging the Wire Mesh
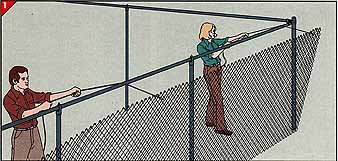
1. Raising the mesh.
• Set a roll of chain-link mesh fabric near a terminal post—an uphill one if the land slopes—and unroll the fabric on the ground outside of the post-and-rail framework.
• Tie ropes to the upper edge of the fabric at the end of the roll and at a point 15 feet from the end.
• Run the two ropes over the top rail and pull the fabric up against the line posts and the top rail. Secure the fabric temporarily to the top rail with tie wires at intervals of 5 feet.
• Continue raising the fabric by the same method until you have reached the next terminal post, then cut the fabric about a foot short of the post.
• If a roll ends between terminal posts, splice on a second roll as shown in Step 2; otherwise, proceed to Step 3.
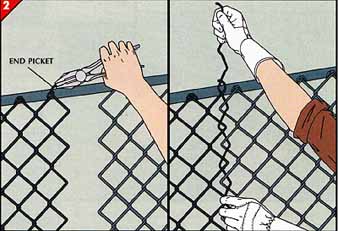
2. Joining two rolls.
• Hoist alongside the end of the exhausted roll (light gray) one end of a fresh roll (dark gray), following the procedure in Step 1.
• Using lineman’s pliers, loosen the top and bottom of the end strand, or picket, of the new roll (near right).
• Unscrew the picket from the wire weave in a corkscrew fashion.
• Pull the ends of the two rolls of fabric together and weave the picket strand back down through the ends of both rolls (far right).
• Bend over the ends of the picket strand.
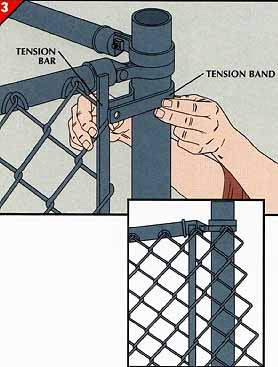
3. Connecting to a terminal post.
• Weave a tension bar down through the row of diamonds nearest the terminal post used as a starting point.
• Slip tension bands around the terminal post at 14-foot intervals, with the flat side of each band on the outside face of the fence (left).
• Pull the tension bar between the jaws of the bands, and install bolts and nuts to clamp the jaws shut.
• For a section of fence that ends on a slope, have a helper pull the fabric past the terminal post.
• Weave the tension bar through the fabric at an angle to keep the bar parallel to the terminal post (inset).
• Attach the bar to the post with tension bands, cut off the excess fabric, and bend loose fabric strands around the bar.
Taking Up the Slack
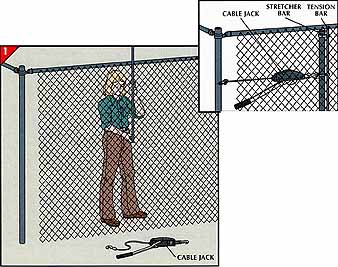
1. Attaching the cable jack.
• About 4 or 5 feet from the far terminal post, have a helper weave a tension bar through the fabric (left).
• Hook the cable of a cable jack around the post, and hook the other end to a stretcher bar—a 3-foot bar with a hook at the center of one side and three hooks on the other.
• Use these three hooks to attach the stretcher to the tension bar (inset). If the fence is under 4 feet tall, center the stretcher bar on the tension bar; for a taller fence, use two cable jacks and two stretcher bars, as pictured below.
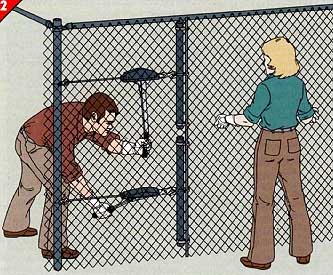
2. Stretching the fabric.
• While a helper moves along the fence, lifting the fabric so it clears the ground, work the handles of the cable jacks to pull the fabric taut (above).
• Continue stretching the fabric until the rows of its diamond weave are quite straight.
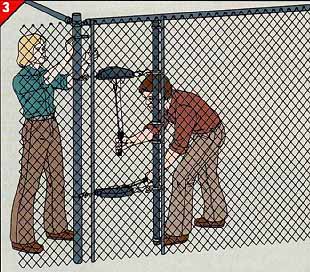
3. Fastening to the far terminal.
• Weave a second tension bar into the fabric 4 inches from the terminal post.
• Tighten the jacks until the bar is next to the post (above).
• Slip tension bands around the post and tension bar and bolt the jaws of the bands together (Step 3, opposite).
• Cut off excess fabric with lineman’s pliers and release the jacks, then remove the stretcher bars from the tension bar you hooked them to and ex tract the tension bar.
On land that slopes, align the tension bar at the far terminal post so that it's parallel to it.
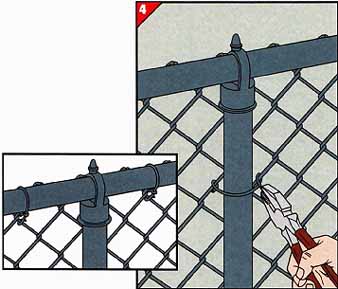
4. Tying down the fabric.
• Working inside the fence at each of the line posts, slip the pigtail of a tie wire around a strand of chain link 8 inches below the top rail.
• Turn the wire around the post and twist it around a link of chain (left).
• Install additional tie wires down the posts at intervals of 12 to 18 inches.
• Make a final adjustment of the fabric to set it even with the top rail, and at 2-foot intervals wrap a tie wire around the rail and through the chain link, twisting the pigtail around the mesh and wrapping the other end to the tie wire above the pigtail (inset).
• Set terminal post caps on the terminal posts and lightly tap them into place with a hammer.
Gates for Walks and Driveways
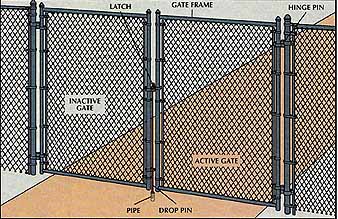
Installing gates.
The gatepost side, or leaf, of each hinge has a pin on which the gate turns by way of a hole in the gate frame leaf. Add a single gate as follows:
• Loosely bolt the gatepost leaves in their approximate locations with the lower pin pointing up and the up per pin pointing down. Also bolt the other leaves to the gate frame.
• With a helper if necessary, fit the gate frame leaves onto the pins and raise or lower both hinges to bring the top of the gate frame even with the top rail. Tighten all the bolts securely.
• Bolt a latch to the other gatepost.
• For a double gate, use the same techniques to hang both gates. Then bolt the latch to the active gate, close the gates, and let the latch fall.
• Loosen the drop pin on the inactive gate and let it drop to the ground. Mark its location.
• In a concrete or asphalt walk or driveway, use a carbide bit to drill a hole for the pin; in dirt or gravel, drive a pipe 4 inch wider than the pin to act as a stop.
Previous: (none)
Next: Low-Cost Security Lighting